Introducing Stamparatus – New Stamp Positioning Tool From Stampin’ Up!

It’s big news when something breaks the mold and changes everything. The Stamparatus will change the way you stamp, and before long, you’ll wonder how you ever crafted without it! Why do YOU need one? You’ll fall in love with stamping all over again when you learn everything you can do with it!
Designed to work on any stamp and project size, both red rubber and photopolymer stamps. Every time you want a precise placement when working with two-step stamping stamps and so much more:

  • Make multiples with ease
  • Consistently stamp crisp, clean images
  • If you want a darker impression, apply more ink and restamp—no need to start over
  • Make fewer mistakes, saving time and money
  • Easily create 2-step, 3-step, and 4-step stamped images using reversible plates
  • Develop new and specialised stamping techniques with adjustable stamping plates and precision placement
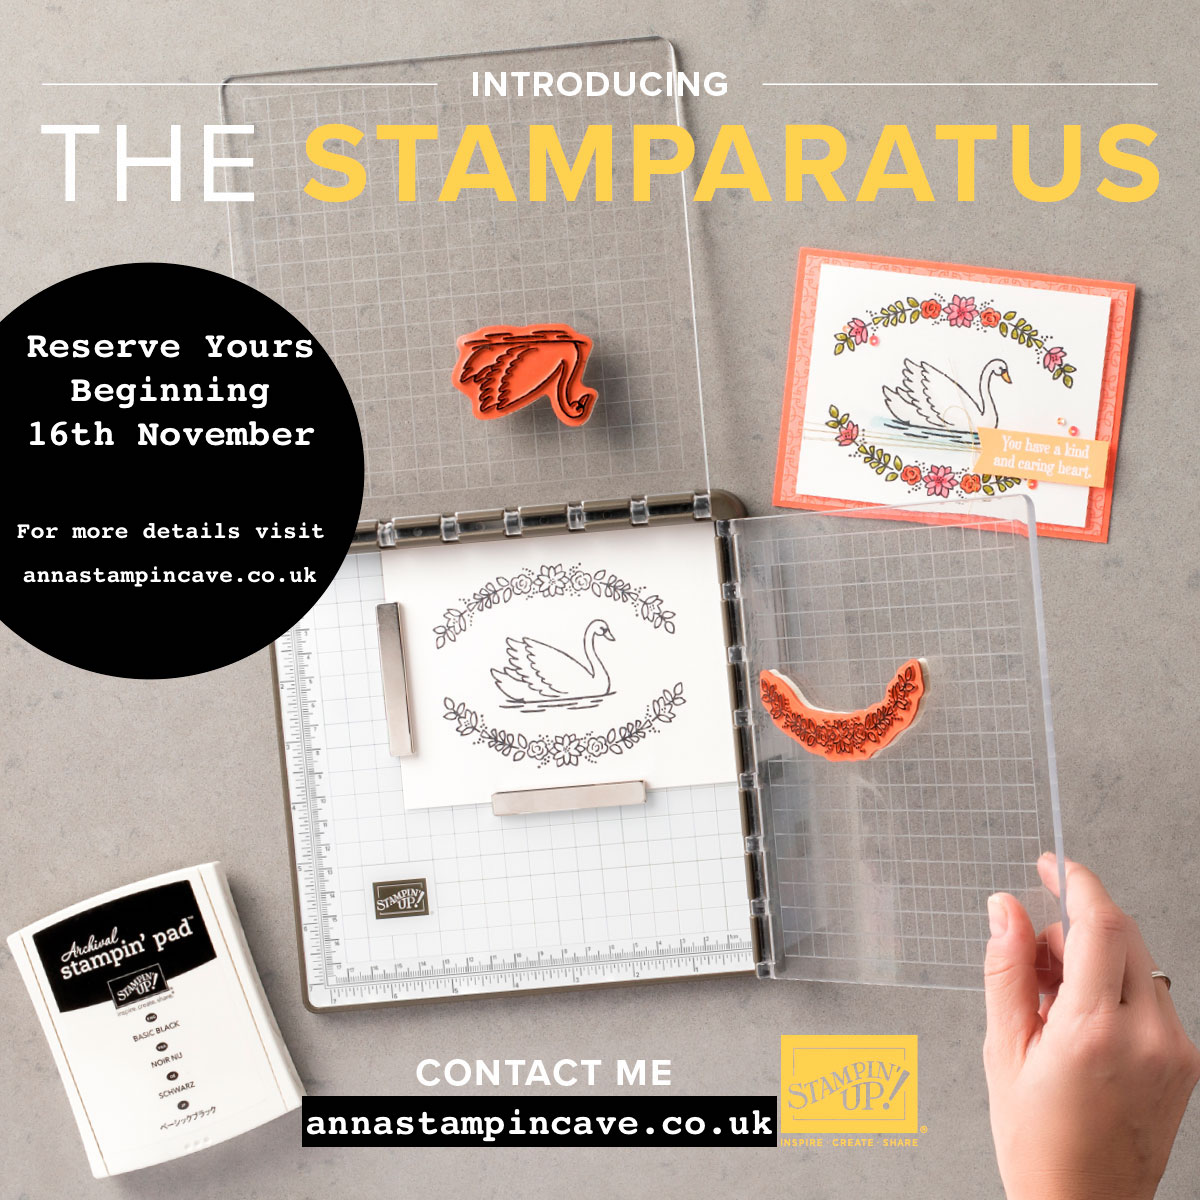
Product details:

  • Compatible with Stampin’ Up!’s red rubber and photopolymer stamp
  • Foam mat to use with photopolymer stamps
  • Rulers and gridlines for quick measuring
  • 2 open sides so you can stamp on larger paper
  • 2 reversible plates: a total of 4 surfaces to work with
  • 2 magnets to hold the paper in place
  • Magnet storage areas
  • Retail Price–59,00 €/£44.00

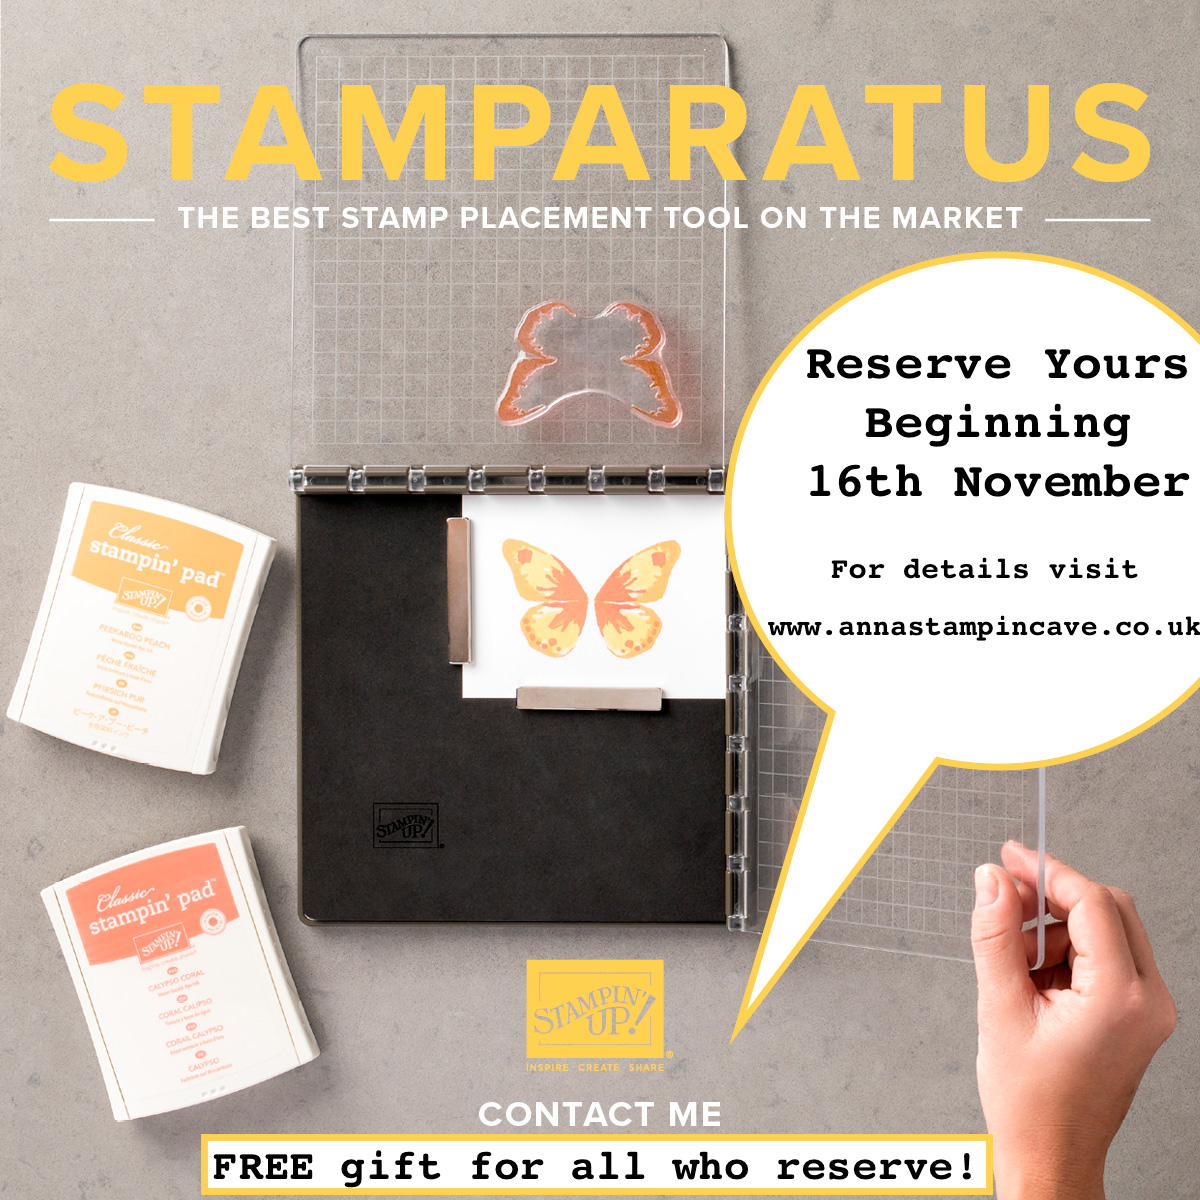
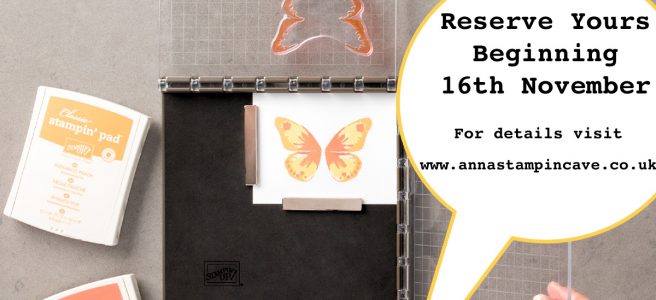
Check it out in action to see its full potential and be ready to act fast and reserve yours on 16th November – reservation will be open while supplies last! You must have a customer profile – CLICK HERE to do so.

With the launch of this tool, Stampin’ Up! is trying something different: testing a new reservation system. And it acts like a true pre-order. You reserve your spot and we guarantee shipment as soon as the product arrives in our warehouse. Demonstrators and customers will place reservations and receive their product at the same time. This system will allow Stampin’ Up! to get the product to market as soon as possible while avoiding backorders and efficiently managing inventory.

The global launch will feature three reservation windows. For each window, please note the following:

  • Reservation quantities are while supplies last only.
  • Limit is 3 tools per demonstrator and 1 tool per customer per reservation window. (Join as a demonstrator now to be able to reserve more than 1 tool! Learn more.)
  • You may participate in multiple reservation windows.
  • In order to reserve your Stamparatus, you are required to provide your credit/debit card information.
  • Credit/debit cards will not be charged until you finalize your order once the Stamparatus is available to ship. When you close your order, be sure to verify that your credit card and shipping information is correct.
  • The Stamparatus will be sold for 59,00 €/£44.00

Customer Stamparatus Launch Q & A:

Q: How do I reserve my Stamparatus?
A: Normally you order Stampin’ Up! products through the online store; in this case, you will click the RESERVE link on the Stamparatus page which will take you to the reservation page. For step-by-step instructions, please see the How to Reserve Your Stamparatus Tutorial for Customers.
Q: What if I do not have a Stampin’ Up! customer account?
A: To reserve a Stamparatus, you must have a customer account. To create one, click Create Account in the online store.
Q: Why does it take so long for the Stamparatus to ship?
A: We will place an order with the manufacturer based on how many reservations are made during any given reservation window. Shipping dates depend on how long it takes the order to arrive in our warehouse after the tools have been manufactured.
Q: Will the available-to-ship dates be the same for all markets?
A: Yes.
Q: Am I billed at the time I reserve my Stamparatus?
A: No. You will be billed when you finalise and close your order.
Q: When will I be charged for the Stamparatus?
A: When inventory arrives in the warehouse, we will add your reservation to a shopping cart. We will then send you an email notifying you that your Stamparatus order is ready. At this time you will pay for and finalise your order.
Q: Will I be able to add other products to my Stamparatus reservation?
A: No. However, once your reservation is transferred to your shopping cart, you will then be able to add other items to your order. Important note: Please do not delete the Stamparatus from your order. We will not be able to add it back and you will lose your reservation.
Q: Will I be able to update my address when I open my shopping bag to complete my order?
A: Yes.
Q: What if I change my mind and want to cancel my reservation?
A: You can cancel your reservation at any time.
Q: Will the tool be available in the 2018–2019 annual catalogue?
A: Yes. Once the annual catalogue ordering period begins, you will be able to order the Stamparatus as you would any other product. Reservations will no longer be required, and there will be no limit on the number of tools you can order.

Q: Once the Stamparatus has been added to my shopping cart, how long will it stay there?
A: Indefinitely. As with all products, it will be subject to temporary interruptions in availability depending on demand.

Q: When I close my order, can I take advantage of current Stampin’ Up! promotions?
A: Yes.

Q: Can I participate in all three reservation periods?
A: Yes.

Q: How many stamp placement tools can I reserve per reservation window?
A: For customers, there is a limit of 1 per reservation window.

Thank you for stopping by and have a blessed day,

The Creative Flow Blog Hop – Hello Spring

Anna’ Stampin’ Cave – The Creative Flow Blog Hop – Hello Spring

Thank you for joining us on our Creative Flow Blog Hop. Each month we are set a challenge to creatively stretch our imaginations. The products we have used are all available in the current Annual and/or seasonal Stampin’ Up!® catalogues. To hop along, please use the buttons at the bottom of the post to keep hopping. And this month’s theme is ‘Spring is sprung’.

I don’t know about you, but for me, nothing says ‘spring’ more than flowers. So today I’ve got for you a set of super cute, 4 x 4″ notecards.

Anna' Stampin' Cave - Stampin' Up! Number Of Years Stamp Set - Hello Spring Set of Notecards 2.JPG

Spring notecards dimensions:

  • In Colour cardstock: five pieces, one of each colour, 4″ x 8 ” scored in half at 4″ (20,3cm x 10,1cm scored in half at 10,1cm) + scraps for die cutting
  • Whisper White cardstock: five panels 3″ x 3″ (7cm x 7cm)
  • Linen Thread five pieces, 20″ length each
  • Pearls: 15 mini pearls, 3 for each notecard

For the base of my little notecards I decided to use, soon retiring, 2015-2017 In Colours. I stamped each card base with a ‘dotty’ stamp from Number Of Years Stamp Set in Versamark.

Anna' Stampin' Cave - Stampin' Up! Number Of Years Stamp Set - Hello Spring Tip Top Taupe Notecard

Anna' Stampin' Cave - Stampin' Up! Number Of Years Stamp Set - Hello Spring Cucumber Crush Notecard

I stamped each 3 x3″ Whisper White panel using Writing Notes background stamp. I’ve used Cucumber Crush, Mint Macaron, Blushing Bride and So Saffron x2. Next, in the middle of each panel, I stamped a little bouquet of flowers, from Number Of Years Stamp Set. This is a two-step stamping set, so I first stamped the foliage using Pear Pizzazz and Wild Wasabi ink pads, and next I added the flowers in So Saffron, Pool Party, Watermelon Wonder, Blushing Bride and Wisteria Wonder.

Anna' Stampin' Cave - Stampin' Up! Number Of Years Stamp Set - Hello Spring Watermelon Wonder Notecard

Anna' Stampin' Cave - Stampin' Up! Number Of Years Stamp Set - Hello Spring Delightful Dijon Notecard.JPG

I die-cut my bouquets with stitched circle die and adhered a leftover piece to the card base. I also die-cut five scalloped circles: one in each In Colour. Next, I layered each bouquet with a scalloped circle and adhered them to the card base with dimensionals.

Anna' Stampin' Cave - Stampin' Up! Number Of Years Stamp Set - Hello Spring Mint Macaron Notecard

Sentiments come from Crazy About You Stamp Set and I stamped them in coordinating colours once my cards were assembled. For the final touch, I added mini pearls to some of the flowers. I also created cute little bows using Linen Thread and added them to the cards using glue dots.

Anna' Stampin' Cave - Stampin' Up! Number Of Years Stamp Set - Hello Spring Set of Notecards 3.JPG

I’m really pleased with my little notecards and I think they fit the theme perfectly. But just a little reminder that In Colours 2015-2017 will retire soon (end of May) so if you love them I would really advise you to stock up on cardstock, Designer Series Paper, and ink refills as they surely will be sold out way before the end of May. Click the picture below to check the entire collection.

In Colours 2015-2017

Now be sure to hop along to see more inspiring projects. Your next stop is lovely and talented Jerim.

Thank you for stopping by and have a blessed day

You Are Amazing – Kylie Bertucci’s International Stampin’ Up! Blog Highlights

Anna’ Stampin’ Cave – You Are Amazing – Kylie Bertucci’s International Stampin’ Up! Blog Highlights

International-Highlights-header-vote-fav

Thanks for coming to my blog today! We are being highlighted internationally by Kylie Bertucci and you are able to VOTE on my project. The top ten winners will get to be part of an international blog hop so please vote for my project. You can do it here or use button at the end of my post.

Anna' Stampin' Cave - Stampin' Up! All Things Thanks Stamp Set CAS Card You Are Amazing

Our theme for this highlight is using the stamp set All Things Thanks! This is a Wonderful stamp set with so many gorgeous sentiments. We wanted to highlight how versatile it really is.

This is my first time taking part in Kylie Bertucci’s International Stampin’ Up! Blog Highlight so I’m a little bit nervous. For my card, I went with monochromatic clean and simple design.

Anna' Stampin' Cave - Stampin' Up! All Things Thanks Stamp Set Monochromatic CAS Card You Are Amazing.JPG

You Are Amazing Card dimensions:

  • Whisper White cardstock: 11-6/8″ x 4-1/8″ scored in half at 5-7/8″ (29.7 x 10.5 cm scored in half at 14.8 cm)
  • Basic Grey DSP from Neutrals DSP Stack: two pieces 3″x 3″ each (7.6 cm x 7.6 cm)
  • Basic Grey cardstock: 1/2″ x 3-3/6″ (1.2 cm x 9.5 cm)
  • for sentiment piece of Whisper White cardstock
  • Whisper White Thick Baker’s Twine: 12″

First, I stamped my sentiment in Basic Grey on a piece of Whisper White cardstock and die cut it using 2nd smallest oval from Stitched Shapes Framelits Dies. Next, I took my card base and adhered my squares of Designer Series Paper in the middle, offsetting them slightly.

I took Basic Gray strip of cardstock and created a fun banner using a dotted strip die from Mini Treat Bag Thinlits Dies.

I adhered the banner in in the centre of my card front and popped up the sentiment on top using dimensionals. I wrapped bakers twine around my card and tied a simple knot on the front. For the final touch, I added a rhinestone to the ‘i’ in the sentiment.

Anna' Stampin' Cave - All Things Thanks Stamp Set by Stampin' Up! Monochromatic CAS Card You Are Amazing.JPG

Thanks for visiting my blog today and make sure you head over to Kylie’s blog to check all lovely projects and vote for your favourites. Hope my project will be among them as I would love to be chosen to do an international blog hop.

Vote for me Kylie's Highlights Badge

Thank you for stopping by and have a blessed day,

Shake It In Teals – Birthday Card For Sweet 17

Hello and welcome! Today I want to share with you a card I’ve made for our daughter’s 17th birthday. I don’t know where the time has gone but I could swear she was just 7 not that long ago.

She’s not a girly-girl ( happy mamma here lol). She’s studying fine art in Sixth Form and she loves mixed media. So I had to come up with something little more ‘sophisticated’ than flowers and butterflies if you know what I mean 😉

This year I decided to make a shaker card in beautiful teal shades. [You can see her last year’s birthday card here]

P1130276

Shake It In Teals Card dimensions:

  • Thick Whisper White cardstock: 11-6/8″ x 4-1/8″ scored in half at 5-7/8″ (29.7 x 10.5 cm scored in half at 14.8 cm)
  • Watercolour Paper: 5-6/8″ x 3-7/8″ (14.5 cm x 9.7 cm)
  • Basic Black cardstock: 1/2″ x 5-6/8″ (14.5 cm x 1.2 cm)
  • for die-cutting word happy pieces of Basic Black, Island Indigo and Emerald Envy

It’s very simple, a straightforward card so I won’t include a whole step by step instructions, just some hints, and tips.

Frame: To create a teal-like shade for the watercolour panel I’ve mixed Island Indigo ink with Emerald Envy ink in a watercolour wash. When the panel was dry I die cut a rectangle from the middle of the panel, creating a frame.

P1130298

Numbers: I didn’t want the number to look flat and boring, so I took that watercoloured rectangle, stamped two paisley images in Versamark in the middle, heat embossed them in white and die cut numbers 1 and 7 from that piece.

‘Happy’: I die cut it three times: one from Basic Black cardstock, 2nd from Island Indigo and 3rd from Emerald Envy and adhered them together. To add shine to it I cover my word in Versamark and heat embossed in clear. I did the same with the Basic Black strip.

P1130289

Before I put my shaker card together I adhered few sequins to the base of my card so not all sequins fall down when the card is standing on the shelf. For the final touch, I added some random gold dots to the frame with my gold Sharpie.

There’re few things that didn’t come out as I hoped for, but with my numb hands, I think that overall the card looks nice. The most important is the fact that our girl loved it, so YAY!

If you wish to purchase any of products I have used, simply click the images below to go directly to my online store and don’t forget to enter the hostess code for the month of March G3JKVASG to receive a gift from me.

Thank you for stopping by and have a blessed day

Roses and Dragonfly Thank You For A Smile Card for GDP#075

Anna’ Stampin’ Cave – Roses and Dragonfly Thank You For A Smile Card for GDP#075

gdp075

Hello and welcome everyone! Today I’ve got for you a card I created for this week’s Global Design Project theme challenge: Winged Creatures. I’m bit late to the party but thankfully not too late.

I’m a big fan of detailed die-cutting and had this idea bouncing around in my head for a while now, just never had enough time to try it.

In this card, I’ve incorporated two die-cutting techniques – inlaid die-cutting and partial die-cutting – using a couple of detailed die sets: Rose Garden Thinlits Dies and Detailed Dragonfly Thinlits Dies.

anna-stampin-cave-stampin-up-dragonfly-dreams-bundle-and-rose-garden-thinlits-dies-inlaid-partial-die-cutting-technique

Roses and Dragonfly Thank You For A Smile Card dimensions:

  • Sweet Sugarplum cardstock: 11-6/8″ x 4-1/8″ scored in half at 5-7/8″ (29.7 x 10.5 cm scored in half at 14.8 cm)
  • Whisper White cardstock cut into two panels: bottom one measure 5-6/8″ x 4″ (14,5 x 10,2 cm) and top one 5-1/2″ x 3-7/8″ (14 cm x 9,8 cm)
  • Blooms & Bliss Designer Series Paper: 5-1/2″ x 3-7/8″ (14 cm x 9,8 cm)

anna-stampin-cave-stampin-up-dragonfly-dreams-bundle-rose-garden-thinlits-dies-inlaid-partial-die-cutting-technique

To create my card I started with die-cutting.

I wanted this small dragonfly to be in the foreground of my die-cut panel so  I run it through my Big Shot first.

For this technique, you first want to die-cut the image you want to have in the foreground of your card and you work your way backwards. Everything you die-cut later will appear to be ‘behind’ this first image.

Once it has been die-cut, I removed the dragonfly die and die-cut and I placed the rose die on the panel. I placed it the way that some parts of the die overlapped the negative space where dragonfly was die-cut previously from.

anna-stampin-cave-stampin-up-dragonfly-dreams-bundle-and-rose-garden-thinlits-dies

Again, I run it through the Big Shot and very carefully removed my rose die-cut from the die, being careful not to lose all the separate pieces as I will need them all to inlaid them back to my panel. I die-cut two more partial roses (one at a time) from the same panel, every time making sure they overlap the space of a previously die-cut image and saving all the little die-cut pieces. I arranged all my die-cut on the desk, so I knew

Once all the images were die-cut, I adhered what was left of the panel to the Blooms & Bliss DSP piece. And now the fun began: I had to inlay all the die-cut outlines where they came from.

anna-stampin-cave-stampin-up-dragonfly-dreams-bundle-and-rose-garden-thinlits-dies-inlaid-partial-die-cutting-technique

The easiest part was to inlay the dragonfly outline. From there, I worked my way through the roses in the same order I die-cut them. Once I was done, I matted my detailed panel with slightly bigger Whisper White piece and next mounted it onto my Sweet Sugarplum card base.

I masked bottom part of the sentiment ‘Thanks for the smile and everything else’, stamped it on a strip of Whisper White cardstock in Basic Black Archival Ink and cut it into a banner. I also cut a banner from Sweet Sugarplum cardstock and adhered them both to my card, offsetting slightly.

anna-stampin-cave-stampin-up-dragonfly-dreams-bundle-and-rose-garden-thinlits-dies-inlaid-partial-die-cutting-technique

I was pretty happy with the outcome but I had a feeling that something was missing. So I masked the detailed part and all the edges of my card, and I added some tiny speckles in Basic Black and Sweet Sugarplum. Few rhinestones wrap up my card.

I hope you feel inspired and that you give this technique a go. Thank you for stopping by and have a blessed day,