Simply Sketched Saturday Challenge #17 – Paisleys & Posies

Anna’ Stampin’ Cave – Simply Sketched Saturday Challenge #17 – Paisleys & Posies

SSSC Header

Thank you for joining us for another Simply Sketched Saturday Challenge!  We are so excited to be sharing this hop with you. The products used are all available in the current Annual, or seasonal, Stampin’ Up!®  Catalogues*. Simply use the buttons at the bottom of the post to keep hopping!

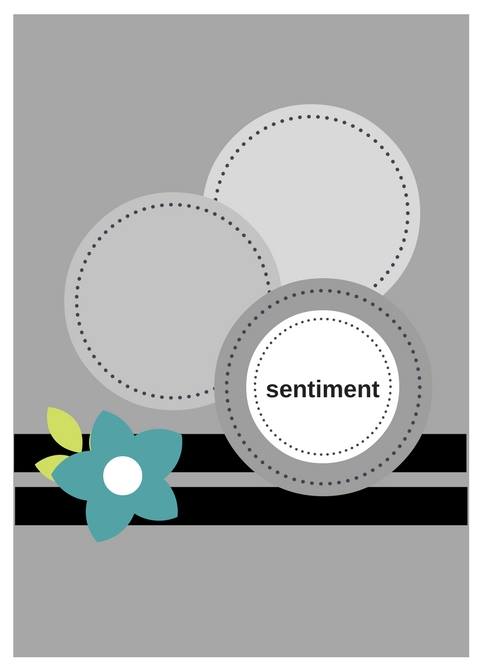
Hello and welcome after a long break. Today’s brilliant sketch has been designed by lovely Sam from Sam’s Sentiments blog. Just check how beautiful this sketch is?! Sadly Sam wasn’t able to take a part in the hop. Such a shame.

sssc-17

I’ve been so busy lately with home renovating and night shifts, that only a couple of days ago I realised our monthly blog hop is today. I panic slightly first but the moment I sit down to the sketch, I knew exactly what I wanted to make. I decided to ‘dig out’ my favourite stamp set from Autumn-Winter catalogue: Paisleys & Posies, as it seemed perfect for the technique I wanted to try: watercolour with markers. Well, it’s kinda watercolour. Anyhow. I had so much fun that I created not one but three cards.

anna-stampin-cave-stampin-up-paisleys-posies-stamp-set-diy-watecolour-dsp

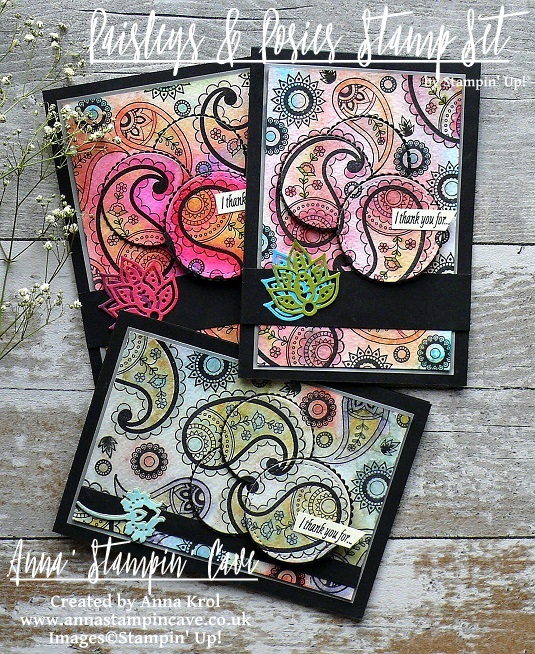
Aren’t these gorgeous?! Such bold designs! And they really super easy to make.

Paisleys & Posies cards dimensions:

  • 3x Basic Black cardstock: 11-6/8″ x 4-1/8″ scored in half at 5-7/8″ (29.7 x 10.5 cm scored in half at 14.8 cm) + 2 x strips 1″x 4-1/8″ + 1 stripe 3/8″x 5-2/8″
  • 3x White Vellum cardstock: 3-5/8″ x 5-3/8″(9,2 x 13,6 cm)
  • 3x Water Colour Paper: 3-1/2″ x 5-2/8″ (8,9 x 13,3 cm)
  • 3x Very Vanilla cardstock: 3-1/2″ x 5″ for the inside panels + scraps for sentiments
  • scraps of the following cardstocks for die-cutting: Basic Black, Rich Razzleberry, Melon Mambo, Tempting Turquoise, Old Olive, Pool Party & Pear Pizzazz

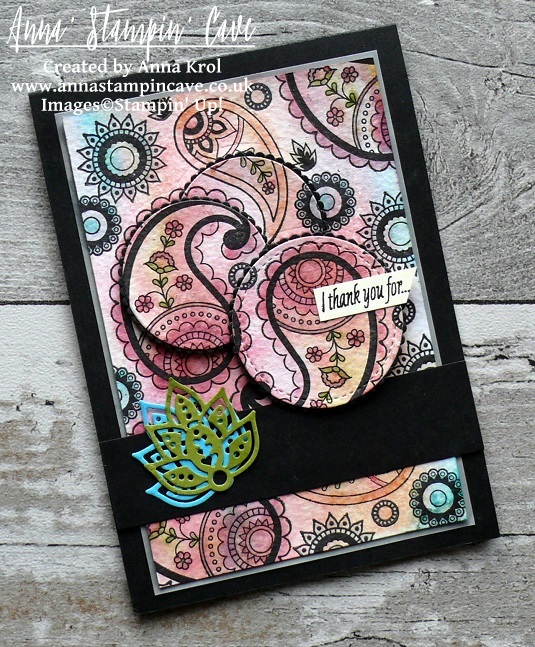
To start off, I stamped various images from Paisleys & Posies Stamp Set onto the watercolour panel in Basic Black Archival Ink.

Tip of the day: Because I did my cards late at night, I had no time for the ink to dry completely but I didn’t want to smear black all over my watercolour panels. So I sprinkled clear embossing powder over the whole piece once I was done with stamping. But I didn’t heat set it, I just let embossing powder to ‘soak in’ all the ‘moisture’. I let it sit for couple of minutes and then brush off the powder.

When my panels were ready I started to colour them in with Stampin’ Markers. Nothing fancy really, and no need to stay in lines either.

anna-stampin-cave-stampin-up-paisleys-posies-stamp-set-diy-watecolour-dsp-vivid-brights

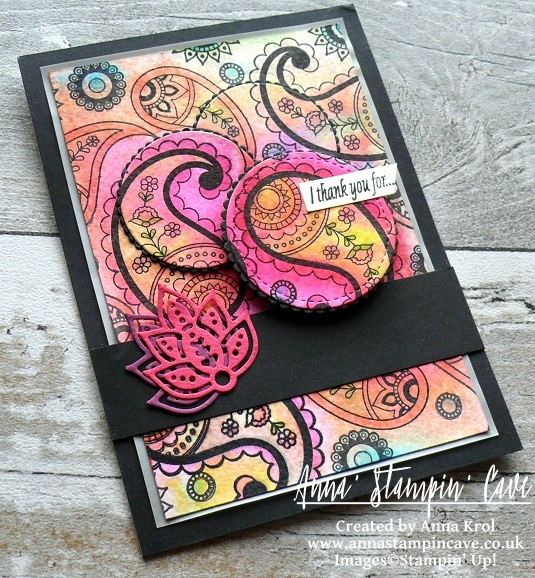
For the first card, I’ve used Melon Mambo, Tangerine Tango, Daffodil Delight, Old Olive and Tempting Turquoise. When all the images were coloured in, I spritzed the whole panel with water. And that’s when all the ‘magic’ happen, as all the colours blend together nicely creating a beautiful watercolour piece. It’s like making your own watercolour DSP. And each piece is different.

To add more colour I dried my panel with a heat tool. Next,  I colour it in again with markers and spritz it with water. You can build up the colour as much as you wish, just remember to dry your panel in-between.

For my next card, I decided to use all markers from Brights family. But this time I only spritz it once, hence much more subtle look.

anna-stampin-cave-stampin-up-paisleys-posies-stamp-set-diy-watecolour-dsp-brights

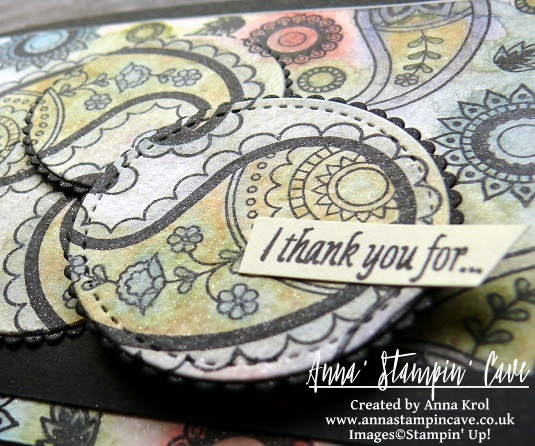
For the last cardI’ve used Subtles Stampin’ Markers and I have to say they needed the most work. I had to dry my piece and keep adding more colour several times until I was happy with the outcome. Once all my panels were created I decided to add some shimmer to them. I added few drops of Clear Wink of Stella to the water in my spritzer, and I spritzed all the panels.

anna-stampin-cave-stampin-up-paisleys-posies-stamp-set-diy-watecolour-dsp-subtles

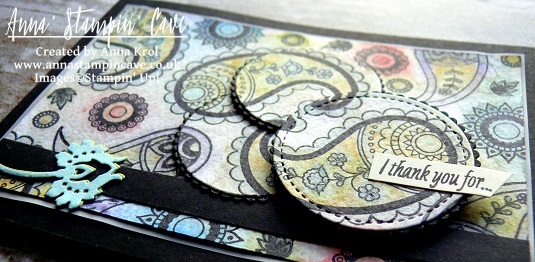
Once the panels were dry I die-cut three circles from each panel: full circle using 1-7/8” circle from Stitched Shapes Framelits Dies and two ‘partial’ circles using Layered Circle Framelits Dies. I also die-cut slightly bigger scalloped circles from Basic Black cardstock to go underneath.

anna-stampin-cave-stampin-up-paisleys-posies-stamp-set-subtles

To assemble my cards I adhered vellum to card bases and watercolour panels on top. Next, I glued black scalloped circles underneath the watercolour ones and in-laid them back into the panels. I also adhered Basic Black strips, sliding them slightly underneath the die-cut circles.

anna-stampin-cave-stampin-up-paisleys-posies-stamp-set-vivid-brights

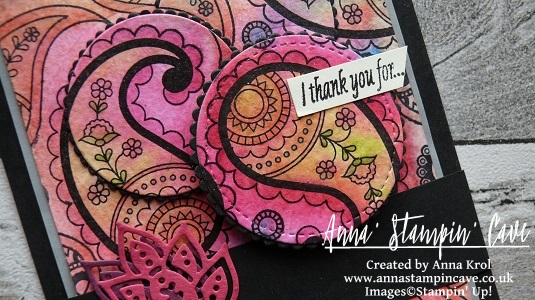
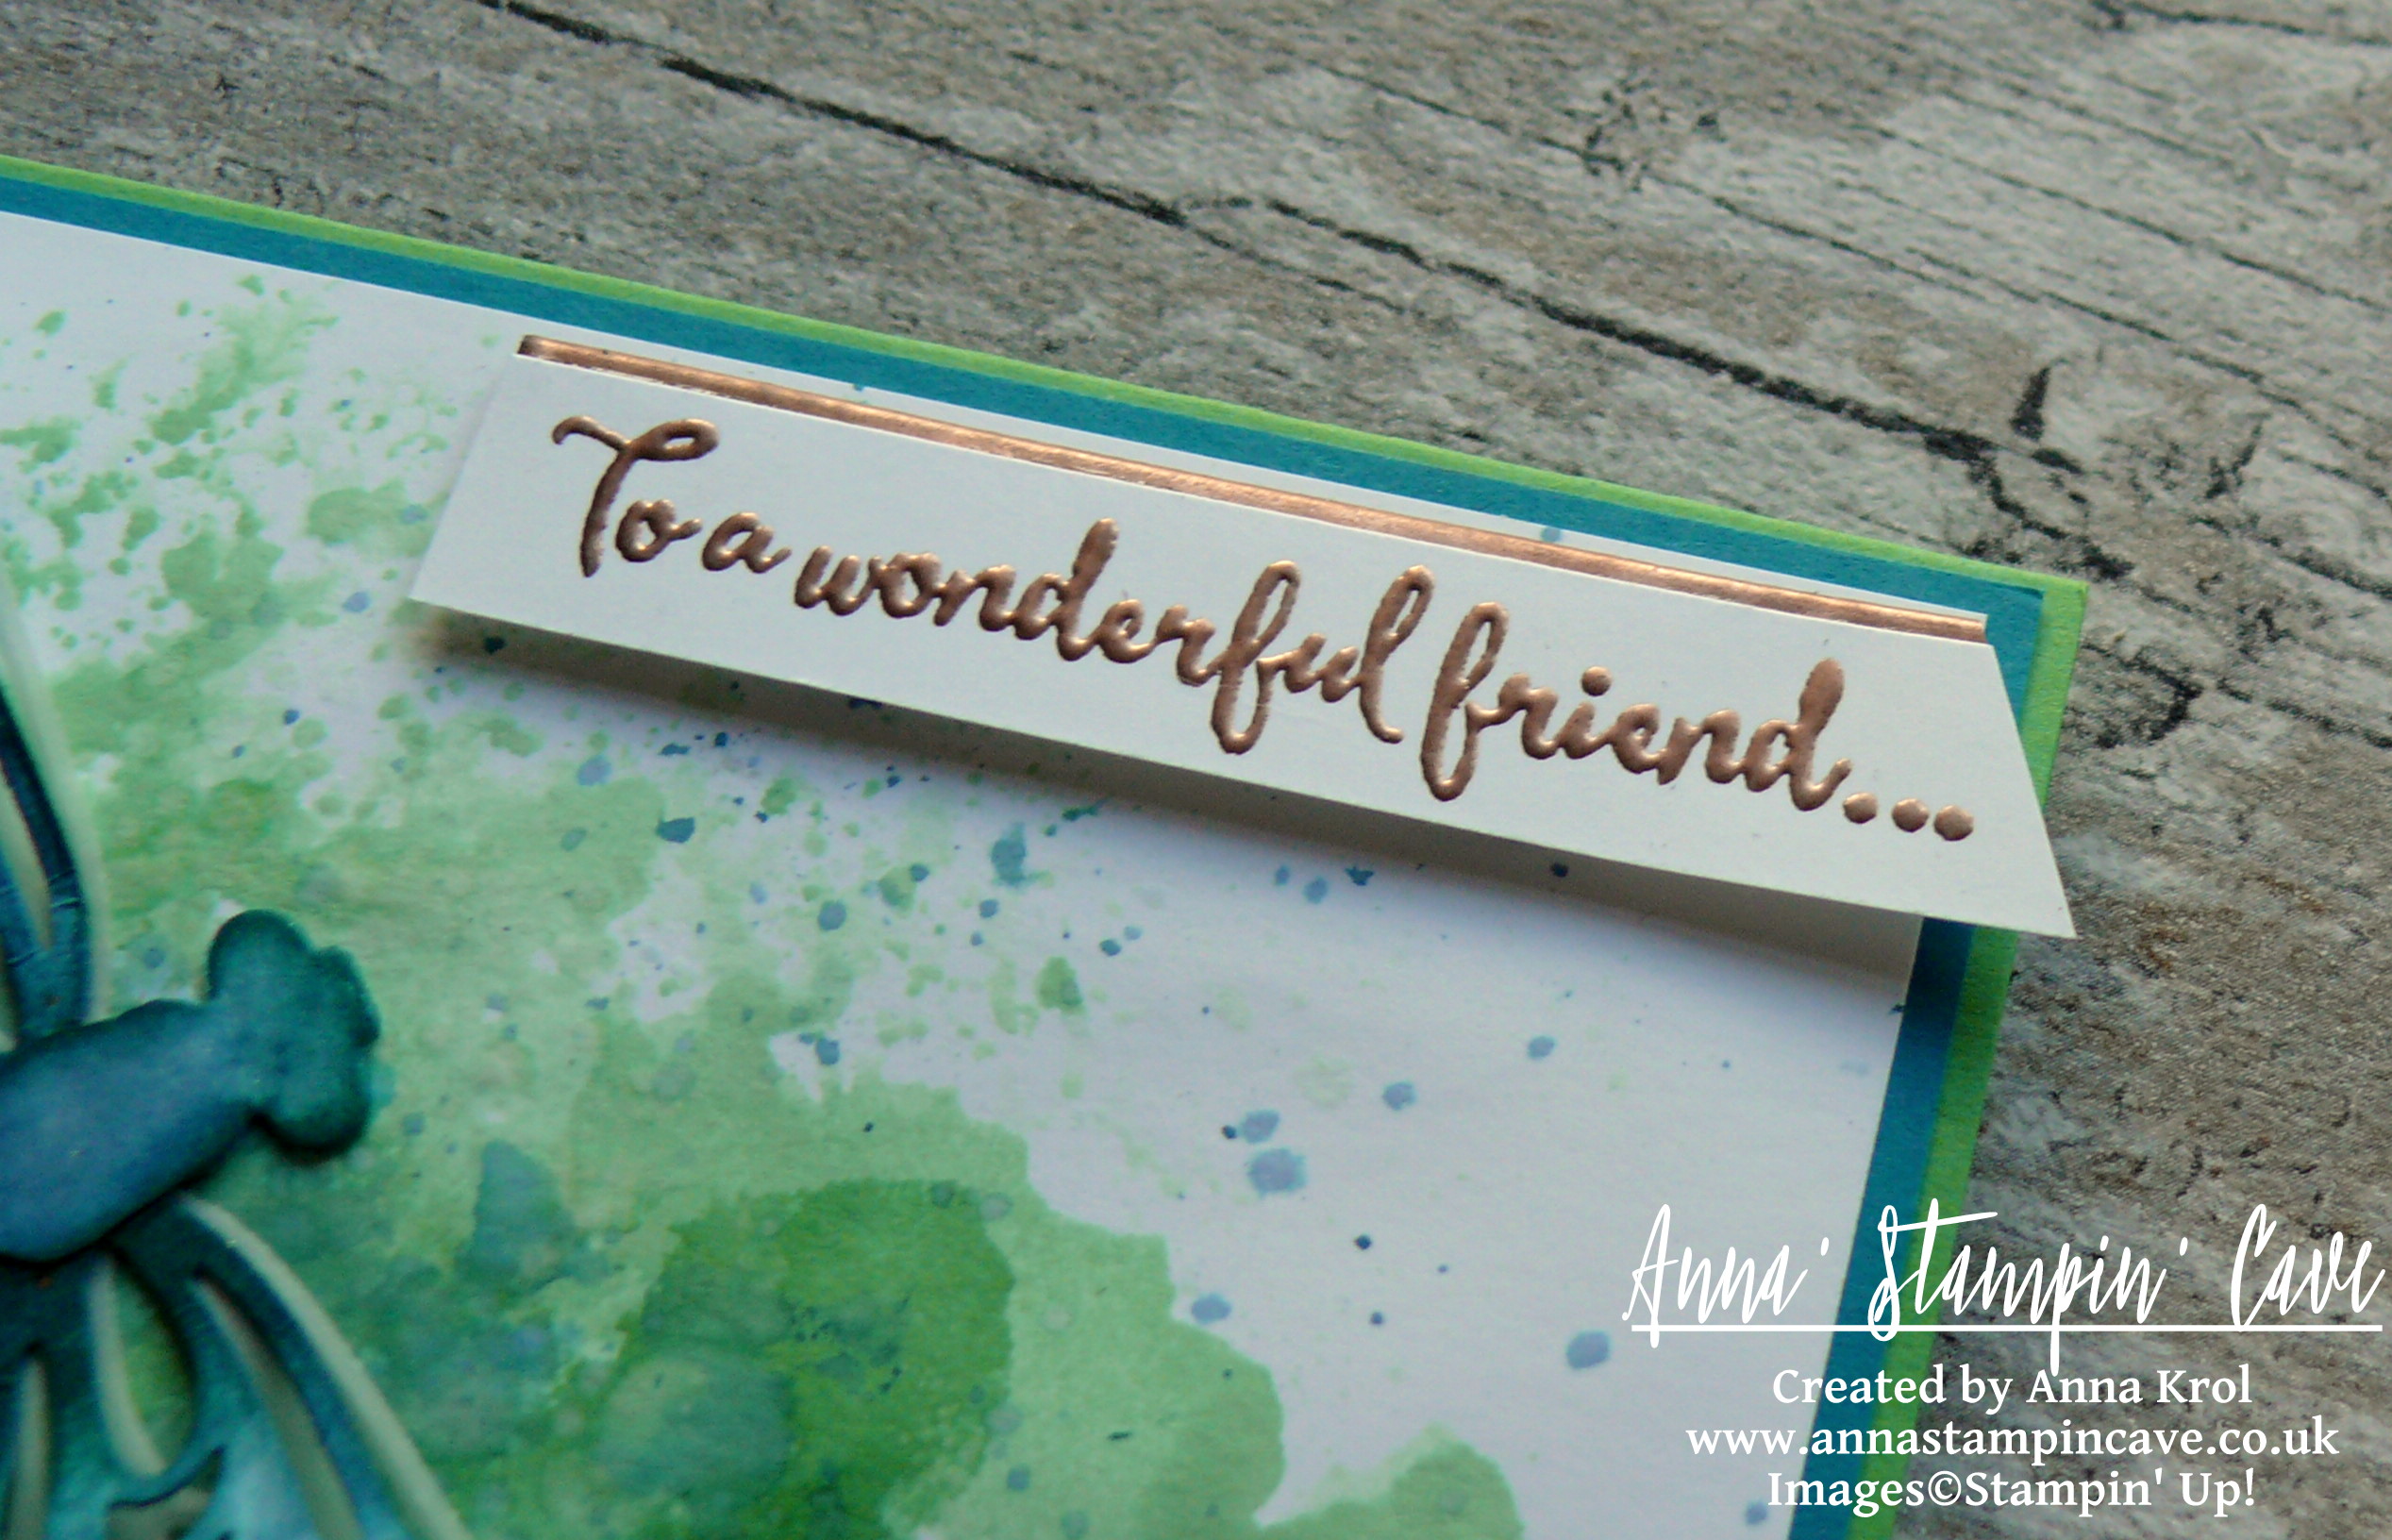
I stamped my sentiments (masking a part of it) on a 3/8″ strip of Very Vanilla cardstock, and adhered it to the card with liquid glue. The full sentiment is stamped inside of the card.

anna-stampin-cave-stampin-up-paisleys-posies-stamp-set-brights

For the final touch, I die-cut some leaves and flowers using a couple of intricate dies from Paisleys Framelits Dies and adhered them to the black stripes.

And these are my cards for today. I hope you like my take on the sketch. Now be sure to hop along to see more inspiring projects. Your next stop is very talented Hannah.

Thank you for stopping by and have a blessed day,

SSSC Previous  SSSC Next Blog

Dragonfly Dreams Stamp Set & Coordinating Dies

Anna’ Stampin’ Cave – Dragonfly Dreams Stamp Set & coordinating dies

anna-stampin-cave-ink-smooshing-technique-with-dragonfly-dreams-stamp-set-coordinating-dies

For today’s project, I have used once again Dragonfly Dreams Stamp Set and Detailed Dragonfly Thinlits Dies. I love this bundle and either together or separate, I just can’t get enough of it. This time though I decided to revisit two of my favourite techniques: watercolour and ink smooching. Bright colours, Cucumber Crush and Island Indigo, seemed perfect combination for a dragonfly card.

anna-stampin-cave-ink-smooshing-technique-with-dragonfly-dreams-stamp-set-detailed-dragonfly-thinlits-dies

Watercolour Dragonfly card dimensions:

  • Cucumber Crush cardstock: 8-1/4″ x 5-7/8″ scored in half at 4-1/8″ (21 x 14.8 cm scored in half at 10.5 cm)
  • Island Indigo cardstock: 4″x 5-6/8″(10,2 x 14,5 cm)
  • Whisper White cardstock: 3-7/8″ x 5-5/8″ (9.8 x 14.2 cm) and 2-7/8″ x 1/2″(7.4 x 1.3 cm) for a sentiment
  • Scraps of Whisper White, Shimmery White and White Vellum cardstock for die-cutting

First thing first I had to prepare my watercolour panel. And to be honest I risked a bit using regular Whisper White cardstock here.

If you are not confident with water colouring and don’t want to risk, please always use watercolour paper with ink smooshing technique.

I pressed Cucumber Crush ink pad on a craft mat, spritz it with water (not too much) and took a piece of acetate to lift some of this puddle of colour. I smooshed it on my panel and dried it with a heat gun. I repeat this process couple of times, every time drying my panel in-between until I was happy with layers of colour. Next, I switched to Island Indigo but I only added one layer of colour. The last touch was to add few splotches of ink to my panel with help of aqua painter.

anna-stampin-cave-ink-smooshing-technique-with-dragonfly-dreams-stamp-set-detailed-dragonfly-dies

I die cut two dragonflies, one from Whisper White cardstock and one from vellum (without the head) for 3D effect. To colour in cardstock dragonfly I used a very similar technique as previously. I pressed some more of Island Indigo ink on the craft mat, spritz it with water and dabbed the dragonfly straight in the puddle, dried and repeat until I was happy with the colour.

I wanted to add more depth and ‘life’ to my dragonfly, so I sponged the edges of wings and the body with Island Indigo ink. I also added few speckles with bronze metallic Sharpie marker.

While sponging I’ve noticed that the dragonfly was bit ‘flimsy’ (note to myself: if you plan to dab your intricate die-cuts in the puddles of coloured water, use paper with the higher grammage, like watercolour perhaps(!?) lol. So I die-cut just the body of a dragonfly from Shimmery White cardstock, watercolour it, sponged the edges and adhered on top of the dragonfly with liquid adhesive. Next, I adhered the vellum dragonfly underneath, offsetting slightly.

anna-stampin-cave-ink-smooshing-technique-with-dragonfly-dreams-stamp-set-detailed-dragonfly-thinlits

The sentiment I chose comes from the same Dragonfly Dreams stamp set. I stamped it in Versamark on the strip of Whisper White, heat embossed it using Copper Embossing Powder and trimmed it diagonally. The sentiment alone seemed a bit dull so I took a very narrow strip of Whisper White (around 1/8″), dabbed it in Versamark and heat embossed in copper as well. Next, I trimmed it and adhered it to the sentiment, underneath the top edge, so it peeks out slightly.

anna-stampin-cave-ink-smooshing-technique-with-dragonfly-dreams-bundle

To assemble the card I’ve used my favourite Tombow liquid adhesive. I love it because it gives you some wiggle room before it sets. Also, it’s the best for those slightly warped watercolour panels. Next, I’ve added my sentiment in the top right corner using dimensionals. For dragonfly, I’ve used Tombow again. The last touch was to add some extra shimmer to the dragonfly with Clear Wink of Stella Glitter Brush. You can’t go wrong with this stuff right?!

I hope you’ve enjoyed my project and that it will give some extra ideas of how to use this beautiful Dragonfly Dreams Bundle. I would love to hear what you think in comments below. As always, if you wish to purchase any of products I have used, simply click the images below to go directly to my online shop.

Thank you for stopping by and have a blessed day

Dragonfly Dreams Photopolymer Bundle

Dragonfly Dreams Photopolymer Bundle
[144728]
£42.25

Detailed Dragonfly Thinlits Dies

Detailed Dragonfly Thinlits Dies
[142749]
£28.00

Dragonfly Dreams Photopolymer Stamp Set

Dragonfly Dreams Photopolymer Stamp Set
[142924]
£19.00

Cucumber Crush A4 Cardstock

Cucumber Crush A4 Cardstock
[138342]
£7.25

Island Indigo A4 Card Stock

Island Indigo A4 Card Stock
[124390]
£7.25

Whisper White A4 Card Stock

Whisper White A4 Card Stock
[106549]
£8.25

White Vellum A4 Card Stock

White Vellum A4 Card Stock
[106584]
£6.00

Shimmery White A4 Card Stock

Shimmery White A4 Card Stock
[121717]
£7.25

Cucumber Crush Classic Stampin' Pad

Cucumber Crush Classic Stampin’ Pad
[138324]
£6.00

Island Indigo Classic Stampin' Pad

Island Indigo Classic Stampin’ Pad
[126986]
£6.00

Versamark Pad

Versamark Pad
[102283]
£7.75

Embossing Buddy

Embossing Buddy
[103083]
£5.50

Copper Stampin' Emboss Powder

Copper Stampin’ Emboss Powder
[141636]
£4.50

Aqua Painters

Aqua Painters
[103954]
£15.50

Clear Wink Of Stella Glitter Brush

Clear Wink Of Stella Glitter Brush
[141897]
£7.25

Liquid Multipurpose Glue

Liquid Multipurpose Glue
[110755]
£3.75

Stampin' Dimensionals

Stampin’ Dimensionals
[104430]
£3.75

Paper Snips Scissors

Paper Snips Scissors
[103579]
£9.00

Stampin' Trimmer

Stampin’ Trimmer
[129722]
£27.00

Big Shot

Big Shot
[143263]
£99.00

The Creative Flow Blog Hop -Shaun The Sheep Punch Art

Anna’ Stampin’ Cave – The Creative Flow Blog Hop -Shaun The Sheep Punch Art

the-creative-flow-header

Thank you for joining us on our Creative Flow Blog Hop. Each month we are set a challenge to creatively stretch our imaginations. The products we have used are all available in the current Annual and/or seasonal Stampin’ Up!® catalogues. To hop along, please use the buttons at the bottom of the post to keep hopping.

Hello hello! This is our very first The Creative Flow Blog Hop, and I’m really excited to be a part of it. Today’s theme was a quite a stumper. We’ve been set a challenge to create an ‘animal’ project using Pretty Pines Thinlits Dies. Yes, I know!?!? How is that even possible!!! 😀 But hey, with a little bit of imagination everything is possible!

anna-stampin-cave-shaun-the-sheep-bah-humbug-christmas-card-punch-art-stampin-up

Because not every one of us had these dies, our lovely Jerim has sent some of us (including me) a foam die-cuts so we could actually use them as stamps! How cool! Thank you, Jerim, you are a ⭐

So I’ve spent some time looking at these shapes and…nothing sparked! Typical, right? And then one day: Eureka!!! I saw a sheep 😉 But not just normal, ordinary sheep. I saw Shaun the Sheep, how wicked is that lol Yet I had to figure out how to bring him to life, not literally of course 😉 After few attempts and different combinations I knew exactly which shapes will become Shaun the Sheep. At this point, I wasn’t sure yet what occasion for this card would be.


First, for tummy, ‘curls’ and tail, I stamped one of the large pinecones twice, using Smoky Slate Ink Pad. I stamp-it-off twice for a lighter shade. To create ‘curls’ for my Shaun the Sheep I cut off the bottom of one of the pinecones. I used what’s left to hand cut his little tail. For the head, I stamped the smallest pinecone using Basic Black Archival Ink Pad. To create legs, rams and ears I’ve used larger mistletoe branch. I stamped it three times, also in Basic Black Archival Ink and cut them apart. For his eyes, I punched two 3/16″ circles from Whisper white cardstock using Crop-a-Dile, and two Basic Black tiny circles using Owl Builder Punch. When I had all my pieces ready I assembled my Shaun the Sheep using liquid glue. To make his eyes ‘pop’ I added Fine-Tip Glue to them. I also used Fine-Tip Glue Pen to create his nostrils.

anna-stampin-cave-shaun-the-sheep-punch-art-stampin-up

So now, when I had my sheep created I had to decide what kind of card/sentiment I want to make. And I have to tell you my mind went blank. I only knew it has to be something fun. And while looking for some fun ‘sheepy’ sentiment (if it’s even a word lol) I came across this ‘Christmassy’ sentiment: ‘Bah humbug’ or even ‘Baa humbug’ haha. Yes! That was it! Let it be a Christmas (kinda) card then.

I took a piece of Whisper White cardstock that measures 4″ x 5-6/8″ and stamped a wreath using following colours: Pear Pizzaz and Wild Wasabi for fir branches, Mint Macaron for mistletoe and Cajun Craze for twigs. Mint Macaron and Cajun craze has been stamped off. The sentiment is stamped at the bottom of my panel using Labeler Alphabet stamp set in Basic Black Archival Ink.

anna-stampin-cave-shaun-the-sheep-bah-humbug-christmas-card-punch-art-stampin-up

I die-cut two ovals: one from vellum using largest of the Layering Ovals Framelits Dies, and the second one from Whisper White cardstock using the largest Oval Stitched Die. I assembled them using dimensionals and adhered Shaun the Sheep on top. I adhered my panel to the Cajun Craze card base.

anna-stampin-cave-shaun-the-sheep-bah-humbug-christmas-card-punch-art-stampin-up

For the final touch, I took three White Perfect Accents, paint them in black using nail polish (couldn’t find my sharpie doh) and added them to the card. I think it really finished the look of the card. I like how this card turned out. It’s quirky and fun. I hope you like it too. Please let me know in the comments below. I would love to hear from you.

Your next stop is lovely Keila  go and see what she has made for you. Thank you for stopping by and have a blessed day

the-creative-flow-previous-button the-creative-flow-next-button

Simply Sketched Saturday Challenge #15 – Follow Your Dreams

Anna’ Stampin’ Cave – Simply Sketched Saturday Challenge #15 – Follow Your Dreams

SSSC Header

Thank you for joining us for another Simply Sketched Saturday Challenge!  We are so excited to be sharing this hop with you. The products used are all available in the current Annual, or seasonal, Stampin’ Up!®  Catalogues*. Simply use the buttons at the bottom of the post to keep hopping!

Welcome to our 15th sketch challenge blog hop! This month it was me who had a pleasure to create a sketch we are gonna work with. Here it is:

sssc-15

When creating this sketch, I won’t be lying, I had our new Stitched Shapes Framelits Dies in mind. And however I don’t have these dies yet myself, I hope to see them used a lot through this blog hop.

I know that in the ‘age’ of everything ‘clean and simple‘ and ‘less is more‘ in crafting world, layered, ‘busy’ and distressed cards are kinda faux pas. But I can’t help I love them the most! I love all the organic, (sometimes messy) creative process of designing a card.

stampin-up-follow-your-dreams

For my card base, I’ve used Island Indigo cardstock (standard top folding A6 size). The first layer is Vellum that measures 4”x 5-5/8” and next one is Whisper White 3-7/8”x 5-1/2” panel which I stamped using Hardwood background stamp in Sahara Sand. But because it felt rather ‘boring’ I also added few ‘splotches’ from Gorgeous Grunge stamp set in Mint Macaron, stamping them off a couple of times. I distressed the edges of my panel using regular scissors.

I also created a similar panel for the inside of the card, but this time I also stamped off the Hardwood image few times, so it wasn’t as crisp as the one on the card front.

follow-your-dreams

I took two pieces of Blooms & Bliss DSP, which measure 4”x 1” each, and cut them into banners. One of the banners I adhered flat down using a fast fuse and a second one I pop with dimensionals with few lengths of Linen Thread underneath.

To create large roses I punched six flowers using Pansy punch from Mint Macaron cardstock (three flowers create one rose). For white tiny roses, I punched nine flowers using Petite Petals punch (again three flowers create one rose). I also punched one petite petals flower from Mint Macaron cardstock to create tiny leaves: I cut the shape apart so I end up with two double ‘leaves’ and one single ‘leaf’. White roses appeared bit ‘blunt’ so I decided to add some interest to them: using Island Indigo ink and a small paint brush I added some ‘speckles’ to them.

I also decided to add some sparkle to my flowers. I dipped the edges of petals first in watered-down Multipurpose Liquid Glue and next in Dazzling Diamonds glitter, and let it dry. Once they were ready I adhered them to the card with glue dots.

stampin-up-follow-your-dreams-handmade-roses

For the sentiment, I decided to use this awesome quote you probably have seen many times on the net: “Follow your dreams”. We might don’t have a stamp set with this sentiment, but this is where our amazing various alphabet sets come in handy.

Using Labeler Alphabet stamp set and Basic Black Archival ink pad, I stamped “follow your” on a 2/8” wide strip of Whisper White cardstock and cut it apart. Next, using Brushwork Alphabet stamp set and Basic Black Archival ink pad again, I stamped “Dreams” on a Whisper White panel that measures 7/8”x 3-1/2”, and heat embossed it with clear embossing powder for extra oomph. I pop ‘narrow’ part of the sentiment with dimensionals. For a wider piece, I created a vellum mat that measures 3-5/8”x 1”, and adhered them to the card front with a fast fuse.

anna-stampn-cave-stampin-up-follow-your-dreams

Do you like my project?! If so, please leave me a comment. I would love to hear from you!

Now, be sure to hop along and see more inspiring projects. Your next stop is Jillian’s blog  go and see what she has made for you.

Thank you for stopping by and have a blessed day,

SSSC Previous   SSSC Next Blog

Elegant Monochromatic With Pop Of Colour

Anna’ Stampin’ Cave – Elegant Monochromatic With Pop Of Colour

Wow! It’s hard to believe, but today is last day with My Hero Stamp Set from Stampin’ Up! Yep, 5 weeks have passed!

For my final project, I’ve created this striking yet elegant, almost monochromatic card, in shades of grey but with a pop of colour in form of dainty orange flowers.

stampin-up-botanical-builder-framelits-my-hero-stamp-set

For the base of my card I took an A4 sheet of Smoky Slate cardstock, cut it in half at 4-1/8″ and folded in half at 5-7/8″. I run the front of the base through Big Shot with Festive Embossing Folder. The panel is a piece of Basic Grey cardstock that measures 2″ x 5-7/8″. I adhere it to the base with Multipurpose Liquid Adhesive.

Next, I created my floral composition using Botanical Builder Framelits Dies. I die cut a couple of leaves from vellum and six flowers: three tiny flowers and three small 3D flowers from a scrap of Whisper White cardstock.

Savvy Tip: Don’t know what to do with random off cuts that are to small to use on cards or to punch anything out of them? Don’t throw them away! I save all my off cuts and use them up when need to die cut small elements, flowers, etc using framelits dies

To add a little bit of colour to my flowers I sponged the edges of the tiny flowers with Watermelon Wonder. For 3D flowers, I decided for more ‘dramatic’ look I sponged entire flowers using Pumpkin Pie ink pad and a dab of Watermelon Wonder to the centres. I also added a large rhinestone to each centre. You can’t really tell from the photos (blame the awful English weather) but I’ve added a touch of shimmer using Clear Wink Of Stella Glitter Brush to each flower (tiny ones too).

stampin-up-botanical-builder-framelits-my-hero-stamp-set

Next, I took a strip of vellum ( 1/2″ x 4-1/8″) and stamped a ‘Celebrate’ from My Hero Stamp Set in Versamark. Of course, I’ve used an Embossing Buddy prior to stamping. I heat embossed the sentiment with Silver Stampin’ Emboss Powder.

Tip: For best results with heat embossing always treat your cardstock, dsp, vellum, etc with embossing buddy. I takes off the statick from the surface of your paper, and makes the powder stick only to the areas you stamped.
Tip 2: If you don’t have an embossing buddy or any other antistatic tool you can use cornflour instead. Just sprinkle a little amount of flour over the surface of your cardstock, spread it with fingers or paint brush, and shake off the excess. Now you can stamp and heat emboss.

I assembled my composition using Glue Dots and liquid adhesive. Two tiny flowers on the vellum banner are hiding adhesive that I’ve used to adhere the banner to the card base.

stampin-up-botanical-builder-framelits-my-hero-stamp-set

I really like how this card turned out. I love the monochromatic, cold look of greys with a pop of bright orange. And what do you think about this colour combination? Do you like it? I would love to hear from you in comments below.

Thank you for stopping by and have a blessed day,