Masculine Birthday Card with Hexagon Hive Thinlits Die by Stampin’ Up!

Hello everyone. Today I will share with you the masculine card I’ve made for a friend request. He needed something special for his brother’s birthday. What I knew about the recipient is that he loves his little boys, Manchester United and heavy metal 😉 I’ve decided to go for the football club colours: black, yellow and red, and to use Stampin’ Up! Hexagon Hive Thinlits Die.

The base is Basic Black cardstock. The background is made on Whisper White cardstock. How I did it? It’s such a cool and effective technique.

 dla neila 5

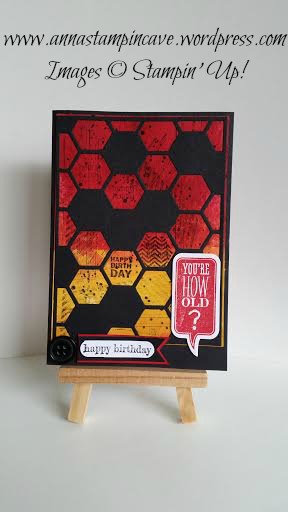
 I took a stamping clear block and simply I stamped the entire Real Red inkpad on the block, then spritz it with a water and stamped it on the cardstock. I repeat it few times till get the right intense shade. I did dry it in between. Then I’ve done the same with Crushed Curry ink pad for yellow. and to finish it I’ve randomly stamped some stamps from Gorgeous Grunge set. I took a piece of Basic Black cardstock and Hexagon Hive Thinlits and run it through the Big Shot. I’ve attached my background to the base with snail and hexagon die cut on the top with Tombow glue. But then I’ve thought it needs some more twist. I took “happy happy”, “happy birthday” and “chevron” mini stamps from Honeycomb Hello (coordinates with Hexagon Hive Thinlits) and stamp them in the little hexagons on the background.

dla neila 4

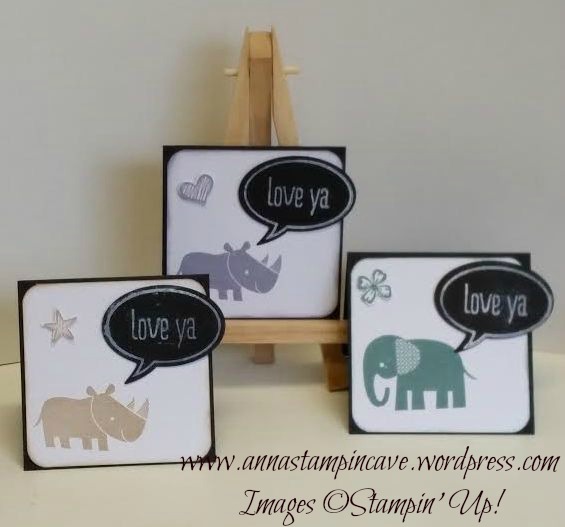
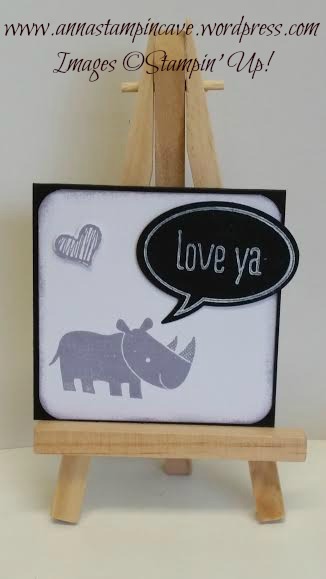
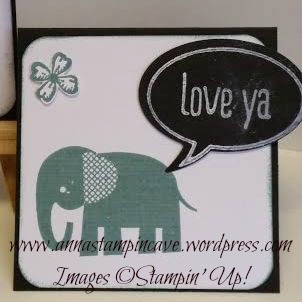
For the first sentiment I’ve taken a piece of Whisper White cardstock (watercoloured in Real Red same technique as the background) and a piece of basic black, cut them into mini banners and layer them together. The sentiment is from Something To Say and punched using Word Window Punch. The second sentiment is totally awesome! It’s one of the stamps from Just Saying set and cut out with coordinating framelits from Word Bubbles. Stamped it in Real Red of course in a piece of Whisper White and attached it with dimensionals. Oh, and a black button for that extra touch.

I really love how this card turned out. All supplies I’ve used are Stampin’ Up! except for the button. I know I’ve used lots of different stamp sets and accessories for one card but I’m just starting so don’t have a wide variety of coordinating stamps, punches, framelits etc. But I’m getting there slowly 🙂

Hope you like this project. Thank you for stopping by and happy crafting,

Who said….

So who said that “Zoo Babies” is a stamp set for babies? 😉 I’m telling you: absolutely not! And here’s the proof 🙂

love ya 1

This is super cute 3×3 note card. You can give your friend, daughter or mum – truly you can give it to anyone who’s got that special spot in your heart – justso they know they’re important for you! 🙂

love ya 2

The base of thi card is 3×3 Basic Black cardstock. I’ve also used a piece of Whisper White cardstock. The sentiment is from “Just Sayin” stamp. I’ve stamped it with Whisper White Pigment Ink. Make sure that ink is completely dry or you will smudge it…just like I did – patience is not my virtue 😉 But you can always use heat gun to speed it up. I’ve used coordinating Word Bubbles framelits to cut out the sentiment.

love ya 3

From “Zoo Babies” I’ve picked the elephant and little rhino and stamped them using Wisteria Wonder, Crumb Cake and one of new in-colours Lost Lagoon. Envelope Punch Board helped me to round the corners of white pieces, then I sponged the edge and taa daaah!  🙂

And at the very end just to add bit of interest I’ve used little stamps from “Something To Say” with coordinating Itty Bitty Accents punch pack and stick them using dimensionals. Oh and bubbles with sentiments are attached using dimensionals too.

Hope you like my little project. Please leave the comments below.

Thank you for stopping by and happy crafting

Hurray! It’s Klara’s First Birthday!

So I’ve been recently asked to design an invitations for little Klara first birthday. And I knew straight away that “Zoo Babies” is just perfect for this occasion.

zaproszenie dla klary 2

Card measures 4×4″. I’ve stamped the elephant with Blushing Bride Classic Ink Pad, then I’ve used 2 3/8″ scallop circle to punch out this little fella and sponged the edges. Cute little dots are from “Perfect Pennants”. Klara is polish little girl hence the sentiment is in polish too 🙂

It very quick project and truly hope you like it.

Happy crafting

Wise Owl Chocolate Wallet for Your Favourite Teacher

Have you ever wondering what to give to your child’s teachers, assistants, head teacher etc at the end of school year and don’t ruin your budget?! Here’s my idea: Super cute wallet/holder for chocolate bar. It’s a card and a treat all in one. Quite easy to make and perfect as a thank you gift: because chocolate bar don’t have to be boring! And because my project is a thank you gift for a teacher hence the Wise Owl 🙂

For the base I’ve used a piece of  cardstock that measures 7 1/8″ x 7 3/8″ and scored it ( on shorter side) at 3 3/8″ and 3 6/8″. Then I assembled the ribbon before decorate it with DSP.

wallet3

For the pocket which holds chocolate I’ve used a piece of cardstock that measures 4 5/8″ x 4 1/2″ and scored it (on wider side) at 3/8″, 6/8″, 3 7/8″ and 4 2/8″. Then turnon the shorter side and score it at 3/8″ and 6/8″. The sentiment on the pocket I’ve found and printed from internet. Loved this chalky handwriting 🙂

wallet5

The second pocket if flat and can hold gift cards, but I’ve used it as a tag holder. The base for this pocket measures 3 1/8″ x 4 3/8″. Tag measures 2″ x 6″ and you can either decorate it or write your message on.

wallet2

To add some detail to both pockets I’ve used Retired Scallop Trim Border Punch. But it’s still available in digital. I will post details in the list below. I’ve also punched a single flower in DSP to add some interest.

wallet6

I truly hope you enjoy this project, and that it will inspire your creativity 🙂

Thank you for stopping by