Easy Peasy Bokeh Technique And Tin Of Cards Stamp Set By Stampin’ Up!

Bokeh technique! Have you ever tried it?! I loved this technique “from aside” for a while but never get around to try it myself. Until now 🙂 And why oh! why I waited so long?! hahaha

This is such a cool and easy technique and you can achieve this effect in many different ways. But wait, what the bokeh effect is and means?! In photography bokeh (originally /ˈbkɛ/, /ˈbk/ boh-kay — also sometimes pronounced as /ˈbkə/ boh-kə is the aesthetic quality of the blur produced in the out-of-focus parts of an image produced by a lens. The term comes from the Japanese word boke (暈け or ボケ), which means “blur” or “haze”, or boke-aji (ボケ味), the “blur quality”. The Japanese term boke is also used in the sense of a mental haze or senility. The term bokashi (暈かし) is related, meaning intentional blurring or gradation.

pobrane

Cool, hey? 🙂

To achieve a similar effect on your card you can try the watercolour technique background which can be pretty amazing, and for the “blur” you simply add lighter “circles” with white pigment ink. And what’s cool about the pigment ink, you can make your circles as soft or as intense as you wish.

The first card I created is for my hubby’s 41st Birthday which happens to be today! HAPPY BIRTHDAY, BABY!!! I love you to the moon and back! You are such a blessing in my life xx

ja aaa

You must have noticed our ‘cheeky little thing’ photobomb the picture haha

And here’s the card –

Happy Birthday Card - Anna's Stampin' Cave

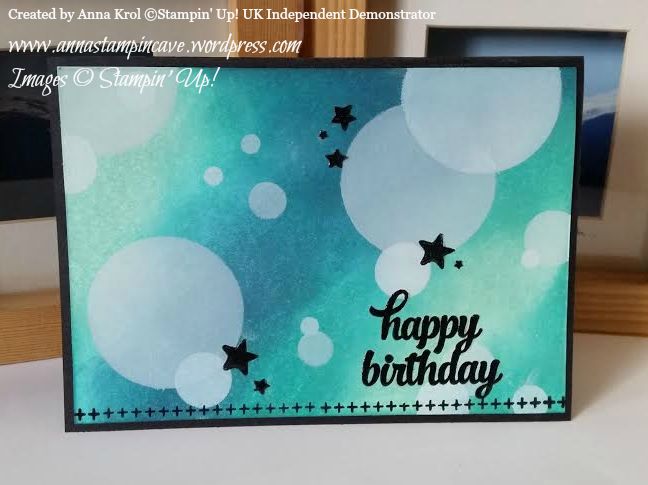
For the background, I’ve used three colours of ink: Pool Party, Bermuda Bay and Island Indigo. I’ve sponged the panel randomly, making sure all the colours are blended well. When I was happy with my background I started adding circles in various sizes with Whisper White Craft Ink and sponge.

Happy Birthday Card - Anna's Stampin' Cave

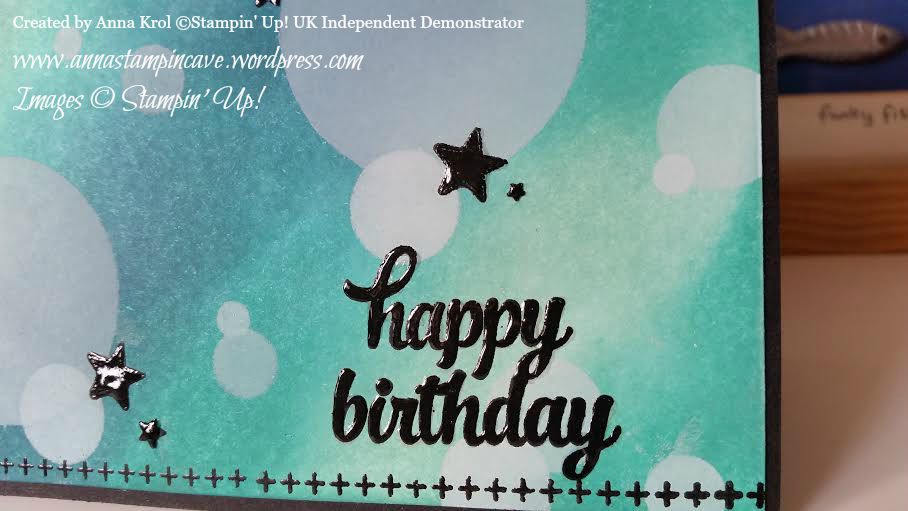
Sentiment and border come from Tin Of Cards stamp set that coordinates with Tin Of Cards Project Kit. But this set is so versatile with its bold images. Once you’ve created your beautiful kit you can use that stamp set over and over again on different occasions. I stamped the sentiment in Versamark and heat-embossed with black embossing powder. Stars are punched with Confetti Stars Punch. To add some WOW effect I added Crystal Effects to the sentiment and stars. I love how they “pop!” from the card.

But because I had all my supplies out, I’ve created three more cards using same technique and stamp set but different colours.

A Happy Hello Card - Anna's Stampin' Cave

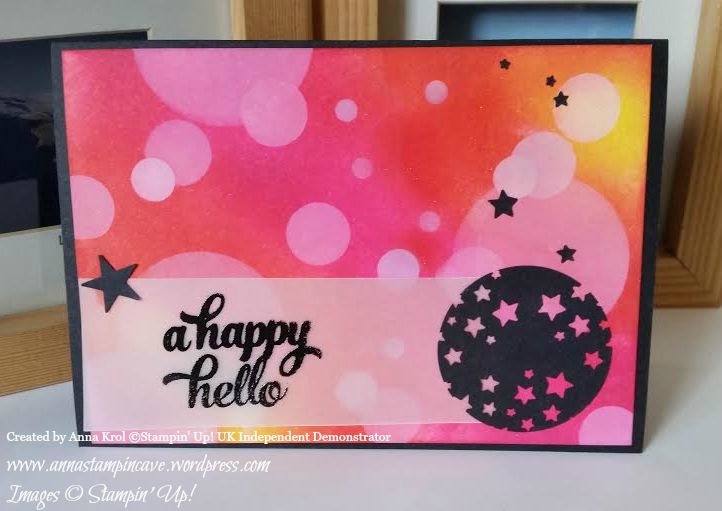
For this one, I used Daffodil Delight, Watermelon Wonder and Melon Mambo. For a little twist, I stamped my sentiment onto vellum and added a circle full of punched out stars so the background is peeking from behind. I really love this effect. Larger star comes from Itty Bitty Accents punch pack and it holds vellum in place.

Thank You Card - Anna's Stampin' Cave

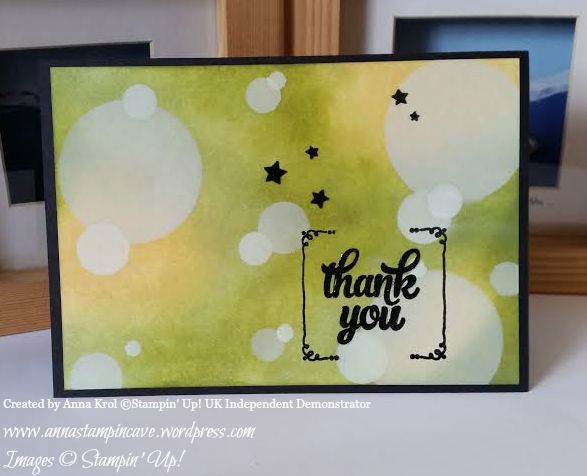
My third card is a Thank You card. And again same technique but different sentiment and colours: So Saffron, Pear Pizzazz and Old Olive. And again I used Crystal Effects on stars and sentiment.

For my last card today I used Wisteria Wonder, Perfect Plum and Rich Razzleberry.

Congrats To You - Anna's Stampin' Cave

But this time I decided to add a vellum “screen” to my layout. Such an easy way to intensify the blur effect.

Hope you like my today’s cards and that I’ve inspired you to try bokeh technique yourself. Honestly, I had lots of fun creating these cards and would love to hear what you think about them. Please let me know in the comments below.

Thank you so much for stopping by,

He Is Risen Card Using Hardwood Stamp By Stampin’ Up! And Acrylic Block Stamping Technique

Today I’ve got for you a card that is very special for me.

I’m a Christian, but I do not belong to any denomination. Long story short: I try my best to follow Jesus, my saviour, and his teachings, not human traditions, in everything I do. So at the time when nearly all christian world celebrate Easter, I and my family, simply commemorate anniversary of Jesus’s death according to the Bible’s lunar calendar. But lets back to the card.

I love all things nature and had this idea for some time now. So went to my garden for a little “foraging” and brought myself few twigs. No, no plant gets hurt 😉 For the base for my card I choose Crumb Cake card stock. Sponged the edges to add a little depth.

he is risen 7

My background is created using acrylic block stamping technique. This technique is really easy. Take an acrylic block and ink pads of your choice. I used Pear Pizzazz and Pool Party. Then just press or tap (gently) your acrylic block into the pad. When you’ve got the ink transferred on your block (as much or as less as desired) swipe the block across your card stock. Repeat these steps until you’re happy with a result. You can use just one colour, or as many as you wish. There’s no right or wrong if it comes to this technique.

he is risen

I was really pleased how my background turned out. I inked Hardwood stamp in Crumb Cake, added some Soft Suede on edges and stamped it onto my background. Before adhered it to the base I distressed all edges with scissors.

he is risen 4

To form the cross I tied my twigs with piece of white baker’s twine. I coloured twine with Soft Suede marker after, because I wasn’t sure how much of a twine I will need in first place. Added my cross to the card using sticky strip. Hot glue would be better idea but my hands are not “safe” to hold glue gun 😉

he is risen 3

Long time I couldn’t decide what sentiment to use. I even thought about printing something from the internet. But then I had a lightbulb moment: Alphabet Rotary Stamp! It’s font is simple and rough – perfect for my card! I created my phrase “he is risen” in no time. Stamped on piece of card stock with Crumb Cake again and cut it into a banner. First I thought to rise a sentiment with dimensionals, but I really wanted the cross to stand out.

he is risen 6

I’m really pleased with my card. With acrylic block stamping technique I made it in no time. Hope you like this technique and that I inspired you to give it a try. If so please give me a “like” or live a comment below. Thank you for stopping by and happy crafting!

Mother’s Day Card using “Mum’s Love” Stamp Set by Stampin’ Up!

Mother’s Day – a day to show love to all wonderful mums in the whole world. In different parts of the world it’s celebrated in different days: in US it’s second Sunday of May, in Poland it’s 26th of May but here in UK and Ireland it’s celebrated on fourth Sunday of March. But regardless time and place it’s a day to show how much we value and appreciate their hard work. We give them cards, Mother’s Day gifts or simply buy flowers. A little acts of kindness is all that matters after all.

So today I want to share with you this beautiful fun fold card for Mother’s Day. It’s quick and easy to make and you really don’t need many supplies to make one.

mother's love 6

To make this card you need  half of A4 piece of card stock (cut in half on long side) folded in half. I’ve used Strawberry Slush. Then you cut front panel of the card in half. This is our base.

mother's love

You will also need three pieces of whisper white card stock. For inside of the card you need a piece that measures 5 5/8 x 4″. And two smaller pieces for the front panels: both measure 4 x 2 3/4″. One of them I run through the Big Shot with Happy Heart Embossing Folder and slightly sponged embossed part with Pistachio Pudding ink.

mother's love 1

On second panel I stamped a this fun flower. It’s double step stamp, so for the first step I used Basic Black ink, and for second step Strawberry Slush and Pistachio Pudding. Both, flower and sentiment comes from Mum’s Love stamp set. Don’t you just love this sentiment and artful font? 🙂

mother's love 3

This stamp set has a coordinating sentiment for the inside of the card and it’s amazing: “…and no mum deserves more love than you…” – Isn’t it beautiful? Now it’s time to asseble the card.

mother's love 8

This little flower looks so cute 🙂

mother's love 4

…hmmm..I think there’s something missing…so I stamped inside few mini flowers from same stamp set.

mother's love 9

I just love how this card turned out! So simply to make yet so effective and cheery 🙂 I hope you like this project.

Thank you for stopping by.

New Butterfly Basics Stamp Set and Framelits by Stampin’ Up!

Oh, so happy I finally get to play with some new products: Butterfly Basics stamp set and coordinating thinlits.The cards I’ve made today are bit edgy because I really like a slightly distressed look. Backgrounds for all cards are sponged using different shades of green. For some of those cards, I’ve used colour resist technique. I’ve stamped leaves with Versamark and then heat embossed them with clear embossing powder.

butterfly basic 3

With second card I also stamped leaves with Versamark but this time I didn’t heat-emboss it. As you can see Versamark resist colour even if it’s not embossed, but the effect is more gentle. The only layer in this card is a butterfly 🙂

butterfly basic 4

Some leaves have been also stamped off first to get a lighter shade. Filigree honeycomb-kind-of image and little circle are stamped in Hello Honey.

butterfly basic 5

To add some interest to the cards I’ve stamped some “splatters” from Gorgeous Grunge (Hello Honey again)

butterfly basic 6

I just love this sentiment! So versatile. You can use it for thank you cards, birthdays, scrapbook pages, decorations, frames, shadowboxes, etc

butterfly basic 7

For a final touch, I’ve added some beautiful sequins from In Color Sequin Assortment. Easy yet effective 🙂

butterfly basic 8

 Last two cards are mounted on black base. I just couldn’t decide which one I like the most: white, black or none 🙂 And which one is your favourite?

I hope you like my today’s cards. I surely had lots of fun making them.

Thank you for stopping by, happy crafting

Thank You Cards with Sale-a-Bration Stamp Set Lotus Blossom

Today I’ve got some cool 4×4″ cards to share with you. These are Thank You cards I made for my customers and they showcasing Lotus Blossom – one of the stamp sets you can choose as your freebie during Sale-a-Bration.

lotus

Isn’t it gorgeous?! I’m in love with this set! It’s a 3 part stamp (3 step stamping) but all you really need for the flower is just ONE ink pad! Really! So all yesterday evening I’ve been playing with different colours to get different looks. I have to admit that lighter colours work best

lotus blossom 3 Wisteria Wonder

lotus blossom 5 Hello Honey

lotus blossom 6 Crisp Cantaloupe

But with stamping off technique you can use the richer colours too

lotus blossom 2 Lost Lagoon

lotus blossom 4 Coastal Cabana

Or even you can mix colours like in this one

lotus blossom

I stamped first and second part in Strawberry Slush ( second part I stamped off once) and third is stamped in Blushing Bride. All stems are stamped in Pear Pizzazz and Old Olive. To finish off the cards I stamped thank you (comes with set) with black Memento ink pad. Then I die cut film photo frames, attached them with liquid glue. Easy, and I really like how they turned out. Hope my customers will like them too 🙂

lotus blossom all

Thank you for stopping by