Shadowhunters Fangirl Birthday Card using Stampin’ Up! Products

Sharing something a little different with you today. I’m so happy I finally had some spare time to post this awesome card (if I do say so myself).

My (not so little anymore) girl had her 16th birthday last Sunday. And because she’s a big fan of Cassandra Clare’s Shadowhunters book series, I really wanted to create something in that theme for her.

4

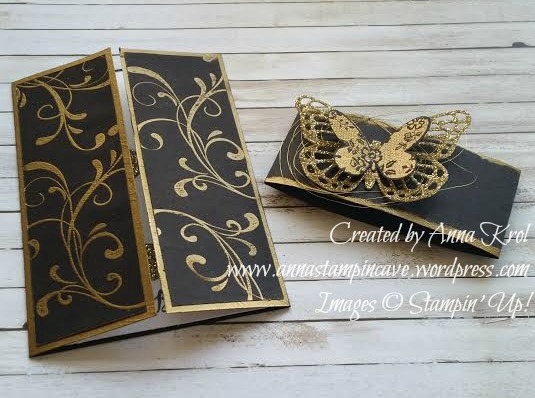
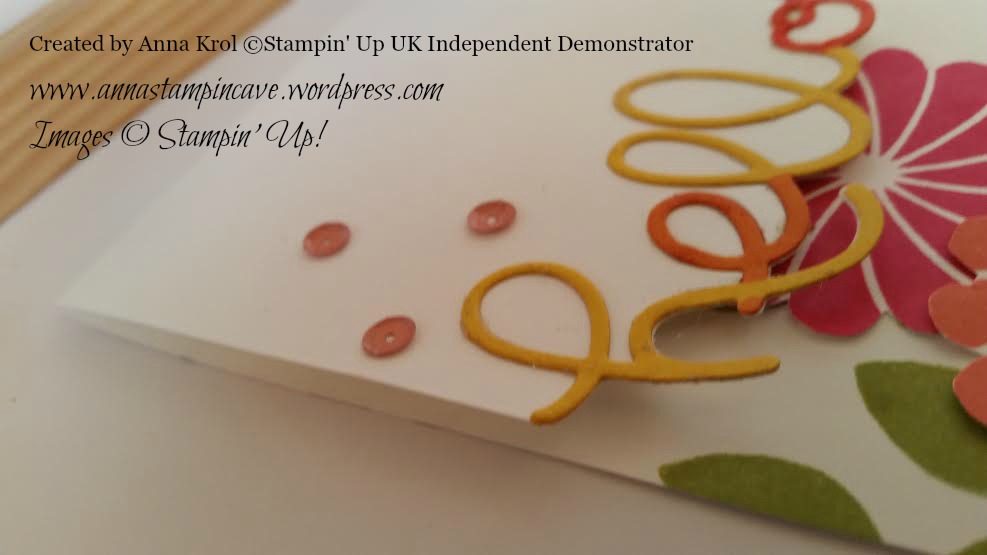
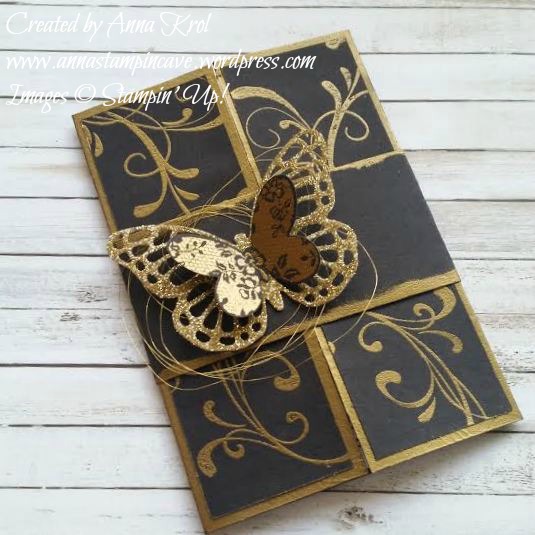
Obviously, I don’t own any matching stamp sets so I had to improvise. I’ve used pretty few current stamp sets to create my card. First I choose black & gold colour combo – I think it fits the theme perfectly. It’s a gate-fold card, with base in Basic Black. I “brushed” Versamark around the edges, added gold embossing powder and heat set it. I didn’t go for perfection – it was meant to be a bit edgy, rough. Next, I cut two panels to go on the front. Using Versamark again, I stamped flourishes from Everything Eleanor stamp set, and heat embossed it in gold. As before, I didn’t pay attention to detail on purpose – the edgier the better.

3

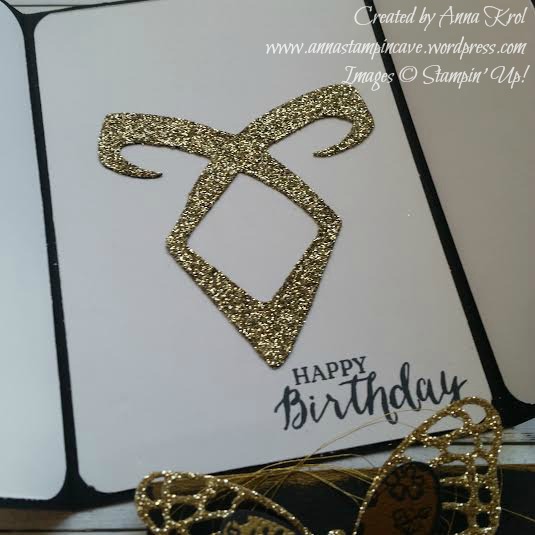
Inside of the card is pretty simple. I’ve found Angelic Rune symbol online, printed it on copy paper and then traced it on a piece of basic black. I hand-cut it and heat embossed it with Iridescent Ice embossing folder first. But I didn’t like how this turned out and decided to add more sparkle to it. I dabbed Versamark on top of my symbol and added  Heat & Stick powder. I melt the powder with Heat Tool, covered it with gold glitter and heat set my piece again. I love how this turned out. Sentiment comes from Rose Wonder stamp set.

1

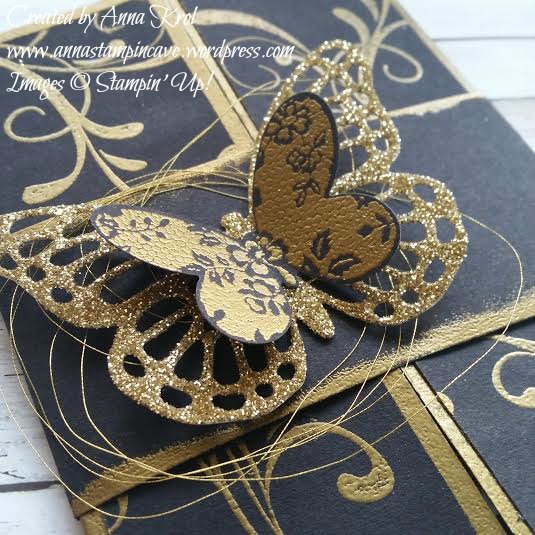
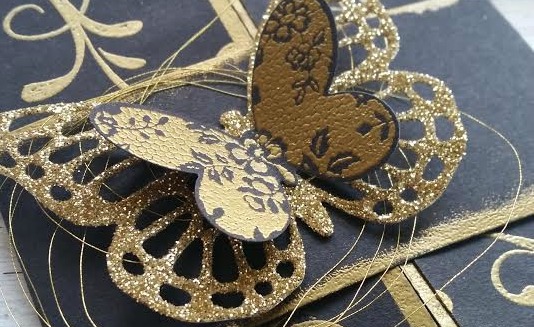
To close my card I created a belly-band. Same as with a card front I added that rough gold edge. I stamped small butterfly from Butterfly Basics, heat embossed it in gold and die-cut it. I also die-cut the more intricate butterfly from gold glimmer paper. I adhered them together, added some gold Metallic Thread underneath and attached it to my belly-band.

2

And that’s it. That’s my Shadowhunters birthday card. Do you like it? I have to say that my daughter truly loved it. And the moment she opened the card and saw the Angelic Rune symbol – well, that was priceless to see how her eyes light up. Mission completed!

Thank you for stopping by and have a great day,

Framelits Art Easter Bunny Card Using Hearts Collection Framelits Dies

I usually don’t post everyday but today I felt well enough to spend some time in my *atelier* 😉 and made this fun and super easy Easter card. You all probably know what punch art is – you take various punches, punch different shapes, and then put them together to create some funny critter. My card today is framelits art. The idea isn’t mine – I’ve found it on sizzix blog. To make this adorable bunny you need various heart sizes. I used Hearts Collection Framelits Dies from Stampin’ Up! And you don’t have to figure out which sizes you need – I did all the work for you 😉

easter bunny

Here’s the list of the hearts/colours you need:

– smallest heart: 2 x whisper white, 1 x crisp cantaloupe, 1 x strawberry slush

– 2nd smallest: 1 x crisp cantaloupe, 1 x strawberry slush

– 3rd smallest: 2 x crisp cantaloupe, 1 x strawberry slush

– 5th heart: 1 x crisp cantaloupe

My card base is A5. I guess it’s possible to downsize it to A6, where the smallest heart would be from itty bitty accents punches. But I like it big 🙂 I assembled my bunny first, before put my card together (except paws and feet). For eyes I punched two medium circles from owl punch. I love his “bright”eyes 😉 I also cut few tiny strips of paper for whiskers.

easter bunny 4

For sentiment I stamped Happy Easter from Crazy About You in Versamark, heat embossed in clear and sponged with Pear Pizzazz. Then trimmed it and backed with slightly bigger piece of Whisper White. I adhered paws so it looks like a banner held by bunny.

easter bunny 2

To assemble my card I layered my card base with So Saffron DSP and two stripes/banners of Pear Pizzazz. I adhered my bunny, his feet and added paws with sentiment. Also added wee flowers in the right bottom corner and card was done.

I love this card and had lots of fun creating it 🙂 Hope you like it too. As always thank you for stopping by,

Lotus Blossom Gorgeous Grunge And Gold Fancy Foil Vellum All About Kindness + Bonus Free Gift

Lotus Blossom is so far the most popular Sale-A-Bration product. And I’m not surprised at all. This gorgeous three step stamping stamp set is very versatile, and flowers look like hand-painted. It comes with two sentiments: simple “thank you” and absolutely beautiful “The kindness you show has no end…”. And this sentiment I’ve used in today’s card.

I wanted to keep this card sweet and gentle so decided to use Crisp Cantaloupe for card base and Pistachio Pudding for banner. I’ve layered the base (standard A6) with piece of Gold Fancy Foil Designer Vellum. Pistachio Pudding banner measure 1 1/2″ x 4 1/2″, and is dry embossed with Chevron Embossing folder to add some texture to the card.

sweet 1

I took a piece of Whisper White and cut it into banner that measures 2 1/2″ x 3 1/2″ and distressed the edges. Then stamped Lotus Blossom in Crisp Cantaloupe. Added little stem in Pistachio Pudding. But it was missing something, so decided to stamp some splotches from Gorgeous Grunge. Sentiment is stamped in versamark and heat embossed with Gold Embossing Powder – LUSH, and it fits the vellum.

Before I put the card together I decided to add Crisp Cantaloupe Thick Bakers Twine (in Weekly Deals offer this week) to my white banner. To avoid visible traces of glue under vellum I used glue dots – perfect, as they are hiding under gold dots. For the rest of the card I’ve used snail adhesive. Less then 10 minutes and card is done 🙂

sweet 2

I love this card. It looks exactly the way I wanted 🙂 Soft colours, and a WOW factor with gold embossing and vellum. And all done in 10 minutes – it’s a win win 🙂

Thank you for stopping by,

Hello Sunshine Card Using Crazy About You Stamp Set & Matching Dies By Stampin’ Up!

Hello everyone! Today I’ve got for you a card made using cool technique called partial diecuting. This technique I learned from Jennifer McGuire. You can check her YouTube Channel. So when I saw Crazy About You stamp set and matching Hello You thinlits in Spring/Summer catalogue I knew I have to try this technique! This stamp set is absolutely amazing! 


hello sunshine 2

As you can see I partially diecut word hello, then I diecut whole word from Daffodil Delight and adhere it to the front of my card.

hello sunshine 1

Large flowers are cut by hand with scissors, as I don’t have that punch yet (1 3/4″ Scallop Circle). Small flowers are punched with 1 1/4 Scallop Circle Punch.

hello sunshine 5

To add some definition to the flowers I stamped twig with leaves on some scrap piece of cardstock. I hand cut few of them and adhered them here and there.

hello sunshine 3

Letters e and o are coloured with Blendabilities I get for FREE as my Sale-A-Bration freebie 🙂 If you want to choose something different as you free SAB items you can purchase Blendabilities in our store. I will add links at the end of this post.

hello sunshine 4

I added few sequins and voila! – card is done! Really hope you like today’s project!

Thank you for stopping by!

Extraordinary Faceted Gift Box Using Envelope Punch Board

Look at this beautiful faceted box I’ve made today! I absolutely love it! Feels so good to be able to do a little crafting at last. Some of you who follows me on facebook knows the reason I was absent, but some of you don’t, so I owe you an explanation. I had a relapse of Multiple Sclerosis. Yep I know :/ I couldn’t walk, didn’t feel my legs at all, same with arms and hands. I get to hospital and after nearly two weeks of painful injections and few doses of steroids I finally can walk a little. my hands are still a pain though. So while it’s really hard for me to stamp (but I will have a little card for you in a day or two) I’ve decided to try a little bit of papercrafting.  This idea isn’t mine. I followed a tutorial of Australian demo Leonie Schroder.

10

To make this box all you need is Envelope Punch Board, scoring board, Tombow glue, 6×6″ piece of cardstock and 6×6″ piece of DSP. For my box I’ve used stunning Something Borrowed Designer Series Paper from new Spring/Summer Catalogue and Baked Brown Sugar cs for the base. I know that the colour on DSP is Sahara Sand, but with Baked Brown Sugar they make very elegant combination.

1

First take your EPB and punch and score both pieces of cardstock at 3″ on all sides. Thats it! Now bring your scoring board.

2

Score at 3/8” (where the notch is) on each side. Remember you do exactly the same with DSP just for the teaching purposes I only show the cardstock. You wouldn’t see it clearly on DSP anyway.

3

Now you need to cut out these little corners. You can use scissors for that but as I mentioned my hands are affected so I can’t hold a scissors. I’ve decided to use square punch instead.

4

Barnish all of the score lines. And now the trickies part: assemble the box.

5

You need to adhere the flaps of one triangle from the top piece to the flaps in a gap between two triangles on the base. I hope that make sense if not check the picture below.

6

You can use any adhesive but I truly recommend using a tombow glue. It gives you more flexibility, while sticky strip adhere immediately so once it stick it holds, period. And trust me with this box you need that flexibility.

7

Leave last section (triangle) if the lid open, do not glue it as it’s gonna be your opening. Just tuck tabs in and they will hold your box closed. Also when you tie ribbon around the box make sure it holds the opening corner.

8  9

And Taa Daah! Your box is done! Easy hey?! 😉

11

Now just a little bit of decoration. And with such a bold deign on DSP less is more. I only used fancy folded Natural Chevron Ribbon.

12


Sentiment comes from Your Perfect Day Stamp Set. It’s brand new set from Spring/Summer Catalogue; same as DSP. And it’s absolutely gorgeous! I’ve stamped “cheers to the new mr & mrs” in Sahara Sand, punched it with Artisan Label  punch, and sponged the edges. That sponging came a little bit messy – my hands again – but I’ve decided to leave it this way (second time wouldn’t get better anyway)

13

I’ve layered the sentiment with piece of Baked Brown Sugar and attached it with dimensionals.

I really hope you like this project and that it tackle your creativity 🙂

Thank you for stopping by