Dragonfly Dreams Clean & Simple For GDP#069 Colour Challenge

Anna’ Stampin’ Cave – Dragonfly Dreams Clean & Simple For GDP#069 Colour Challenge

gdp069

Hello and welcome everyone! Something new from me today as it’s the first time when I bite the bullet and decided to take a part in Colour Challenge over at Global Design Project.

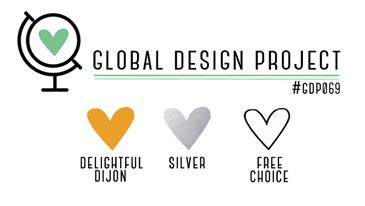
I’ve been following this blog for some time now, just never felt confident enough to join in the fun. But hey! It’s just for fun, right?! And when I saw Delightful Dijon (I really, really love this colour) amongst other colours in this week’s challenge, I just knew: now or never. It’s a great colour combination and as my free choice, I simply used Whisper White.

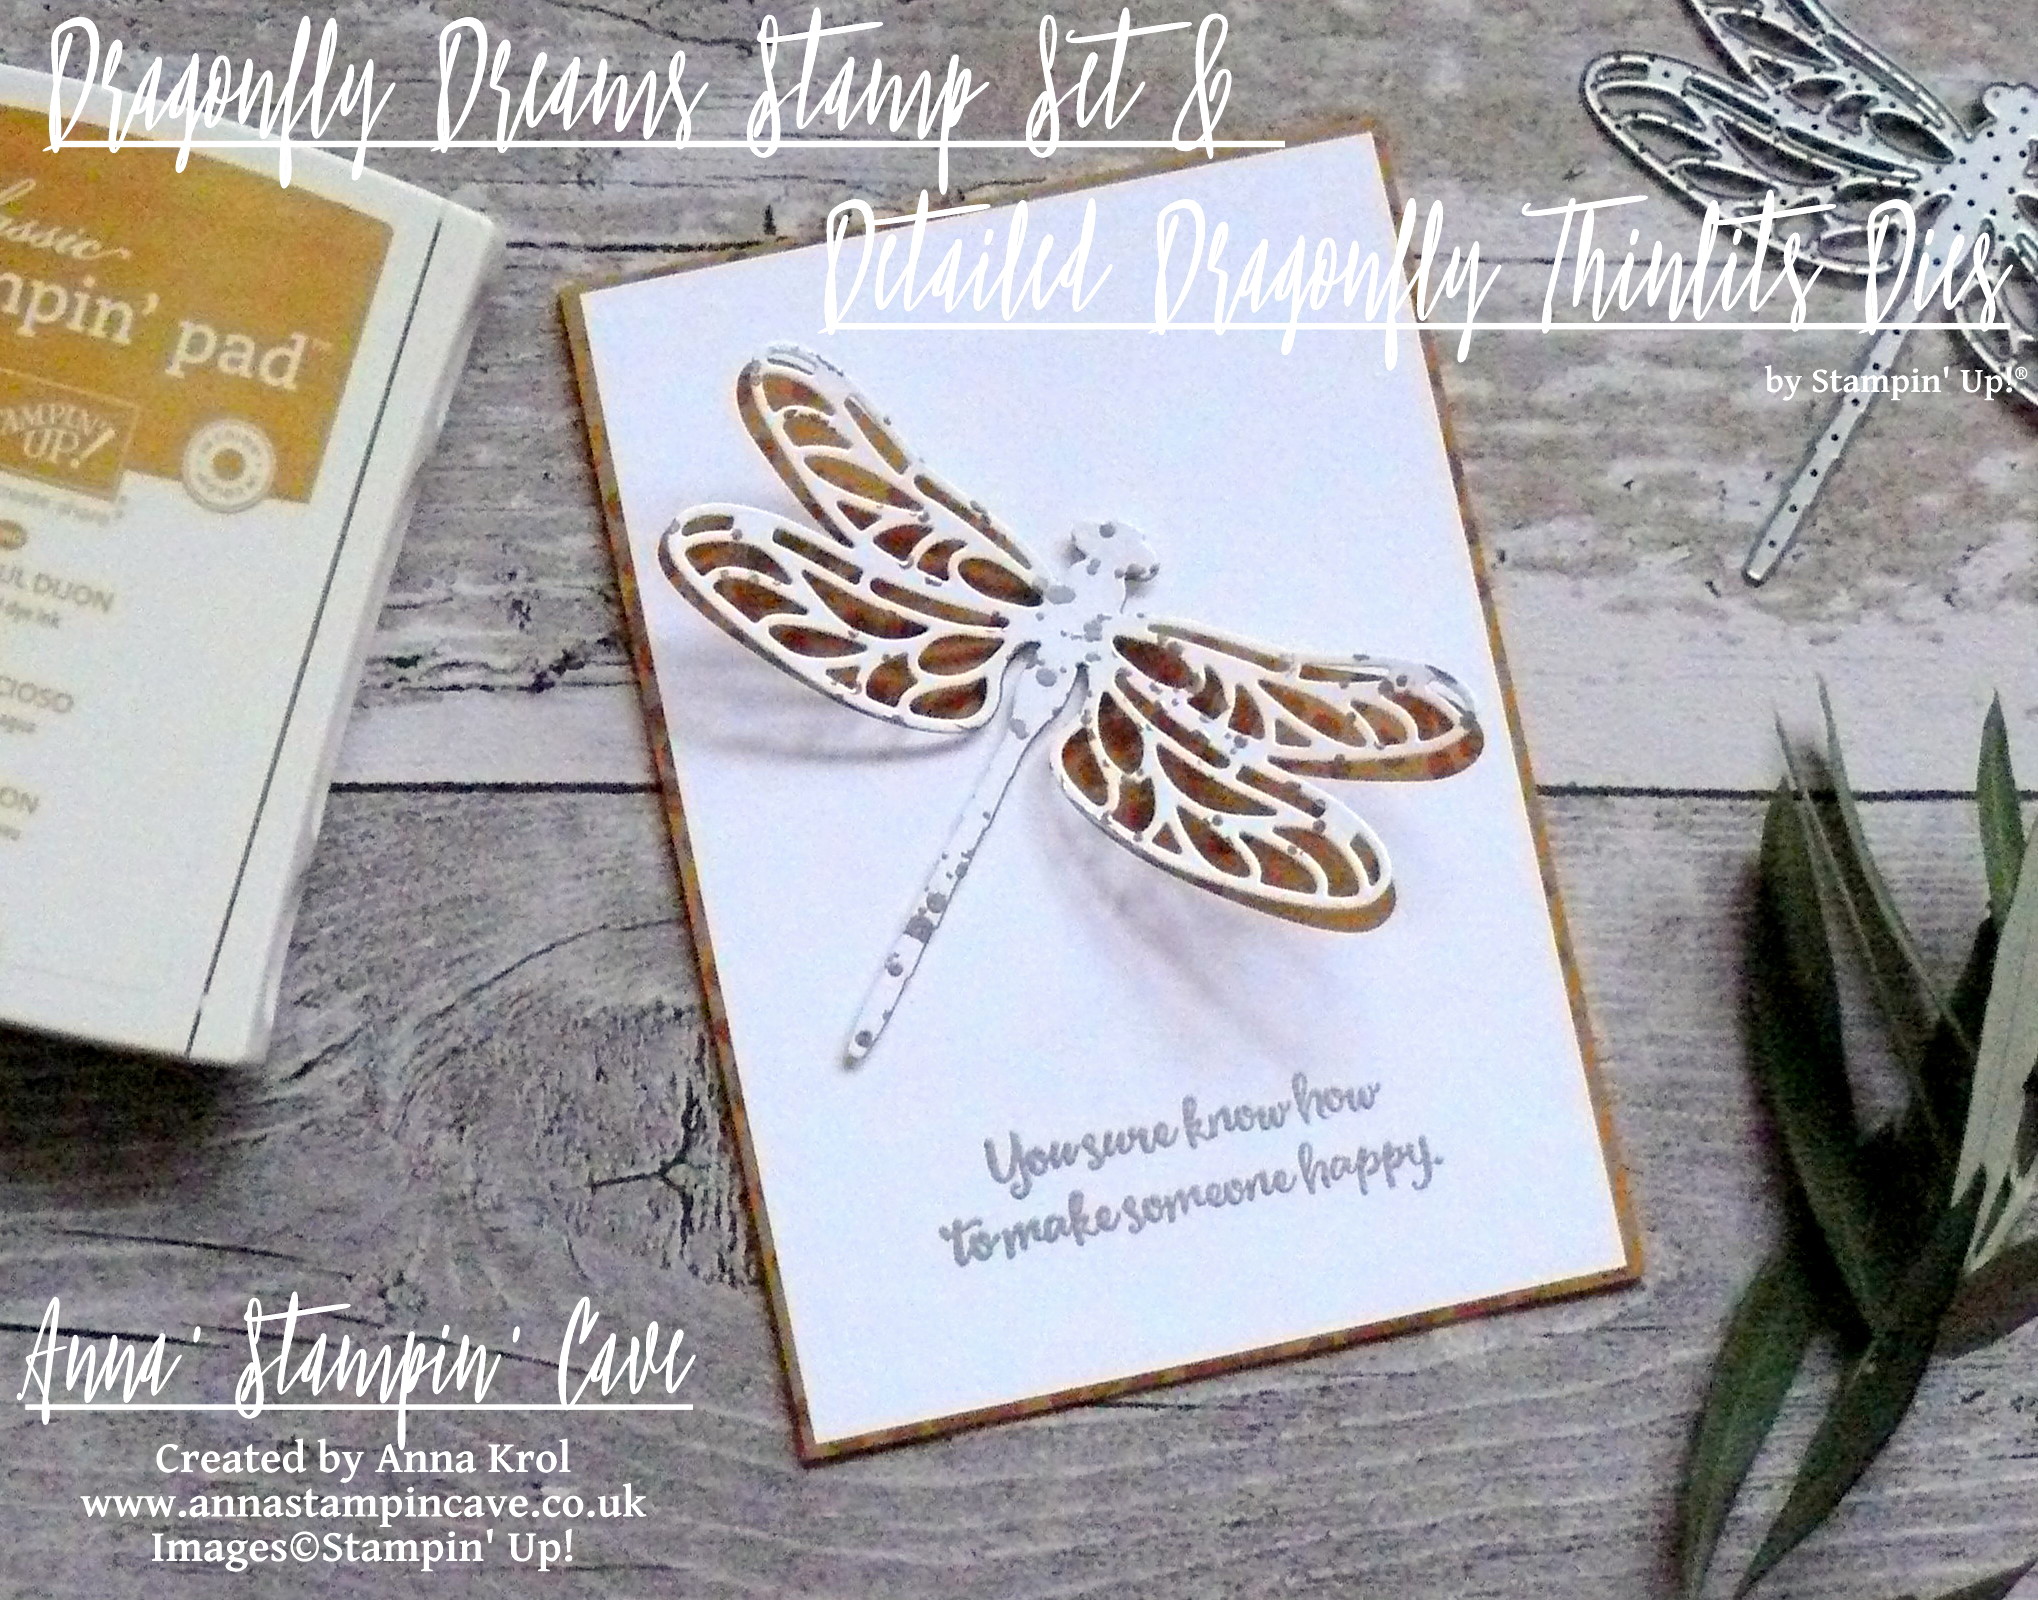
I didn’t craft much lately due to health issues, but I was eager to use a new stamp set from Stampin’ Up! Spring Summer 2017 Catalogue, called Dragonfly Dreams. It comes with coordinating Detailed Dragonfly Thinlits Dies, as a bundle, and is just beautiful. It seemed perfect for the idea I had in my head.

Just forgive me poor photos. I don’t have any fancy equipment and take my photos in the daylight. But the weather is so miserable since few days down here in Midlands, UK, that it was just impossible to take any decent picture.

anna-stampin-cave-stampin-up-dragonfly-dreams-stamp-set-and-dies-bundle-clean-and-simple-card

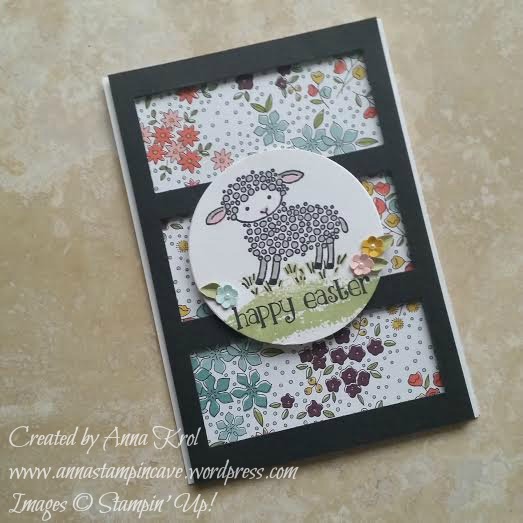
‘Nearly Inlay’ Dragonfly Dreams card dimensions:

  • Delightful Dijon cardstock: 11-6/8″ x 4-1/8″ scored in half at 5-7/8″ (29.7 x 10.5 cm scored in half at 14.8 cm)
  • Whisper White cardstock: 2 panels 4″x 5-5/8″(10,2 x 14,3 cm)

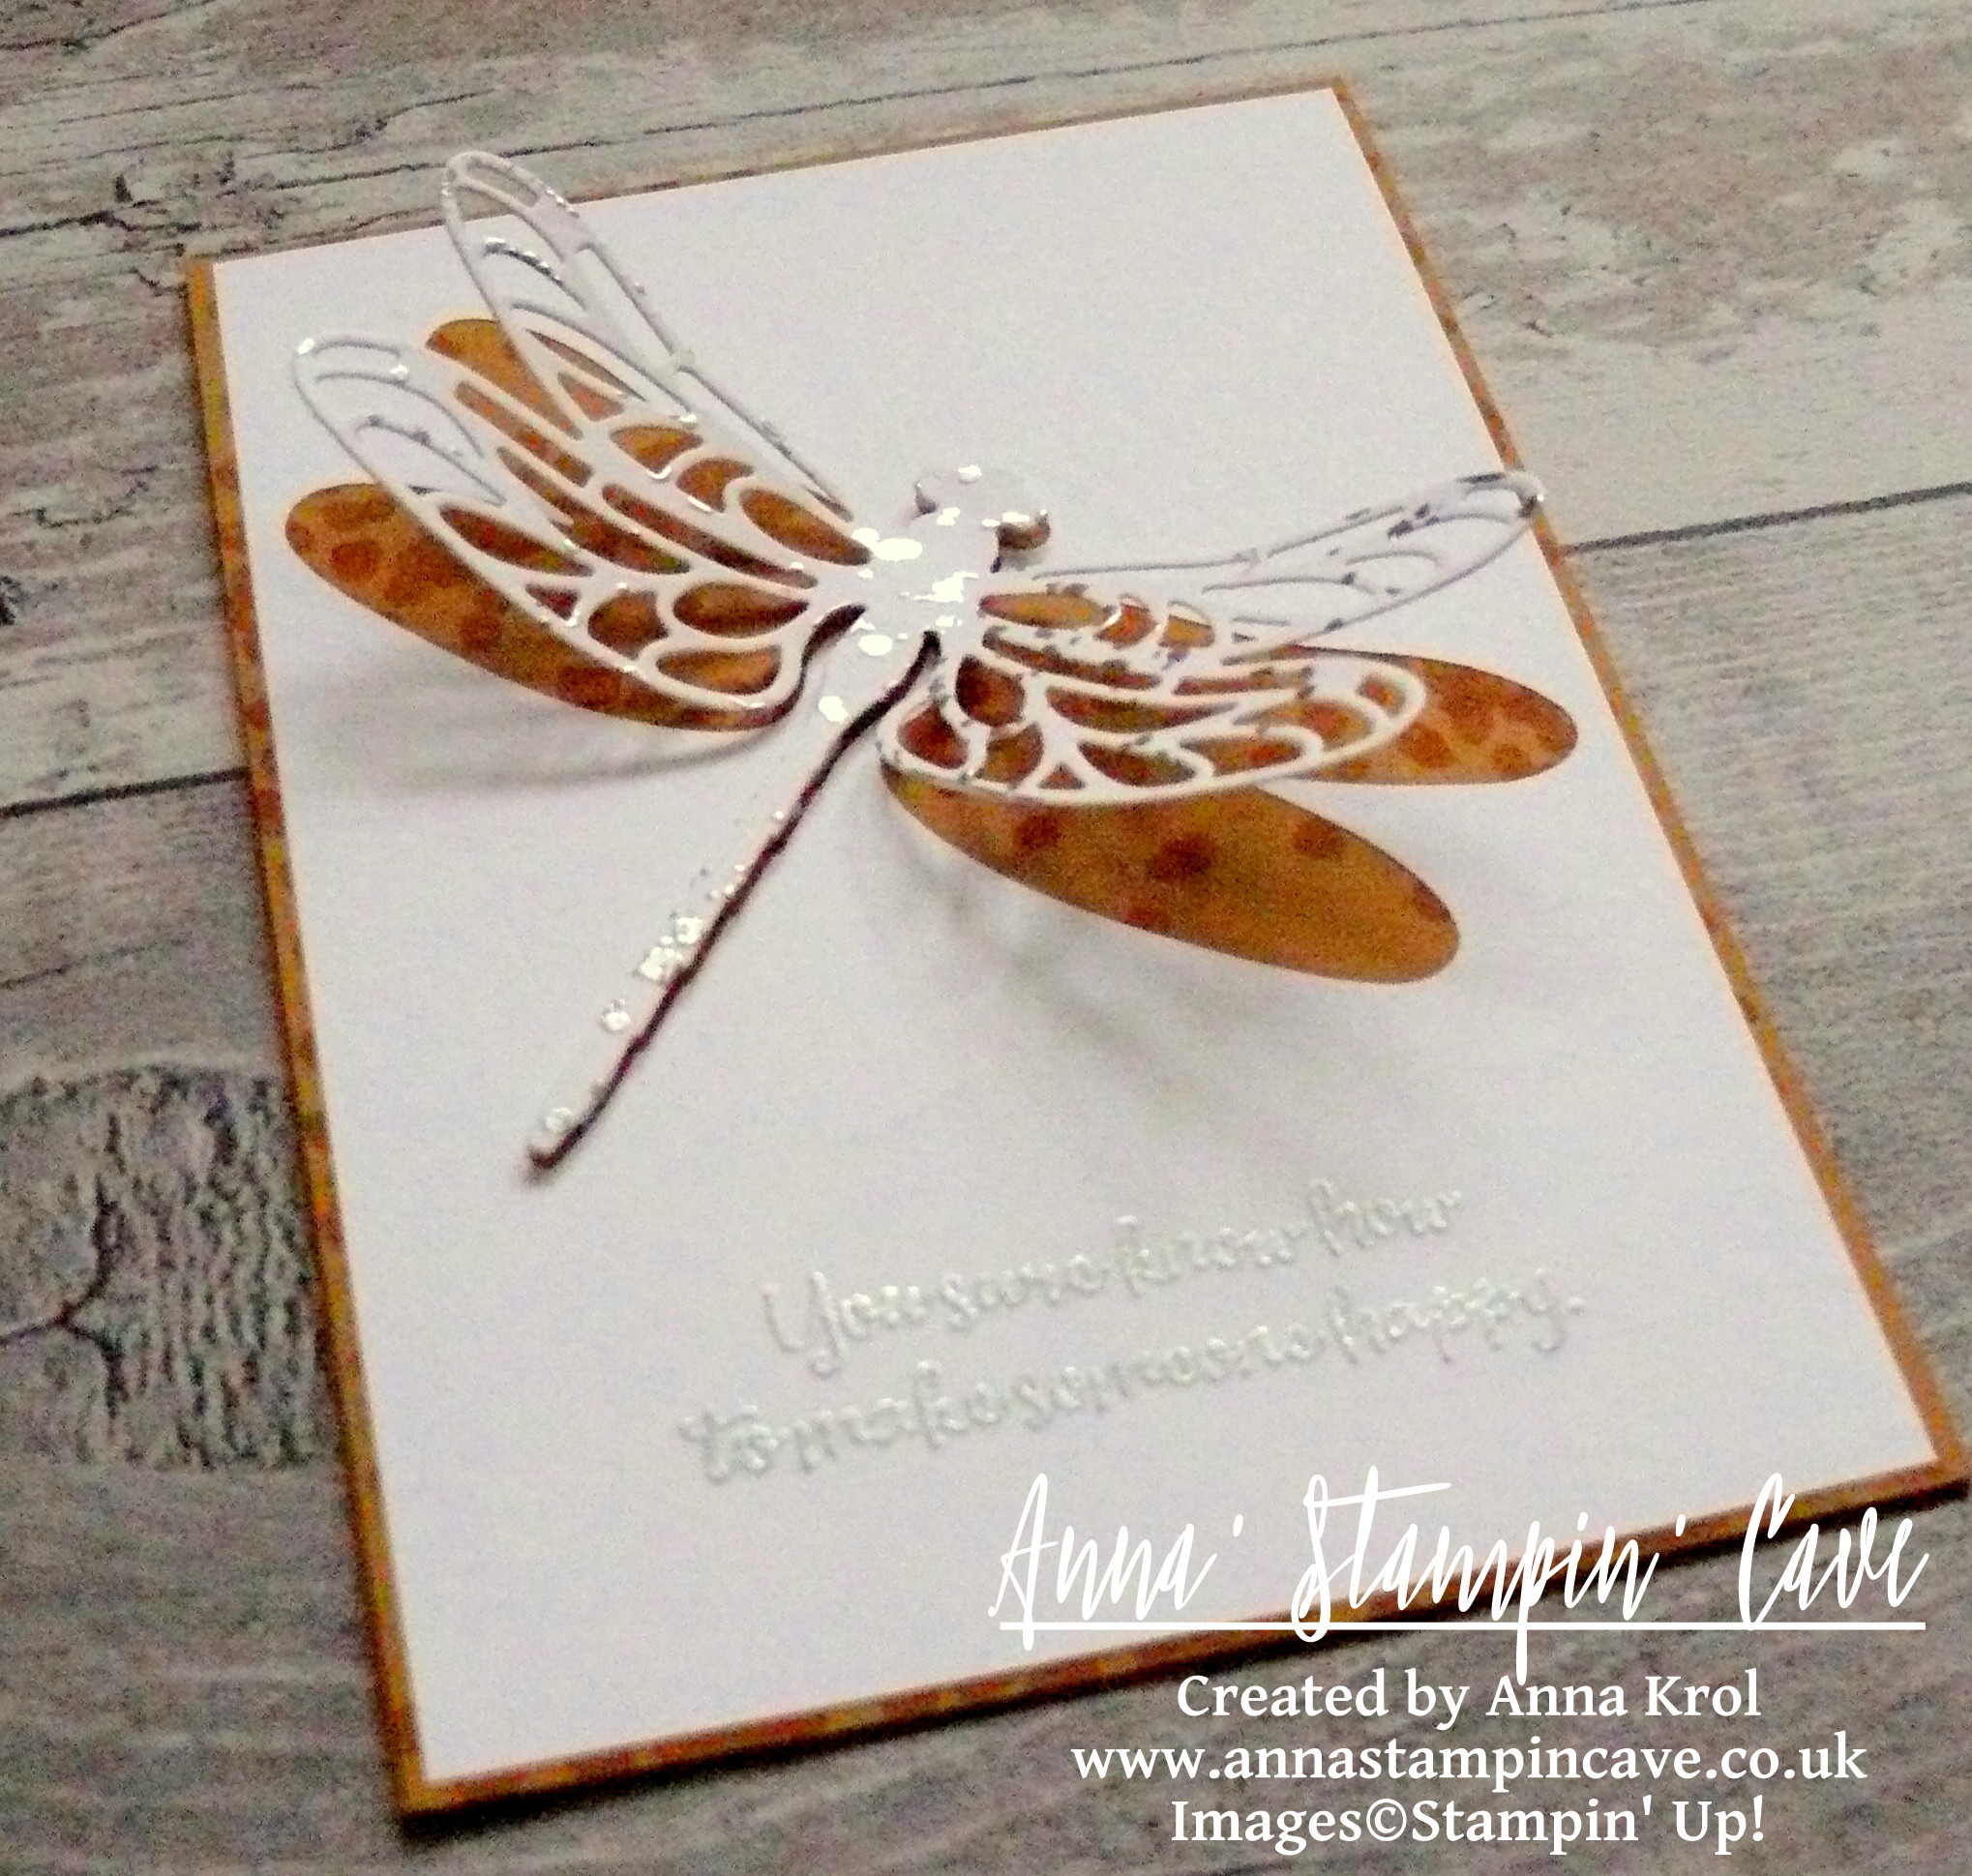
First, I stamped the card base with the polka dot (kinda) background stamp from Dragonfly Dreams Stamp Set until it was all covered. I’ve used Delightful Dijon ink for a tone on tone effect.

anna-stampin-cave-stampin-up-dragonfly-dreams-bundle-clean-and-simple-card

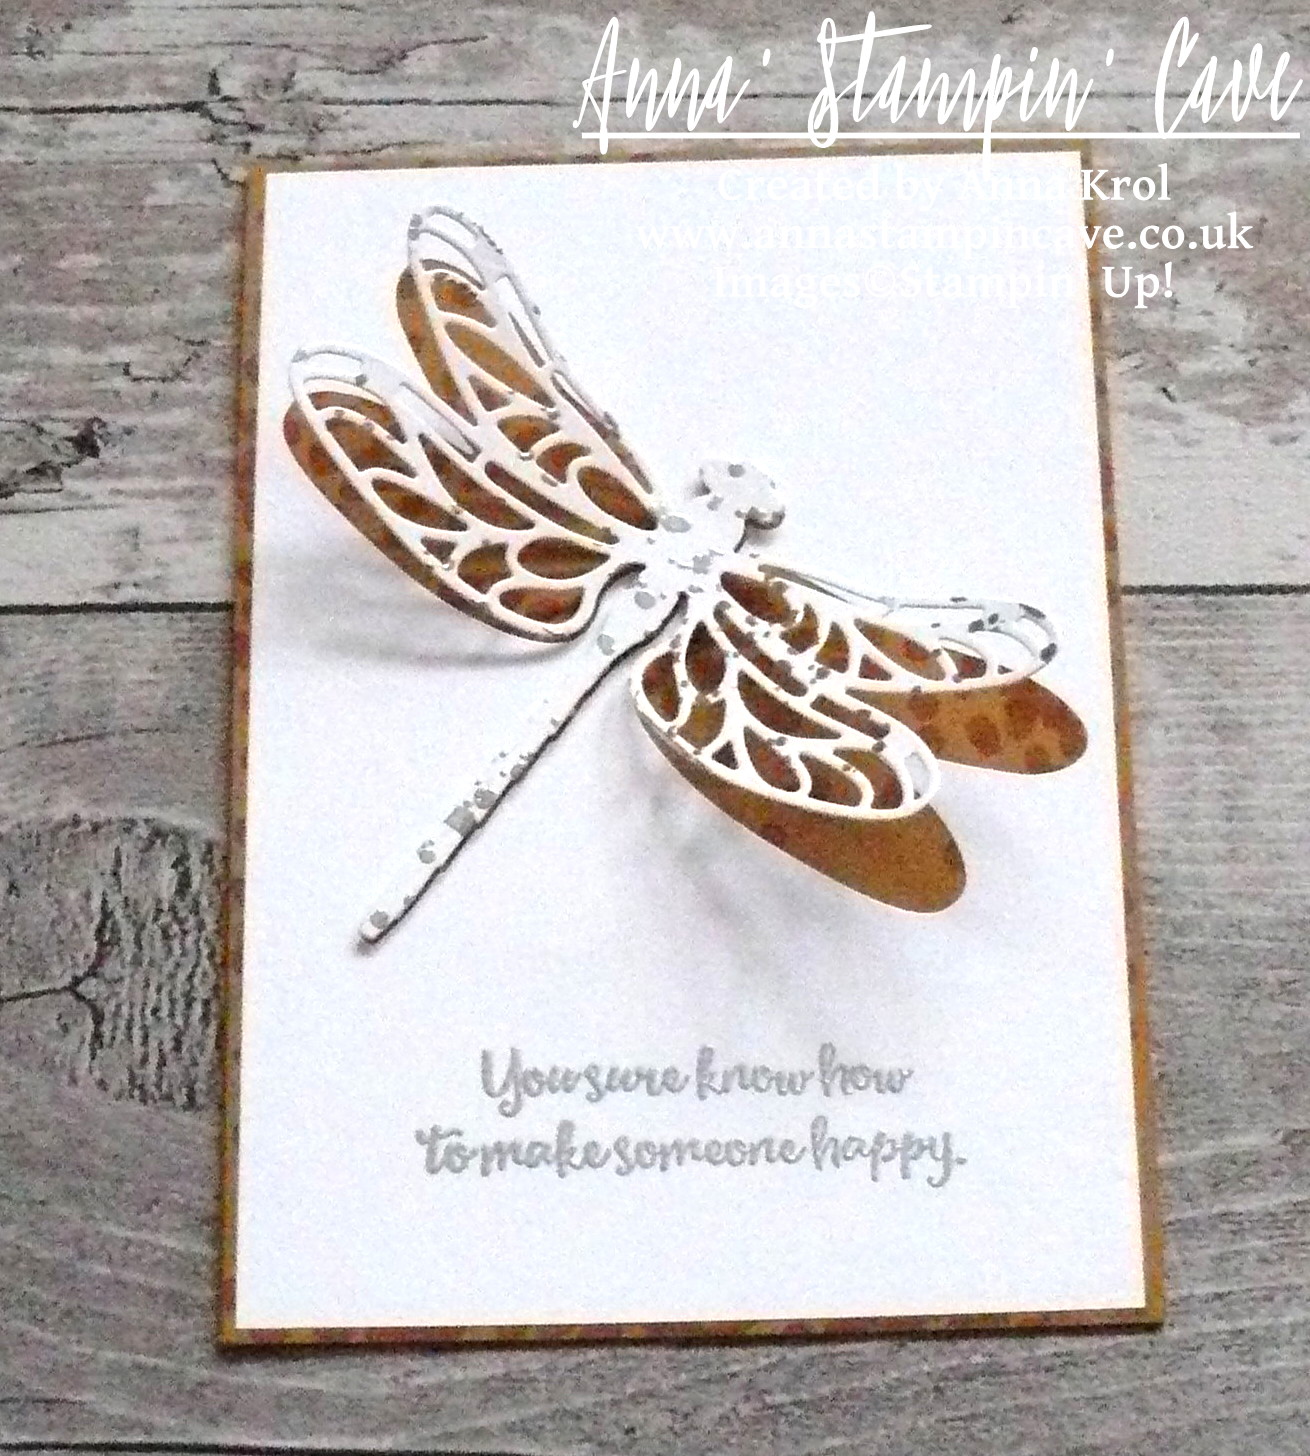
Next, I die-cut the largest detailed dragonfly, using Detailed Dragonfly Thinlits Dies, from one of the  Whisper White panels and adhered that panel (without dragonfly) to the card base. Of course, I forgot to stamp my sentiment before adhering the panel to the card front.  Typical, right?! LOL But nothing was lost yet. I picked the beautiful ‘You sure know how to make someone happy’ sentiment from Dragonfly Dreams Stamp Set (I love sentiments and the fonts in in this set) and heat embossed it on my card base with silver embossing powder. Seemed easy, but while heat embossing it, the base ‘curled up’ a bit. So I run it through my Big Shot to straighten it up. Bear in mind if you’ve got worn out plates they will leave an impression on your cardstock – ask how do I know.

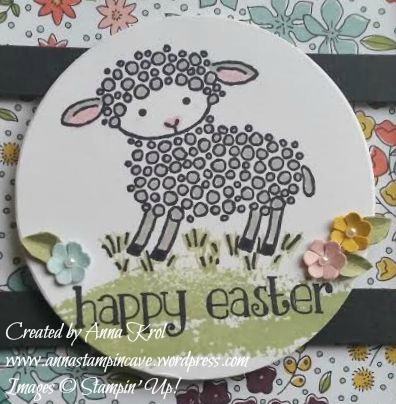
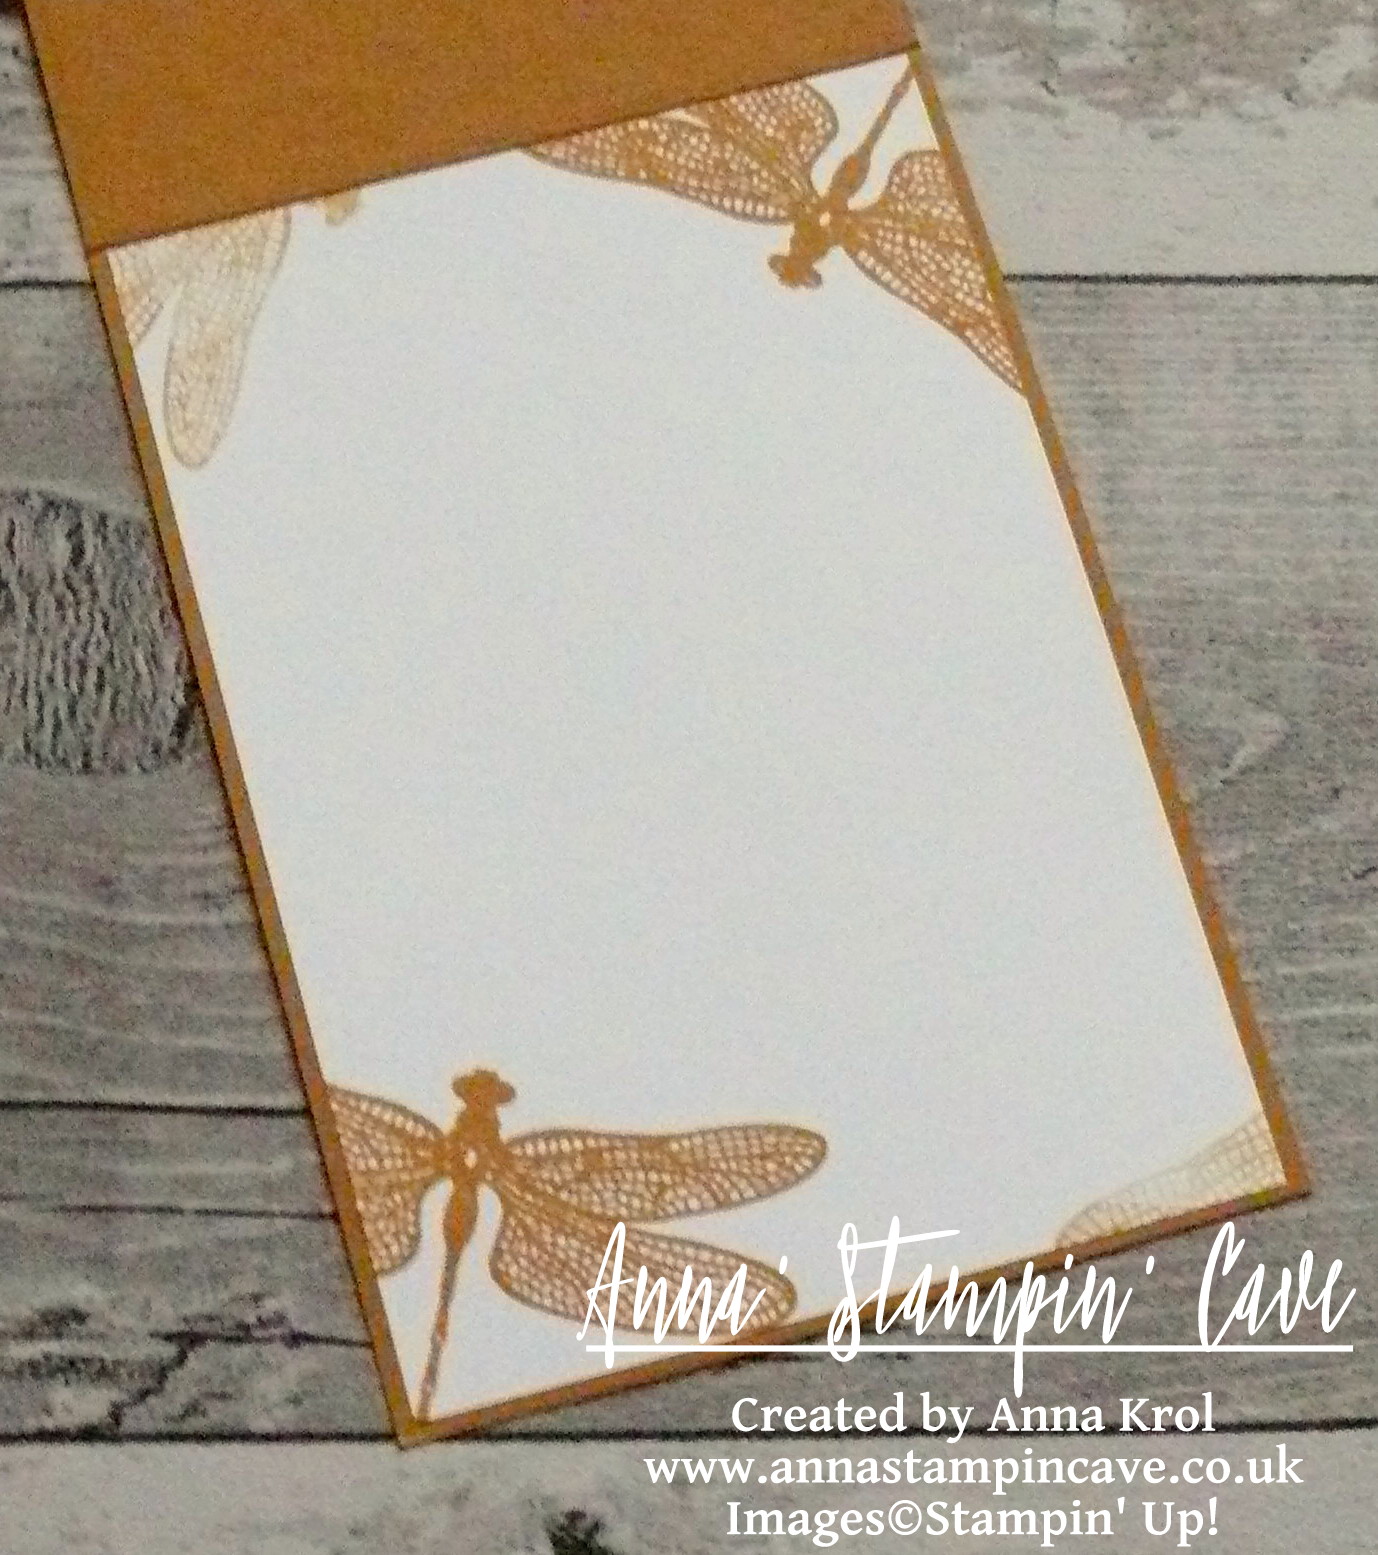
For the inside panel, I stamped few dragonflies in Delightful Dijon in the corners before adhered it with liquid adhesive.

anna-stampin-cave-stampin-up-dragonfly-dreams-bundle-clean-and-simple-card-inside

I wanted for my dragonfly to carry some silver detail too, so I stamped tiny splotches/dots from Gorgeous Grunge Stamp Set all over the die-cut, using Versamark ink, and heat embossed it with silver embossing powder.

Anna' Stampin' Cave Dragonfly Dreams Bundle Clean and Simple Card.JPG

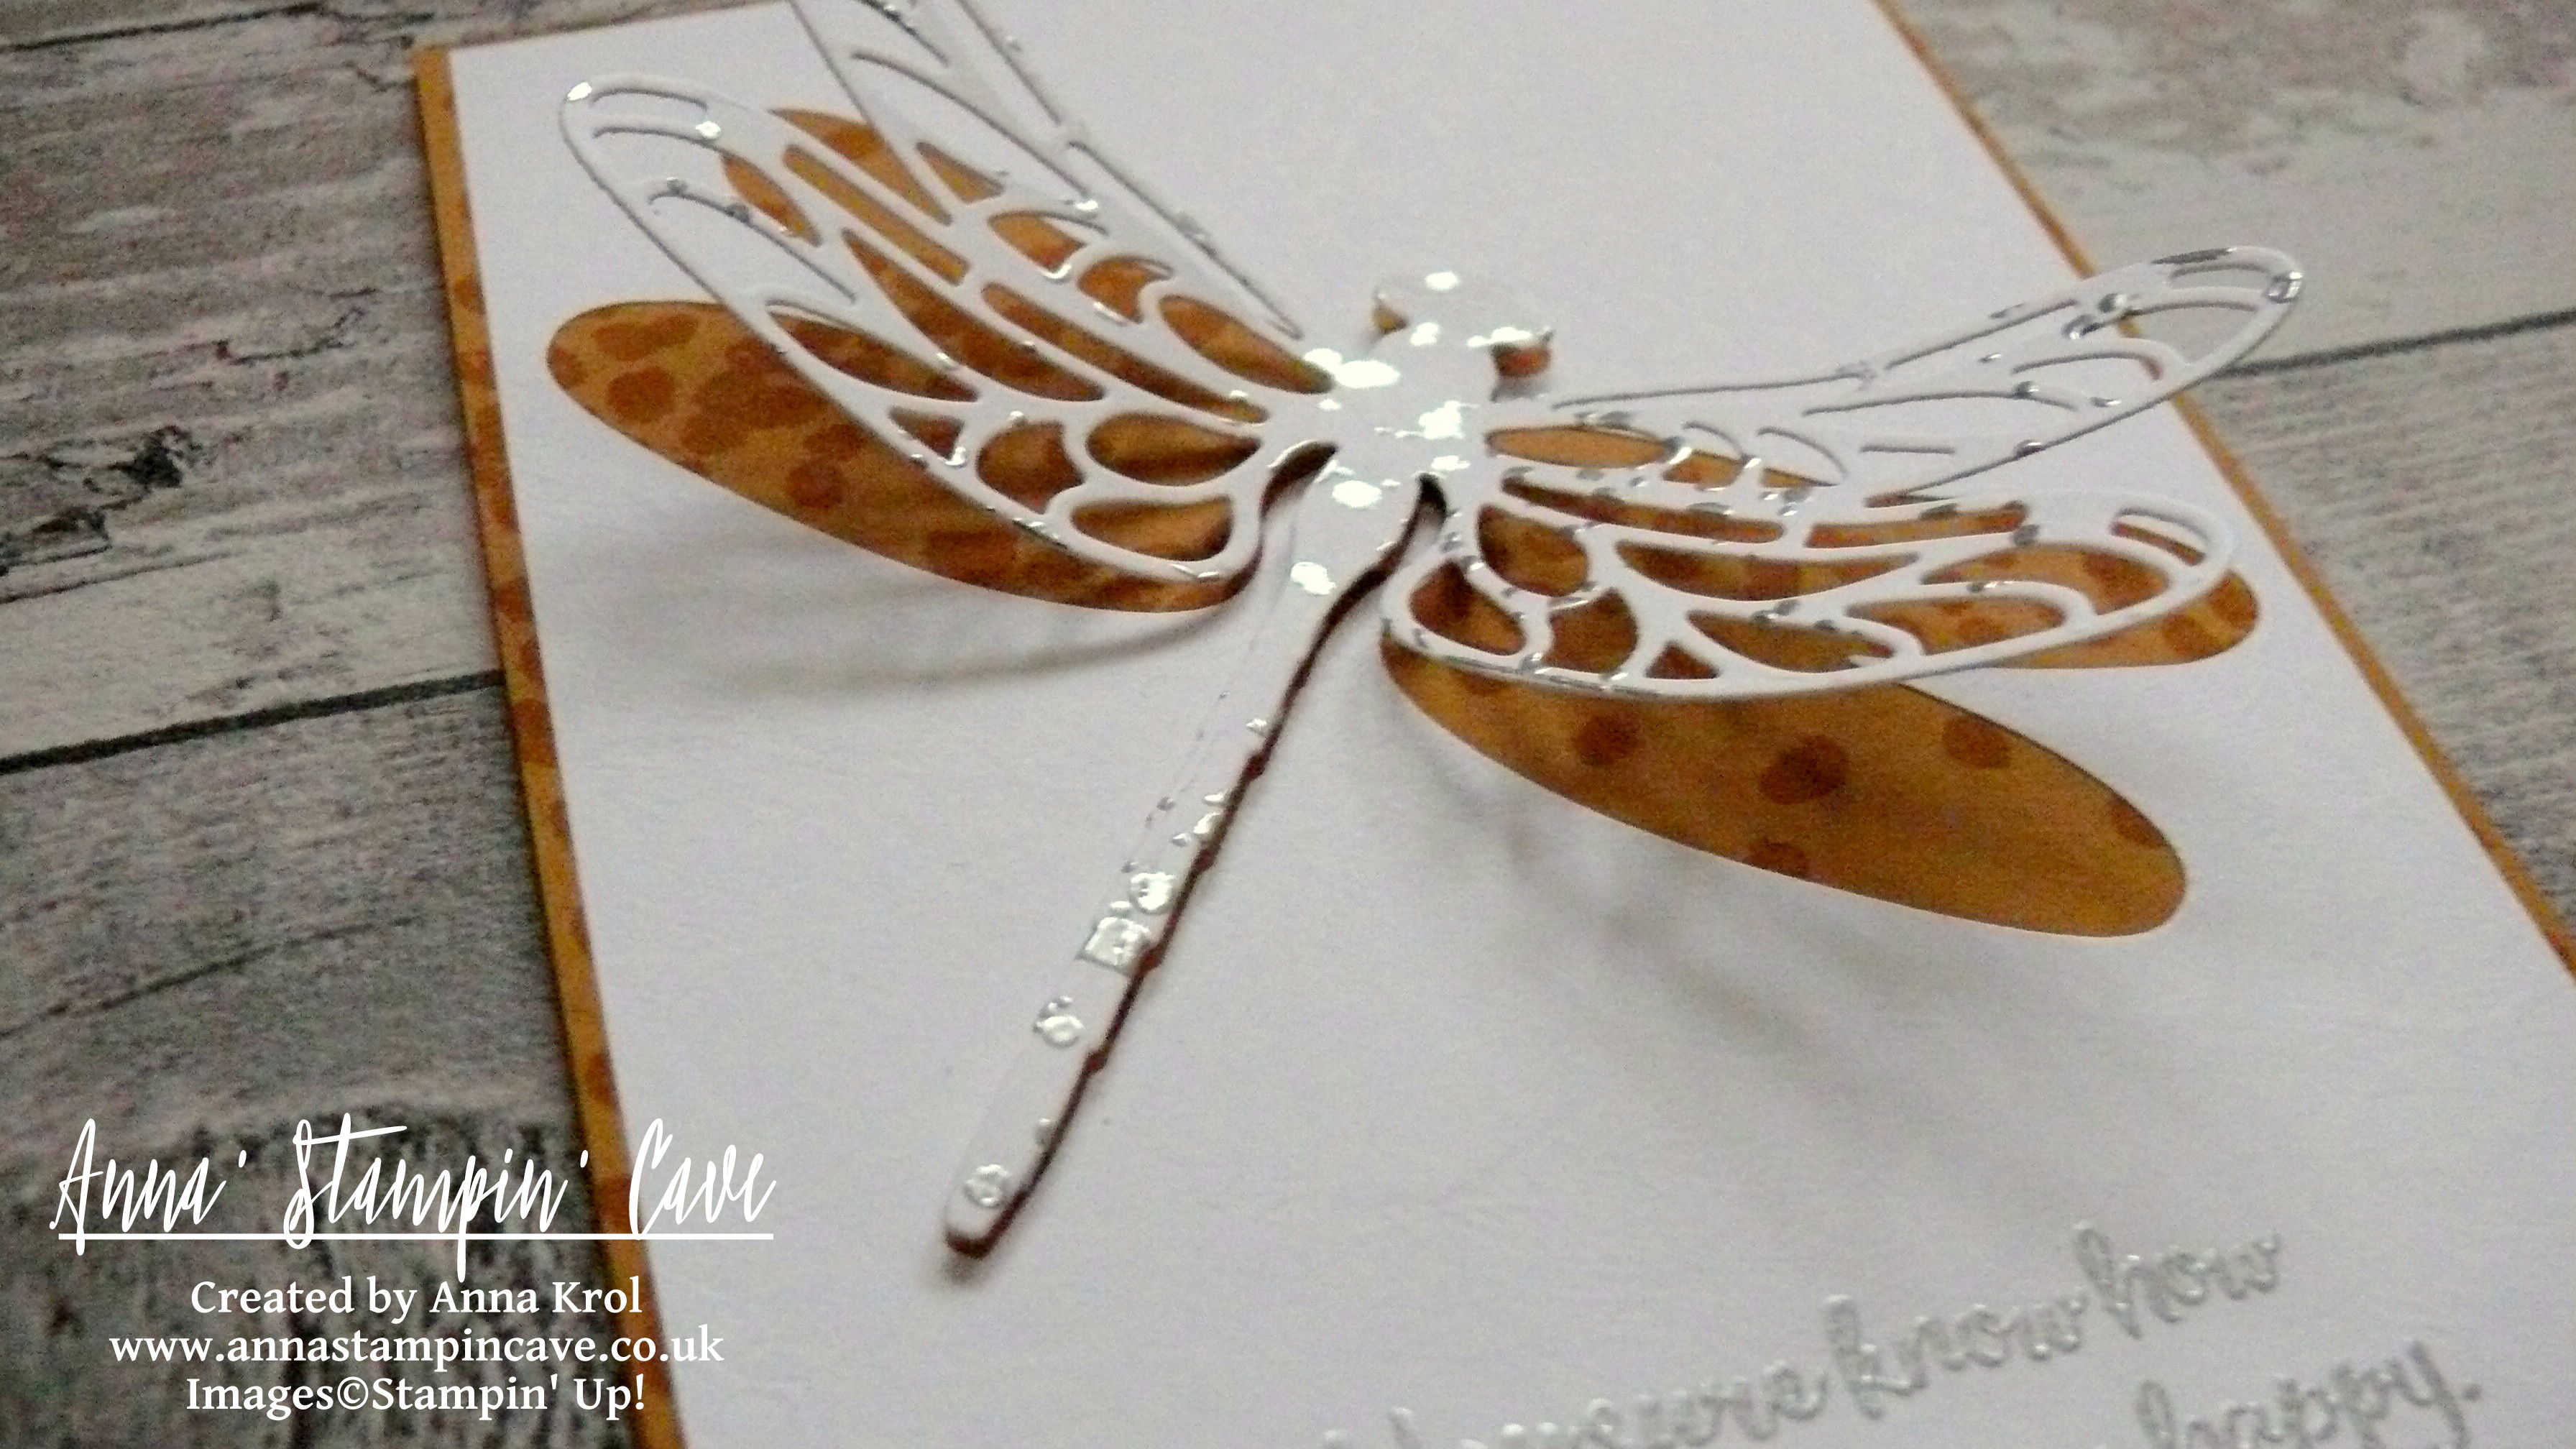
My original idea was to inlay the dragonfly die-cut back to the negative on the card base. But I’ve changed my mind along the way as the stamped detail on the card base wouldn’t be really visible through the die cut. So I decided to adhere my dragonfly only on the body length but it didn’t look good either. At the end, I’ve used tiny pieces of dimensionals to pop the dragonfly up.

anna-stampin-cave-stampin-up-dragonfly-dreams-bundle-cas

I’m really pleased how this card turned out and I hope you like it too.

I really want to encourage you to check the Global Design Project challenge blog. They have a new challenge every week with various themes and extremely talented Design Team – they will simply blow your mind with their creativity! Just click on their logo below to visit the website

gdp_blog_header

As always, if you wish to purchase any of the products I have used, simply click the images below to go directly to my online shop.

Thank you for stopping by and have a blessed day

Dragonfly Dreams Photopolymer Bundle

Dragonfly Dreams Photopolymer Bundle
[144728]
£42.25

Detailed Dragonfly Thinlits Dies

Detailed Dragonfly Thinlits Dies
[142749]
£28.00

Dragonfly Dreams Photopolymer Stamp Set

Dragonfly Dreams Photopolymer Stamp Set
[142924]
£19.00

Gorgeous Grunge Clear Stamp Set

Gorgeous Grunge Clear Stamp Set
[130517]
£18.00

Delightful Dijon A4 Cardstock

Delightful Dijon A4 Cardstock
[138345]
£7.25

Whisper White A4 Card Stock

Whisper White A4 Card Stock
[106549]
£8.25

Delightful Dijon Classic Stampin' Pad

Delightful Dijon Classic Stampin’ Pad
[138327]
£6.00

Embossing Buddy

Embossing Buddy
[103083]
£5.50

Versamark Pad

Versamark Pad
[102283]
£7.75

Silver Stampin' Emboss Powder

Silver Stampin’ Emboss Powder
[109131]
£4.50

Stampin' Dimensionals

Stampin’ Dimensionals
[104430]
£3.75

Liquid Multipurpose Glue

Liquid Multipurpose Glue
[110755]
£3.75

Stampin' Trimmer

Stampin’ Trimmer
[129722]
£27.00

Big Shot

Big Shot
[143263]
£99.00

Pootlers New Seasonal Catalogue Blog Hop – Thankful, Grateful, Blessed With Paisleys & Posies Bundle

pootler's blog hop

Thank you for joining us on another Pootlers Blog Hop! We’re showcasing lots of gorgeous projects using products from the new Stampin’ Up!® Autumn Winter Seasonal Catalogue. Simply use the buttons at the end of each post to keep hopping!

If you arrived here from lovely Louise’s blog, thank you for stopping by. I hope you enjoy seeing all these beautiful projects and inspiration and continue to hop on through to see what everyone has made.

For today’s project, I’ve been using new Paisleys & Posies Stamp Set with Paisley Framelits Dies, and these two are a part of beautiful Petals & Paisleys Product Suite. I used them to create a beautiful contemporary card and matching gift box.

I don’t know about you, but I just love paisley. It is such a trendy design right now, you can find it everywhere: from home decor, through fashion, art and more.

thankful-grateful-blessed-gift-set-with-paisleys-posies-bundle

For my card, I randomly stamped various images from Paisleys & Posies Stamp Set on a piece of Whisper White. It’s like creating your own DSP. To take off the guesswork, I’ve used the colours that coordinate with Petals & Paisleys Suite: Cajun Craze, Rich Razzleberry, Delightful Dijon, Mint Macaron, Soft Suede and Night of Navy.  I adhered it to my card base (Cajun Craze) and added a layer of vellum on the top, to soften the bold colours. Next, I cut a strip of Whisper White and stamped the sentiment from the same stamp set (love this font!), to the left in Cajun Craze. Backed it with a slightly wider piece of Cajun Craze cardstock, and adhered it to the card front. Using Paisley Framelits Dies, I die-cut two intricate leaves, one in Rich Razzleberry and one in Delightful Dijon, and add it to the panel. The final touch for the card was a tiny Rich Razzleberry bow I’ve made using one of the ribbons from new 3/8″ (1 cm) Ribbon Trio Pack.

thankful-grateful-blessed-card-with-paisleys-posies-bundle

Top tip 1: Glue dots are handy to adhere small elements like little bows. Top tip 2: There’s not such a thing as an invisible adhesive for when using vellum; be smart and hide adhesive under panels, die-cuts or embellishments. Savvy tip: To save the precious ribbon, tie a square knot straight from the spool.

For the gift box base, I’ve used, again, Cajun Craze cardstock. It’s really cute dinky little box, with the base being a 2-7/8 x 2-7/8″ square, and 1″ tall. Same as with the card, I created my own piece of DSP to decorate the box. Using dimensionals I slightly elevated the panel that goes on the top of the lid. But panels on the sides of my box are glued flat. Next, I’ve added a panel of vellum to the top of my box, followed by a little banner with a sentiment, and (again) leaves and a bow to match the card.

I don’t make boxes or gift sets too often, but I really like this one. I don’t know why. Perhaps for the autumnal colours and maybe for the paisley design. Whatever the reason, I hope you like it too.

Your next stop is lovely Jerim. Simply click the next button to keep hopping around all the blogs to see lots of new ideas and inspiration.
next pootler blog

previous pootler blog

Thank you for stopping by and have a blessed day,

Halloween Treat Holders With Popcorn Box Thinlits Dies

Hello, everyone! From today, for every Thursday, for the next 5 weeks, I’m gonna showcase My Hero Stamp Set by Stampin’ Up!Stampin' Up! My Hero Stamp Set

The stamp set is called ‘My Hero’ and what’s amazing about this particular set is that it’s a Ronald McDonald House Charities Stamp Set.

If you haven’t heard about it, here’s how it works: through the Making a Difference program, which Stampin’ Up! launched back in 2003, we partnered with Ronald McDonald House Charities (RMHC). Each year, Stampin’ Up! design an exclusive stamp set to promote the partnership with RMHC, and donate a portion of the proceeds from each sale of that set. To date over $1.5 million has been donated from RMHC stamp set sales!

But let’s get back to my project. For this week I’ve decided for something fun and created these Halloween treat holders using Popcorn Box Thinlits Dies.

Anna' Stampin' Cave Stampin Up Popcorn Box Die Halloween Treat Holders

Aren’t these cute?!! You won’t believe how quick and easy they are to make. For each holder, you only need one die-cut piece (for the box you need two). Next, you trim the larger flap, varnish well all the score lines and use a strong adhesive. I’ve used Tombow Multipurpose glue.

Anna' Stampin' Cave Stampin Up Popcorn Box Thinlit Dies Halloween Treat Holder

To create panels from Designer Series Paper you just simply die-cut the box and hand cut them following shallow lines created by the die.

For my treat holders, I’ve used two different colour combinations: Basic Black with Pumpkin Pie and Elegant Eggplant with Old Olive. I think these colours suit Halloween perfectly.

I’ve used ‘face’ stamp from My Hero Stamp Set, which I believe supposed to be a pumpkin face (!!?), and created these uber cute spiders. For their legs, I’ve used a wavy die from Popcorn Box Thinlits Dies. And yes, I know that spiders supposed to have 8 legs, but come on! These are mine and they only have six lol The sentiment is stamped using  Brushwork Alphabet Stamp Set and the panels underneath are just cut-outs I have left after die-cutting the box itself. These tiny strips of paper in my treat holders are also created using cut-offs. I love it – cute and frugal! For a final touch, I’ve added a piece of Metallic Foil Doily in Silver and also Basic Black and Silver Metallic Threads under the sentiment.

Anna' Stampin' Cave Stampin Up Popcorn Box Die Halloween Treat Holders Basic Black Pumpkin Pie

Elegant Eggplant with Old Olive treat holders I have turned into cute Frankenstein. For the hair, I die-cut a circle from a piece of Basic Black cardstock and gave him a trim with scissors. Not that I’m talented hairdresser but hey, for Frankenstein it’s just perfect.

Anna' Stampin' Cave Stampin' Up Popcorn Box Die Halloween Treat Holders Elegant Eggplant Old Olive

To create black doilies I took the smallest of Metallic Foil Dollies and deepen them in Basic Black Archival ink pad. Remember to set them aside for a while, as it takes some time before the ink dries. I also added few loops of Gold Metallic Thread under the doily. For the sentiment, I’ve stamped (randomly) ‘sweet treats’ from Teeny Tiny Sentiments Stamp Set on the diagonal white stripes. I put some purple tissue paper into my treat holders. I coloured the smallest dot from White Perfect Accents, using a golden sharpie – it holds the overhung tissue paper in place.

Anna' Stampin' Cave Stampin Up Popcorn Box Die Halloween Treat Holders Pumpkin Pie Basic Black

Anna' Stampin' Cave Stampin Up Popcorn Box Die Halloween Treat Holders Old Olive Elegant Eggplant

So here they are! I really hope you like my little project and that you will try to make these cute treat holders yourself. These would be super cute for Christmas treats too.

Thank you for stopping by and have a blessed day,

Swirly Scribbles See-Through Window Shaker Card

Anna’ Stampin’ Cave – Simply Sketched Saturday Challenge – Swirly Scribbles See-Through Shaker Card

SSSC Header

Thank you for joining us for another Simply Sketched Saturday Challenge!  We’re so excited to be sharing this hop with you. The products used are all available in the current Annual, or seasonal, Stampin’ Up!®  Catalogues*. Simply use the buttons at the bottom of the post to keep hopping!

The sketch we’re working today with was designed by talented Keren Howell.

SSSC 11

I really like this sketch. And funny how many cards I created recently could fit this sketch perfectly. But today I wanted to make something slightly different: a see-through window shaker card.

Swirly Ccribbles See-Through Window Shaker Card

Don’t you just love Playful Palette Designer Series Paper Stack?! 48 sheets of such fun designs! I couldn’t decide which one to choose. But because I wanted to use Sweet Sugarplum cardstock for my base, these fun, wonky squares were perfect.

I cut out the window in my base first. Next, I traced the “window” on my DSP and cut it out too. Save that piece as you will need it later. I’ve used our new Foam Adhesive Strips to create the shaker. I added them around the window on the base and adhered a piece of acetate. I’ve used more foam strips around the base to adhere my piece of DSP. To finish my shaker window, I added black sequins and adhered another piece of acetate on the inside of the card.

Swirly Ccribbles See-Through Window Shaker Card 2

For the inside, I’ve used a Very Vanilla panel and a piece of DSP that I cut out when creating the window. But this time I’ve used the reverse side of that DSP. The placing is the key, so when the card is closed, you can see that piece through the window. The sentiment “It’s Your Day” was stamped in Basic Black Archival Ink, using Labeler Alphabet Stamp Set (which I truly love). And yes, I stamped it wonky on purpose 😉

Swirly Ccribbles See-Through Window Shaker Card inside

When the shaker bit and the inside of the card were done I could concentrate on the front. I die-cut two wreaths using Swirly Scribbles Thinlits Dies. One in Basic Black, and one in Very Vanilla. I glued them together slightly off-setting, so the Very Vanilla is peeking from underneath. I adhered it to the base with Multipurpose Liquid Glue. My sentiment, again, was stamped using Labeler Alphabet Stamp Set. I stamped it on a piece of Very Vanilla, and hand-cut it leaving a little border around the letters. Adhered it with liquid glue.

For embellishments, I’ve used White Perfect Accents, which I coloured black using a permanent marker. And that finish off my card.

Do you like my project?! If so please leave me a comment. I would love to hear from you!

Now, be sure to hop along and see more inspiring projects. Your next stop is Helen’s blog  go and see what she has made for you.

Thank you for stopping by and have a blessed day,


SSSC Previous   SSSC Next Blog

Simply Sketched Saturday Challenge Blog Hop #8 – Easter Lamb At Wildflower Fields

Simply Sketched Saturday Challenge Blog Hop #8 – Easter Lamb At Wildflower Fields

SSSC Header

Thank you for joining us for another Simply Sketched Saturday Challenge!  We’re so excited to be sharing this hop with you. The products used are all available in the current Annual, or seasonal, Stampin’ Up!®  Catalogues*. Simply use the buttons at the bottom of the post to keep hopping!

I really like today’s sketch designed by lovely Justyna from Perfect Crafts.

SSSC 8

Don’t you just love it?! I had so many ideas for this sketch, I couldn’t decide which way to go. But I really wanted to use super cute Easter Lamb stamp as my focal point. So here’s my take on the sketch:

Easter Lamb

My very first idea for this sketch was to make a shaker card. So I created a frame for my card first. I’ve used foam adhesive at the back of my frame – you could use Stampin’ Dimensionals too. But because I only have the metallics sequins at this moment, and I really didn’t want to go into silver/gold colour theme, I gave up this idea. But then I thought: hey, you can still use the “frame” to create a dimensional layout.

Easter Lamb 2

I had some leftover pieces of Wildflower Fields DSP, so I cut three strips and adhered them to the card base, beneath my frame. I stamped Easter Lamb in Stampin’ Up! Black Archival ink on a piece of Whisper White, and die-cut it using the middle circle from Circles Collection Framelits. I’ve used Stampin’ Write Markers to add some colour to my little cutie: Pink Pirouette for ears, nose and cheeks, Sahara Sand for wool and Pear Pizzazz for grass. I also stamped some grassland using swoosh stamp from Sheltering Tree.

Easter Lamb 3

To make it even cuter I punched few tiny flowers in Blushing Bride, Daffodil Delight and Pool Party using Tree Builder Punch. I’ve made a little cut between each petal to add some extra dimension to my flowers. I also punched few raindrops using the same punch and Pear Pizzazz cardstock and turned them into tiny leaves for my flowers. To finish off my card I added smallest of the Pearl Basic Jewels to the centre of each flower. For the inside, I stamped beautiful sentiment from Suite Sayings.

Easter Lamb 4

I would love to hear from you. Do you like my take on the sketch?

Now, be sure to hop along and see more inspiring projects. Your next stop is Karen’s blog  go and see what she has made for you.

Thank you for stopping by and have a blessed day!

SSSC Previous   SSSC Next Blog