Stampin’ Dreams Blog Hop – Party Pandas Valentine

Anna’ Stampin’ Cave Party Pandas Valentine For Stampin’ Dreams Blog Hop

Hello everyone! Welcome to the monthly Stampin’ Dreams Blog Hop. This month’s theme is Love. You are currently visiting Anna Krol from United Kingdom. I hope you enjoy my project. It’s my first time ‘hopping’ with Stampin’ Dreams crew. And I’ve got for you the most adorable love card EVER! Even if I do say so myself haha

Party Pandas card dimensions:

  • Basic Black cardstock: 11-6/8″ x 4-1/8″ scored in half at 5-7/8″ (29.7 x 10.5 cm scored in half at 14.8 cm)
  • Lemon Lime Twist cardstock: 3-1/2″ x 5-1/4″ (8.9 cm x 13.4 cm)
  • Whisper White cardstock: 2-1/2″ x 4″ (6.4 cm x 10.2 cm)
  • Watercolour Paper
  • Whisper White cardstock for the inside of the card: 3-1/2″ x 5-1/4″ (8.9 cm x 13.4 cm)

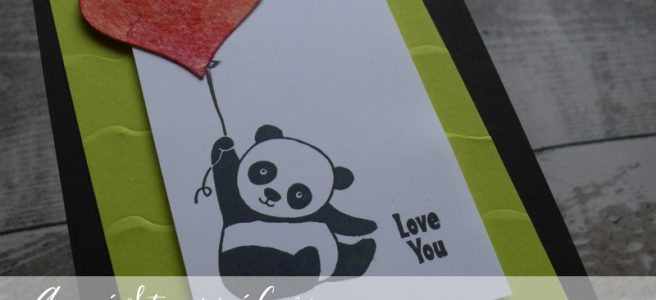
When I saw a theme of this month’s blog hop I instantly knew which stamp set I will use. Isn’t this panda adorable?! Especially with its slightly oversized heart balloon!

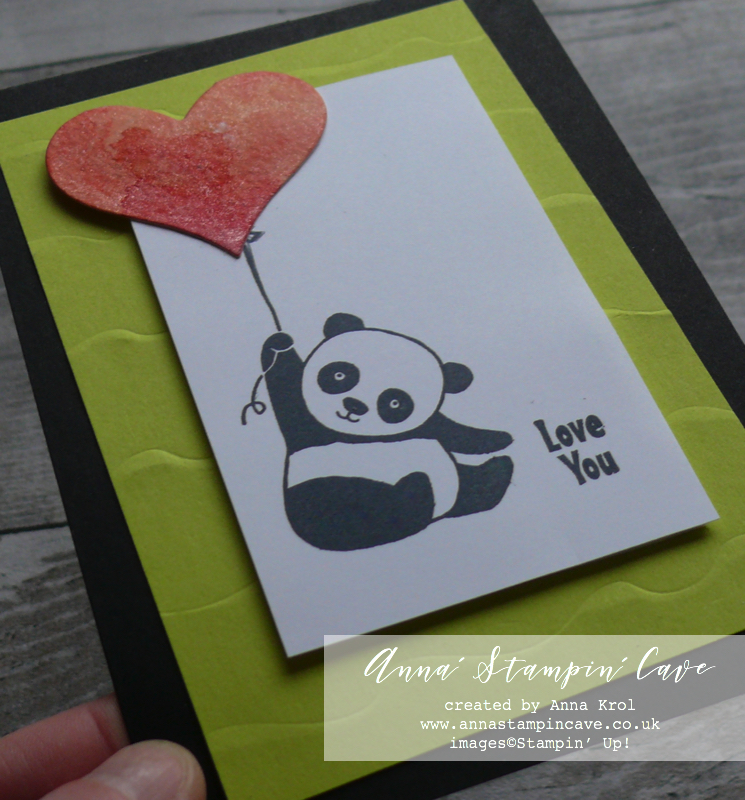
The base of my card is standard A6 size in Basic Black. For the first layer I took a piece of Lemon Lime Twist cardstock, spritz it with water to soften the fibres, and run it through the Big Shot with lovely Ruffled Dynamic Textured Impressions Embossing Folder. I adhered it to the card base with Fast Fuse

Next, I inked my panda (I didn’t ink the balloon part) with Black Memento ink and stamped it onto Whisper White. With help of Stamp-a-ma-jig I positioned and stamped the sentiment ‘love you’ from the same stamp set.

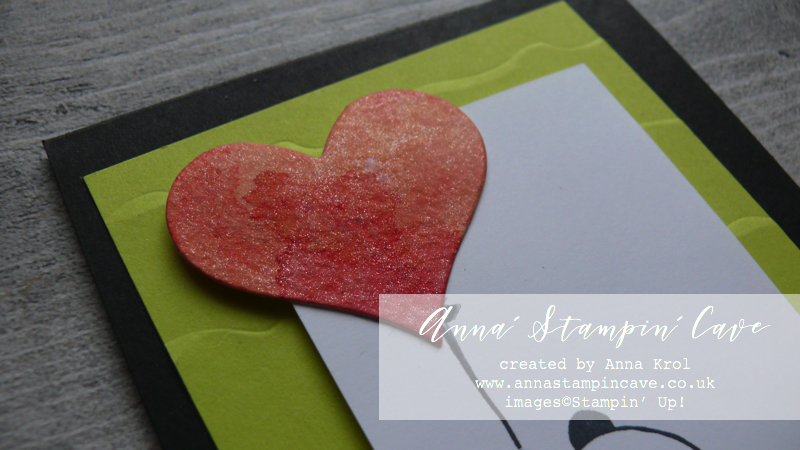
Using watercolour paper and Brusho Crystal Colour in Brilliant Red and Gamboge, I created a watercolour wash. Once it dried, I took the heart die from Mini Treat Bag Thinlits Dies, die-cut my balloon and added some shimmer with Clear Wink of Stella.

I glued my heart to the panda, where the balloon was and adhered the whole piece to the card base using dimensionals.

I’m really happy how this card turned out! Love the colours, dimension but most of all this adorable panda. And I hope that my card inspired you & brightened your day. I would love for you to see the list below & hop through all of the lovely artists on the list to see all our projects. You don’t want to miss any!

I’m also entering this card at

If you wish to purchase any of products I have used, simply click the images below to go directly to my online store and don’t forget to enter the hostess code for the month of January GK3G3AR3 to receive a gift from me.

Thank you for stopping by and have a blessed day


Hostess Code for January 2018 GK3G3AR3 Use this code in the month of January and receive a gift from me.

Special Notes:1) Make sure you select Anna Krol as your demonstrator;
2) If you select “No Contact” box I do not have access to your name and can’t send you a gift;
3) If your order is £150

Aqua Painters

£15.50

Big Shot

£99.00

Don’t forget to check:

Spring Summer Catalogue Paper & Ribbon Shares. Shares are open to Austria, France, Germany, Netherlands & United Kingdom. 102 sheets of DSP & 2 yards of each type of ribbon from Spring/Summer Catalogue. Click here for more details —>

The New Stampin’ Up! Spring/Summer 2017 Catalogue and Sale-A-Bration is LIVE and it’s AMAZING! For every 60 €/£45, you spend either from Spring Summer Catalogue or Annual Catalogue, you will get to choose one FREE  level 1 product from SAB brochure! If you spend 120 €/£90, you get one FREE level 2 product, OR, you can choose two level 1 items. If you spend 180 €/£135, you have the option to choose three level 1 items or one level 1 item and one level 2 item. Click here for more details —>

Today Is All About You Card Using Beautiful Peacock Stamp Set

Anna’ Stampin’ Cave – Today Is All About You Card Using Beautiful Peacock Stamp Set

Hello and thanks for stopping by today!

Today I’ve got for you lovely card using Beautiful Peacock Stamp Set. Did you know that during Sale-A-Bration you can earn this stamp set (and many other goodies) for FREE?! You can check all the details HERE –>

Today Is All About You card dimensions:

  • Night Of Navy cardstock: 11-6/8″ x 4-1/8″ scored in half at 5-7/8″ (29.7 x 10.5 cm scored in half at 14.8 cm)
  • Whisper White cardstock two panels: 5-1/2″ x 3-7/8″ (14.1 cm x 9.9 cm)
  • Pool Party cardstock: 2-7/8″ x 2-7/8″ (7.3 cm x 7.3 cm)
  • Whisper White cardstock piece for the stamping

Night of Navy and Melon Mambo (together with Cherry Cobbler) are the colours I use and like the least, from Stampin’ Up! colour families but it’s good to challenge yourself once in a while to do something differently. And this unusual for me colour combination comes from The Color Throwdown Challenge #475.

This card was pretty easy to put together. First, I prepared my base by cutting and scoring a piece of Night of Navy cardstock. Next, I stamped Watercolor Wash background stamp on one of my Whisper White panels in Night of Navy ink.

Tip: To get good, even stamped image with large background stamps use paper to stamp technique. Just put your stamp on your work surface, image facing up, ink it well, and press your cardstock to the inked image, face down. Use some scratch paper to rub over the top. Make sure you apply pressure around the corners too, so that it’s even. When it’s done just lift your cardstock. Perfectly stamped background every each time.

It’s especially helpful technique if you suffer some medical conditions, like arthritis or like me – I lost the feeling sensations in my arms and hands three years ago, after one of the MS relapses, and since it’s really for me to hold anything heavy. Or even ultimately heavy. This technique is a real …umm… ‘craft-saver’?! haha, you know what I mean.

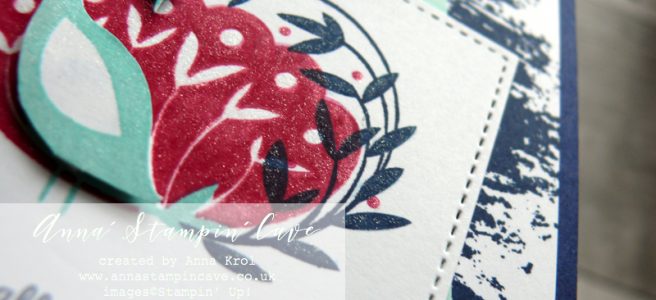
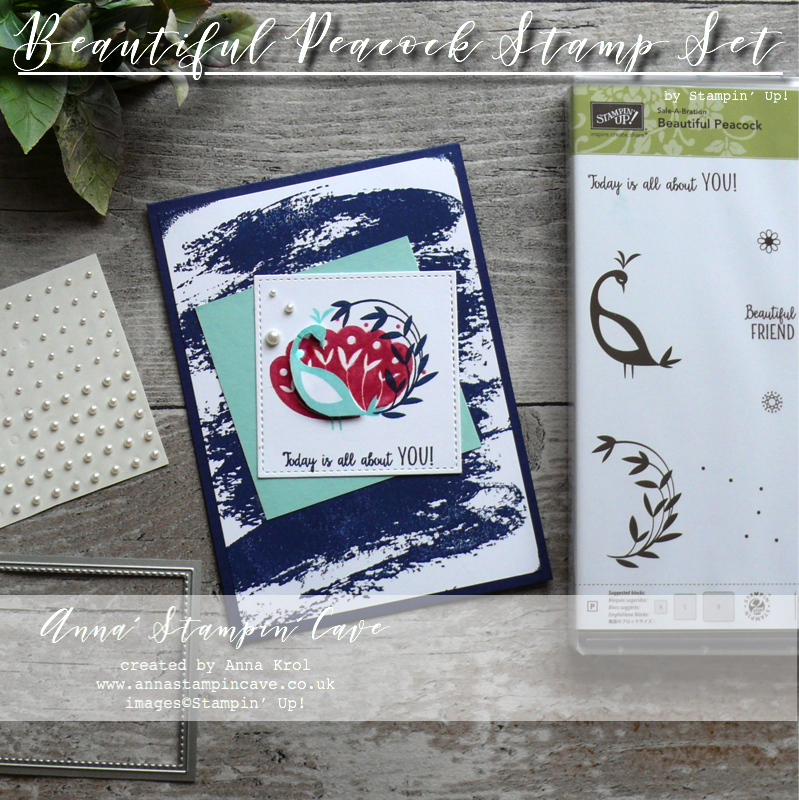
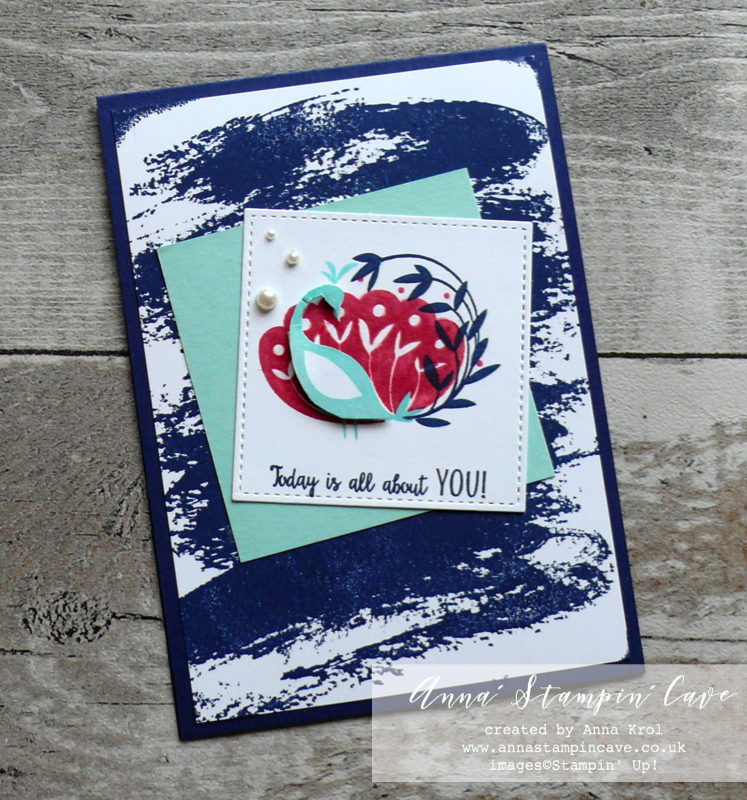
Once I had my background out of the way I stamped the peacock in Night of Navy, Melon Mambo and Pool Party, on a piece of Whisper White cardstock. I’ve used Stamp-a-ma-jig to help line-up all the images. Next. I die-cut the image using the largest square from Stitched Shaped Framelits Dies (2-5/8″ x 2-5/8″ [6.6 cm x 6.6 cm]) and stamped my sentiment in Night of Navy.
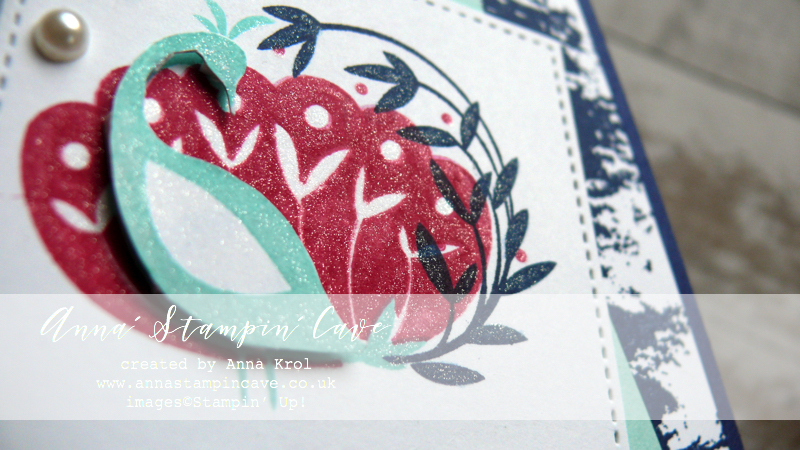
I also stamped the body of the peacock separately, fussy cut it and added to the image with dimensionals. To jazz-it-up, I’ve added lots of shimmer with Clear Wink of Stella to this little guy. Three little pearls finish off the card.

I hope you like my little card. If you wish to purchase any of products I have used, simply click the images below to go directly to my online store and don’t forget to enter the hostess code for the month of January GK3G3AR3 to receive a gift from me.

Thank you for stopping by and have a blessed day


Hostess Code for January 2018 GK3G3AR3 Use this code in the month of January and receive a gift from me.

Special Notes:1) Make sure you select Anna Krol as your demonstrator;
2) If you select “No Contact” box I do not have access to your name and can’t send you a gift;
3) If your order is £150 or more do not use the code and grab your own Stampin’ Rewards + gift from me

Clear Block F

£15.50

Big Shot

£99.00

Don’t forget to check:

Spring Summer Catalogue Paper & Ribbon Shares. Shares are open to Austria, France, Germany, Netherlands & United Kingdom. 102 sheets of DSP & 2 yards of each type of ribbon from Spring/Summer Catalogue. Click here for more details —>

The New Stampin’ Up! Spring/Summer 2017 Catalogue and Sale-A-Bration is LIVE and it’s AMAZING! For every 60 €/£45, you spend either from Spring Summer Catalogue or Annual Catalogue, you will get to choose one FREE  level 1 product from SAB brochure! If you spend 120 €/£90, you get one FREE level 2 product, OR, you can choose two level 1 items. If you spend 180 €/£135, you have the option to choose three level 1 items or one level 1 item and one level 2 item. Click here for more details —>


Global Design Project #120 Case The Designer Challenge

Anna’ Stampin’ Cave – Global Design Project #120 Case The Designer Challenge

Hello and welcome! Finally, I’ve found some time to have a play with this new & fun Bubble Over bundle from Spring Summer Catalogue. And as my inspiration, I have used beautiful card created by amazingly talented Canadian demonstrator, Krista Frattin.

CASE = Copy And Selectively Edit

And here’s my card:

Bubble Over card dimensions:

  • Whisper White Thick cardstock: 11-6/8″ x 4-1/8″ scored in half at 5-7/8″ (29.7 x 10.5 cm scored in half at 14.8 cm)
  • Sky Blue cardstock: 5-3/8″ x 3-5/8″ (13.7 cm x 9.2 cm)
  • Whisper White cardstock: 5-2/8″ x 3-1/2″ (13.3 cm x 8.8 cm)
  • Whisper White for sentiment: 6/8″ x 3″
  • White Vellum and Soft Sky cardstock for die-cutting
  • Whisper White 1/4″ Organza & Gold 1/8″ Ribbon: approx. 7″ each

First, I sponged the bottom of Whisper White panel with Soft Sky ink. To add some more interest to the background I lightly sprinkled the panel with water using big, dry brush.

I die-cut two bottles from the vellum. First I thought about creating ‘labels’ for my bottles, but I end up stamping straight onto the die-cuts. For this I’ve used two circle stamps from Bubble Over Stamp Set, one with a star and and second with ‘yay’ in the middle. You can’t really see it as it’s hidden under the banner. I also die-cut two straws from Soft Sky cardstock.

I played a bit with the placing of my elements and once I was happy, I assembled the card.

For the final touch I’ve scattered some clear epoxy shapes from the Glitter & Clear Epoxy Shapes, also new from Spring Summer Catalogue. You will get 176 elements in the pack: 1 sheet each (clear and with glitter).

Purchase this amazing Bubble Over Photopolymer Bundle, add Glitter & Clear Epoxy Shapes and Whisper White 1/4″ Organza Ribbon to your oreder and you will earn for FREE level 1 product from Sale-a-bration Brochure.  Like this cute Designer Series Paper Bubbles & Fizz, that coordinates with Bubble Over Bundle. 

Above is just an idea, but you can add any product you wish from the brochure.

I really want to encourage you to visit the Global Design Project challenge blog to see other beautiful projects from all around the world. Just click on the logo below to visit their website

If you wish to purchase any of products I have used, simply click the images below to go directly to my online store and don’t forget to enter the hostess code for the month of January GK3G3AR3 to receive a gift from me.

Thank you for stopping by and have a blessed day

Big Shot

£99.00


Hostess Code for January 2018 GK3G3AR3 Use this code in the month of January and receive a gift from me.

Special Notes:1) Make sure you select Anna Krol as your demonstrator;
2) If you select “No Contact” box I do not have access to your name and can’t send you a gift;
3) If your order is £150 or more do not use the code and grab your own Stampin’ Rewards + gift from me

Don’t forget to check:

Spring Summer Catalogue Paper & Ribbon Shares. Shares are open to Austria, France, Germany, Netherlands & United Kingdom. 102 sheets of DSP & 2 yards of each type of ribbon from Spring/Summer Catalogue. Click here for more details —>

The New Stampin’ Up! Spring/Summer 2017 Catalogue and Sale-A-Bration is LIVE and it’s AMAZING! For every 60 €/£45, you spend either from Spring Summer Catalogue or Annual Catalogue, you will get to choose one FREE  level 1 product from SAB brochure! If you spend 120 €/£90, you get one FREE level 2 product, OR, you can choose two level 1 items. If you spend 180 €/£135, you have the option to choose three level 1 items or one level 1 item and one level 2 item. Click here for more details —>

Watercolour Wash Using Colorful Seasons Bundle For #GDP088

Phewww! Finally, some air in the air after a heat wave we experienced lately. Don’t get me wrong: I love summertime. I’m just not a fan of hot weather when you can’t do any activity without gasping for the air. And how funny it may sound, in the UK 26C is hardly bearable. But today I woke up very early to the amazingly fresh breeze. I jumped out of bed (well not literally as I still can hardly walk), fixed some quick breakfast to take my medications, got my Bible study done (book of Judges – loveee) and off I go to my ‘cave’ before the ‘house’ woke up.

Since over a week, I’ve been ‘dying’ to crack open the Colorful Seasons Photopolymer Stamp Set and coordinating Seasonal Layers Thinlits Dies. And what a better excuse (not that I need one haha) than taking a part in Global Design Project. Especially that this week we are CASE’ing extremely talented, Shawn De Oliveira.

Rose Wonder Stamp Set and Rose Garden Thinlits Dies are one of my favourites from 2016-17 catalogue and I’m really happy that they are staying with us for another year (at least). But for my project today I really wanted to ‘play’ with new products.

What I ‘borrowed from Shawn’s card is the colour combination of soft pink and green with a touch of gold. And because I had all my supplies out I’ve made not one but six cards. Since a couple of months, I belong to amazing facebook group Random Act Of Kindness, where each month we are sending cards to random recipients. ‘It is more blessed to give than to receive.’ (Acts 20:35)

Colorful Seasons card dimensions:

  • Whisper White Thick cardstock card base: 11-6/8″ x 4-1/8″ scored in half at 5-7/8″ (29.7 x 10.5 cm scored in half at 14.8 cm)
  • Shimmery White cardstock: 3-1/2″ x 4-1/8″ (8.9 cm x 10.5 cm)
  • Old Olive cardstock two stripes: 4-1/8″ x 7/16″(briefly) and 4-1/8″ x 1″ (10.5 cm x 1.2 cm and 10.5 cm x 2.6 cm)
  • white cardboard from the back of DSP: 4-1/16″ x 2-1/2″ (10.4 cm x 6.3 cm)

I started with creating a scalloped edge to my card base. On the front of the card base, I measured 1″ from the bottom, centred the scallop edge die and secured it with a piece of washi tape (so it won’t shift) and run it through the big shot. Next, using the same die I created a scalloped edge on the wider strip of Old Olive cardstock.

For the watercolour wash, instead of watercolour paper, I’ve used Shimmery White cardstock. It’s beautiful on its own but great for light watercolouring too; plus gives your work delicate shimmery look (hence the name).

Watercolour tip: While your ink pad is closed give the lid a gentle squeeze. It will transfer a little pool of ink from the ink pad into the lid.  Open your ink pad. Now you can pick up the ink with your aqua painter or with the tip of your blender pen.

I took aqua painter and I wet the surface of my panel slightly. I didn’t add the water to the entire piece, just to the centre. I picked some Blushing Bride ink with my aqua painter and I’ve done a quick wash of colour over the panel. Dried it with my heat tool.

When the panel was completely dry I rubbed it with embossing buddy to make sure embossing powder won’t stick where it shouldn’t. I stamped the sentiment and maple leaves with Versamark ink, covered them with gold embossing powder and heat set it.

I adhered Old Olive stripes behind the watercoloured panel with liquid adhesive. And now the #facepalm moment: paper + water = warping! …what was I thinking?! To rescue my watercolour pieces: strengthen and straighten them up, I cut rectangles from the white cardboard (I always save backings from DSP) and adhered them behind the panels, between two Old Olive pieces, with a fast fuse.

I assembled my cards with liquid glue. For a final touch, I decided to add few rhinestones. And that’s my cards done.

As always, I really want to encourage you to visit the Global Design Project challenge blog to see other beautiful projects from all around the world. Just click on their logo below to visit the website

Thanks for visiting my blog today. Have a blessed day

Rustic Best Birds For Global Design Project #084 Challenge

Anna’ Stampin’ Cave – Rustic Best Birds For Global Design Project #084 Challenge

Hello and welcome everyone! Today I’m back with my entry for Global Design Project. This week is Case The Designer Challenge over at GDP and we’re casing wonderful Michelle Last. I have to admit I absolutely love Michelle’s style. She’s an incredible artist and amazing person too (I had the privilege to meet her in person a few years back).

It’s a beautiful card to CASE: clean & simple with lots of yummy texture. But I didn’t really want to follow the colour combination or the layout of Michelle’s card (but as you will see I failed miserably as I ‘accidentally’ cased the layout anyway haha ). For my card, I decided to focus on a couple of products she used instead: Best Birds Stamp Set and coordinating Birds & Blooms Thinlits Dies.

Rustic Best Birds card dimensions:

  • Crumb Cake cardstock: 8-1/4″ x 5-7/8″ scored in half at 4-1/8″ (21cm x 14.8 cm scored in half at 10.5 cm)
  • Crumb Cake cardstock: 4-1/8″ x 5-6/8″ (10.2 cm x 14.6 cm)
  • Whisper White cardstock for stamping & die cutting
  • Pool Party cardstock: 3/8″ x 4-3/8″
  • Burlap Ribbon: approx 5-6/8″ (14.6 cm)

I don’t know about you, but when I first saw this stamp set it has called countryside to me. I only bought this bundle a few weeks ago and was really eager to have a play. So this week’s challenge was perfect for inking up my stamp for the first time.

First, I created the background for my ‘idyllic’ scene. I took Crumb Cake panel and stamped it with Hardwood background stamp in Soft Suede. I also sponged the edges of the panel with Soft Suede ink to add to the ‘rustic feel’.

Next, I stamped and die cut all the elements of my scene. The bird is stamped using Crumb Cake ink. Flowers – Pool Party. For little berries/fruits, I’ve used Pear Pizzazz. Branch is stamped in Soft Suede ink and coloured in with markers: Crumb Cake for the branch and Pear Pizzazz for leaves.

I love this sentiment “It’s a good day” from Best Birds Stamp Set. I stamped it in Soft Suede on a piece of Whisper White cardstock and die cut using an oval die from Stitched Shapes Framelits Dies. I think stitched edge suit rustic ‘feel’ of this card just perfectly.

Before I assembled my card I played a little with a placement of all the elements. To add some ‘natural’ texture I decided to use Burlap Ribbon as a banner. I also cut a thin strip of Pool Party cardstock to ‘break’ all the browns. When I was happy with the placement, I took a photo and started the assembly.

Tip: If you have a layout, either a card or a scrapbook page, that consist of lots of small elements, play with the placement first, before glueing things down. Once you’re happy, take a photo of your test layout with your phone ( we all have it on hand, don’t we?). Next, assemble your card/scrapbook page piece by piece by piece with a help of your reference photo. No more guessing ‘where was this or that element supposed to go.

I truly hope you like my little, rustic card. It reminds me of my childhood in Poland and summer holidays we spent in the countryside with our great-grandmother. Wonderful memories.

As always, I really want to encourage you to visit the Global Design Project challenge blog to see other beautiful projects from all around the world. Just click on their logo below to visit the website

Thank you for stopping by and have a blessed day,