It’s been a long time since last time I posted a project on here. I still struggle with crafting a bit but seems like my hands are slowly getting better. Last week I’ve noticed that I can manage to hold a pen, which I wasn’t able to do since February – I nearly cried with happiness.
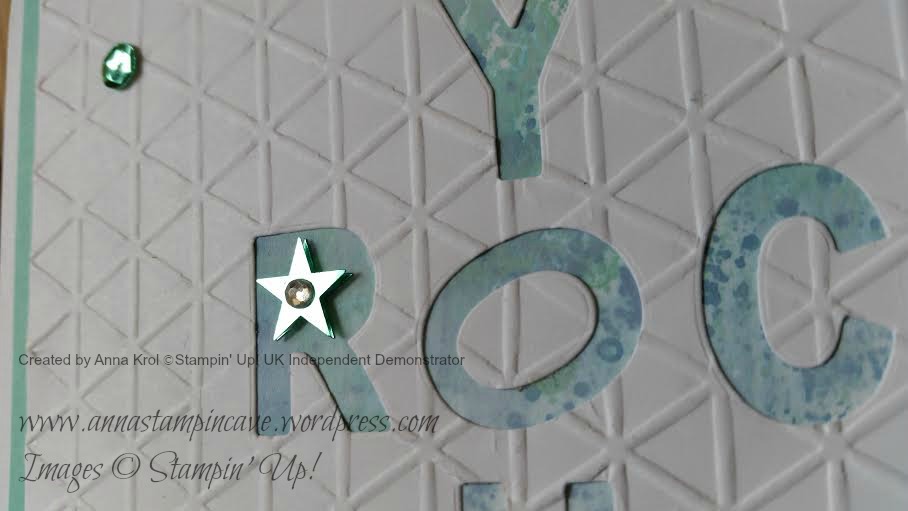
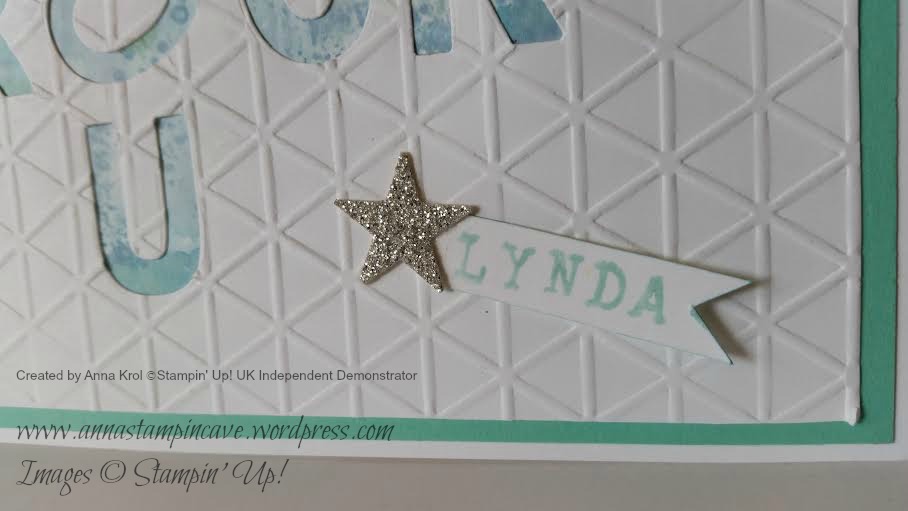
Today I wanted to share with you cards I’ve made recently for few of my friends from all over the world. Friends who supported me and cheered me up when I was really poorly and in hospital. I have to say I’m truly blessed and grateful to have such an amazing people in my life. These cards have been delivered already so no faux pas here xx
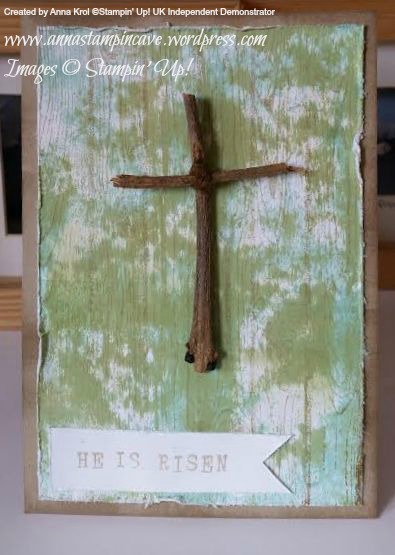
Today I’ve got for you a card that is very special for me.
I’m a Christian, but I do not belong to any denomination. Long story short: I try my best to follow Jesus, my saviour, and his teachings, not human traditions, in everything I do. So at the time when nearly all christian world celebrate Easter, I and my family, simply commemorate anniversary of Jesus’s death according to the Bible’s lunar calendar. But lets back to the card.
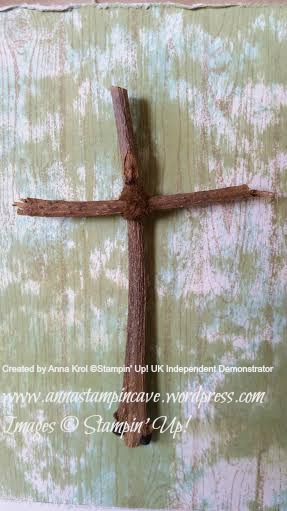
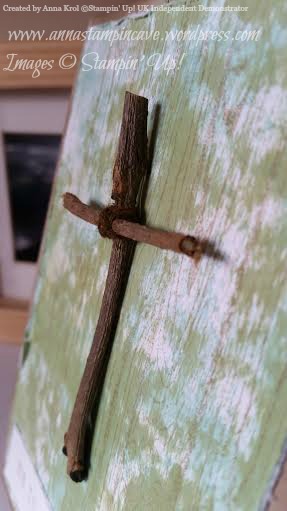
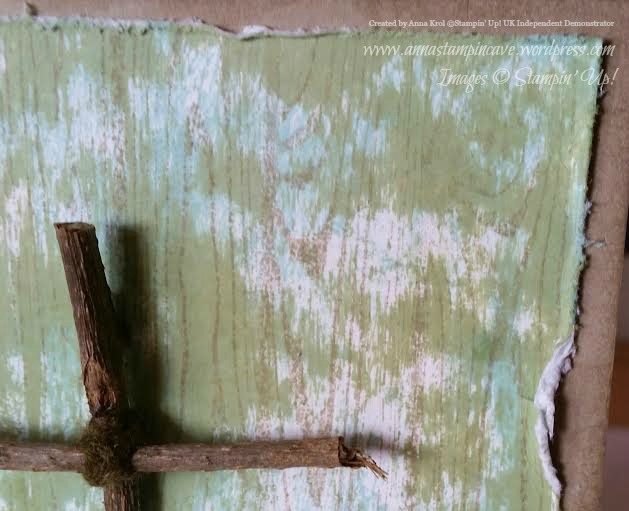
I love all things nature and had this idea for some time now. So went to my garden for a little “foraging” and brought myself few twigs. No, no plant gets hurt 😉 For the base for my card I choose Crumb Cake card stock. Sponged the edges to add a little depth.
My background is created using acrylic block stamping technique. This technique is really easy. Take an acrylic block and ink pads of your choice. I used Pear Pizzazz and Pool Party. Then just press or tap (gently) your acrylic block into the pad. When you’ve got the ink transferred on your block (as much or as less as desired) swipe the block across your card stock. Repeat these steps until you’re happy with a result. You can use just one colour, or as many as you wish. There’s no right or wrong if it comes to this technique.
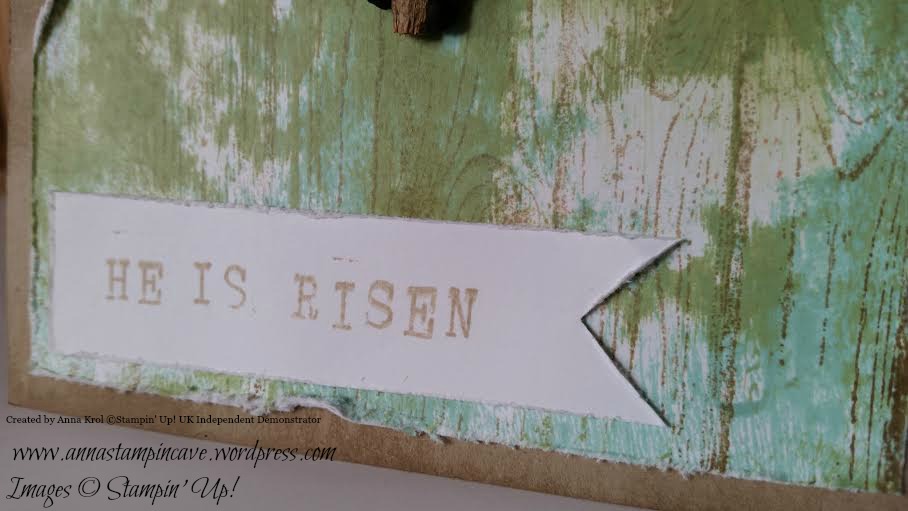
I was really pleased how my background turned out. I inked Hardwood stamp in Crumb Cake, added some Soft Suede on edges and stamped it onto my background. Before adhered it to the base I distressed all edges with scissors.
To form the cross I tied my twigs with piece of white baker’s twine. I coloured twine with Soft Suede marker after, because I wasn’t sure how much of a twine I will need in first place. Added my cross to the card using sticky strip. Hot glue would be better idea but my hands are not “safe” to hold glue gun 😉
Long time I couldn’t decide what sentiment to use. I even thought about printing something from the internet. But then I had a lightbulb moment: Alphabet Rotary Stamp! It’s font is simple and rough – perfect for my card! I created my phrase “he is risen” in no time. Stamped on piece of card stock with Crumb Cake again and cut it into a banner. First I thought to rise a sentiment with dimensionals, but I really wanted the cross to stand out.
I’m really pleased with my card. With acrylic block stamping technique I made it in no time. Hope you like this technique and that I inspired you to give it a try. If so please give me a “like” or live a comment below. Thank you for stopping by and happy crafting!
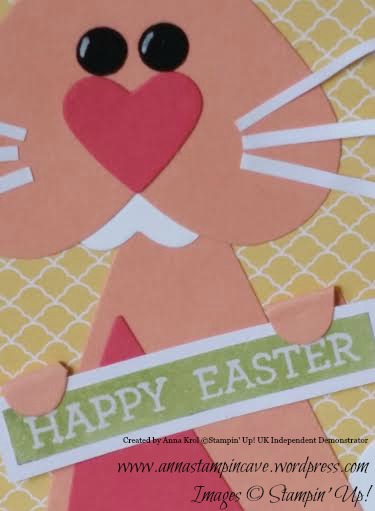
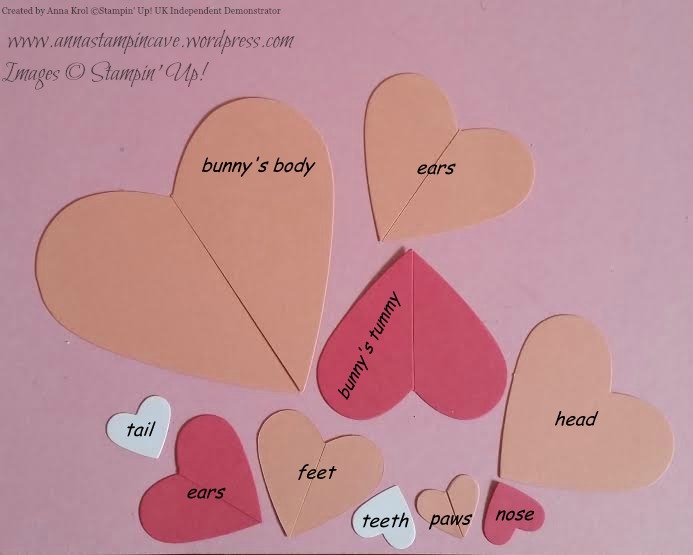
I usually don’t post everyday but today I felt well enough to spend some time in my *atelier* 😉 and made this fun and super easy Easter card. You all probably know what punch art is – you take various punches, punch different shapes, and then put them together to create some funny critter. My card today is framelits art. The idea isn’t mine – I’ve found it on sizzix blog. To make this adorable bunny you need various heart sizes. I used Hearts Collection Framelits Dies from Stampin’ Up! And you don’t have to figure out which sizes you need – I did all the work for you 😉
Here’s the list of the hearts/colours you need:
– smallest heart: 2 x whisper white, 1 x crisp cantaloupe, 1 x strawberry slush
– 2nd smallest: 1 x crisp cantaloupe, 1 x strawberry slush
– 3rd smallest: 2 x crisp cantaloupe, 1 x strawberry slush
– 5th heart: 1 x crisp cantaloupe
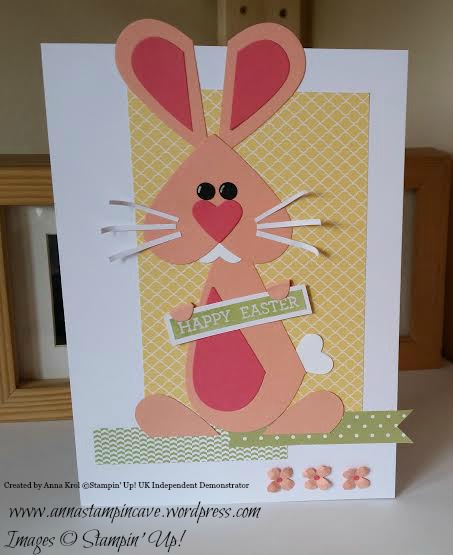
My card base is A5. I guess it’s possible to downsize it to A6, where the smallest heart would be from itty bitty accents punches. But I like it big 🙂 I assembled my bunny first, before put my card together (except paws and feet). For eyes I punched two medium circles from owl punch. I love his “bright”eyes 😉 I also cut few tiny strips of paper for whiskers.
For sentiment I stamped Happy Easter from Crazy About You in Versamark, heat embossed in clear and sponged with Pear Pizzazz. Then trimmed it and backed with slightly bigger piece of Whisper White. I adhered paws so it looks like a banner held by bunny.
To assemble my card I layered my card base with So Saffron DSP and two stripes/banners of Pear Pizzazz. I adhered my bunny, his feet and added paws with sentiment. Also added wee flowers in the right bottom corner and card was done.
I love this card and had lots of fun creating it 🙂 Hope you like it too. As always thank you for stopping by,
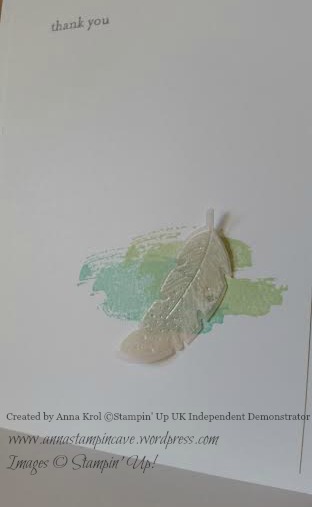
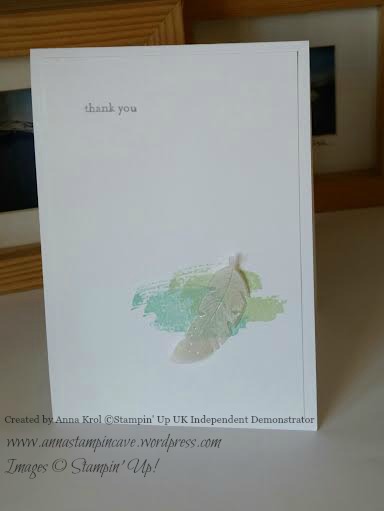
I just love my today’s project. It’s clean and simple…and beautiful! There was a time (not that long ago) when I was wondering what the heck CAS card means…haha…and it means exactly that: clean and simple. Some people also use term KISS (keep it simple stamper!). No wonder I haven’t got an idea: I’ve got a tendency to “overthink” and “overload” my cards. But I quite like the idea of clean and simple layout. It’s just don’t come naturally for me.
So today I gave myself a challenge to create a CAS card. I decided to keep the card white with little splash of colour.
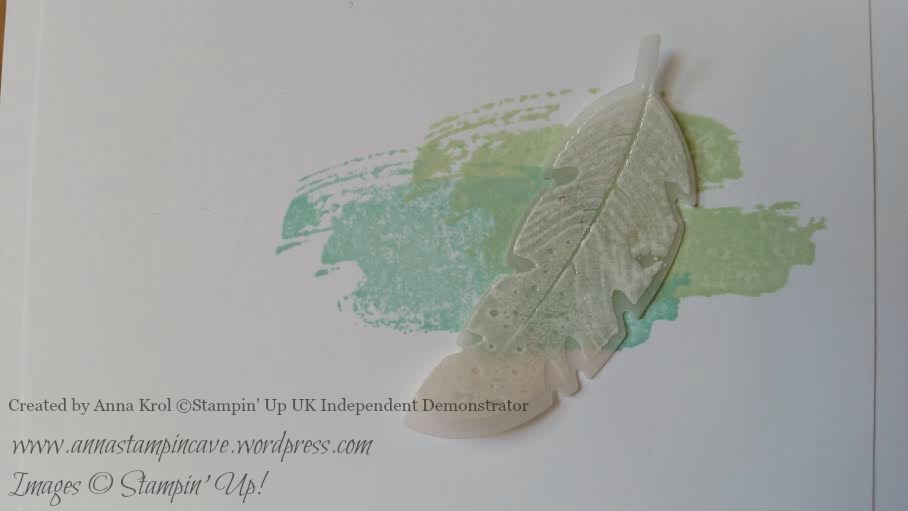
The base of the card is standard A6 and top panel is 1/4″ smaller. For my layout I used Work Of Art stamp set. I love this set for it’s simplycity: shapes, swatches, swooshes (or however you call them) that looks like painted with a brush – fab!
I overlapped two “swooshes”: one in Pool Party and other in Pistachio Pudding. I like how these colours complement each other. Now I needed some simple embellishment for my card. Buttons seemed too heavy. I needed something light, something like… a feather!
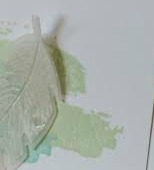
I took Four Feathers stamp set and choose smaller one with speckles. I took a piece of vellum, stamped the image in white craft ink and heat embossed it in clear. Then die-cut it with matching framelits and add it to the card with mini glue dots. Both, stamp set and dies, you can buy separately or save 15% and buy them in a bundle.
Sentiment is from Teeny Tiny Wishes and is stamped in Basic Grey. And that’s it. Card is done!
Do you like my project? Let me know in the comments below! Thank you so much for stopping by,
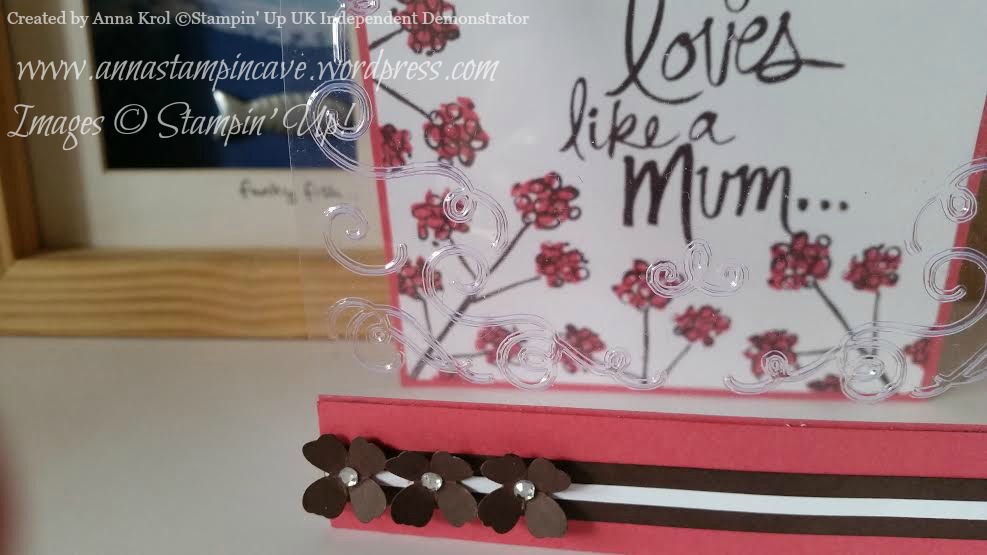
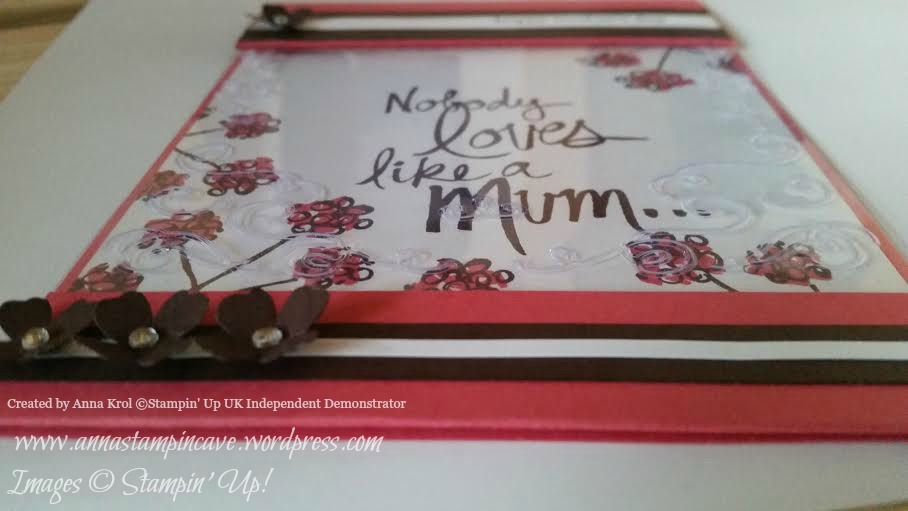
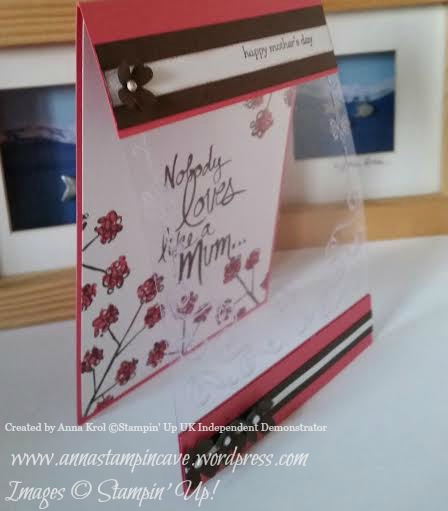
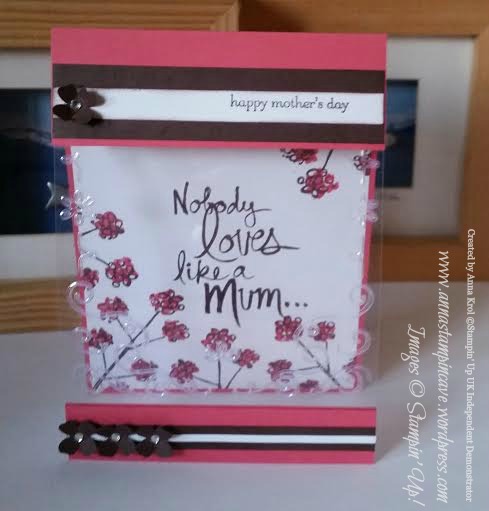
I wanted to wish Happy Mother’s Day to my all UK and Irish followers! Today I’ve been treated with coffee and breakfast to bed ^_^ Feel so pampered 🙂 hmmm…makes me think that Mother’s Day should be every day! 😀 And today I’ve got one more project using Mum’s Love stamp set.
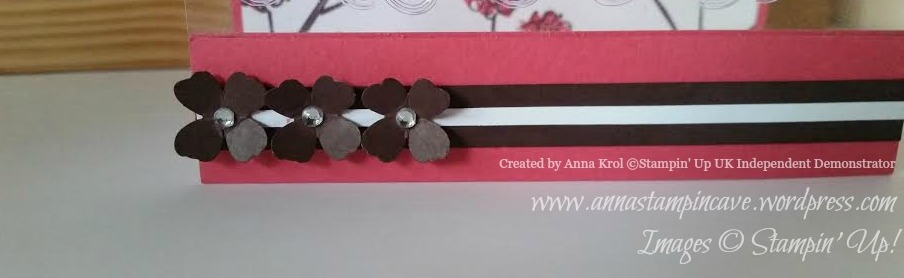
To make this card I’ve used same card stock as yesterday: Strawberry Slush and Whisper White. And you probably wondering what about the brown?
Well, I simply coloured WW with Chocolate Chip ink pad 🙂 Just cut strip of paper, press it into your ink pad and then let it dry. I used this colour to stamp sentiments and flowers too. These little flowers on the front are punched using flower punch from Itty Bitty Accents punch pack. Each one has a tiny rhinestone in the center.
For the front panel I cut a piece of Window Sheet and embossed it with Filigree Frame embossing folder (it was available in autumn/winter catty).
I loooove dry emboss window sheets 🙂 It’s looks gorgeous and adds extra dimension to the card.
I love this stamp set and really think it’s a “must have”. I owe the one in photopolymer but you can choose clear or wood mount too.
Thank you for stopping by and have an amazing day everyone!