Crazy Crafters & Pootlers Spring/Summer & Sale-A-Bration Catalogue Blog Hop

blog hop header

Hello everyone! Welcome to the Crazy Crafters / Pootlers Blog Hop. We are super excited to share with you lots of new products from the soon to be launched seasonal catalogue. We hope you’ll find great inspiration from our projects. If you have arrived here from Stephanie Fischer, a big welcome to you. Be sure to click on the buttons further down to continue your journey on this blog hop.

This blog hop is very exciting not only for the sneak peeks. This is our first collaboration with amazing Kylie Bertucci and her lovely team of Crazy Crafters all the way from Australia! We are thrilled that they invited us to play along. Thank you, Kylie and her team.x

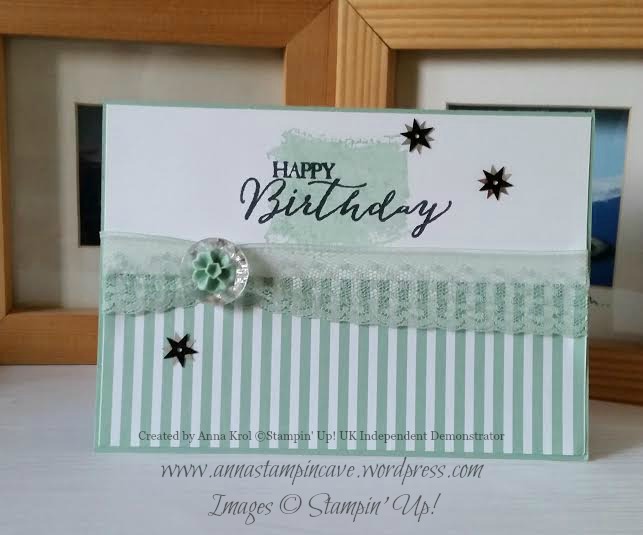
In my project today I decided to incorporate two of my favourite techniques: watercolour and inlaid die-cutting. I have used a brand new set called Rose Wonder with coordinating Rose Garden Thinlit Dies – perfect for techniques!

Stampin' Up! Rose Wonder Bundle

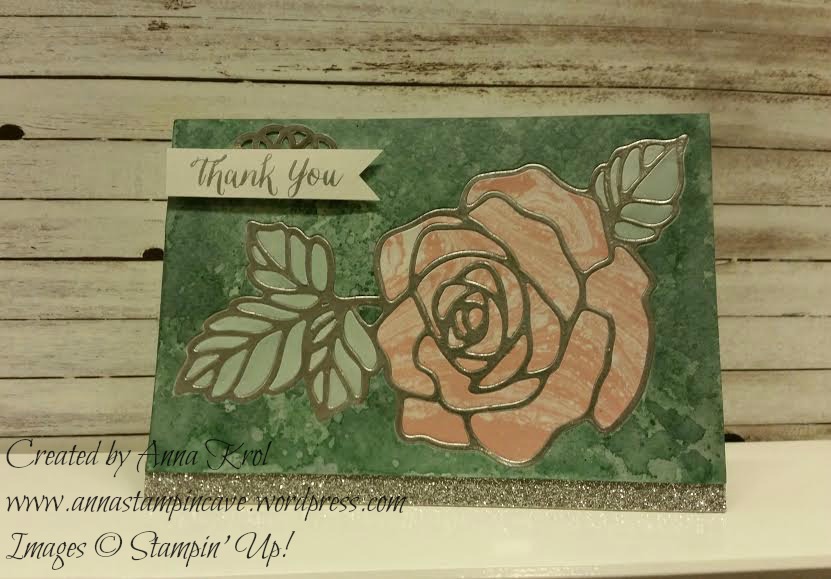
We’ve been given a theme ONE, to use only one stamp set, one ink pad, one DSP, one cardstock etc. Luckily we could also use heat embossing and embellishments. I had to come up with some smart idea how to create my watercolour card with just one ink pad.

For a watercolour panel, I’ve used Lost Lagoon ink pad. It’s such a beautiful shade of blue. But how to create a rose if you only have one ink colour? Perfectly Artistic DSP came as a rescue! All inner pieces of my flower and leaves were die-cut from this DSP and “inlaid” into the rose frame. I love this beautiful paper. It has a marbled effect design on one side, while the reverse side has a watercolour wash. And what’s even better, this paper will be available as a FREEBIE during Sale-a-bration!

Stampin' Up! Rose Wonder Bundle

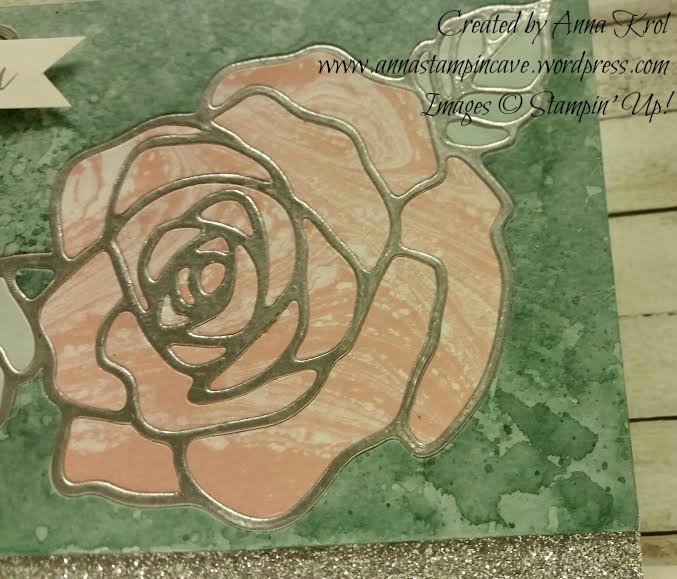
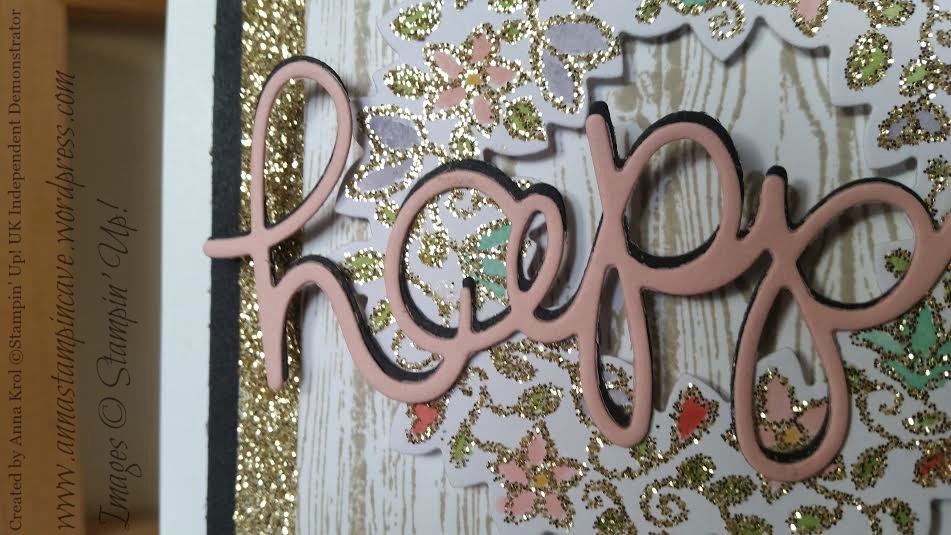
The frame of the flower, as well as sentiment, are heat embossed in silver. A glittery strip of paper is heat embossed too, using Heat and Stick powder and silver glitter.

Stampin' Up! Rose Wonder Bundle

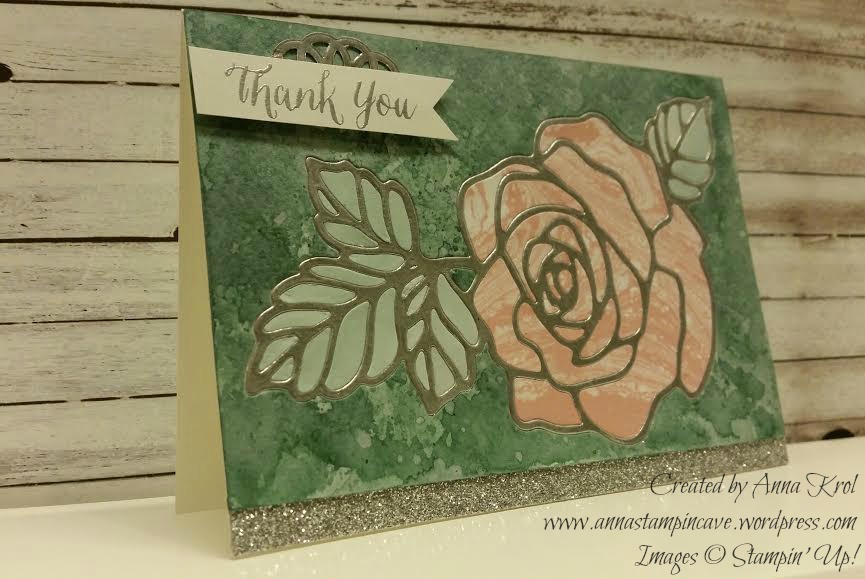
For my sentiment, I created simple, little banner with a piece of silver doily underneath to add some dimension. Don’t you just love this beautiful font? I’m in love with sentiments in this set.

I truly hope you enjoyed coming to my blog and see my card.

Now, be sure to hop along and see more inspiring projects. Below is the list of all the participants but you can also use the buttons to keep hopping. Your next stop is lovely Emilie Robinson – go and see what she has made using the new items.

Thank you for stopping by and have a blessed day!

previous button   next button

Full Blog Line Up:

Sam Hammond Donald
Angela Lorenz
Angelina Clark
Nicole Spicer
Lea Denton
Bruno Bertucci
Angela Westland
Wendy Boag
Jessie Holton
Camille Moriarty
Stephanie Fischer

Snow Friends For The Holidays!

Howdy friends! How’s your weekend going? I had a lovely and quick crafty session with my little sister on Friday morning. She badly wanted to play with Snow Place bundle from Stampin’ Up before back home for a half term break at uni. So I sorted out some time to make a little crafty mess at my kitchen table.

Snow Friends Collage

Last time I used cute little snowmen so this time I decided to use Mr Penguin, or shall I say Mr & Mrs Penguin? haha Yep, I decided to make cute Mrs for our handsome friend, so he’s not feeling lonely at a Christmas time.

Snow Friends by Stampin' Up!

The card layout is pretty straightforward: top-folded base and a piece of the white panel inside for your writing. You also need a piece of white card for snow bank at the front of your card. You can die-cut it or use your scissors, but I just simply tear it. It adds some fun texture to the card.

Snow Friends by Stampin' Up!

You also need a piece of card for your stamping. And I have to mention here that there’s a lot of black in penguin, and it’s not that easy to get perfect impression/coverage. I tried two black ink pads I have: Memento Black and new Archival Stampin’ Up! Basic Black to get the best possible image. And although I love my Memento Black the best black and the really crisp impression I got while using Basic Black Archival ink.

Snow Friends by Stampin' Up!

When we had all of our images stamped we took it to my studio to die cut it with matching framelits. If you don’t have framelits or die-cutting machine fear not. Images are so simple that you can easily cut them by hand with a pair of good scissors. I actually hand-cut leaves with berries that Mrs Penguin has in her hair lol

I also used clear Wink Of Stella Glitter Brush to add shimmer to snowflakes, berries and leaves, Mrs Penguin’s beak and cheeks as well as white stripes on the candy cane.

Now just wanted to show you a project that my sister created. Firstly she wanted to make a cute card for her boyfriend. But when the card was finished she asked if there’s a way to make it into gift card holder, haha But hey, everything is possible! So I made a pocket to hold a gift card and attached it inside of her card. It may not be perfect but it’s made with love and that is what really matters.

That’s it from me for today. I really hope you like our cute little projects. We definitely had lots of fun crafting, getting inky and making a mess.

Have a blessed day,

Simply Sketched Saturday Challenge Blog Hop #4 – Let It Snow

SSSC Header

Thank you for joining us for another Simply Sketched Saturday Challenge!  We’re so excited to be sharing this hop with you. The products used are all available in the current Annual, or seasonal, Stampin’ Up!®  Catalogues*. Simply use the buttons at the bottom of the post to keep hopping!

Welcome to our 4th sketch challenge, and this week it was my turn (and pleasure) to design a sketch. Here it is:

4

I truly hope this sketch will ignite your creativity.

Do you know it’s less than three weeks till Christmas?! It’s crazy how time flies by. And although I had pretty few ideas with this sketch in mind, I decided to go with a winter theme. Well…little crazy & fun winter theme 😉

Let it snow

Finally had a chance to play with Snow Place photopolymer bundle. It was one of those products in Autumn/Winter catalogue that didn’t catch my attention at first. I couldn’t see me using it at all: my daughter will be 16 y.o soon and you know teenagers, she thinks she’s so grown up 😉 But hey, once she knew there’s a snowman to build…yep! She’s a little crazy chicken about Frozen haha.

The base of the card is Smoky Slate. A layer of Whisper White measures 4″ x 5-3/4″ and the top layer of designer paper measures 3-7/8″ x 5-5/8″. I picked big dots design from Merry Moments DSP but it’s also available in 6×6″ paper stack. I chose big dots design as I thought it will go well with this fun card. Banner is cut from a piece of Smoky Slate (5-1/2″ x 1-3/4″) with three “windows” created using the smallest square from Squares Collection Framelits Dies and run it through the big shot with Decorative Dots Embossing Folder. If you don’t have squares framelits you could use punches instead. And it does not have to be square either. You could use circles or stars. To add some interest to the banner I sponged some Whisper White Craft Ink over the embossed area.

And now let’s meet my friends: crazy snowmen 🙂 I stamped snowmen and their accessories in Basic Grey Archival Ink. I was planning to do a little water-colouring, and our new Archival Inks are perfect for this technique. To add some dimension to these guys I coloured them with an aqua painter and Soft Sky. Noses are water-coloured in Calypso Coral and Pumpkin Pie.

Let it snow 5

My first little fella wears Santa’s hat. Firstly I die-cut two hats: one in Basic Grey, and the other one in Real Red. Then I cut out just the top from a red hat and glued it on the top of grey one. I didn’t like the white border on my die cuts so I fussy cut it. To add some sparkle to the hat I used Dazzling Details, and once it was dry I add Crystal Effects on top.

Let it snow 4

My second little friend looooves ice-creams. He could eat them all day long 🙂 I love how Crystal Effects makes the scoop of ice-cream pops!

Let it snow 3

My third guy looks very elegant with this Real Red shiny bow-tie 😉

Let it snow 2

To finish off my card I die-cut a little star from silver glimmer paper. I used silver cording trim to create few fancy loops and glued them to the card with a glue dot, and added glimmer star on top. The sentiment “Let It Snow” comes from the same stamp set.

Now, be sure to hop along and see more inspiring projects. Thank you for stopping by and have a blessed day!

SSSC Previous   SSSC Next Blog

Simply Sketched Saturday Challenge Blog Hop #3 – Sweet & Mint

SSSC Header

Thank you for joining us for another Simply Sketched Saturday Challenge!  We’re so excited to be sharing this hop with you. The products used are all available in the current Annual, or seasonal, Stampin’ Up!®  Catalogues*. Simply use the buttons at the bottom of the post to keep hopping!

Today’s sketch was designed by very talented Angelina from Intatwyne Designs. I really like the simplicity of this design.

3

My first thought about this sketch was that it’s sweet. So is my today’s card: sweet & mint. I absolutely love 2015 – 2017 In Colors. But Mint Macaron is definitely my favourite one.

Sweet & Mint

The base of my card is Mint Macaron scored at 4-1/4″ and folded in half in landscape mode. Both panels measure 5-3/4 x 2″. The top panel is a piece of Whisper White. I stamped one of the “swooshes” from Work of Art in Mint Macaron (briefly in the middle of the panel). Then I stamped the sentiment in Memento Black. The bottom panel is a piece of 2015-2017 In Color Envelope Paper.

Sweet & Mint 2

I adhered both panels to the base and added a ribbon in the middle ( I tucked the ends under the panels). Don’t you just love this Dotted Lace Trim Ribbon? I’ve used a glue dot to bunch up the ribbon and adhered button on top. I was planning to add bakers twine bow on top, but I didn’t like it. I added Blossom Accent instead.

Sweet & Mint 3

To finish my card off I added few star sequins. I didn’t plan that but needed to hide a boo-boo. I end up adding three just for a good measure 😉

Hope you like my sweet and simple card. It’s very versatile design and would work nicely with different sentiments. Plus it’s perfect for mass-producing: only took few minutes to put it together. So it’s a win-win.

Now, be sure to hop along and see more inspiring projects. Thank you for stopping by and have a blessed day!

SSSC Previous   SSSC Next Blog

Beautiful Birthday Card Using Circle Of Spring Stamp Set By Stampin’ Up!

I love to make birthday cards for friends and family. Makes me so happy to see their smiles, it makes my day. And when the card I make is a challenge and turn out better then I hoped for?! Well, I nearly squealed with excitement when I finished this card for my friend’s birthday. She received the card already so I can share it with you now.

Spring wreath

My friend Linda is an amazing crafter and she makes the most beautiful, feminine cards ever. So no pressure there, haha

I wanted to create a card that is soft, feminine and exciting. Plus I wanted to use some cool techniques.

Spring wreath 4

I stamped this beautiful wreath in Versamark, heat embossed with Heat & Stick powder and sprinkled with Gold Stampin’ Glitter. I heat set it again and watercoloured flowers and leaves. Then I die-cut ‘happy’ twice: in basic black and blushing bride, and glue them together. I slightly offset both pieces for ‘shadow’ effect.

Spring wreath 3

I love this cute sentiment from Circle of Spring. I do not own many punches, so I had to cut it out with Circle Framelits Dies. But I believe you could use 1″ Circle punch too. The glittery scalloped circle is 1-1/4 Scallop Circle punch. To make it I didn’t use glimmer paper. I punched it from a piece of paper, squashed it into Versamark and again used Heat & Stick powder and gold glitter. It’s so easy to make your own glimmer paper, and I love it.

Spring wreath 6

Just look at all this sparkle ✨✨✨ I love it!

Hope you like my little card, and maybe you will try to add some sparkle to your projects too.

Thank you for stopping by and have a blessed day,