In And Out Pop-Up Birthday Card

Anna’ Stampin’ Cave – Fun In and Out Birthday Card Using Birthday Delivery Bundle

Hello and thank you for stopping by.

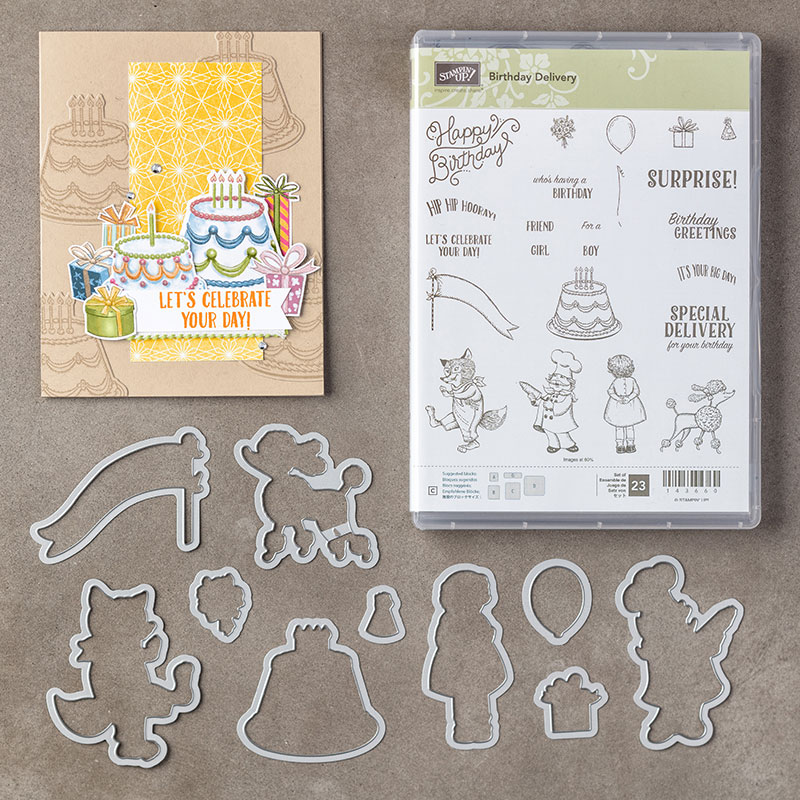
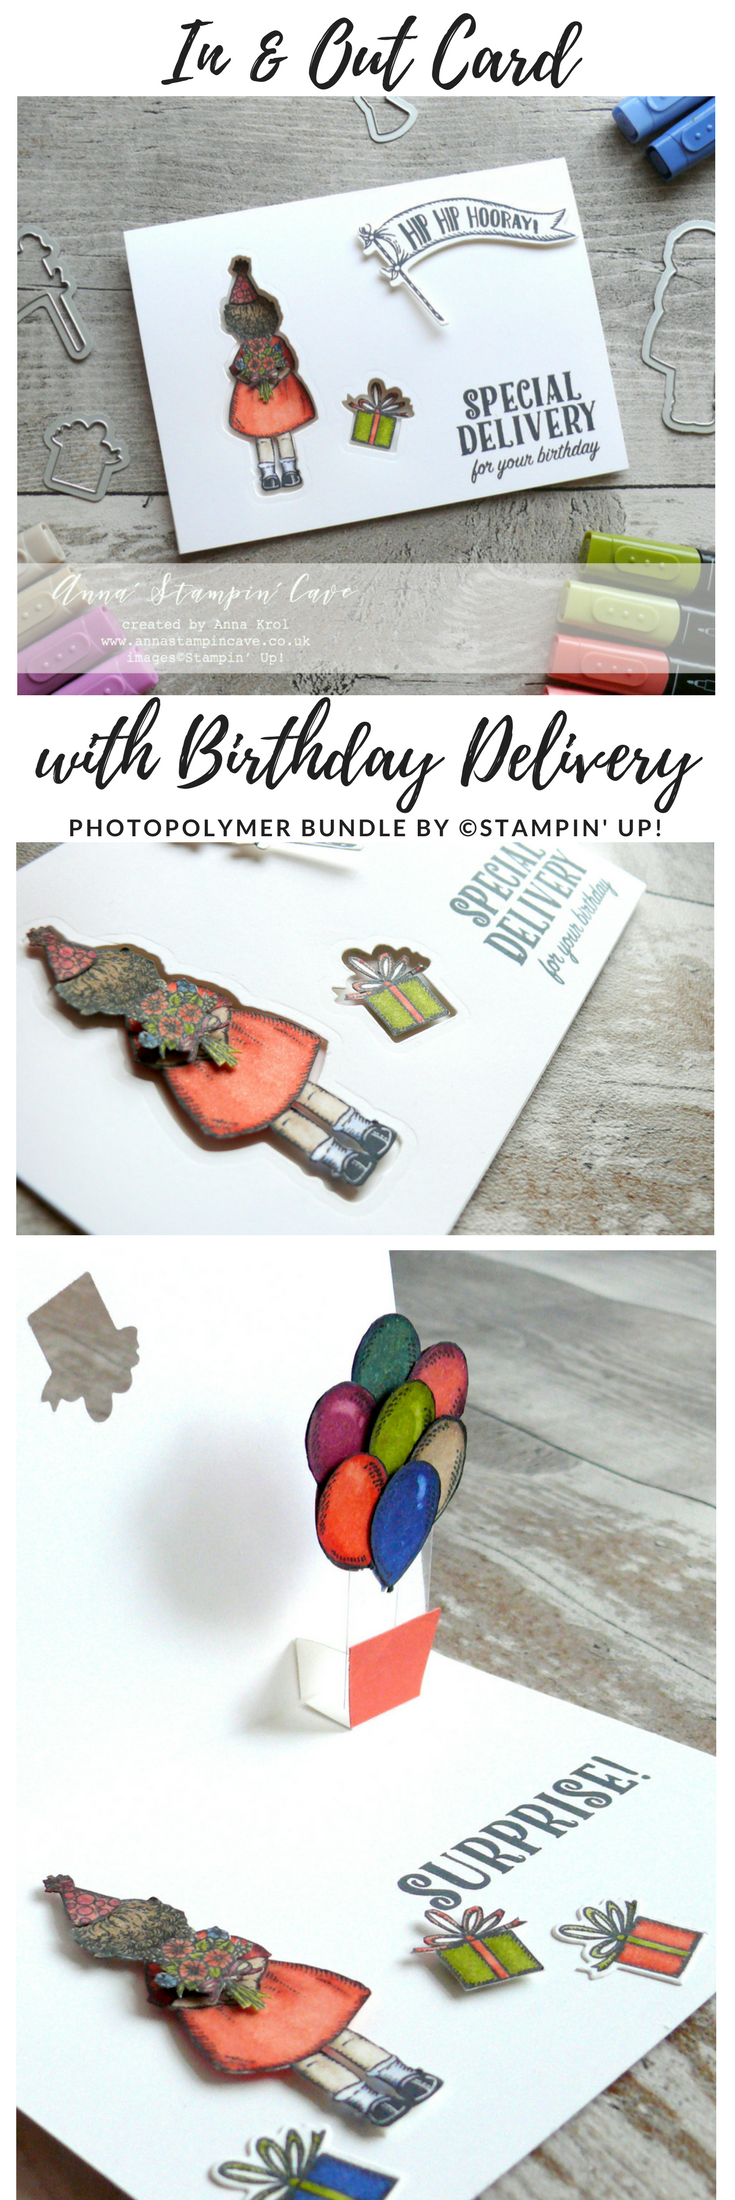
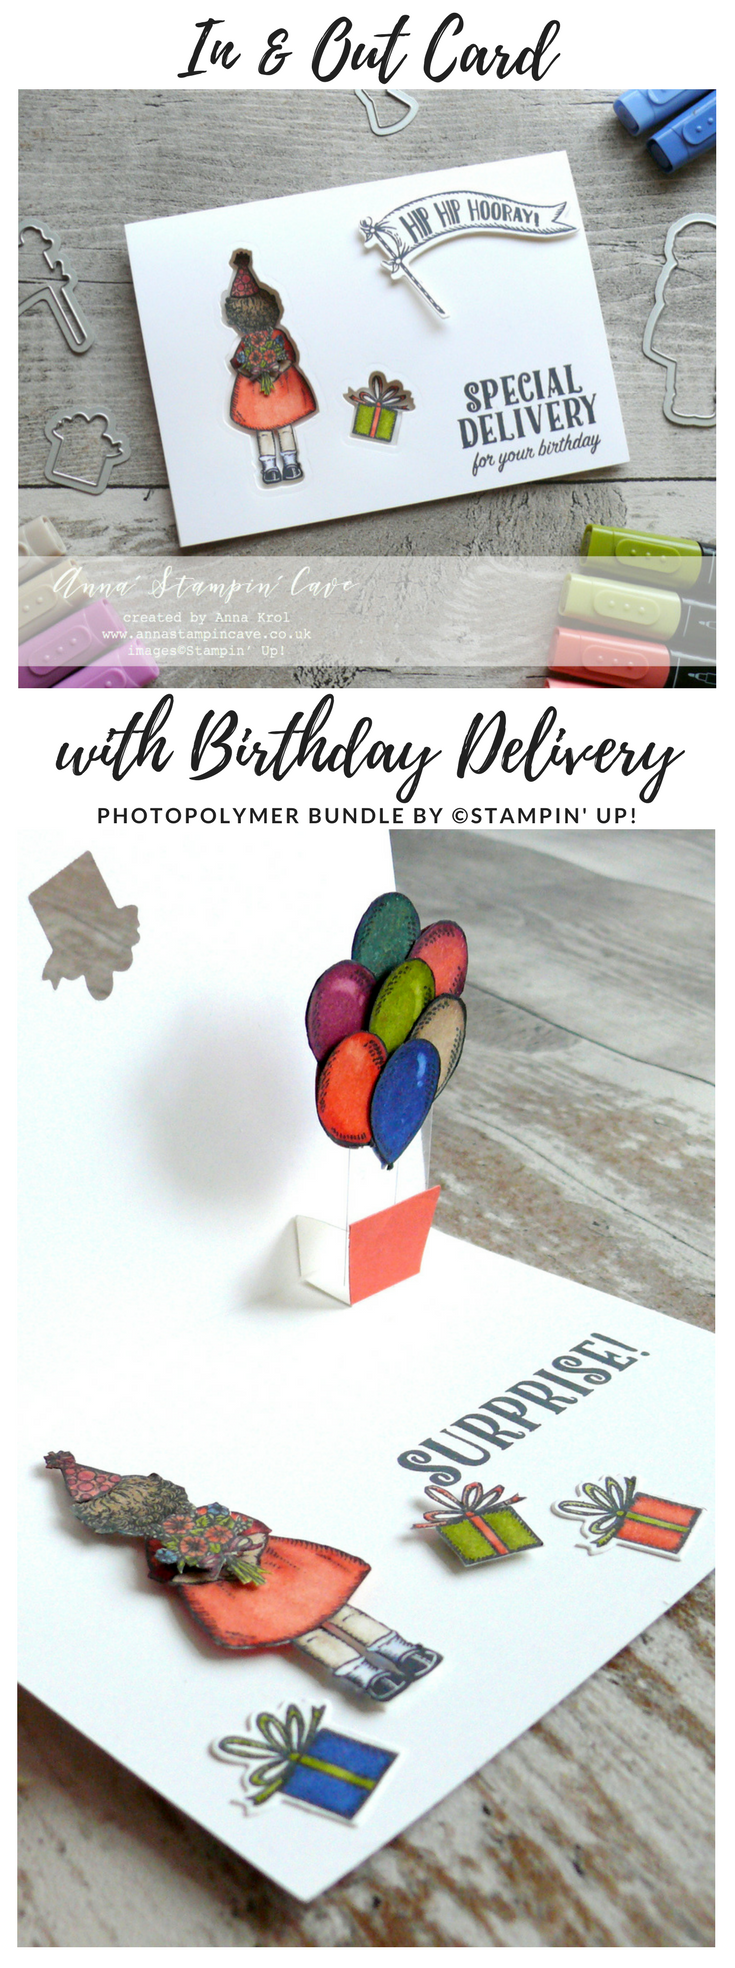
Today, I wanted to show you a fun card I created for my grand niece’s 6th birthday recently. I got an idea for this card from ever amazing Jennifer McGuire, and its called ‘In & Out Card’. For her technique, you need a stamp set that comes with coordinating dies. And Birthday Delivery Stamp Set with Birthday Friends Framelits Dies was just perfect!

And here’s my card:

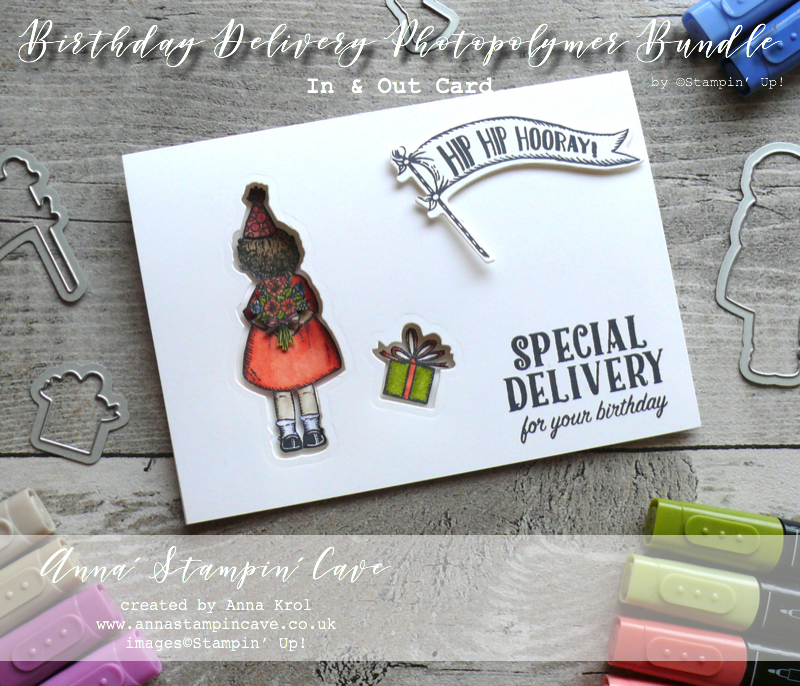
First, I stamped all the images I wanted to include in my card, on a scrap of Whisper White cardstock. I wanted to use my Stampin’ Blends to colour images in (bear in mind I only had five colours in the dark and light shade at that time) so I’ve used Black Memento Ink Pad for my stamping. I also stamped a sentiment in the bottom right corner of the card base.

Because I had the ink pad out already, I stamped ‘Hip, Hip, Hooray’ flag on a scrap of Whisper White cardstock, which I die-cut later.

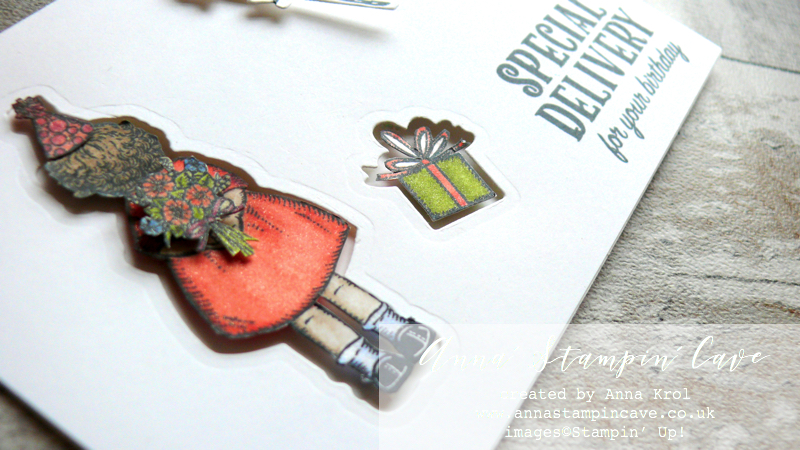
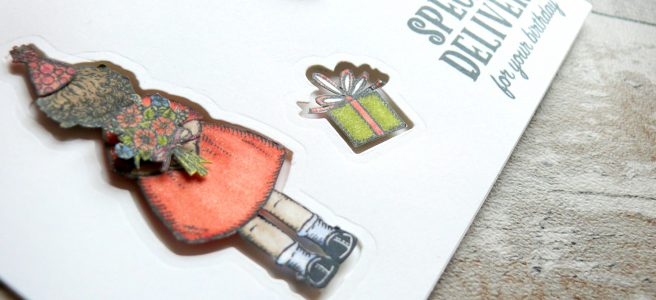
When finished my colouring, I fussy cut the images which I wanted to ‘peek’ through. I cut them out right up against the edge of the stamping. Next, I planned on their placing on the card and using coordinating dies, I die cut their shapes from the card base.

The party hat was bit tricky, but once I die cut the girl shape, I adhered my fussy cut party hat to girl’s head, place the image through the opening and using a piece of washi tape, I secured party hat die where it should go. Done!

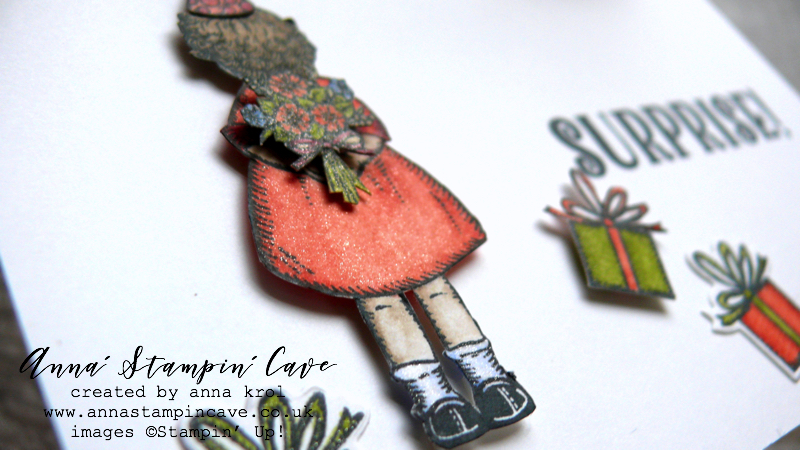
I adhered them through these openings, using dimensionals. Because these images are fussy cut, they fit snugly and don’t interfere with opening/closing the card. I also stamped, coloured and fussy cut the bouquet, And adhered it with dimensionals so it looks like my girl is carrying the flowers.

I stamped the second sentiment that says: ‘Surprise’ inside of the card. I also adhered two more pressie images inside of the card using snail adhesive.

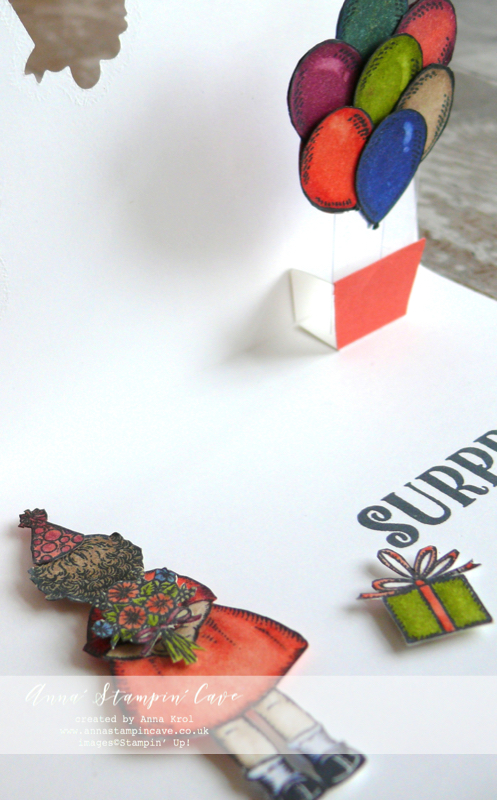
I still wasn’t entirely happy with the card so I thought: Balloons!! I stamped 14 balloons from Birthday Delivery Stamp Set on a piece of Whisper White cardstock and coloured them in with Stampin’ Blends. Because I didn’t have many, I mixed some of the colours to create new shades. Also these I fussy cut.

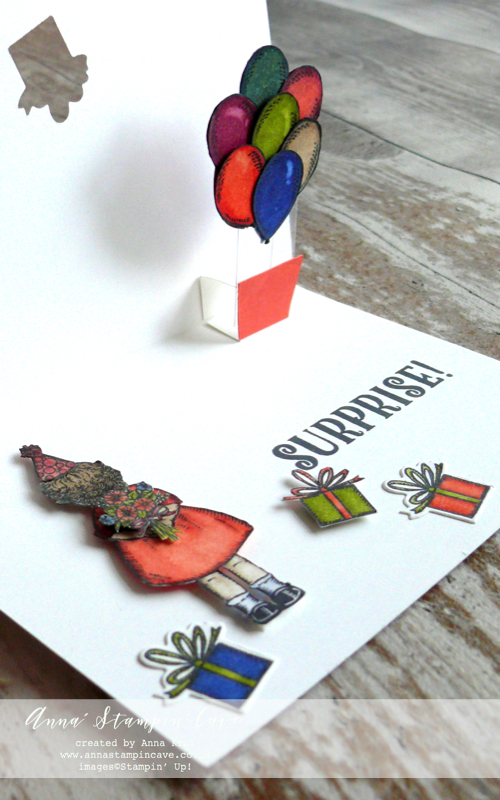
I created a small pop up element on the inside of the card.

I’ve used few strips of acetate and adhered my balloons – back to back – on one end of these acetate strips. The second end I adhered to the pop-up element and I hide it with a piece of Calypso Coral cardstock.

Now to finish off my card.

Using dimensionals I popped up ‘Hip Hip Hooray’ flag on the front of my card. I also added Clear Wink of Stella to my images for a bit of shimmer.

I truly hope you like my card. I surely had fun putting it together for my grand niece. And if you would like to check Jennifer’s video just click HERE.

If you wish to purchase any of products I have used, simply click the images below to go directly to my online store and don’t forget to enter the hostess code RRMR76JH to receive a gift from me.

Thank you for stopping by and have a blessed day

Hostess Code for February: RRMR76JH – Use this code in the month of February and receive a gift from me.

Special Notes:1) Make sure you select Anna Krol as your demonstrator;
2) If you select “No Contact” box I do not have access to your name and can’t send you a gift;
3) If your order is £150 or more do not use the code and grab your own Stampin’ Rewards + gift from me
Product List

Big Shot

£99.00

Pin me

Summary of the project which gives all the views of the card in one photo. I’d love if you pinned and called by on Pinterest xx


Don’t forget to check:

Spring Summer Catalogue Paper & Ribbon Shares. Shares are open to Austria, France, Germany, Netherlands & United Kingdom. 102 sheets of DSP & 2 yards of each type of ribbon from Spring/Summer Catalogue. Click here for more details —>

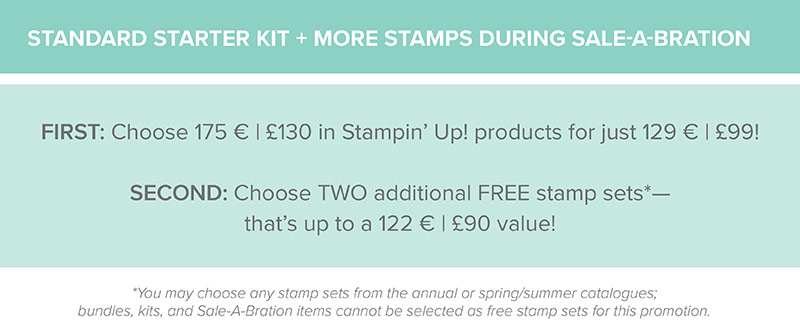
The New Stampin’ Up! Spring/Summer 2017 Catalogue and Sale-A-Bration are LIVE and it’s AMAZING! For every 60 €/£45, you spend either from Spring Summer Catalogue or Annual Catalogue, you will get to choose one FREE  level 1 product from SAB brochure! If you spend 120 €/£90, you get one FREE level 2 product, OR, you can choose two level 1 items. If you spend 180 €/£135, you have the option to choose three level 1 items or one level 1 item and one level 2 item. Click here for more details —>

Ever wondered what it’s like to join Stampin’ Up!’s community? I may have few answers for you. Click here for more details –>

Dragonfly Dreams Stamp Set & Coordinating Dies

Anna’ Stampin’ Cave – Dragonfly Dreams Stamp Set & coordinating dies

anna-stampin-cave-ink-smooshing-technique-with-dragonfly-dreams-stamp-set-coordinating-dies

For today’s project, I have used once again Dragonfly Dreams Stamp Set and Detailed Dragonfly Thinlits Dies. I love this bundle and either together or separate, I just can’t get enough of it. This time though I decided to revisit two of my favourite techniques: watercolour and ink smooching. Bright colours, Cucumber Crush and Island Indigo, seemed perfect combination for a dragonfly card.

anna-stampin-cave-ink-smooshing-technique-with-dragonfly-dreams-stamp-set-detailed-dragonfly-thinlits-dies

Watercolour Dragonfly card dimensions:

  • Cucumber Crush cardstock: 8-1/4″ x 5-7/8″ scored in half at 4-1/8″ (21 x 14.8 cm scored in half at 10.5 cm)
  • Island Indigo cardstock: 4″x 5-6/8″(10,2 x 14,5 cm)
  • Whisper White cardstock: 3-7/8″ x 5-5/8″ (9.8 x 14.2 cm) and 2-7/8″ x 1/2″(7.4 x 1.3 cm) for a sentiment
  • Scraps of Whisper White, Shimmery White and White Vellum cardstock for die-cutting

First thing first I had to prepare my watercolour panel. And to be honest I risked a bit using regular Whisper White cardstock here.

If you are not confident with water colouring and don’t want to risk, please always use watercolour paper with ink smooshing technique.

I pressed Cucumber Crush ink pad on a craft mat, spritz it with water (not too much) and took a piece of acetate to lift some of this puddle of colour. I smooshed it on my panel and dried it with a heat gun. I repeat this process couple of times, every time drying my panel in-between until I was happy with layers of colour. Next, I switched to Island Indigo but I only added one layer of colour. The last touch was to add few splotches of ink to my panel with help of aqua painter.

anna-stampin-cave-ink-smooshing-technique-with-dragonfly-dreams-stamp-set-detailed-dragonfly-dies

I die cut two dragonflies, one from Whisper White cardstock and one from vellum (without the head) for 3D effect. To colour in cardstock dragonfly I used a very similar technique as previously. I pressed some more of Island Indigo ink on the craft mat, spritz it with water and dabbed the dragonfly straight in the puddle, dried and repeat until I was happy with the colour.

I wanted to add more depth and ‘life’ to my dragonfly, so I sponged the edges of wings and the body with Island Indigo ink. I also added few speckles with bronze metallic Sharpie marker.

While sponging I’ve noticed that the dragonfly was bit ‘flimsy’ (note to myself: if you plan to dab your intricate die-cuts in the puddles of coloured water, use paper with the higher grammage, like watercolour perhaps(!?) lol. So I die-cut just the body of a dragonfly from Shimmery White cardstock, watercolour it, sponged the edges and adhered on top of the dragonfly with liquid adhesive. Next, I adhered the vellum dragonfly underneath, offsetting slightly.

anna-stampin-cave-ink-smooshing-technique-with-dragonfly-dreams-stamp-set-detailed-dragonfly-thinlits

The sentiment I chose comes from the same Dragonfly Dreams stamp set. I stamped it in Versamark on the strip of Whisper White, heat embossed it using Copper Embossing Powder and trimmed it diagonally. The sentiment alone seemed a bit dull so I took a very narrow strip of Whisper White (around 1/8″), dabbed it in Versamark and heat embossed in copper as well. Next, I trimmed it and adhered it to the sentiment, underneath the top edge, so it peeks out slightly.

anna-stampin-cave-ink-smooshing-technique-with-dragonfly-dreams-bundle

To assemble the card I’ve used my favourite Tombow liquid adhesive. I love it because it gives you some wiggle room before it sets. Also, it’s the best for those slightly warped watercolour panels. Next, I’ve added my sentiment in the top right corner using dimensionals. For dragonfly, I’ve used Tombow again. The last touch was to add some extra shimmer to the dragonfly with Clear Wink of Stella Glitter Brush. You can’t go wrong with this stuff right?!

I hope you’ve enjoyed my project and that it will give some extra ideas of how to use this beautiful Dragonfly Dreams Bundle. I would love to hear what you think in comments below. As always, if you wish to purchase any of products I have used, simply click the images below to go directly to my online shop.

Thank you for stopping by and have a blessed day

Dragonfly Dreams Photopolymer Bundle

Dragonfly Dreams Photopolymer Bundle
[144728]
£42.25

Detailed Dragonfly Thinlits Dies

Detailed Dragonfly Thinlits Dies
[142749]
£28.00

Dragonfly Dreams Photopolymer Stamp Set

Dragonfly Dreams Photopolymer Stamp Set
[142924]
£19.00

Cucumber Crush A4 Cardstock

Cucumber Crush A4 Cardstock
[138342]
£7.25

Island Indigo A4 Card Stock

Island Indigo A4 Card Stock
[124390]
£7.25

Whisper White A4 Card Stock

Whisper White A4 Card Stock
[106549]
£8.25

White Vellum A4 Card Stock

White Vellum A4 Card Stock
[106584]
£6.00

Shimmery White A4 Card Stock

Shimmery White A4 Card Stock
[121717]
£7.25

Cucumber Crush Classic Stampin' Pad

Cucumber Crush Classic Stampin’ Pad
[138324]
£6.00

Island Indigo Classic Stampin' Pad

Island Indigo Classic Stampin’ Pad
[126986]
£6.00

Versamark Pad

Versamark Pad
[102283]
£7.75

Embossing Buddy

Embossing Buddy
[103083]
£5.50

Copper Stampin' Emboss Powder

Copper Stampin’ Emboss Powder
[141636]
£4.50

Aqua Painters

Aqua Painters
[103954]
£15.50

Clear Wink Of Stella Glitter Brush

Clear Wink Of Stella Glitter Brush
[141897]
£7.25

Liquid Multipurpose Glue

Liquid Multipurpose Glue
[110755]
£3.75

Stampin' Dimensionals

Stampin’ Dimensionals
[104430]
£3.75

Paper Snips Scissors

Paper Snips Scissors
[103579]
£9.00

Stampin' Trimmer

Stampin’ Trimmer
[129722]
£27.00

Big Shot

Big Shot
[143263]
£99.00

Swirly Scribbles See-Through Window Shaker Card

Anna’ Stampin’ Cave – Simply Sketched Saturday Challenge – Swirly Scribbles See-Through Shaker Card

SSSC Header

Thank you for joining us for another Simply Sketched Saturday Challenge!  We’re so excited to be sharing this hop with you. The products used are all available in the current Annual, or seasonal, Stampin’ Up!®  Catalogues*. Simply use the buttons at the bottom of the post to keep hopping!

The sketch we’re working today with was designed by talented Keren Howell.

SSSC 11

I really like this sketch. And funny how many cards I created recently could fit this sketch perfectly. But today I wanted to make something slightly different: a see-through window shaker card.

Swirly Ccribbles See-Through Window Shaker Card

Don’t you just love Playful Palette Designer Series Paper Stack?! 48 sheets of such fun designs! I couldn’t decide which one to choose. But because I wanted to use Sweet Sugarplum cardstock for my base, these fun, wonky squares were perfect.

I cut out the window in my base first. Next, I traced the “window” on my DSP and cut it out too. Save that piece as you will need it later. I’ve used our new Foam Adhesive Strips to create the shaker. I added them around the window on the base and adhered a piece of acetate. I’ve used more foam strips around the base to adhere my piece of DSP. To finish my shaker window, I added black sequins and adhered another piece of acetate on the inside of the card.

Swirly Ccribbles See-Through Window Shaker Card 2

For the inside, I’ve used a Very Vanilla panel and a piece of DSP that I cut out when creating the window. But this time I’ve used the reverse side of that DSP. The placing is the key, so when the card is closed, you can see that piece through the window. The sentiment “It’s Your Day” was stamped in Basic Black Archival Ink, using Labeler Alphabet Stamp Set (which I truly love). And yes, I stamped it wonky on purpose 😉

Swirly Ccribbles See-Through Window Shaker Card inside

When the shaker bit and the inside of the card were done I could concentrate on the front. I die-cut two wreaths using Swirly Scribbles Thinlits Dies. One in Basic Black, and one in Very Vanilla. I glued them together slightly off-setting, so the Very Vanilla is peeking from underneath. I adhered it to the base with Multipurpose Liquid Glue. My sentiment, again, was stamped using Labeler Alphabet Stamp Set. I stamped it on a piece of Very Vanilla, and hand-cut it leaving a little border around the letters. Adhered it with liquid glue.

For embellishments, I’ve used White Perfect Accents, which I coloured black using a permanent marker. And that finish off my card.

Do you like my project?! If so please leave me a comment. I would love to hear from you!

Now, be sure to hop along and see more inspiring projects. Your next stop is Helen’s blog  go and see what she has made for you.

Thank you for stopping by and have a blessed day,


SSSC Previous   SSSC Next Blog

Happy Mother’s Day! ‘Mum’s Love’ Says It All

I wanted to wish Happy Mother’s Day to my all UK and Irish followers! Today I’ve been treated with coffee and breakfast to bed ^_^ Feel so pampered 🙂 hmmm…makes me think that Mother’s Day should be every day! 😀 And today I’ve got one more project using Mum’s Love stamp set.

mums love 7

To make this card I’ve used same card stock as yesterday: Strawberry Slush and Whisper White. And you probably wondering what about the brown?

mums love 9

Well, I simply coloured WW with Chocolate Chip ink pad 🙂 Just cut strip of paper, press it into your ink pad and then let it dry. I used this colour to stamp sentiments and flowers too. These little flowers on the front are punched using flower punch from Itty Bitty Accents punch pack. Each one has a tiny rhinestone in the center.

mums love

For the front panel I cut a piece of  Window Sheet and embossed it with Filigree Frame embossing folder (it was available in autumn/winter catty).

mums love 5

I loooove dry emboss window sheets 🙂 It’s looks gorgeous and adds extra dimension to the card.

mums love 8

I love this stamp set and really think it’s a “must have”. I owe the one in photopolymer but you can choose clear or wood mount too.

Thank you for stopping by and have an amazing day everyone!

Endless Wishes And Sequins Shaker Card

Yep. It’s just about a time for me to try something I haven’t tried before 🙂 A shaker card! If I can be honest the idea for this card poped out to me while surfing the internet. I’ve seen so many beautiful shaker cards. And one day it happened I came across gorgeous card by Amy White. I’ve changed some colours used plus instead of punched stars I’ve used silver sequins and white snowflakes by Stampin’ Up.

shaker 1

For the background, same as Amy, I’ve used Endless Wishes. But I chosed Lost Lagoon, Smoky Slate and Soft Sky ink pads. The shaker bit is made from Chalk Talk framelit, piece of window sheet, 1 3/4″ circle punch and the largest of shaker frames. It’s attached to the card with piece of Lost Lagoon Ribbon, Whisper White Bakers Twine and beautiful Snowflake Embellishment which is available in our Autumn/Winter Catalogue.

shaker 2

The background is slightly “kicked” 😉 and attached to the Lost Lagoon base. The fake stiching around the background and shaker is made using Pool Party Stampin’ Marker.

Really hope you like my shaker card with sequins. Thank you for stopping by