Negative Die-Cutting

Anna’ Stampin’ Cave – Negative Die-Cutting


Hello everyone and welcome! Today I’ve got for you super cool & easy technique to try out: negative die-cutting. Just a reminder: each week we are using Ronald McDonald House stamp set ‘My Hero’.

anna-stampin-cave-my-hero-stamp-set-with-negative-die-cutting

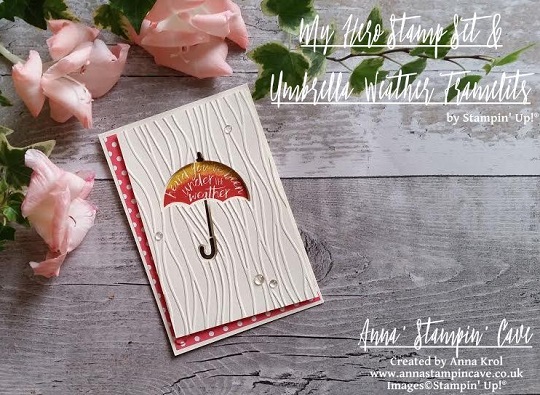
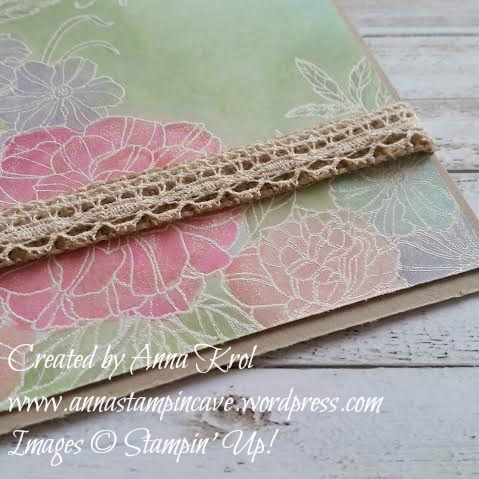
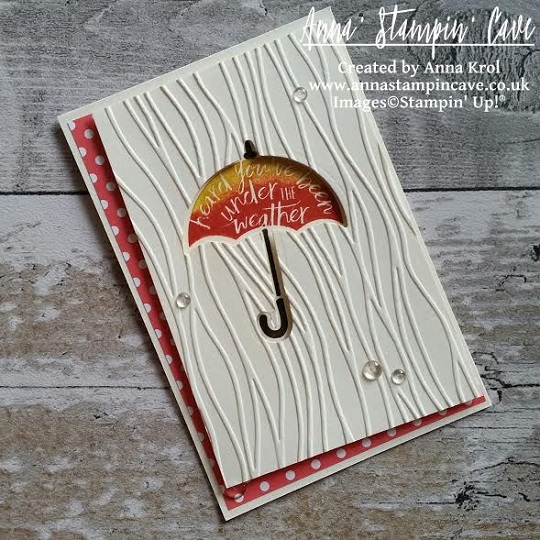
For today’s project, I’ve decided to use this lovely umbrella image. To create my card I started with a Very Vanilla card base and a Very Vanilla panel, slightly smaller than my base. First, I arranged the layout of my card using the Umbrella Weather Framelits. When I was happy with the placing, I die cut the umbrella first and the handle next, from my panel. But instead of using the die-cut piece on the card (as we usually do, don’t we?), I’ve used the negative image. Savvy tip: Don’t throw your die cuts away. You can use them for your next project.

I took my panel, placed it on the card base without adhering it, and I stamped the umbrella and the handle through a die cut holes. Stamp-A-Ma-Jig ( I love this tool!!!) was a big help to position my stamps perfectly. To create an ombre effect on umbrella image, I coloured the stamp with Crushed Curry and Tangerine Tango Stampin’ Markers (Crushed Curry to the top and Tangerine Tango in the middle). And, because I don’t own the 2015-2017 In Colour Stampin’ Markers, I carefully dabbed Watermelon Wonder ink pad to the bottom of the stamp.

my-hero-stamp-set-with-negative-die-cutting-2

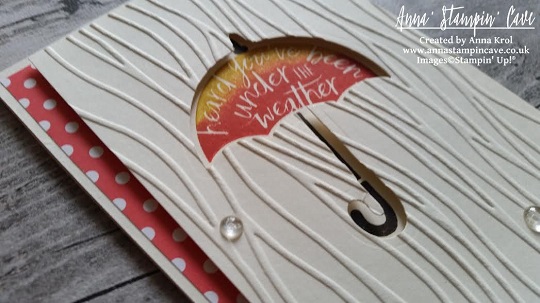
When I was done with the stamping, I trimmed my layer at slightly ‘wonky’ angles, and run it through the Big Shot with a Seaside embossing folder. This folder is intended to imitate the waves, but if you turn it aside, it looks like rain streaks on a window, which is totally cool 🙂

I took a piece of Watermelon Wonder DSP from 2015-2017 In Color Designer Paper Stack (there are four different designs to choose from, but I’ve gone for dots). It was slightly bigger than my top layer, but I  didn’t want to use it all on my card. I only wanted it to peek from underneath my top layer where the ‘wonky’ angles were. So I measured it up, trimmed the piece and adhered it to the base. next, using dimensionals, I’ve added the top layer.

my-hero-stamp-set-with-negative-die-cutting

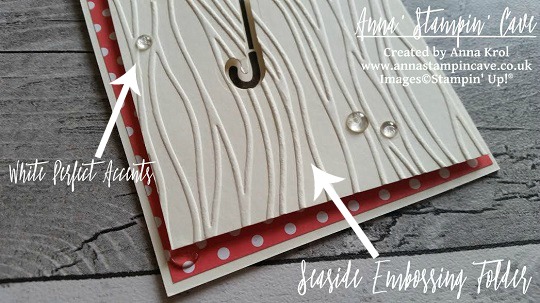
I decided not to use any additional sentiment on my card, as I think the one on the umbrella says it all. To embellish the card I’ve used White Perfect Accents. But hey, you say, these are clear, right? But did you know that you can peel off the white, sticky backing from your  White Perfect Accents, and you get these super awesome clear, perfectly round embellishments?! It’s cool or what?! But, of course, once you peel the backing off, you need to use glue to adhere them.

pootlers-design-team-week-2

So, did you liked my project?! I hope I inspired you to give this technique a go. It’s really cool and you will be hooked in no time!

Thank you for stopping by and have a blessed day,

Touches of Texture – More Than Flowers

Anna’ Stampin’ Cave – Touches of Texture – More Than Flowers

Touches Of Texture Stamp Set project.jpg

Have you played with the Touches of Texture Stamp Set yet? You’ll have fun mixing and matching the floral images with layers of texture.

The textured images in the set work well for all kinds of styles, as shown in the projects above and below.

Touches Of Texture

I’m in awe by all the possible techniques and designs that can be created with this set!

Touches Of Texture Stamp Set

Order your Touches of Texture in clear mount here or if you are a fan of wood mount you will find it here.
Thank you for stopping by and have a blessed day,

Embossing Resist Technique With Corner Garden Background Stamp By Stampin’ Up!

Embossing Resist Technique With Corner Garden Background Stamp By Stampin’ Up!

Corner Garden Easter Card 4

While Easter is just around the corner, today I’ve got for you beautiful Easter card using embossing resist technique. I love this technique as it has a real WOW factor to it! I love how the colours just POP on the card when sponged or water coloured over the heat embossing.

But first thing first – I wanted to apologise for being absent on the blog for a long time. I didn’t mean to neglect anyone of you but I’ve been struggling with a very nasty bacterial chest infection, which knocked me down, literally. I wasn’t able to do anything around the house, or even myself (not to mention crafting). So blessed to have a wonderful husband who took care of the house and our family, cooking, cleaning, etc and most of all – me.

The project I share today was made for our team swap at the end of February. But since the infection kicked in I wasn’t able to share it with you at all.

Corner Garden Easter Card

To create my card I stamped a beautiful image from Corner Garden background stamp in Versamark on the piece of regular Whisper White. Remember to always use an antistatic tool on your card before stamping your image if you want to heat emboss it, as it will take all the static from your card, and embossing powder will stick only to your stamped image. The sentiment is stamped in Versamak too. Both: flowers and sentiment are heat embossed in white.

Now the fun part starts – water colouring! You may think: oh no! You should use a watercolour paper. But to be honest, if you don’t plan to soak your cardstock in water, use your aqua painters gently, and your layer will be mounted on the base – you can add your water colouring on regular cardstock without any problem. Just like I did. Believe me or not, I coloured all my flowers and leaves using aqua painter. As they say, the devil is in the detail. You can’t allow aqua paint brush to carry lots of water, it needs to be slightly wet. You only use it to pick the colour from the lid of your ink pad ( to have some ink on your lid you have to squeeze you ink pad gently when it’s closed). And you pick more colour with every stroke or two. You can’t paint with water only as it will damage your paper if using regular Whisper White.

Corner Garden Easter Card 2

When all the colouring was done I sponged the background using Pear Pizzazz, Wild Wasabi and Pool Party. Any place of the background that I thought was too dark, I lightened with Whisper White Craft ink pad. I also lightened the look of some flowers, especially the Melon Mambo one, the large at the bottom of my card. I also added some Clear Wink of Stella to my flowers for a shimmer.

Corner Garden Easter Card 3

To embellish my card I cut a narrow strip of Burlap Ribbon, added Venetian Crochet Trim at the top and add it at the bottom of my layer. Next, I mount it on my Crumb Cake base.

I love that slight rustic feel to my card, even though there’s lots of shimmer on the flowers from Wink of Stella. It may not be your traditional Easter card but I love it! And you can always change a sentiment and make it into the birthday card, get well or congratulations card maybe? Possibilities are endless. If it comes to Easter I personally prefer cards with the strong message like this one I’ve made last year:

he is risen 6

Now I would love to hear from you! Do you prefer more traditional Easter cards? Or maybe you’re a fan of fun and cheeky ones (I’ve seen lots of these lately)? Let me know in the comments below.

Have a blessed day,

Wildflower Fields Fridge Mini Calendars

Wildflower Fields Fridge Mini Calendars

Wildflower Fields Fridge Mini Calendars - Blackberry Bliss

Good evening everyone. A few days ago, on my facebook page,  I’ve posted some fridge mini calendars I’ve made as a thank you gifts for my customers. But they were such a hit that I thought I will make a blog post, to show how to make them. Just a warning, it’s gonna be picture heavy 😉

Wildflower Fields Fridge Mini Calendars - Blackberry Bliss 2

I’ve bought these mini calendars on eBay while ago, but due to chronic fatigue I just couldn’t push myself to sit down and craft – maybe except for the cards once in a while. But I was wondering about customers gifts the other day and had a lightbulb moment – why not make cute magnetic fridge calendars?! Each calendar measures approx 2-7/8″ x 1-7/8″, and on their size, I’ve based my design.

Wildflower Fields Fridge Mini Calendars - Instructions 1

The base for my calendar measures 3″x 4″ – here I’ve used Hello Honey. Designer Series Paper measures 2-7/8″x 2″ and Whisper White piece for stamping measures 1-1/2″x 2″. I rounded all the edges of my base, top edges of DSP and right top corner of Whisper White. I’ve used my Envelope Punch Board to do so, but you could use the corner rounder punch if you have one.

Wildflower Fields Fridge Mini Calendars - Instructions 2 Wildflower Fields Fridge Mini Calendars - Instructions 3

I stamped “a little something cute…” sentiment from Something To Say stamp set on my Whisper White pieces. Next, I stamped floral images from Flowering Fields stamp set. I just love this set! Don’t forget that this beautiful stamp set you can earn free with every £45 purchase during Sale-a-bration.

instrukcje

I’ve used Hello Honey for butterflies, Old Olive for stems and leaves, and Lost Lagoon and Calypso Coral for flowers. I’ve used ink pads as well as Stampin’ Markers to do my stamping. I have to say here, I love that all Stampin’ Up’s Designer Series Papers got all coordinating colours listed at the back of the paper pack. It makes creating so much easier if you don’t have to work out which colours to use. I also sponged stamped panels, so they stand out nicely from the background.

Wildflower Fields Fridge Mini Calendars - Hello Honey 2 Wildflower Fields Fridge Mini Calendars - Lost Lagoon

Wildflower Fields Fridge Mini Calendars - Lost Lagoon 2 Wildflower Fields Fridge Mini Calendars - Hello Honey

To embellish my Blackberry Bliss calendars I’ve used Silver 1/8″ Ribbon as it looked pretty neat on a dark background. But it didn’t work as good on the light one. So I cut “skinny” strips of cardstock in Lost Lagoon and Hello Honey, smooshed Versamark over them and heat embossed with Iridescent Ice Embossing Powder. I love this gentle shimmer.

Wildflower Fields Fridge Mini Calendars - Instructions 5

I assembled my calendars using Tombow glue. I also added two strips of a magnet at the back of each one.

Wildflower Fields Fridge Mini Calendars - Lost Lagoon & Hello Honey

I really hope you like my little project and that you give them a go. Or maybe you have different ideas to use these little calendars for? I would love to hear from you!

Have a blessed day,

Bloomin’ Love Valentine’s Day Gift Set

Today I’ve got for you beautiful Valentine’s Day card I’ve made to match cute Valentine’s Day gift box I posted two weeks ago. Again I’ve used Bloomin’ Love stamp set and Real Red Stampin’ Pad. This time I also used matching Bloomin’ Heart Thinlit Dies.

The card is a standard A6 top folded card. Because I didn’t want the stamping underneath the heart, I die-cut my heart first and used it as a stencil to lightly mark where the heart will be. I also masked around 1-1/2″ of the bottom of the card base using post-it notes. I wanted to keep it clean for the sentiment.

Valentines Day card 8

I stamped the base carefully around the marked line first, and then just filled in the rest of the space. Next, I stamped the sentiment. I cut a tiny strip of Real Red cardstock and adhered it just above the sentiment to hide where the stamping ends.

Valentines Day card 2

I also stamped the inside of the card using this cute floral stamp.

Valentines Day card 6

When I put my card together I decided to add some pop to it.

I stamped 3 small and 2 large flower outlines on the piece of Whisper White and die-cut them. I sponged their edges and attached them to the heart with glue dots. Just a little touch of Clear Wink of Stella glitter pen and few mini pearls and the card was ready.

Valentines Day card 3

I love how this card turned out and how it matches the box. Perfect little gift for Valentine’s Day.

Thank you for stopping by and have a blessed day,