Rustic Best Birds For Global Design Project #084 Challenge

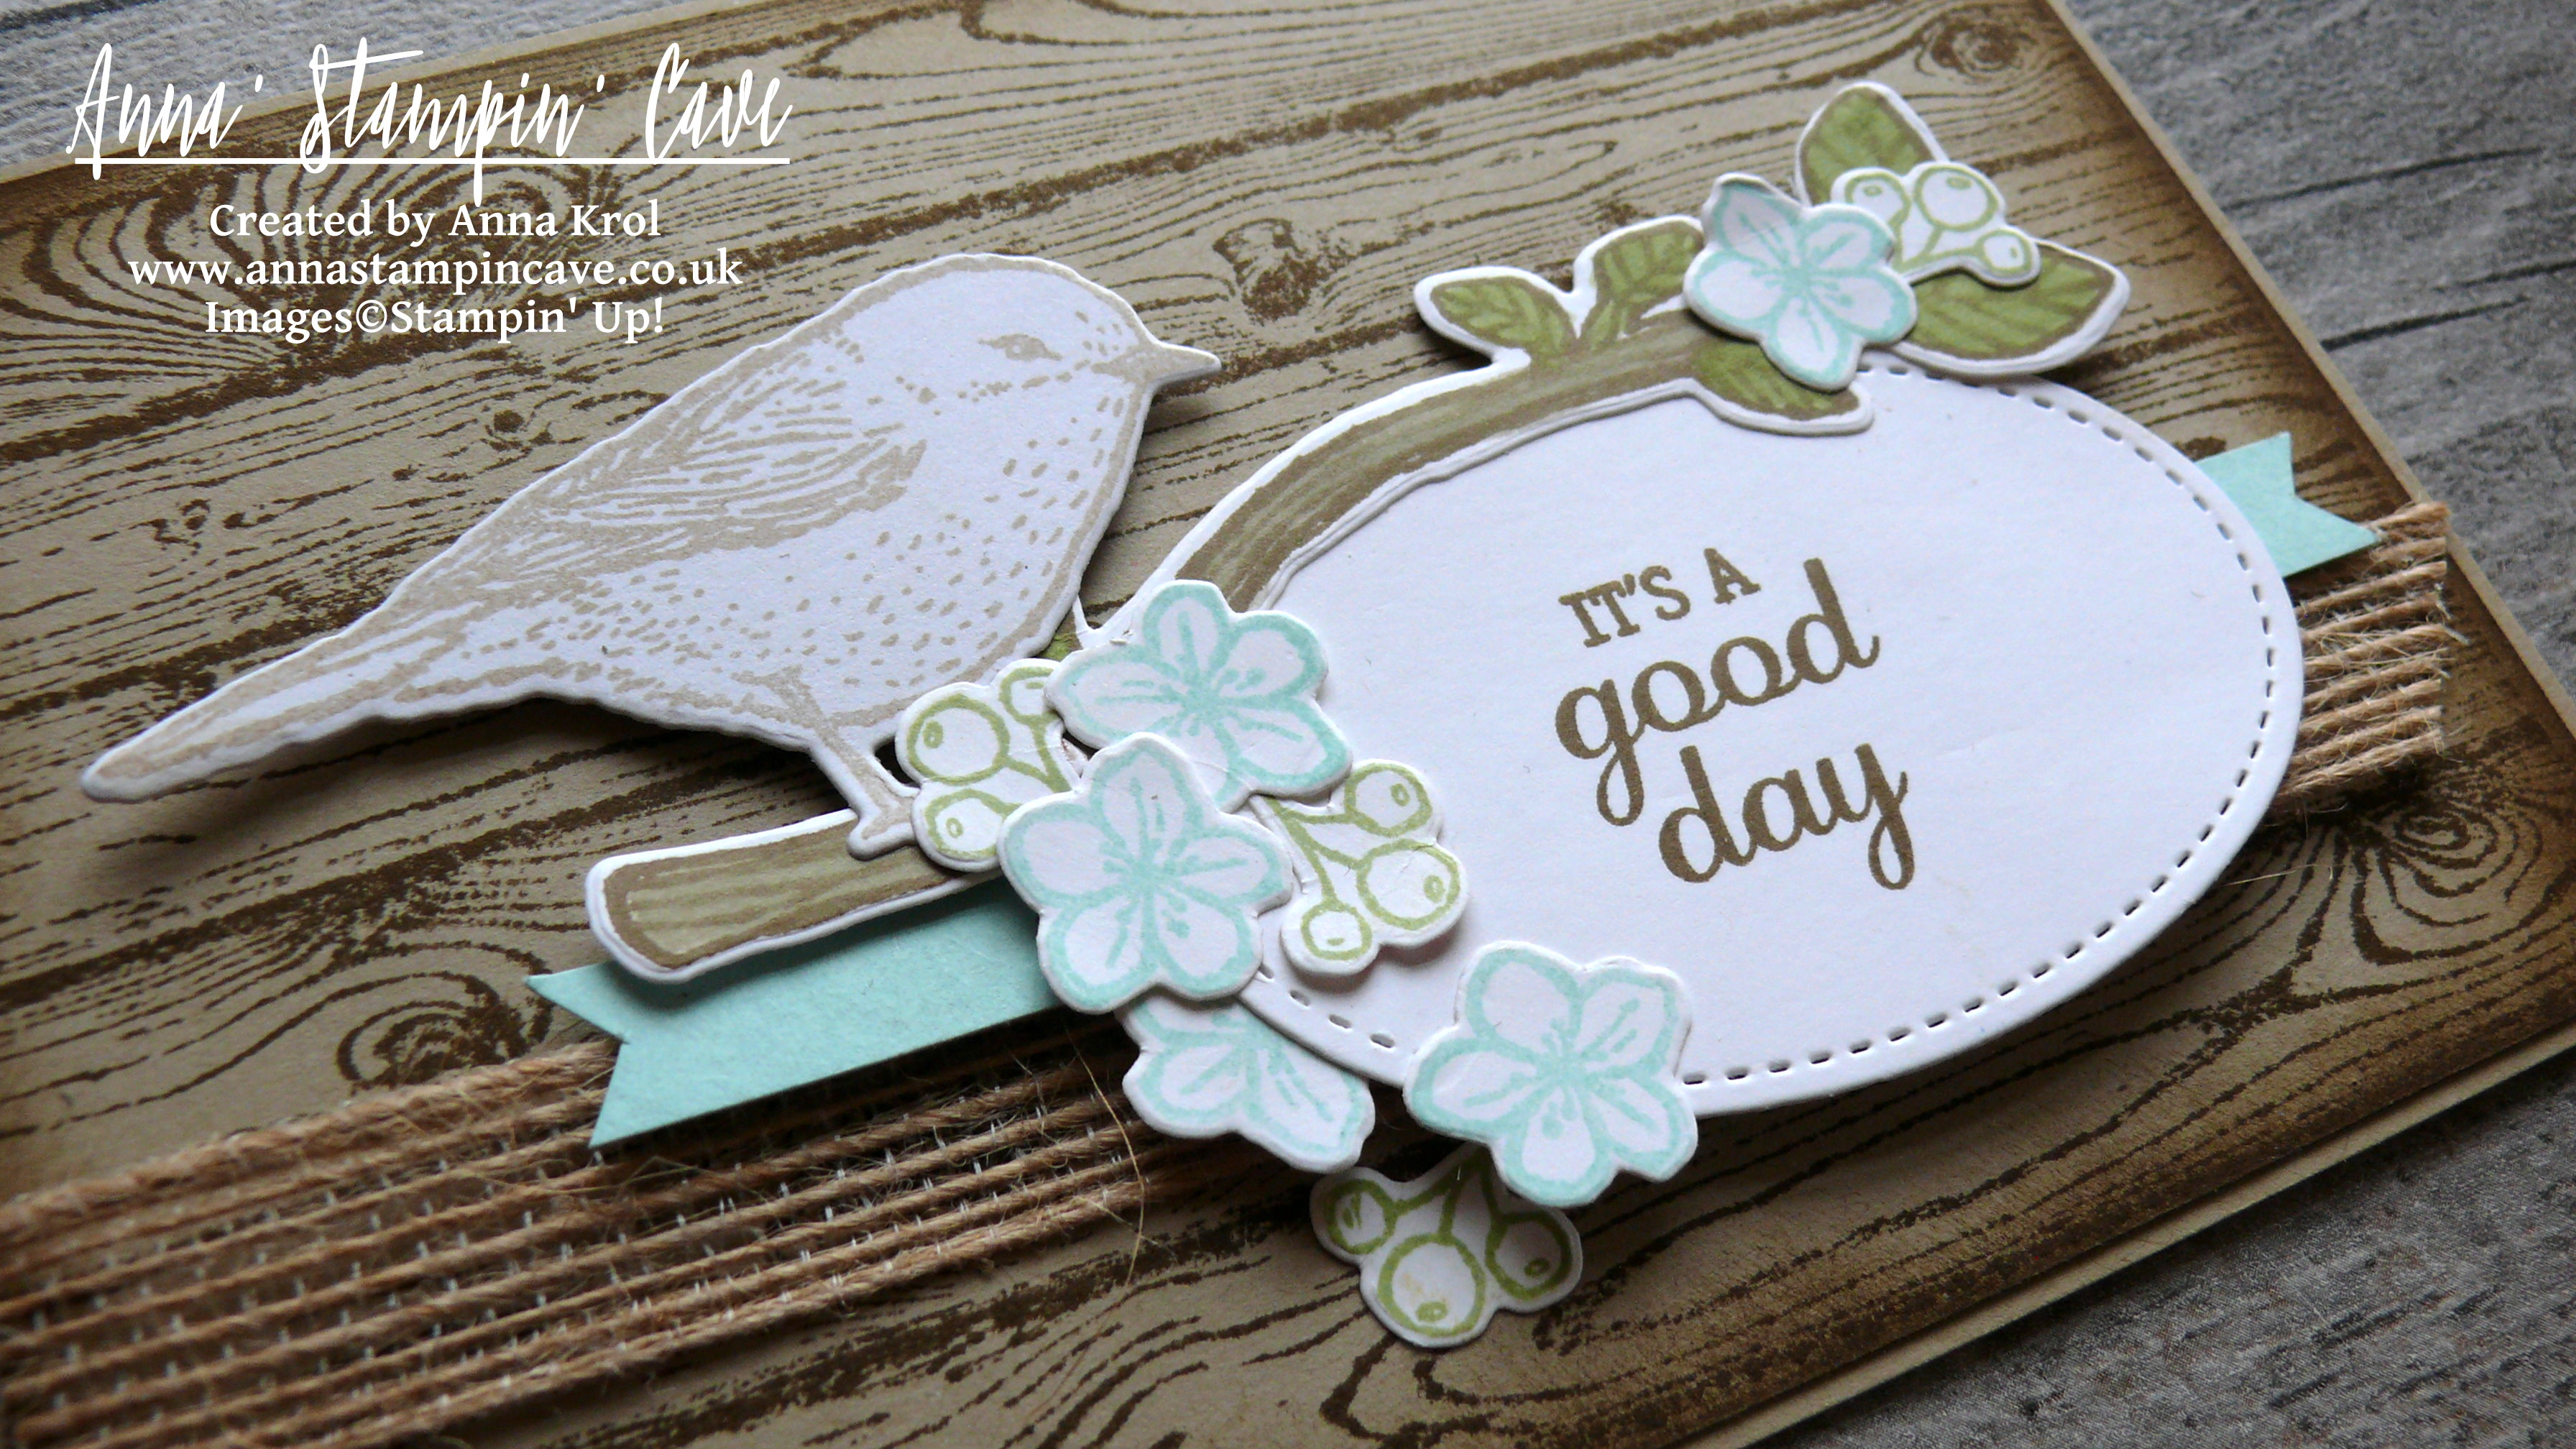
Anna’ Stampin’ Cave – Rustic Best Birds For Global Design Project #084 Challenge

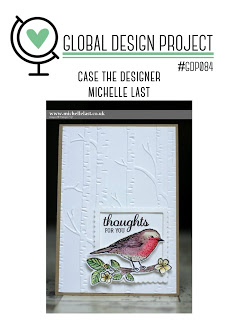
Hello and welcome everyone! Today I’m back with my entry for Global Design Project. This week is Case The Designer Challenge over at GDP and we’re casing wonderful Michelle Last. I have to admit I absolutely love Michelle’s style. She’s an incredible artist and amazing person too (I had the privilege to meet her in person a few years back).

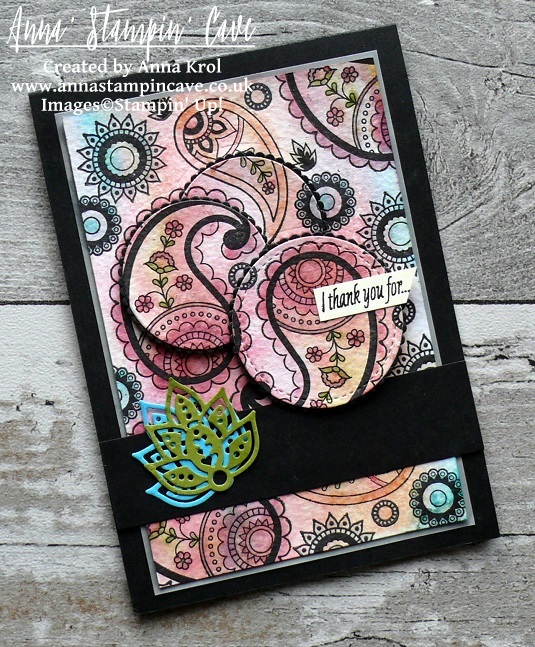
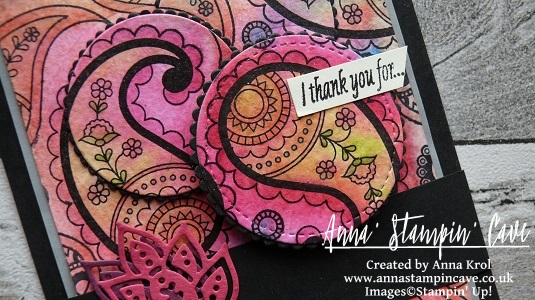
It’s a beautiful card to CASE: clean & simple with lots of yummy texture. But I didn’t really want to follow the colour combination or the layout of Michelle’s card (but as you will see I failed miserably as I ‘accidentally’ cased the layout anyway haha ). For my card, I decided to focus on a couple of products she used instead: Best Birds Stamp Set and coordinating Birds & Blooms Thinlits Dies.

Rustic Best Birds card dimensions:

  • Crumb Cake cardstock: 8-1/4″ x 5-7/8″ scored in half at 4-1/8″ (21cm x 14.8 cm scored in half at 10.5 cm)
  • Crumb Cake cardstock: 4-1/8″ x 5-6/8″ (10.2 cm x 14.6 cm)
  • Whisper White cardstock for stamping & die cutting
  • Pool Party cardstock: 3/8″ x 4-3/8″
  • Burlap Ribbon: approx 5-6/8″ (14.6 cm)

I don’t know about you, but when I first saw this stamp set it has called countryside to me. I only bought this bundle a few weeks ago and was really eager to have a play. So this week’s challenge was perfect for inking up my stamp for the first time.

First, I created the background for my ‘idyllic’ scene. I took Crumb Cake panel and stamped it with Hardwood background stamp in Soft Suede. I also sponged the edges of the panel with Soft Suede ink to add to the ‘rustic feel’.

Next, I stamped and die cut all the elements of my scene. The bird is stamped using Crumb Cake ink. Flowers – Pool Party. For little berries/fruits, I’ve used Pear Pizzazz. Branch is stamped in Soft Suede ink and coloured in with markers: Crumb Cake for the branch and Pear Pizzazz for leaves.

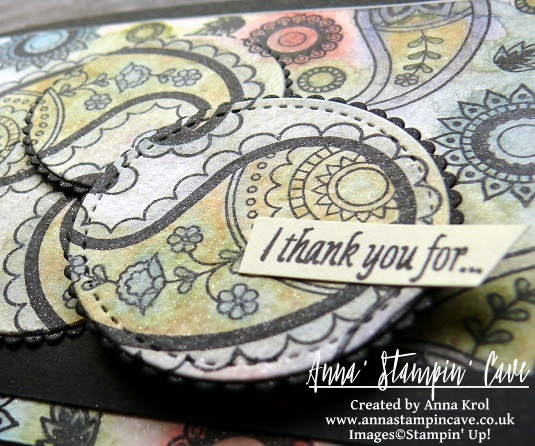
I love this sentiment “It’s a good day” from Best Birds Stamp Set. I stamped it in Soft Suede on a piece of Whisper White cardstock and die cut using an oval die from Stitched Shapes Framelits Dies. I think stitched edge suit rustic ‘feel’ of this card just perfectly.

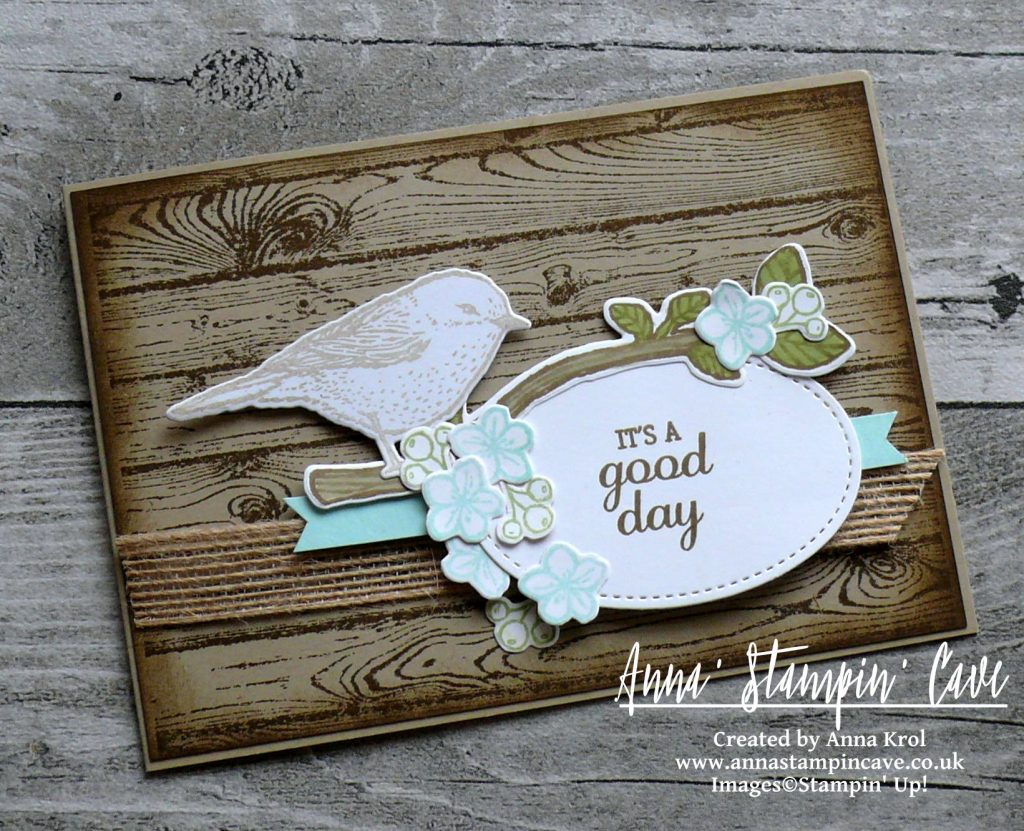
Before I assembled my card I played a little with a placement of all the elements. To add some ‘natural’ texture I decided to use Burlap Ribbon as a banner. I also cut a thin strip of Pool Party cardstock to ‘break’ all the browns. When I was happy with the placement, I took a photo and started the assembly.

Tip: If you have a layout, either a card or a scrapbook page, that consist of lots of small elements, play with the placement first, before glueing things down. Once you’re happy, take a photo of your test layout with your phone ( we all have it on hand, don’t we?). Next, assemble your card/scrapbook page piece by piece by piece with a help of your reference photo. No more guessing ‘where was this or that element supposed to go.

I truly hope you like my little, rustic card. It reminds me of my childhood in Poland and summer holidays we spent in the countryside with our great-grandmother. Wonderful memories.

As always, I really want to encourage you to visit the Global Design Project challenge blog to see other beautiful projects from all around the world. Just click on their logo below to visit the website

Thank you for stopping by and have a blessed day,

Global Design Project #082 Sketch Challenge Beautiful Message

Anna’ Stampin’ Cave – Global Design Project #082 Sketch Challenge Beautiful Message

GDP82

Hello, everyone! Today I’m playing again with Global Design Project Sketch Challenge. But before I show you my take on the sketch I want to share with you some exciting news. My cards were among the winners at the last GDP Colour Challenge! Woo hoo! But that’s not all. I have also been chosen to be a Guest Designer in the next colour challenge! How cool and what a privilege?!

Guest_Designer_Winner_Anna

Totally unexpected; I’m still pinching myself 🙂 If you have not seen my winning cards, just click the button above.

But now let’s go back to today’s project.

Today I’ve got for you this beautiful, clean & simple card with an amazing message from the Bible.

Anna' Stampin' Cave_Stampin' Up! Easter Message Stamp Set_Mint Macaron_gold foil_gold heat embossing_clean and simple_Jesus is risen

Beautiful Message card dimensions:

  • Whisper White Thick cardstock: 11-6/8″ x 4-1/8″ scored in half at 5-7/8″ (29.7 x 10.5 cm scored in half at 14.8 cm)
  • Mint Macaron cardstock: 5-7/8″ x 4″ (14.8 cm x 10.2 cm)
  • Whisper White cardstock: 4-1/8″ x 2-2/8″ (10.4 cm x 5.7 cm)
  • Gold Foil: 5-7/8″ x 1″ (14.8 cm x 2.5 cm)

I was really eager to put my hands on this beautiful stamp set ‘Easter Message’ the moment I saw it. But I was able to order it only just recently.

Anna' Stampin' Cave_Stampin' Up! Easter Message Stamp Set_Mint Macaron_gold foil_gold heat embossing_Jesus is Risen

To create this beautiful card I first took Mint Macaron panel and randomly stamped palm tree all over it, using Versamark inkpad, and heat embossed it in gold.

To make sure none of the embossing powder sticks to the cardstock where unwanted, I rubbed my embossing buddy across the paper before application.

To slightly ‘dull’ golden embossing I rubbed my piece with a dry cloth. I think it creates unique, dramatic effect.

I adhered Mint Macaron panel to the card base, followed by a piece of gold foil.

Next, I took my piece of regular Whisper White cardstock and I stamped cross image in Mint Macaron on the top of my piece, so I still had a room for a sentiment below the cross.

For the sentiment I chose this beautiful, life-giving verse from a Bible: Matthew 28:6 ‘He is not here; He has risen’. I’m short for words to say how much this little verse mean for me.

Anna' Stampin' Cave_Stampin' Up! Easter Message Stamp Set_Jesus Is Risen_Mint Macaron_gold foil_gold heat embossing_clean and simple

I stamped my sentiment in Versamark and heat embossed using Gold Stampin’ Emboss Powder again. To stamp it and not ruin my panel, I’ve used good ole stamp-a-ma-jig, so it’s straight and exactly where it should be.

I mount my piece onto the card base using dimensionals.

I may not be an expert if it comes to clean & simple cards. I’m not good at using a minimal number of supplies either. But I’m working on it, and I have to say I’m really happy how this card came out. I hope you like it too. Gold and mint make such an amazing colour combination.

As always, I really want to encourage you to visit the Global Design Project challenge blog to see other beautiful projects from all around the world. Just click on their logo below to visit the website

If you wish to purchase any of products I have used, simply click the images below to go directly to my online store and don’t forget to enter the hostess code for the month of April XMAJ4CYX to receive a gift from me.

Thank you for stopping by and have a blessed day,

Don’t forget to check:

Stampin’ Up! Spring Summer & Annual Catalogue 2016 2017 Retiring List

Anna' Stampin' Cave Stampin' Up! Retiring Products 2017

It’s that time of the year again, when Stampin’ Up! is getting ready to retire stamps and accessories from both the Annual and Spring Summer catalogues. As sad as it is to see these products go, there’s still time for you to get them before they’re gone. Retiring products will only be available until 31 May, or while supplies last. So if there’s something from retiring products on your wishlist, don’t wait until last day – once they’re gone, they’re gone. And they are selling fast! Click here for more details ->

Global Design Project #081 Colour Challenge – Watercolour Birthday Blooms

Anna’ Stampin’ Cave – Global Design Project #081 Colour Challenge – Watercolour Birthday Blooms

GDP81

Hello and welcome! Today I decided to play along with Global Design Project and their Colour Challenge. I love that one of the colours can be our own choice.

I had couple of ideas which colour to use, but because I couldn’t decide which one to choose I created two cards instead of one 🙂

Anna' Stampin' Cave_Stampin' Up! Birthday Blooms Stamp Set_Watercolour Card_Basic Grey Night Of Navy

Basic Grey/Night of Navy ‘Friend To Friend’ card dimensions:

  • Basic Grey cardstock: 8-1/4″ x 5-7/8″ scored in half at 4-1/8″ (21cm x 14.8 cm scored in half at 10.5 cm)
  • Watercolour Paper: 3-6/8″ x 3″  (9.5 cm x 7.6 cm)
  • Regals Designer Series Paper Paper Stack: 3-5/8″ x 3/8″ (9.2 cm x 1 cm) strip of diagonal stripes design paper in Night of Navy
  • Night of Navy Solid Baker’s Twine: approx 33″ (84 cm) + strip of Basic Grey cardstock to secure/hide the twine ends inside the card

For this first card, I decided to use rather classic Night of Navy with Basic Grey colour combination.

Anna' Stampin' Cave_Stampin' Up! Birthday Blooms Stamp Set_Watercolour Card_Basic Grey Night Of Navy 2.JPG

I heat embossed beautiful floral image from Birthday Blooms Stamp Set on a piece of Watercolour Paper in Whisper White Embossing Powder. Next, I watercolour the image using my ink pads as palettes.  For the flower, I’ve used Night of Navy ink pad. For the leaves, I’ve used Basic Grey Archival ink pad, which was a little bit tricky but doable. Just had to work really fast once I squished some ink onto my ink pad cover flap. When finished my leaves, I’ve added more water to the ink that left on the cover and I’ve done a quick wash of light grey around the flower.

For the sentiment, I chose sweet ‘friend to friend’ from Teeny Tiny Wishes Stamp Set and stamped it in Basic Grey Archival Ink in the bottom right corner of my watercolour panel.

Tip: If using clear mount or wood mount stamp sets, always use Stamp-A-Ma-Jig to align your sentiment. It’s best tool ever!

Anna' Stampin' Cave_Stampin' Up! Birthday Blooms Stamp Set_Watercolour Card_Basic Grey Night Of Navy 3.JPG

To prepare my base I stamped the same floral image all over the card front with Versamark ink. Next, I wrapped Night Of Navy Solid Baker’s Twine around the front of the card and secured it at the back with a piece of cardstock.

I adhered a strip of DSP underneath the watercolour piece and added it to the card base, slightly offsetting my piece. The final touch was to add Clear Wink Of Stella to my floral.

For my next card colour combination, I took an idea from Stampin’ Up!’s Annual Catalogue, page 76.  I love how Night of Navy and Delightful Dijon complement each other creating distinguished look.

Anna' Stampin' Cave_Stampin' Up! Birthday Blooms Stamp Set_Watercolour Card_Delightful Dijon Night Of Navy

Delightful Dijon/Night of Navy ‘Friend To Friend’ card dimensions:

  • Delightful Dijon cardstock: 8-1/4″ x 5-7/8″ scored in half at 4-1/8″ (21cm x 14.8 cm scored in half at 10.5 cm)
  • Regals Designer Series Paper Paper Stack, Night of Navy diagonal stripes design: 4-2/8″ x 3-5/8″ (10.8 cm x 9.2 cm)
  • Watercolour Paper: 3-6/8″ x 3″  (9.5 cm x 7.6 cm)
  • Night of Navy Solid Baker’s Twine: approx 12″ (30 cm)

Same as with my first card, I stamped the whole card front with a floral image from Birthday Blooms Stamp Set in Versamark Ink and adhered the piece of DSP in the middle of my card base.

Anna' Stampin' Cave_Stampin' Up! Birthday Blooms Stamp Set_Watercolour Card_Delightful Dijon Night Of Navy 2

Next, I stamped and heat embossed the same image on the watercolour panel in Whisper White. Flowers, as before, are watercoloured with Night of Navy ink, just this time I decided for darker, deeper shade. For the leaves, however, I’ve used Delightful Dijon ink, with a very light wash of DD in the background.

Anna' Stampin' Cave_Stampin' Up! Birthday Blooms Stamp Set_Watercolour Card_Delightful Dijon Night Of Navy 3

A sentiment, same again, is stamped in Night of Navy ink in the top right corner of the panel. I took a piece Night of Navy Solid Baker’s Twine, wrapped it at the bottom of my watercolour piece and tied a little bow. I adhered my panel to the card base, offsetting again. Clear Wink of Stella finishes off the look.

And here are both of my cards together:

Anna' Stampin' Cave_Stampin' Up! Birthday Blooms Stamp Set_Watercolour Card_Delightful Dijon with Night Of Navy_Basic Grey with Night Of Navy

I love how they turned out! Same stamp set, same technique, and same design but two completely different looks. Which one do you like the most? Please let me know in comments below.

As always, I really want to encourage you to visit the Global Design Project challenge blog to see other beautiful projects from all around the world. Just click on their logo below to visit the website

Thank you for stopping by and have a blessed day,


The Creative Flow Blog Hop – Hello Spring

Anna’ Stampin’ Cave – The Creative Flow Blog Hop – Hello Spring

Thank you for joining us on our Creative Flow Blog Hop. Each month we are set a challenge to creatively stretch our imaginations. The products we have used are all available in the current Annual and/or seasonal Stampin’ Up!® catalogues. To hop along, please use the buttons at the bottom of the post to keep hopping. And this month’s theme is ‘Spring is sprung’.

I don’t know about you, but for me, nothing says ‘spring’ more than flowers. So today I’ve got for you a set of super cute, 4 x 4″ notecards.

Anna' Stampin' Cave - Stampin' Up! Number Of Years Stamp Set - Hello Spring Set of Notecards 2.JPG

Spring notecards dimensions:

  • In Colour cardstock: five pieces, one of each colour, 4″ x 8 ” scored in half at 4″ (20,3cm x 10,1cm scored in half at 10,1cm) + scraps for die cutting
  • Whisper White cardstock: five panels 3″ x 3″ (7cm x 7cm)
  • Linen Thread five pieces, 20″ length each
  • Pearls: 15 mini pearls, 3 for each notecard

For the base of my little notecards I decided to use, soon retiring, 2015-2017 In Colours. I stamped each card base with a ‘dotty’ stamp from Number Of Years Stamp Set in Versamark.

Anna' Stampin' Cave - Stampin' Up! Number Of Years Stamp Set - Hello Spring Tip Top Taupe Notecard

Anna' Stampin' Cave - Stampin' Up! Number Of Years Stamp Set - Hello Spring Cucumber Crush Notecard

I stamped each 3 x3″ Whisper White panel using Writing Notes background stamp. I’ve used Cucumber Crush, Mint Macaron, Blushing Bride and So Saffron x2. Next, in the middle of each panel, I stamped a little bouquet of flowers, from Number Of Years Stamp Set. This is a two-step stamping set, so I first stamped the foliage using Pear Pizzazz and Wild Wasabi ink pads, and next I added the flowers in So Saffron, Pool Party, Watermelon Wonder, Blushing Bride and Wisteria Wonder.

Anna' Stampin' Cave - Stampin' Up! Number Of Years Stamp Set - Hello Spring Watermelon Wonder Notecard

Anna' Stampin' Cave - Stampin' Up! Number Of Years Stamp Set - Hello Spring Delightful Dijon Notecard.JPG

I die-cut my bouquets with stitched circle die and adhered a leftover piece to the card base. I also die-cut five scalloped circles: one in each In Colour. Next, I layered each bouquet with a scalloped circle and adhered them to the card base with dimensionals.

Anna' Stampin' Cave - Stampin' Up! Number Of Years Stamp Set - Hello Spring Mint Macaron Notecard

Sentiments come from Crazy About You Stamp Set and I stamped them in coordinating colours once my cards were assembled. For the final touch, I added mini pearls to some of the flowers. I also created cute little bows using Linen Thread and added them to the cards using glue dots.

Anna' Stampin' Cave - Stampin' Up! Number Of Years Stamp Set - Hello Spring Set of Notecards 3.JPG

I’m really pleased with my little notecards and I think they fit the theme perfectly. But just a little reminder that In Colours 2015-2017 will retire soon (end of May) so if you love them I would really advise you to stock up on cardstock, Designer Series Paper, and ink refills as they surely will be sold out way before the end of May. Click the picture below to check the entire collection.

In Colours 2015-2017

Now be sure to hop along to see more inspiring projects. Your next stop is lovely and talented Jerim.

Thank you for stopping by and have a blessed day

Simply Sketched Saturday Challenge #17 – Paisleys & Posies

Anna’ Stampin’ Cave – Simply Sketched Saturday Challenge #17 – Paisleys & Posies

SSSC Header

Thank you for joining us for another Simply Sketched Saturday Challenge!  We are so excited to be sharing this hop with you. The products used are all available in the current Annual, or seasonal, Stampin’ Up!®  Catalogues*. Simply use the buttons at the bottom of the post to keep hopping!

Hello and welcome after a long break. Today’s brilliant sketch has been designed by lovely Sam from Sam’s Sentiments blog. Just check how beautiful this sketch is?! Sadly Sam wasn’t able to take a part in the hop. Such a shame.

sssc-17

I’ve been so busy lately with home renovating and night shifts, that only a couple of days ago I realised our monthly blog hop is today. I panic slightly first but the moment I sit down to the sketch, I knew exactly what I wanted to make. I decided to ‘dig out’ my favourite stamp set from Autumn-Winter catalogue: Paisleys & Posies, as it seemed perfect for the technique I wanted to try: watercolour with markers. Well, it’s kinda watercolour. Anyhow. I had so much fun that I created not one but three cards.

anna-stampin-cave-stampin-up-paisleys-posies-stamp-set-diy-watecolour-dsp

Aren’t these gorgeous?! Such bold designs! And they really super easy to make.

Paisleys & Posies cards dimensions:

  • 3x Basic Black cardstock: 11-6/8″ x 4-1/8″ scored in half at 5-7/8″ (29.7 x 10.5 cm scored in half at 14.8 cm) + 2 x strips 1″x 4-1/8″ + 1 stripe 3/8″x 5-2/8″
  • 3x White Vellum cardstock: 3-5/8″ x 5-3/8″(9,2 x 13,6 cm)
  • 3x Water Colour Paper: 3-1/2″ x 5-2/8″ (8,9 x 13,3 cm)
  • 3x Very Vanilla cardstock: 3-1/2″ x 5″ for the inside panels + scraps for sentiments
  • scraps of the following cardstocks for die-cutting: Basic Black, Rich Razzleberry, Melon Mambo, Tempting Turquoise, Old Olive, Pool Party & Pear Pizzazz

To start off, I stamped various images from Paisleys & Posies Stamp Set onto the watercolour panel in Basic Black Archival Ink.

Tip of the day: Because I did my cards late at night, I had no time for the ink to dry completely but I didn’t want to smear black all over my watercolour panels. So I sprinkled clear embossing powder over the whole piece once I was done with stamping. But I didn’t heat set it, I just let embossing powder to ‘soak in’ all the ‘moisture’. I let it sit for couple of minutes and then brush off the powder.

When my panels were ready I started to colour them in with Stampin’ Markers. Nothing fancy really, and no need to stay in lines either.

anna-stampin-cave-stampin-up-paisleys-posies-stamp-set-diy-watecolour-dsp-vivid-brights

For the first card, I’ve used Melon Mambo, Tangerine Tango, Daffodil Delight, Old Olive and Tempting Turquoise. When all the images were coloured in, I spritzed the whole panel with water. And that’s when all the ‘magic’ happen, as all the colours blend together nicely creating a beautiful watercolour piece. It’s like making your own watercolour DSP. And each piece is different.

To add more colour I dried my panel with a heat tool. Next,  I colour it in again with markers and spritz it with water. You can build up the colour as much as you wish, just remember to dry your panel in-between.

For my next card, I decided to use all markers from Brights family. But this time I only spritz it once, hence much more subtle look.

anna-stampin-cave-stampin-up-paisleys-posies-stamp-set-diy-watecolour-dsp-brights

For the last cardI’ve used Subtles Stampin’ Markers and I have to say they needed the most work. I had to dry my piece and keep adding more colour several times until I was happy with the outcome. Once all my panels were created I decided to add some shimmer to them. I added few drops of Clear Wink of Stella to the water in my spritzer, and I spritzed all the panels.

anna-stampin-cave-stampin-up-paisleys-posies-stamp-set-diy-watecolour-dsp-subtles

Once the panels were dry I die-cut three circles from each panel: full circle using 1-7/8” circle from Stitched Shapes Framelits Dies and two ‘partial’ circles using Layered Circle Framelits Dies. I also die-cut slightly bigger scalloped circles from Basic Black cardstock to go underneath.

anna-stampin-cave-stampin-up-paisleys-posies-stamp-set-subtles

To assemble my cards I adhered vellum to card bases and watercolour panels on top. Next, I glued black scalloped circles underneath the watercolour ones and in-laid them back into the panels. I also adhered Basic Black strips, sliding them slightly underneath the die-cut circles.

anna-stampin-cave-stampin-up-paisleys-posies-stamp-set-vivid-brights

I stamped my sentiments (masking a part of it) on a 3/8″ strip of Very Vanilla cardstock, and adhered it to the card with liquid glue. The full sentiment is stamped inside of the card.

anna-stampin-cave-stampin-up-paisleys-posies-stamp-set-brights

For the final touch, I die-cut some leaves and flowers using a couple of intricate dies from Paisleys Framelits Dies and adhered them to the black stripes.

And these are my cards for today. I hope you like my take on the sketch. Now be sure to hop along to see more inspiring projects. Your next stop is very talented Hannah.

Thank you for stopping by and have a blessed day,

SSSC Previous  SSSC Next Blog