Colourful Striped Background For Global Design Project – I am Guest Designer

Anna’ Stampin’ Cave – Colourful Striped Background For Global Design Project – I am Guest Designer

Hello, my friends! I am so excited as today I am a Guest Designer for Global Design Project. How amazing is that?! I’m so humbled and honoured that GDP team has chosen me to join them for this week’s Colour Challenge. And boy, what a great colours we have to play with!

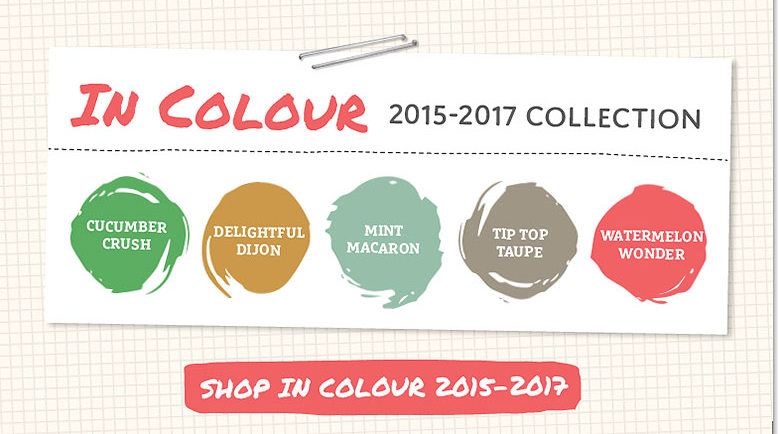
Choose your fav three wasn’t an option for me because I love all of these and wouldn’t know which to choose, to be honest. So I decided to be a rebel and for my project today I’ve used all five. Let’s say this post is a farewell to these beautiful In Colours.

Colourful Striped Background card dimensions:

  • Mint Macaron cardstock: 11-6/8″ x 4-1/8″ scored in half at 5-7/8″ (29.7 x 10.5 cm scored in half at 14.8 cm)
  • Very Vanilla cardstock: two panels, one for the card front, one for the inside of the card 5-7/8″ x 4″ (14.8 cm x 10.2 cm) each
  • cardstock for building the background: 5-7/8″ x 3-1/2″ (14.8 cm x 8.9 cm)
  • scraps of cardstock in colours: Mint Macaron, Delightful Dijon, Watermelon Wonder, Cucumber Crush and Tip Top Taupe
  • White Vellum for stamping and die-cutting

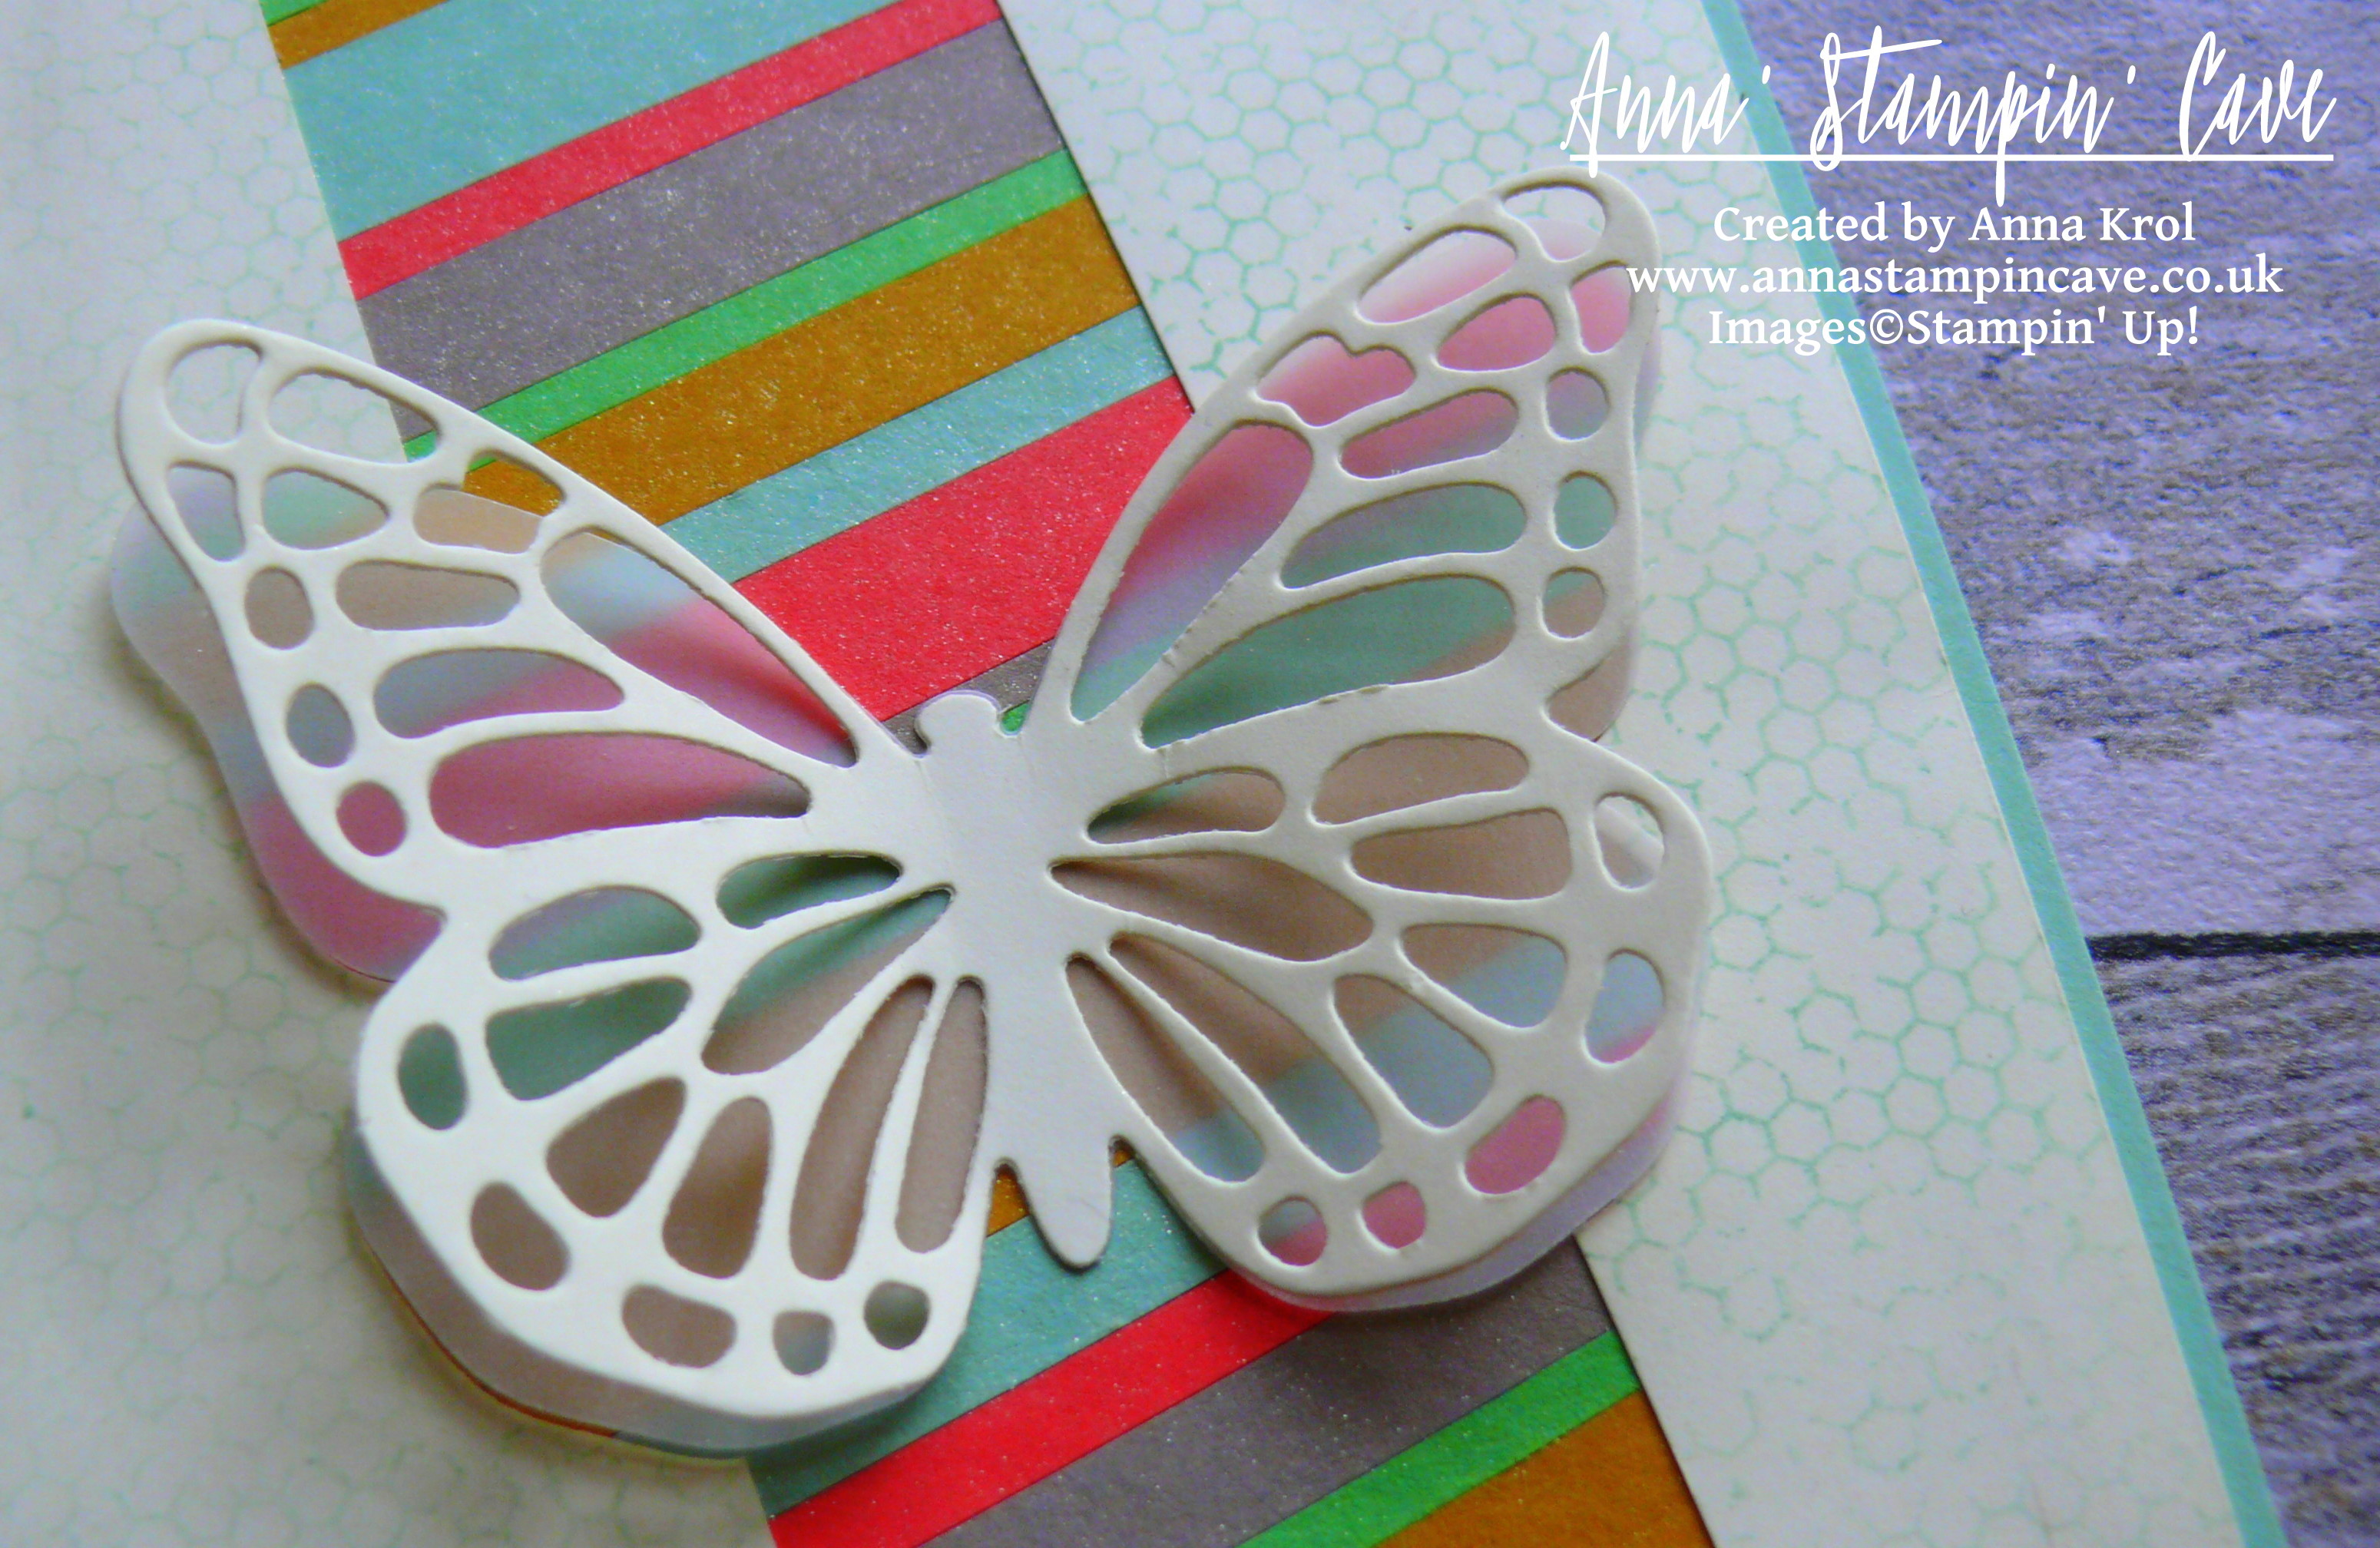
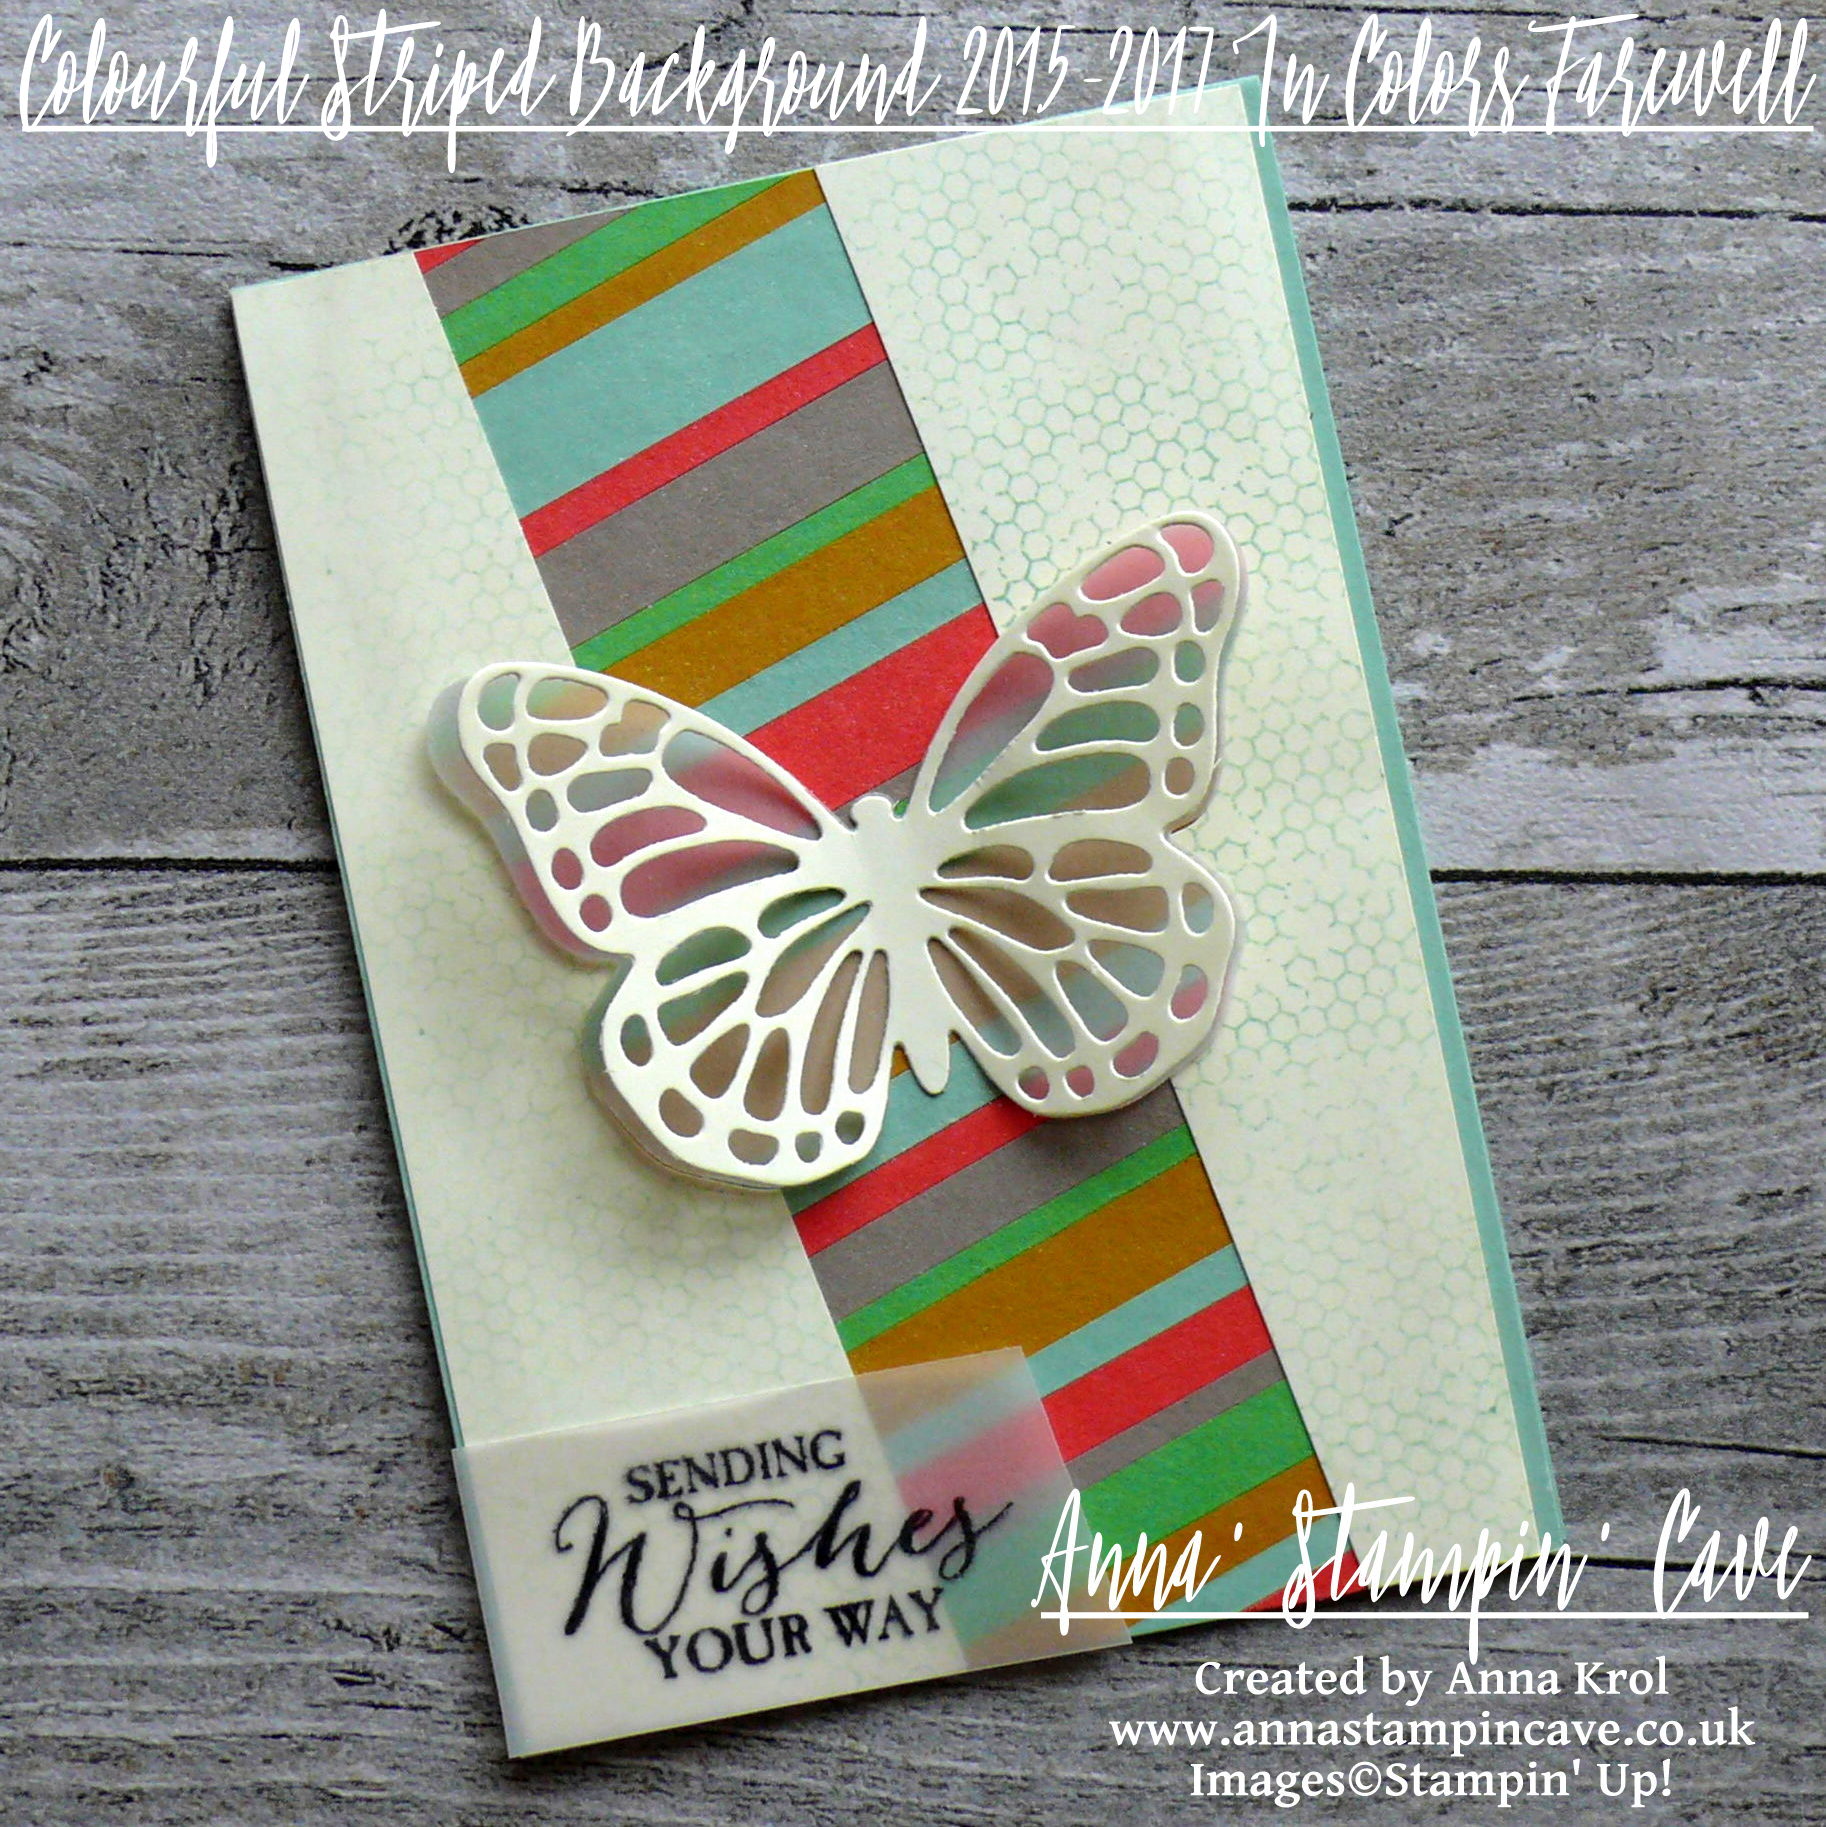
I started my card by creating this fun and colourful striped background. I took my scraps of cardstock of 2015-2017 In Colours and I cut it into strips of different widths. Next, I took a piece of cardstock (random colour as it won’t be seen anyway), covered it in glue,  using snail adhesive, and adhered my strips diagonally, mixing colours and widths, making sure there’s no space left in-between the strips. When the whole panel was covered, I trimmed any overhanging stripes.

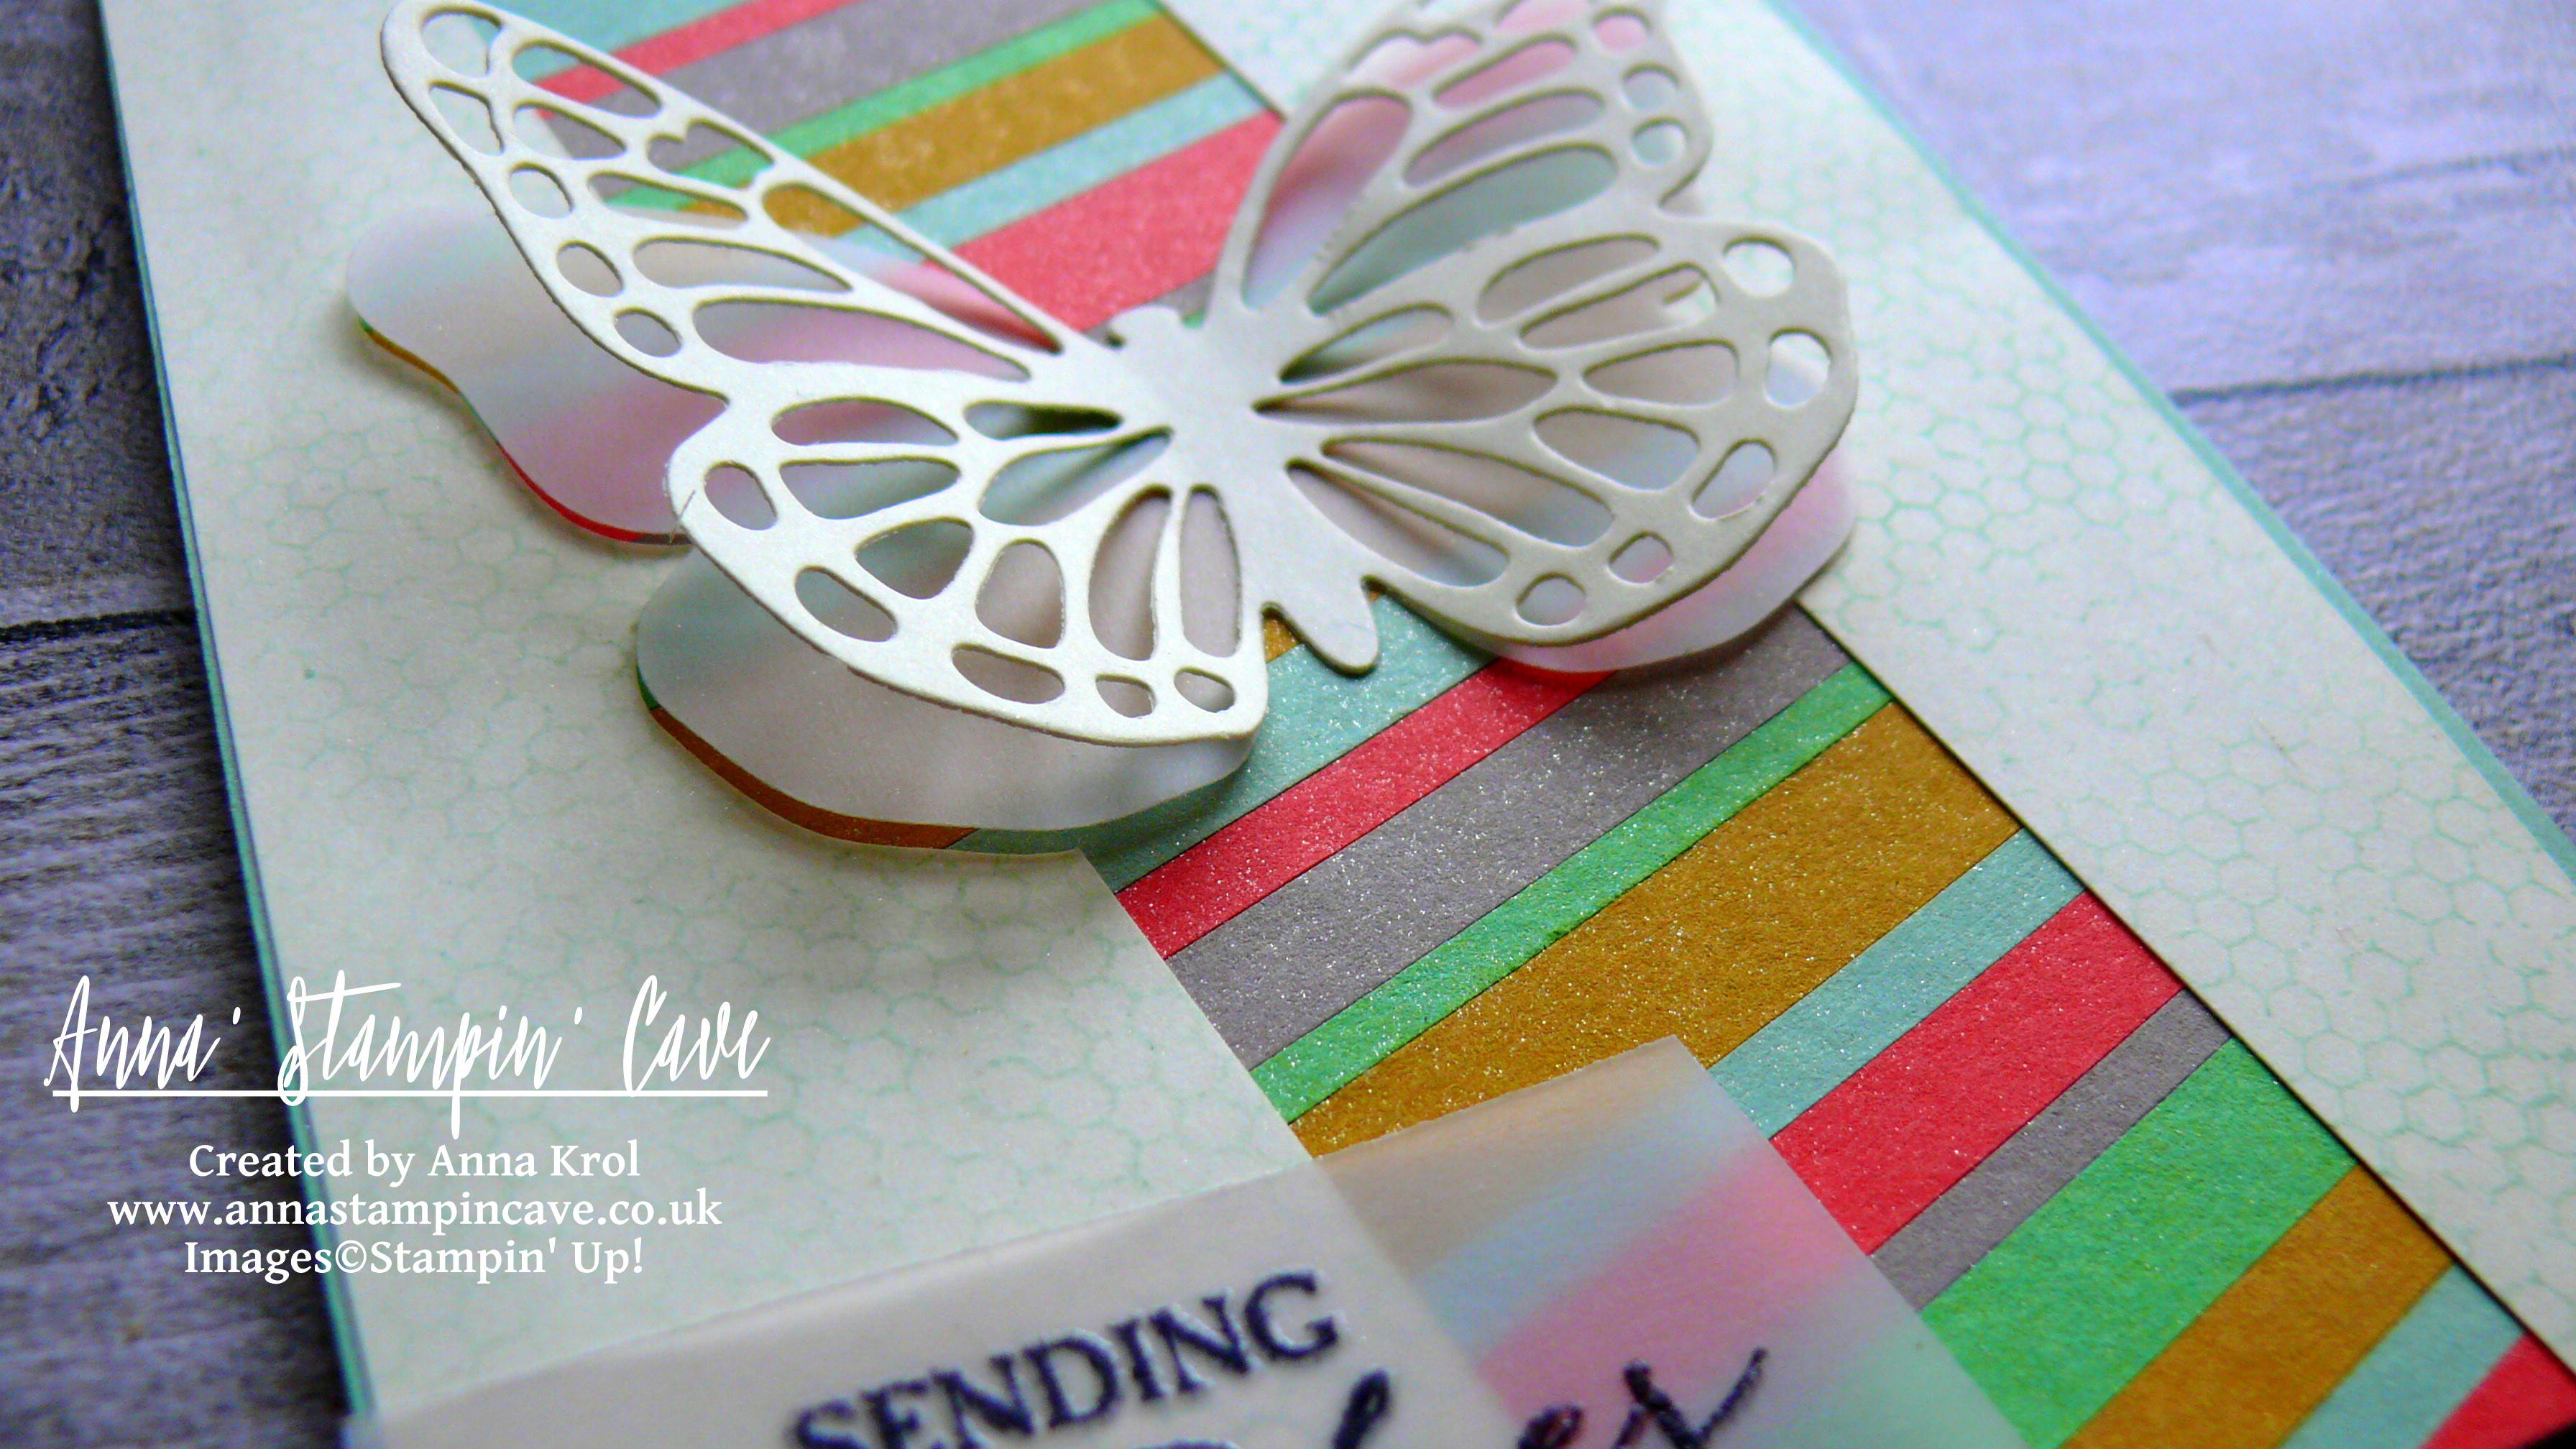
Can you see the shimmer on this panel? I took empty spritzer bottle and fill it with water. Next, I took Clear Wink of Stella Glitter Brush and squeezed pretty few drops of it into the spritzer. I shake it really well, spritz my entire panel with this glittery mist and let it dry.

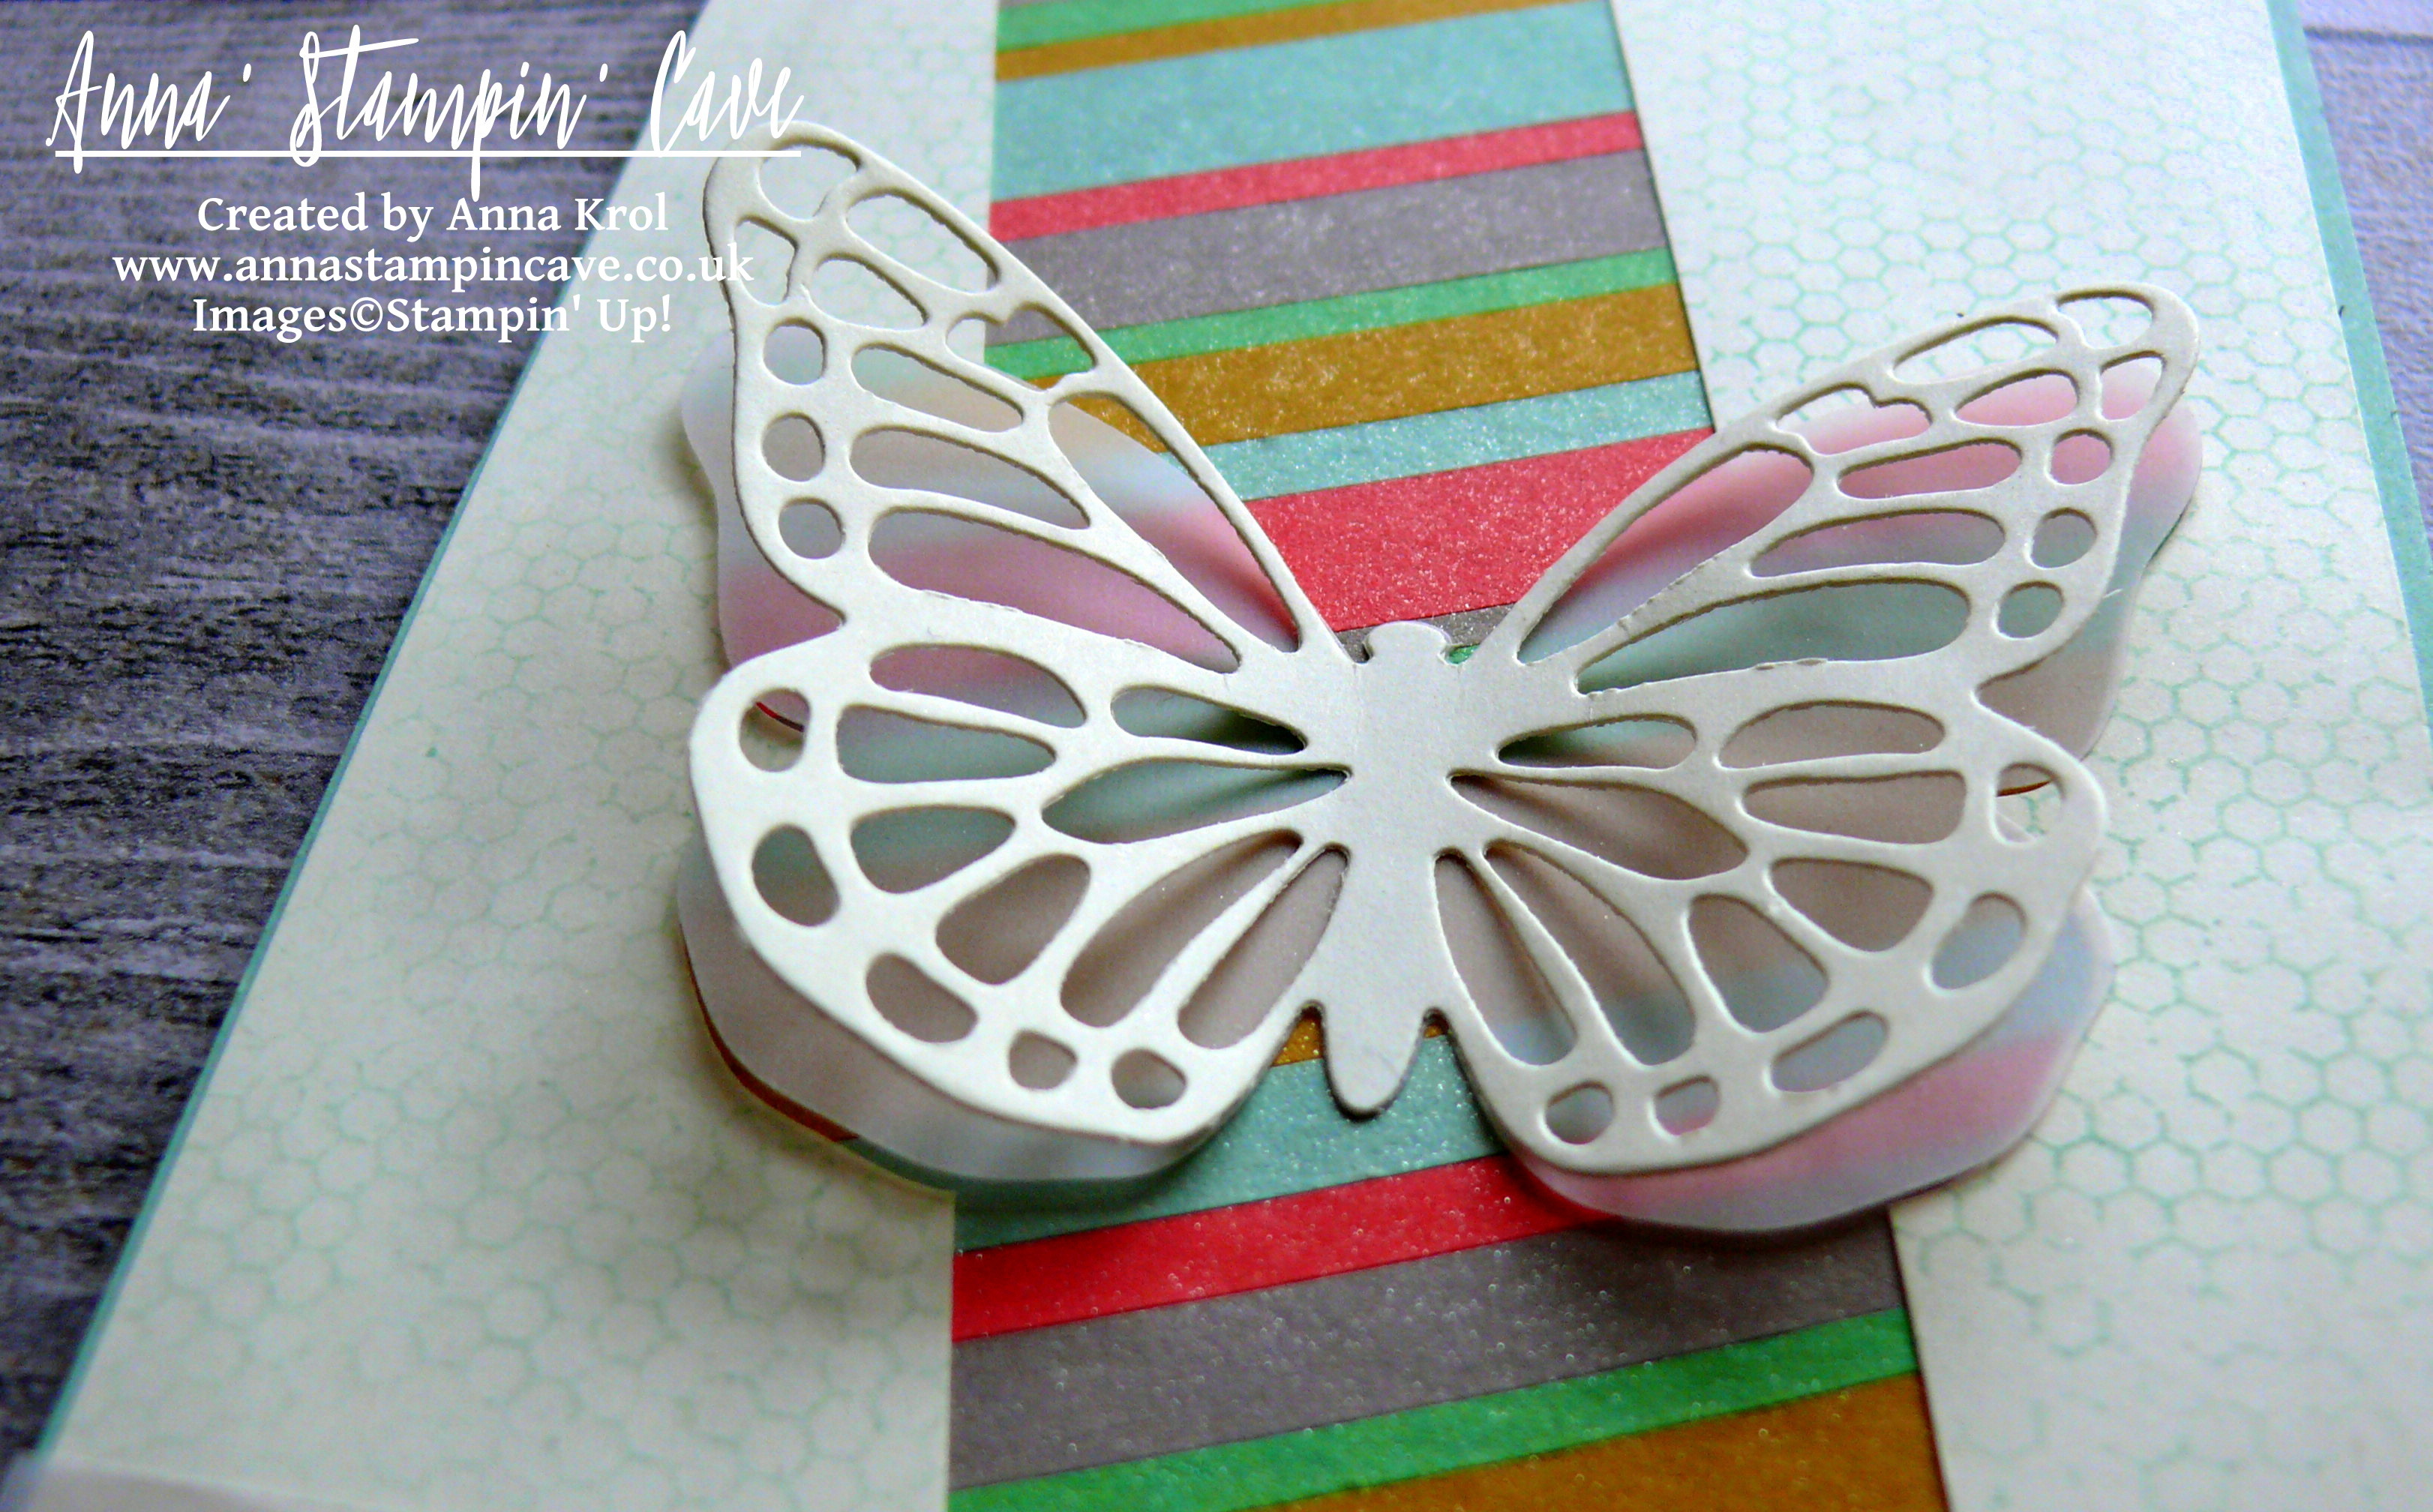
I took the Very Vanilla panel and die-cut this intricate butterfly from Butterflies Framelits Dies in the middle of it. I also die-cut solid butterfly from vellum using Bold Butterfly Framelit Dies.

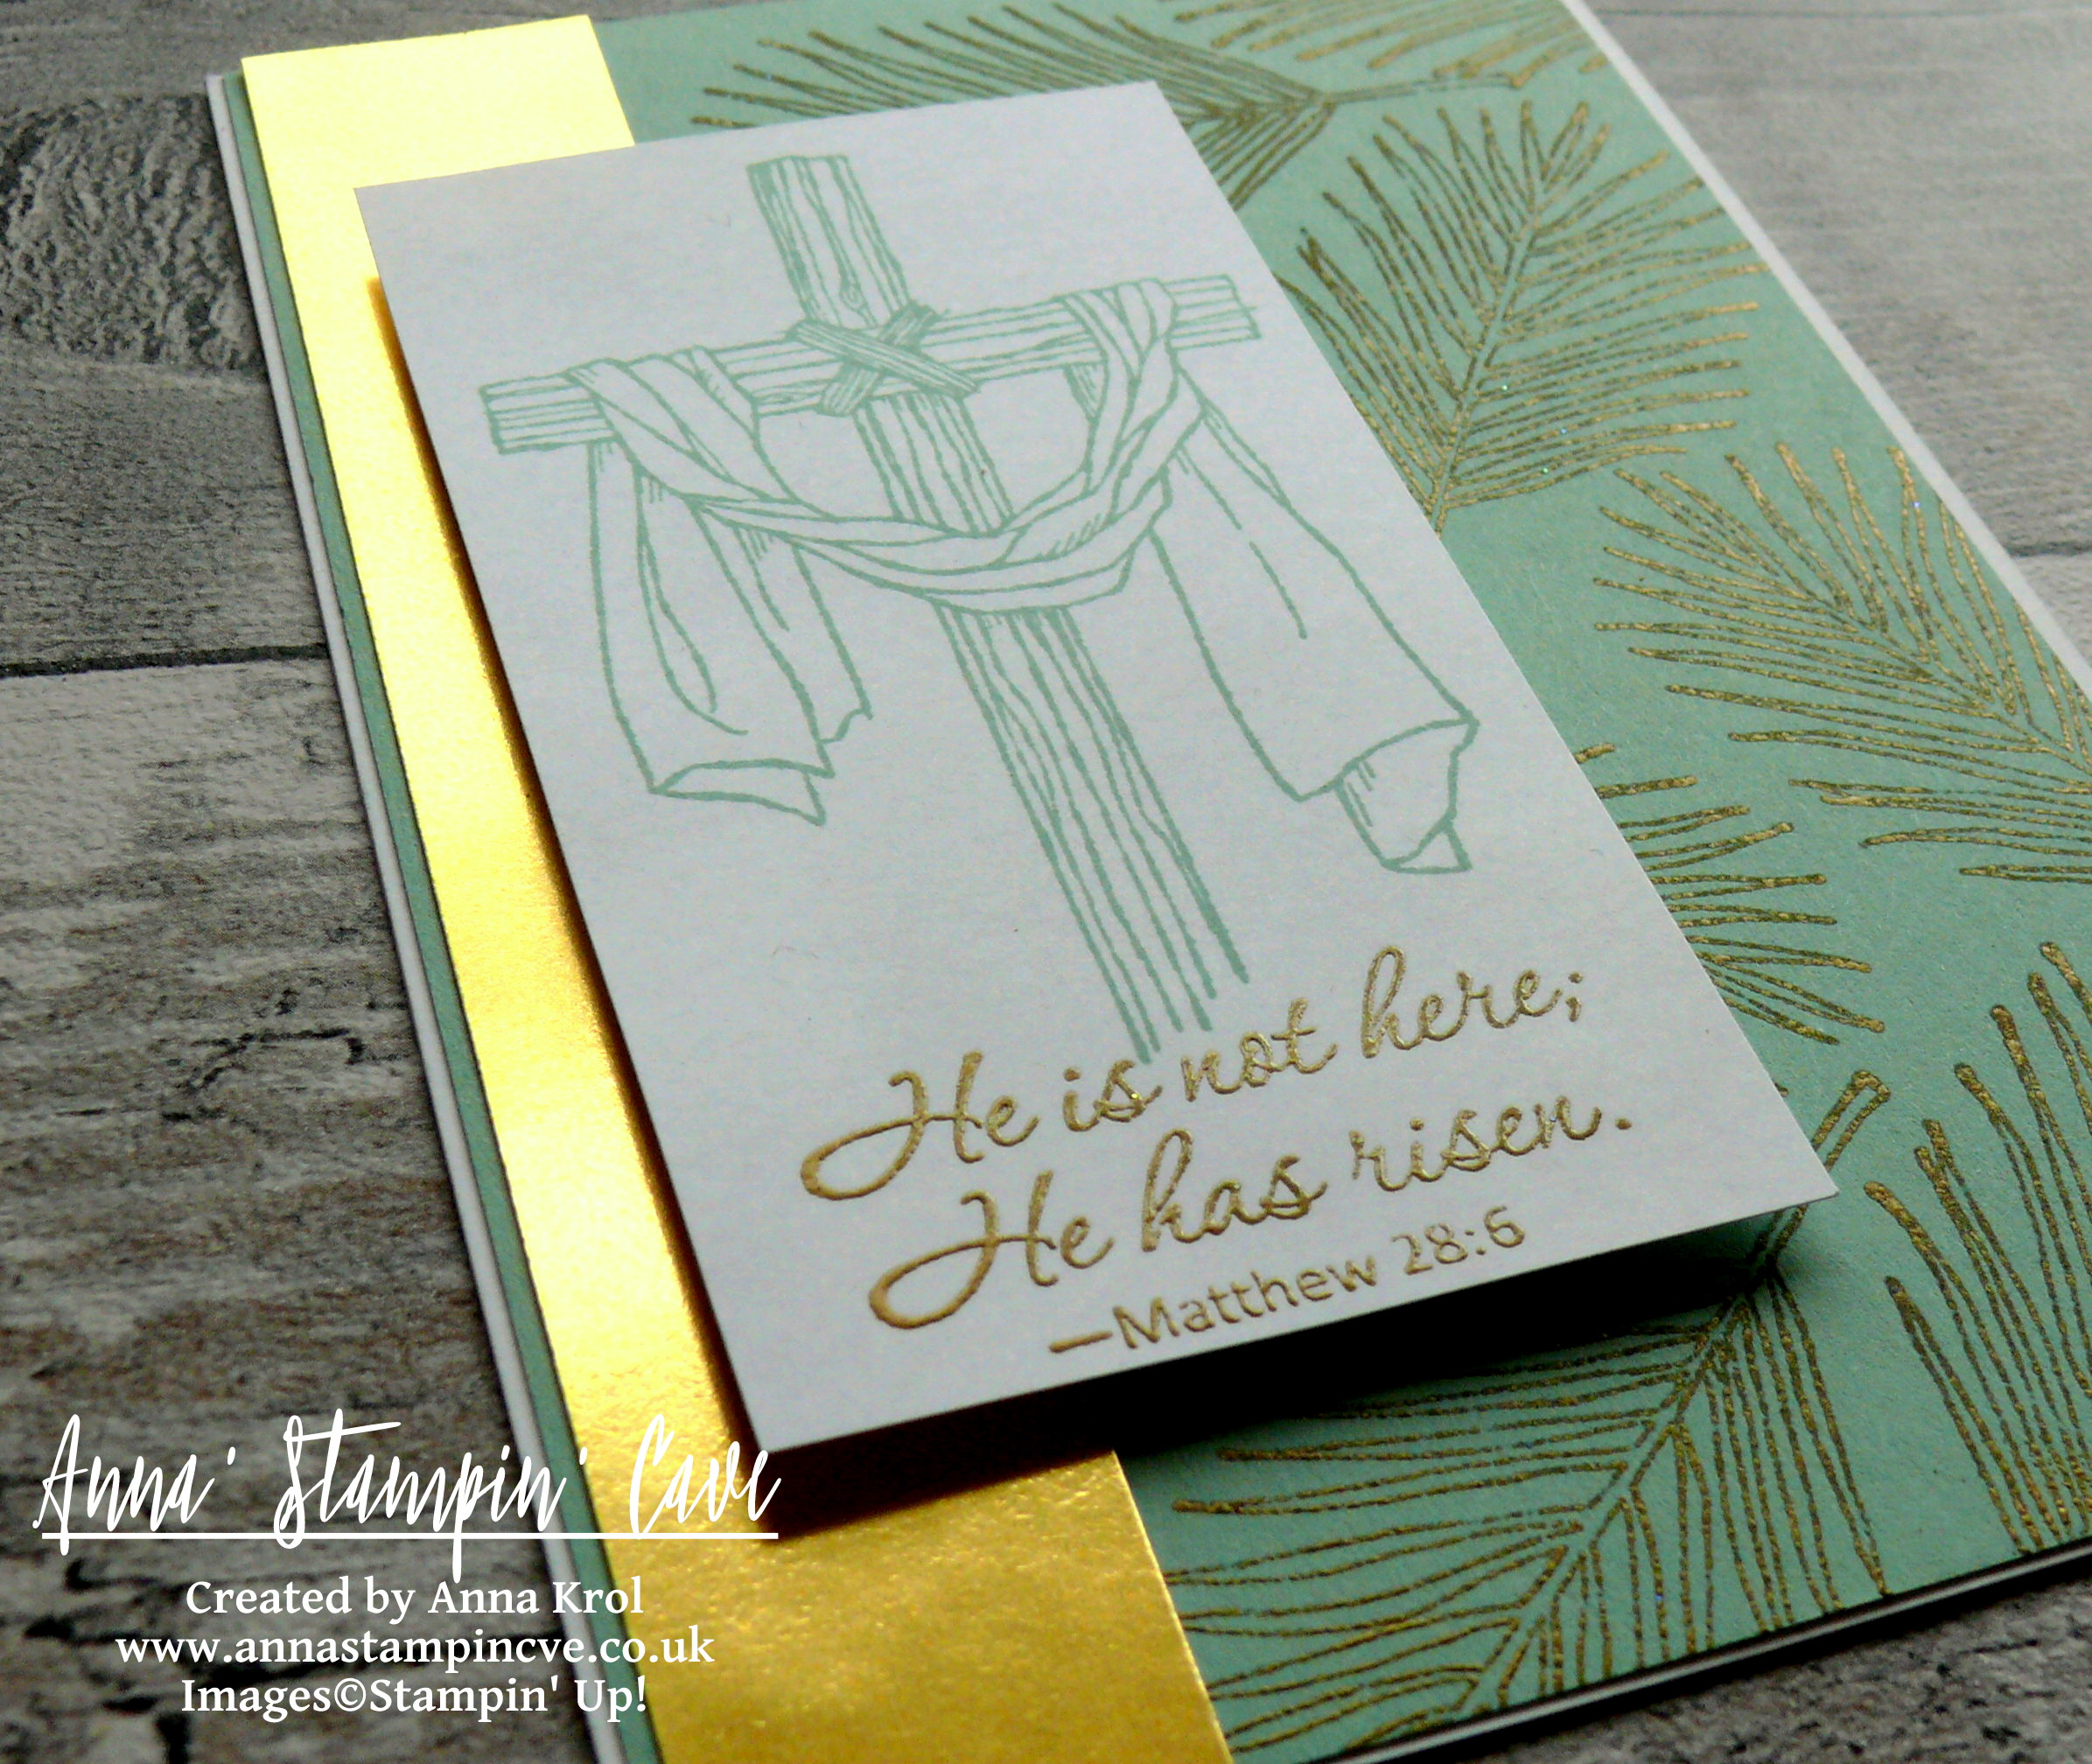
Using t-ruler, I draw two diagonal (and parallel) lines at the back of my panel. Using these lines as guides, I cut my panel into three and discarded the middle piece. Next, I stamped this lovely chicken wire (kinda) pattern from Butterfly Basics Stamp Set all over the other two pieces. I stamped it in Mint Macaron and to create this faded look I stamp off twice before I stamped on the cardstock.

I adhered my Very Vanilla pieces to the background panel, with butterflies inlaid between them: vellum butterfly at the bottom and vanilla one on the top, and added the whole panel to the card base with liquid adhesive.

For the sentiment, I chose “Sending Wishes Your Way”, also from Butterfly Basics Stamp Set. I prepared vellum with embossing buddy, dabbed my stamp in Versamark and straight away in Basic Black Archival ink, and stamped it onto vellum. Sprinkled it with clear embossing powder and heat set it.  Adhered it to the card with few tiny drops of Fine-Tip Glue Pen. All that’s left was to add second Very Vanilla panel inside of the card. Done!

Once again I wanted to thank amazing GDP team for this opportunity and privilege, that I could showcase my project alongside such wonderful artists. Thank you from the bottom of my heart.

As always, I really want to encourage you to visit the Global Design Project challenge and play along. You too have a chance to be the next Guest Designer

Thank you for stopping by and have a blessed day,

Global Design Project #082 Sketch Challenge Beautiful Message

Anna’ Stampin’ Cave – Global Design Project #082 Sketch Challenge Beautiful Message

GDP82

Hello, everyone! Today I’m playing again with Global Design Project Sketch Challenge. But before I show you my take on the sketch I want to share with you some exciting news. My cards were among the winners at the last GDP Colour Challenge! Woo hoo! But that’s not all. I have also been chosen to be a Guest Designer in the next colour challenge! How cool and what a privilege?!

Guest_Designer_Winner_Anna

Totally unexpected; I’m still pinching myself 🙂 If you have not seen my winning cards, just click the button above.

But now let’s go back to today’s project.

Today I’ve got for you this beautiful, clean & simple card with an amazing message from the Bible.

Anna' Stampin' Cave_Stampin' Up! Easter Message Stamp Set_Mint Macaron_gold foil_gold heat embossing_clean and simple_Jesus is risen

Beautiful Message card dimensions:

  • Whisper White Thick cardstock: 11-6/8″ x 4-1/8″ scored in half at 5-7/8″ (29.7 x 10.5 cm scored in half at 14.8 cm)
  • Mint Macaron cardstock: 5-7/8″ x 4″ (14.8 cm x 10.2 cm)
  • Whisper White cardstock: 4-1/8″ x 2-2/8″ (10.4 cm x 5.7 cm)
  • Gold Foil: 5-7/8″ x 1″ (14.8 cm x 2.5 cm)

I was really eager to put my hands on this beautiful stamp set ‘Easter Message’ the moment I saw it. But I was able to order it only just recently.

Anna' Stampin' Cave_Stampin' Up! Easter Message Stamp Set_Mint Macaron_gold foil_gold heat embossing_Jesus is Risen

To create this beautiful card I first took Mint Macaron panel and randomly stamped palm tree all over it, using Versamark inkpad, and heat embossed it in gold.

To make sure none of the embossing powder sticks to the cardstock where unwanted, I rubbed my embossing buddy across the paper before application.

To slightly ‘dull’ golden embossing I rubbed my piece with a dry cloth. I think it creates unique, dramatic effect.

I adhered Mint Macaron panel to the card base, followed by a piece of gold foil.

Next, I took my piece of regular Whisper White cardstock and I stamped cross image in Mint Macaron on the top of my piece, so I still had a room for a sentiment below the cross.

For the sentiment I chose this beautiful, life-giving verse from a Bible: Matthew 28:6 ‘He is not here; He has risen’. I’m short for words to say how much this little verse mean for me.

Anna' Stampin' Cave_Stampin' Up! Easter Message Stamp Set_Jesus Is Risen_Mint Macaron_gold foil_gold heat embossing_clean and simple

I stamped my sentiment in Versamark and heat embossed using Gold Stampin’ Emboss Powder again. To stamp it and not ruin my panel, I’ve used good ole stamp-a-ma-jig, so it’s straight and exactly where it should be.

I mount my piece onto the card base using dimensionals.

I may not be an expert if it comes to clean & simple cards. I’m not good at using a minimal number of supplies either. But I’m working on it, and I have to say I’m really happy how this card came out. I hope you like it too. Gold and mint make such an amazing colour combination.

As always, I really want to encourage you to visit the Global Design Project challenge blog to see other beautiful projects from all around the world. Just click on their logo below to visit the website

If you wish to purchase any of products I have used, simply click the images below to go directly to my online store and don’t forget to enter the hostess code for the month of April XMAJ4CYX to receive a gift from me.

Thank you for stopping by and have a blessed day,

Don’t forget to check:

Stampin’ Up! Spring Summer & Annual Catalogue 2016 2017 Retiring List

Anna' Stampin' Cave Stampin' Up! Retiring Products 2017

It’s that time of the year again, when Stampin’ Up! is getting ready to retire stamps and accessories from both the Annual and Spring Summer catalogues. As sad as it is to see these products go, there’s still time for you to get them before they’re gone. Retiring products will only be available until 31 May, or while supplies last. So if there’s something from retiring products on your wishlist, don’t wait until last day – once they’re gone, they’re gone. And they are selling fast! Click here for more details ->

Global Design Project #081 Colour Challenge – Watercolour Birthday Blooms

Anna’ Stampin’ Cave – Global Design Project #081 Colour Challenge – Watercolour Birthday Blooms

GDP81

Hello and welcome! Today I decided to play along with Global Design Project and their Colour Challenge. I love that one of the colours can be our own choice.

I had couple of ideas which colour to use, but because I couldn’t decide which one to choose I created two cards instead of one 🙂

Anna' Stampin' Cave_Stampin' Up! Birthday Blooms Stamp Set_Watercolour Card_Basic Grey Night Of Navy

Basic Grey/Night of Navy ‘Friend To Friend’ card dimensions:

  • Basic Grey cardstock: 8-1/4″ x 5-7/8″ scored in half at 4-1/8″ (21cm x 14.8 cm scored in half at 10.5 cm)
  • Watercolour Paper: 3-6/8″ x 3″  (9.5 cm x 7.6 cm)
  • Regals Designer Series Paper Paper Stack: 3-5/8″ x 3/8″ (9.2 cm x 1 cm) strip of diagonal stripes design paper in Night of Navy
  • Night of Navy Solid Baker’s Twine: approx 33″ (84 cm) + strip of Basic Grey cardstock to secure/hide the twine ends inside the card

For this first card, I decided to use rather classic Night of Navy with Basic Grey colour combination.

Anna' Stampin' Cave_Stampin' Up! Birthday Blooms Stamp Set_Watercolour Card_Basic Grey Night Of Navy 2.JPG

I heat embossed beautiful floral image from Birthday Blooms Stamp Set on a piece of Watercolour Paper in Whisper White Embossing Powder. Next, I watercolour the image using my ink pads as palettes.  For the flower, I’ve used Night of Navy ink pad. For the leaves, I’ve used Basic Grey Archival ink pad, which was a little bit tricky but doable. Just had to work really fast once I squished some ink onto my ink pad cover flap. When finished my leaves, I’ve added more water to the ink that left on the cover and I’ve done a quick wash of light grey around the flower.

For the sentiment, I chose sweet ‘friend to friend’ from Teeny Tiny Wishes Stamp Set and stamped it in Basic Grey Archival Ink in the bottom right corner of my watercolour panel.

Tip: If using clear mount or wood mount stamp sets, always use Stamp-A-Ma-Jig to align your sentiment. It’s best tool ever!

Anna' Stampin' Cave_Stampin' Up! Birthday Blooms Stamp Set_Watercolour Card_Basic Grey Night Of Navy 3.JPG

To prepare my base I stamped the same floral image all over the card front with Versamark ink. Next, I wrapped Night Of Navy Solid Baker’s Twine around the front of the card and secured it at the back with a piece of cardstock.

I adhered a strip of DSP underneath the watercolour piece and added it to the card base, slightly offsetting my piece. The final touch was to add Clear Wink Of Stella to my floral.

For my next card colour combination, I took an idea from Stampin’ Up!’s Annual Catalogue, page 76.  I love how Night of Navy and Delightful Dijon complement each other creating distinguished look.

Anna' Stampin' Cave_Stampin' Up! Birthday Blooms Stamp Set_Watercolour Card_Delightful Dijon Night Of Navy

Delightful Dijon/Night of Navy ‘Friend To Friend’ card dimensions:

  • Delightful Dijon cardstock: 8-1/4″ x 5-7/8″ scored in half at 4-1/8″ (21cm x 14.8 cm scored in half at 10.5 cm)
  • Regals Designer Series Paper Paper Stack, Night of Navy diagonal stripes design: 4-2/8″ x 3-5/8″ (10.8 cm x 9.2 cm)
  • Watercolour Paper: 3-6/8″ x 3″  (9.5 cm x 7.6 cm)
  • Night of Navy Solid Baker’s Twine: approx 12″ (30 cm)

Same as with my first card, I stamped the whole card front with a floral image from Birthday Blooms Stamp Set in Versamark Ink and adhered the piece of DSP in the middle of my card base.

Anna' Stampin' Cave_Stampin' Up! Birthday Blooms Stamp Set_Watercolour Card_Delightful Dijon Night Of Navy 2

Next, I stamped and heat embossed the same image on the watercolour panel in Whisper White. Flowers, as before, are watercoloured with Night of Navy ink, just this time I decided for darker, deeper shade. For the leaves, however, I’ve used Delightful Dijon ink, with a very light wash of DD in the background.

Anna' Stampin' Cave_Stampin' Up! Birthday Blooms Stamp Set_Watercolour Card_Delightful Dijon Night Of Navy 3

A sentiment, same again, is stamped in Night of Navy ink in the top right corner of the panel. I took a piece Night of Navy Solid Baker’s Twine, wrapped it at the bottom of my watercolour piece and tied a little bow. I adhered my panel to the card base, offsetting again. Clear Wink of Stella finishes off the look.

And here are both of my cards together:

Anna' Stampin' Cave_Stampin' Up! Birthday Blooms Stamp Set_Watercolour Card_Delightful Dijon with Night Of Navy_Basic Grey with Night Of Navy

I love how they turned out! Same stamp set, same technique, and same design but two completely different looks. Which one do you like the most? Please let me know in comments below.

As always, I really want to encourage you to visit the Global Design Project challenge blog to see other beautiful projects from all around the world. Just click on their logo below to visit the website

Thank you for stopping by and have a blessed day,


The Creative Flow Blog Hop – Hello Spring

Anna’ Stampin’ Cave – The Creative Flow Blog Hop – Hello Spring

Thank you for joining us on our Creative Flow Blog Hop. Each month we are set a challenge to creatively stretch our imaginations. The products we have used are all available in the current Annual and/or seasonal Stampin’ Up!® catalogues. To hop along, please use the buttons at the bottom of the post to keep hopping. And this month’s theme is ‘Spring is sprung’.

I don’t know about you, but for me, nothing says ‘spring’ more than flowers. So today I’ve got for you a set of super cute, 4 x 4″ notecards.

Anna' Stampin' Cave - Stampin' Up! Number Of Years Stamp Set - Hello Spring Set of Notecards 2.JPG

Spring notecards dimensions:

  • In Colour cardstock: five pieces, one of each colour, 4″ x 8 ” scored in half at 4″ (20,3cm x 10,1cm scored in half at 10,1cm) + scraps for die cutting
  • Whisper White cardstock: five panels 3″ x 3″ (7cm x 7cm)
  • Linen Thread five pieces, 20″ length each
  • Pearls: 15 mini pearls, 3 for each notecard

For the base of my little notecards I decided to use, soon retiring, 2015-2017 In Colours. I stamped each card base with a ‘dotty’ stamp from Number Of Years Stamp Set in Versamark.

Anna' Stampin' Cave - Stampin' Up! Number Of Years Stamp Set - Hello Spring Tip Top Taupe Notecard

Anna' Stampin' Cave - Stampin' Up! Number Of Years Stamp Set - Hello Spring Cucumber Crush Notecard

I stamped each 3 x3″ Whisper White panel using Writing Notes background stamp. I’ve used Cucumber Crush, Mint Macaron, Blushing Bride and So Saffron x2. Next, in the middle of each panel, I stamped a little bouquet of flowers, from Number Of Years Stamp Set. This is a two-step stamping set, so I first stamped the foliage using Pear Pizzazz and Wild Wasabi ink pads, and next I added the flowers in So Saffron, Pool Party, Watermelon Wonder, Blushing Bride and Wisteria Wonder.

Anna' Stampin' Cave - Stampin' Up! Number Of Years Stamp Set - Hello Spring Watermelon Wonder Notecard

Anna' Stampin' Cave - Stampin' Up! Number Of Years Stamp Set - Hello Spring Delightful Dijon Notecard.JPG

I die-cut my bouquets with stitched circle die and adhered a leftover piece to the card base. I also die-cut five scalloped circles: one in each In Colour. Next, I layered each bouquet with a scalloped circle and adhered them to the card base with dimensionals.

Anna' Stampin' Cave - Stampin' Up! Number Of Years Stamp Set - Hello Spring Mint Macaron Notecard

Sentiments come from Crazy About You Stamp Set and I stamped them in coordinating colours once my cards were assembled. For the final touch, I added mini pearls to some of the flowers. I also created cute little bows using Linen Thread and added them to the cards using glue dots.

Anna' Stampin' Cave - Stampin' Up! Number Of Years Stamp Set - Hello Spring Set of Notecards 3.JPG

I’m really pleased with my little notecards and I think they fit the theme perfectly. But just a little reminder that In Colours 2015-2017 will retire soon (end of May) so if you love them I would really advise you to stock up on cardstock, Designer Series Paper, and ink refills as they surely will be sold out way before the end of May. Click the picture below to check the entire collection.

In Colours 2015-2017

Now be sure to hop along to see more inspiring projects. Your next stop is lovely and talented Jerim.

Thank you for stopping by and have a blessed day

Negative Die-Cutting

Anna’ Stampin’ Cave – Negative Die-Cutting


Hello everyone and welcome! Today I’ve got for you super cool & easy technique to try out: negative die-cutting. Just a reminder: each week we are using Ronald McDonald House stamp set ‘My Hero’.

anna-stampin-cave-my-hero-stamp-set-with-negative-die-cutting

For today’s project, I’ve decided to use this lovely umbrella image. To create my card I started with a Very Vanilla card base and a Very Vanilla panel, slightly smaller than my base. First, I arranged the layout of my card using the Umbrella Weather Framelits. When I was happy with the placing, I die cut the umbrella first and the handle next, from my panel. But instead of using the die-cut piece on the card (as we usually do, don’t we?), I’ve used the negative image. Savvy tip: Don’t throw your die cuts away. You can use them for your next project.

I took my panel, placed it on the card base without adhering it, and I stamped the umbrella and the handle through a die cut holes. Stamp-A-Ma-Jig ( I love this tool!!!) was a big help to position my stamps perfectly. To create an ombre effect on umbrella image, I coloured the stamp with Crushed Curry and Tangerine Tango Stampin’ Markers (Crushed Curry to the top and Tangerine Tango in the middle). And, because I don’t own the 2015-2017 In Colour Stampin’ Markers, I carefully dabbed Watermelon Wonder ink pad to the bottom of the stamp.

my-hero-stamp-set-with-negative-die-cutting-2

When I was done with the stamping, I trimmed my layer at slightly ‘wonky’ angles, and run it through the Big Shot with a Seaside embossing folder. This folder is intended to imitate the waves, but if you turn it aside, it looks like rain streaks on a window, which is totally cool 🙂

I took a piece of Watermelon Wonder DSP from 2015-2017 In Color Designer Paper Stack (there are four different designs to choose from, but I’ve gone for dots). It was slightly bigger than my top layer, but I  didn’t want to use it all on my card. I only wanted it to peek from underneath my top layer where the ‘wonky’ angles were. So I measured it up, trimmed the piece and adhered it to the base. next, using dimensionals, I’ve added the top layer.

my-hero-stamp-set-with-negative-die-cutting

I decided not to use any additional sentiment on my card, as I think the one on the umbrella says it all. To embellish the card I’ve used White Perfect Accents. But hey, you say, these are clear, right? But did you know that you can peel off the white, sticky backing from your  White Perfect Accents, and you get these super awesome clear, perfectly round embellishments?! It’s cool or what?! But, of course, once you peel the backing off, you need to use glue to adhere them.

pootlers-design-team-week-2

So, did you liked my project?! I hope I inspired you to give this technique a go. It’s really cool and you will be hooked in no time!

Thank you for stopping by and have a blessed day,