Pinkies Stampin’ Up! Autumn Winter 2016 Blog Hop – Merry Mice

blog hop logo

Thank you for joining us on another Pinkies Blog Hop! We’re showcasing lots of gorgeous projects using products from the new Stampin’ Up!® Autumn/Winter Seasonal Catalogue. Simply use the buttons at the end of each post to keep hopping.

If you arrived here from lovely Hannah at Stampin by Hannah, thank you for stopping by. I hope you enjoy seeing all these beautiful projects and inspiration and continue to hop on through to see what everyone has made.

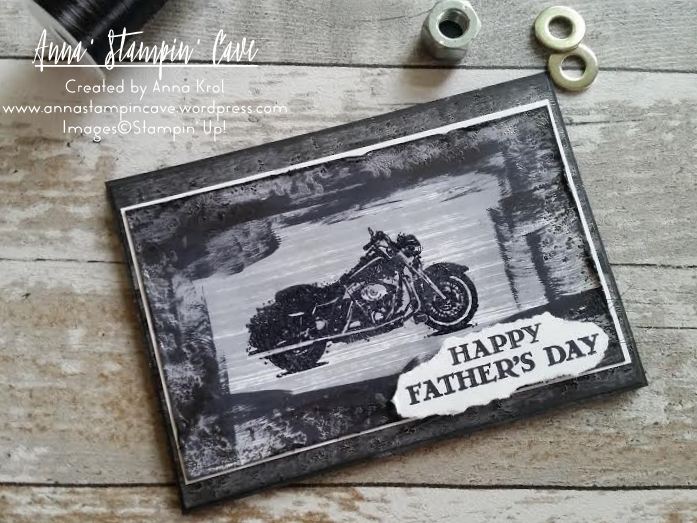
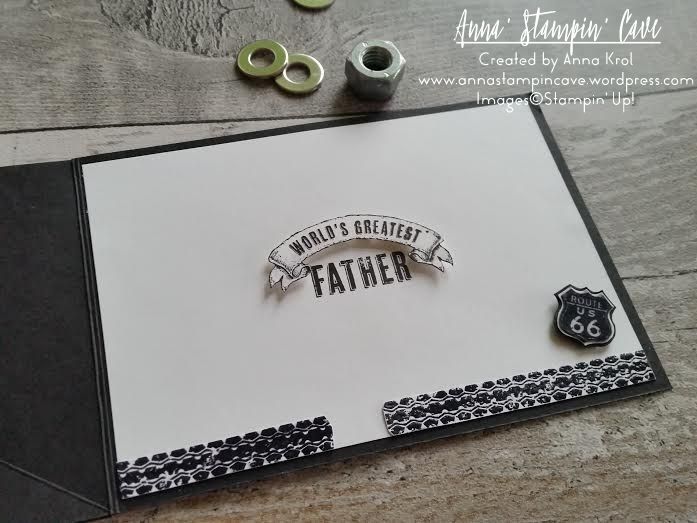
Here is my project –

merry-mice-stamp-set-shadow-box-christmas-card-2

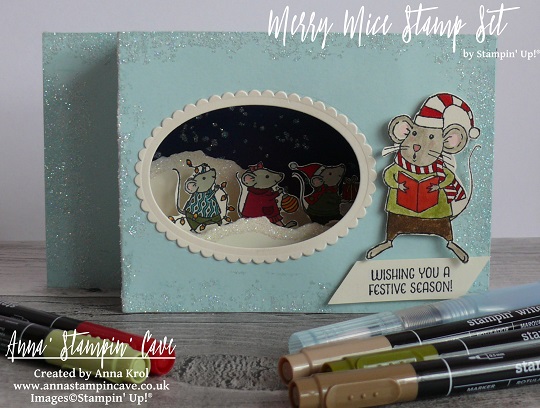
I wanted to create shadow-box type card for a while but never came around to do it. But when I saw these adorable little mice I thought they are just perfect to do so.

For the base, I’ve used two pieces of Soft Sky cardstock that measures 4-1/8 x 8-1/2″.  scored them both at 1-1/2″ and 3″.  Next, I die-cut a window in my front panel using Layering Ovals Framelits. I used the same die and slightly bigger scalloped oval die to create the frame from Very Vanilla cardstock.

I wanted to add some subtle ‘bling’ to my card base, so I decided to use Heat & Stick Powder with Dazzling Diamond Glitter. I took this little, distressed stamp from Timeless Textures stamp set, and stamped it around the front panel in Versamark. I sprinkled Heat & Stick powder over it, heat set it, sprinkled with Dazzling Diamonds Glitter and heat set it again.

I cut a piece of Whisper White cardstock that measures 4-1/16 x 8-1/2″ and sponged it to create a background for my scene. I wanted to achieve beautiful night sky. To do so I’ve used Daffodil Delight, Pumpkin Pie, Melon Mambo, Pool Party, Bermuda Bay, Island Indigo, Perfect Plum and Night of Navy. I started with lighter colours at the bottom and slowly building up the colour until I was happy with the results.

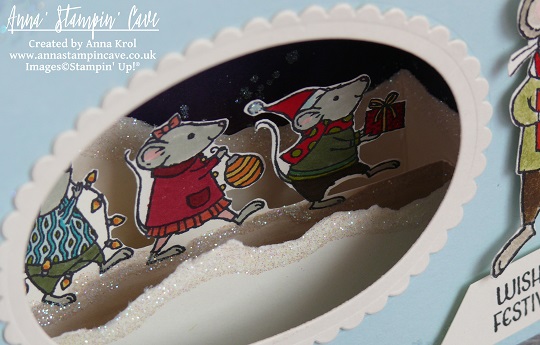
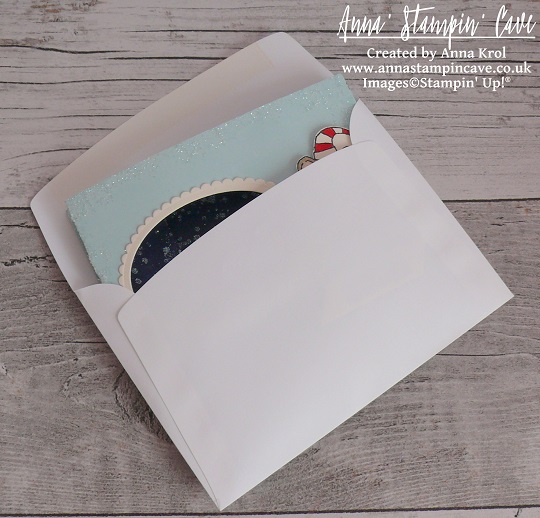
To create starry night I’ve used irreplaceable Gorgeous Grunge and again Heat & Stick powder with Dazzling Diamonds Glitter. Once the glitter was set,  I took this piece and cut a 1-1/2″strip from it, on the long side, and scored the remaining piece at 4″. I glued the longer piece to my base, to the back panel. The strip I cut off, I adhered on the inside of my front base, so once the card is closed for posting, you can still see the starry night. on the inside panel. And what’s cool about this card: it’s folding down, just like a card in the box, and fits standard A6 envelope

To create front and back inserts, I took 2 strips of Very Vanilla, that measured 2-1/2 x 5 and  I tore them both (one bit smaller) on one side so they look like snowbanks. I’ve added a liquid glue to the torn edges and dabbed it in Dazzling Diamonds Glitter. I scored them both at 1/2″ and 4-1/2″. I adhered the taller one to the background panel.

merry-mice-stamp-set-shadow-box-christmas-card-caroler

Now the fun part: colouring the mice! I stamped singing mouse on a piece of Very Vanilla with Jet Black Stazon ink. I coloured him with Many Marvellous Markers and fussy cut it. Next,  I took a piece of Very Vanilla (2-1/2 x 5″) and marked it at 1″ from the bottom, on the long side. This piece will create our middle insert. I stamped my cute carolers so their feet were touching my 1″ mark. I coloured them in, and fussy-cut them, but only to the 1″ mark. I scored this piece at 1/2″ and 4-1/2″.

I took all my inserts and assembled the card. I adhered the singing mouse on the front of my card with dimensionals. The sentiment underneath comes from the same stamp set. But because of all the ‘busy-ness’ (if it’s even a word haha) of the card, I decided to keep it simple.

merry-mice-stamp-set-shadow-box-card

I’m really happy how this card turned out. Aren’t these mice super cute?! I hope I inspired you a little bit.

Now, be sure to hop along and see more inspiring projects. Your next stop is amazingly talented Jerim from Willow Piggy  go and see what she has made using new products.

next

previous

Thank you for stopping by and have a blessed day,

Pootlers Annual Catalogue Blog Hop – One Wild Ride

pootler's blog hop

Thank you for joining us on another Pootlers Blog Hop! We’re showcasing lots of gorgeous projects using products from the new Stampin’ Up!® Annual Catalogue. Simply use the buttons at the end of each post to keep hopping!

I hope you had a chance to look through our Annual Catalogue and you’ve got your favourites already. For today’s project, I’ve used One Wild Ride Stamp Set from page 115, to create a Father’s Day card for my hubby.

Why did I choose this set? As a teenager I was a rebel girl: I was listening to Gun’s N’ Roses, Aerosmith and other rock stars, wearing skinny jeans, long hair and combat boots, I always dreamed of having my own Harley-Davidson. Silly, I know, but who wasn’t those days 😉 No surprise then, this set was in my first order. And what can I say, hubby has a soft spot for Good Ol’ Harry too.

One Wild Ride Stamp Set

To really show off this stamp set I decided to create a twisted easel card, which sounds more complicated than it sounds. I have to admit I wanted this card to look really rough and distressed, so you could nearly feel motorcycle’s grease j/k 😉 (Chris loves distressed cards with lots of layers).

The base of my card is standard top folded A6 in Basic Black. And the “front” of the card is scored in half diagonally to create an easel. For the proper card front I’ve used a piece of Basic Black again, a slightly smaller piece of Basic Black and Whisper White for stamping.

Basic Black panel I left intact. On Basic Grey, I stamped with this gravel-splatter -kinda stamp from the set, with Versamark, and heat embossed it in silver. Next, I took Basic Black Archival Ink and smooshed it across the panel, where the embossing was. It makes it look a little bit dull, but you can still see the Basic Grey card.

To add some shine and dimension to the motorcycle, I dabbed my stamp in Versamark first. Next, without stamping, I dabbed it in Basic Black Archival Ink, so once it’s stamped, Versamark was on top and I heat embossed the image using clear embossing powder. Again I’ve used gravel stamp and stamped it all around the edge of my WW panel. heat embossed it in silver and smooshed Basic Black across the panel where the embossing was. Next, I took a cloth and “took off” some of that ink which created that dull metal look. Because there was a too big contrast between Whisper White and all that black, I smooshed Basic Grey across the centre of the panel. To finish it off I added some distressing to the edges using scissors.

For the inside of the card, I’ve used banner and sentiment from Guy Greetings Stamp Set. I hand-cut the banner and add it to the card using dimensionals. I also stamped tire trail stamp on a scrap piece of paper, cut it out and adhere it to the bottom of the inside panel. To create a stopper for the easel I stamped Route 66 stamp on a piece of whisper white, cut it out with scissors and heat embossed it with clear embossing powder. I next used it as a guide, to create two slightly bigger layers to go underneath the original image. One in Whisper White and one in Basic Black. Glued them together and adhered it in the corner of the inside panel. I could now assemble the whole card.

One Wild Ride Father's Day Card Twisted Easel Card

The sentiment for the front comes, again, from Guy Greetings Stamp Set. I stamp it on a scrap of Whisper White and just simply tore it out. It’s hard to see on the picture, but I added few strings of new Basic Black Metallic Thread underneath the sentiment before adhered it with dimensionals.

I’m really happy with this card(it’s got our daughter approval too haha). I know Chris will love it too.

How about you? Do you like my card? Let me know in the comments below.

Now, be sure to hop along and see more inspiring projects. Your next stop is lovely Kathleen from Lilypopcrafts  go and see what she has made using the new products.

next pootler blog

previous pootler blog

Thank you for stopping by and have a blessed day