Good Tidings Of Great Joy

Anna’ Stampin’ Cave – Good Tidings Of Great Joy

Hello everyone! I hope you all have an amazing time with your family and friends. I definitely enjoy these extra few days we get to spend together.

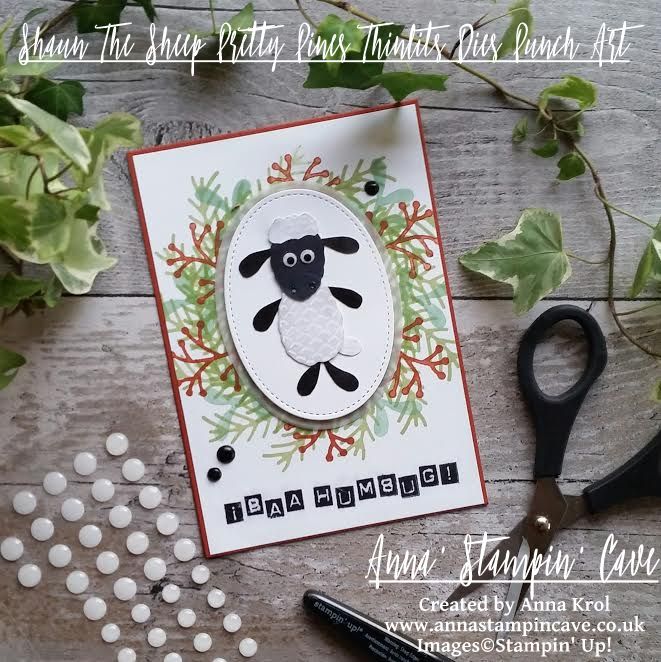
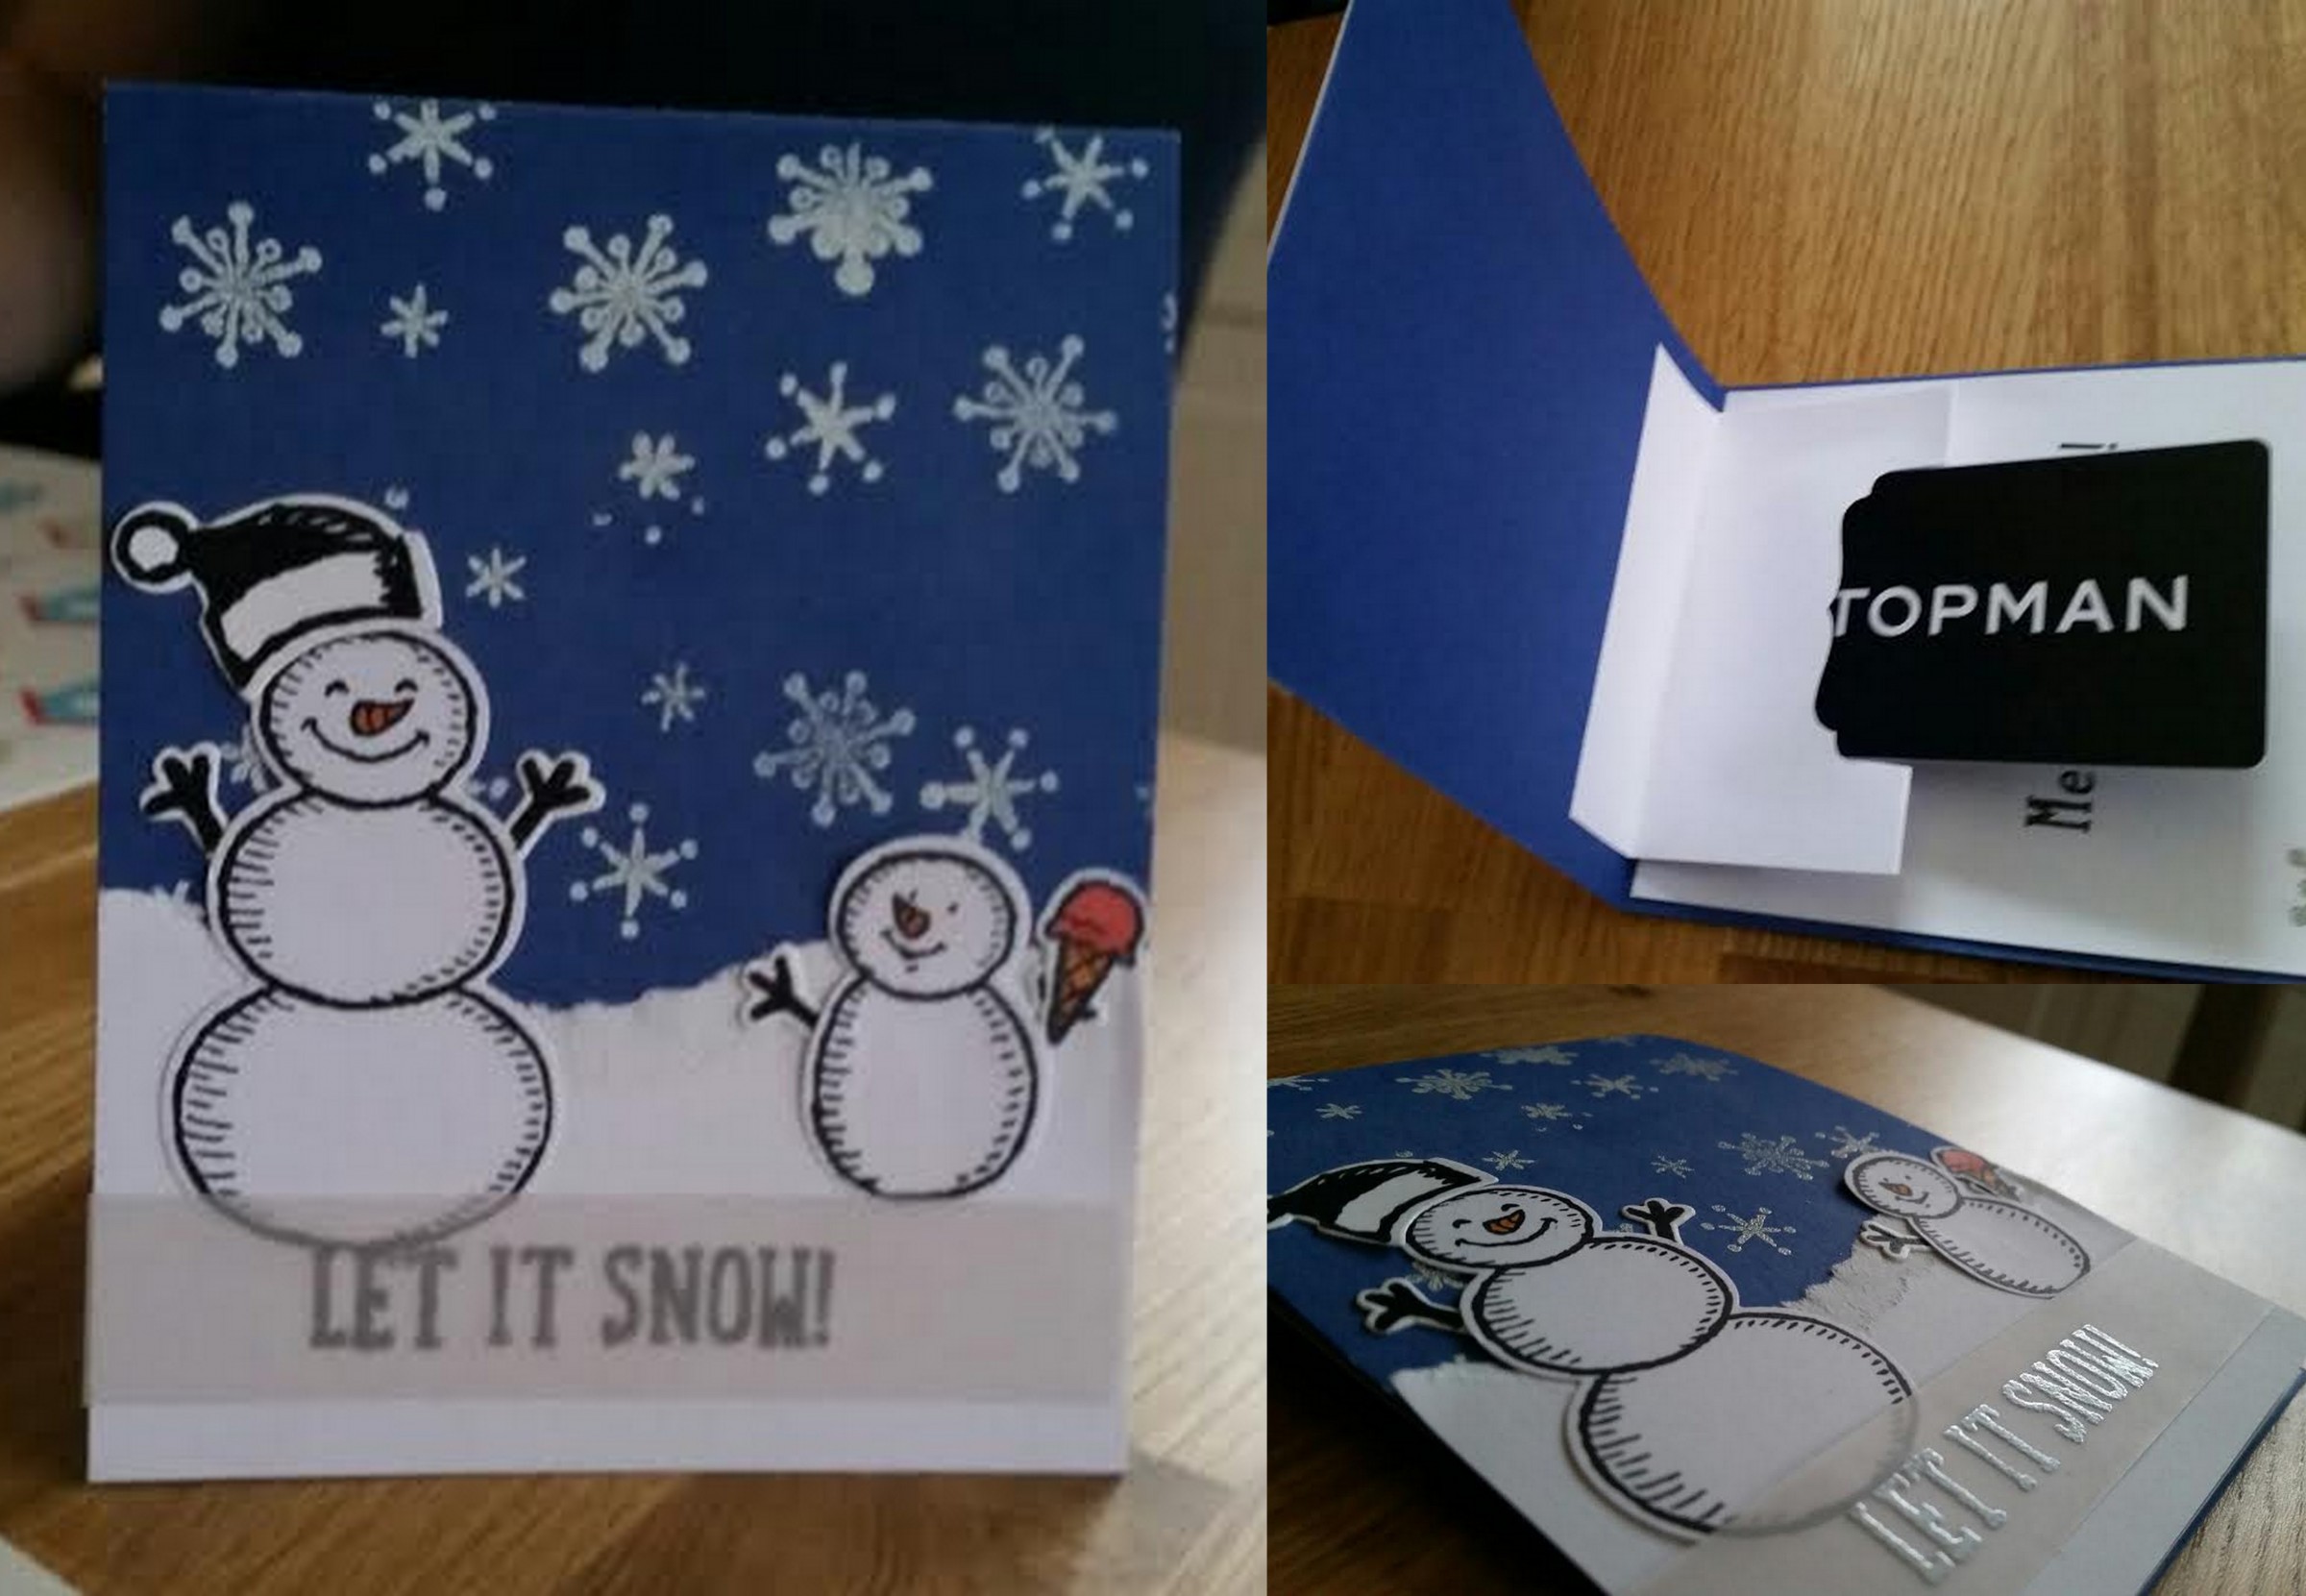
Today I’ve got for you beautiful yet clean and simple card using Good Tidings Photopolymer Stamp Set from Stampin’ Up!

This set is featured in Autumn Winter 2017 catalogue and now you can get it at discount during End-Year Sale. It’s truly stunning, 2-step stamp set.

I’ve used a slightly unusual colour combination for my card but I really like how the colours complement each other.

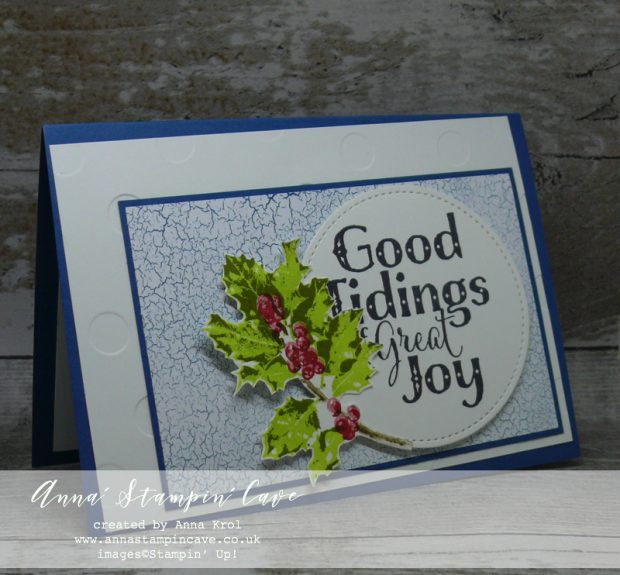
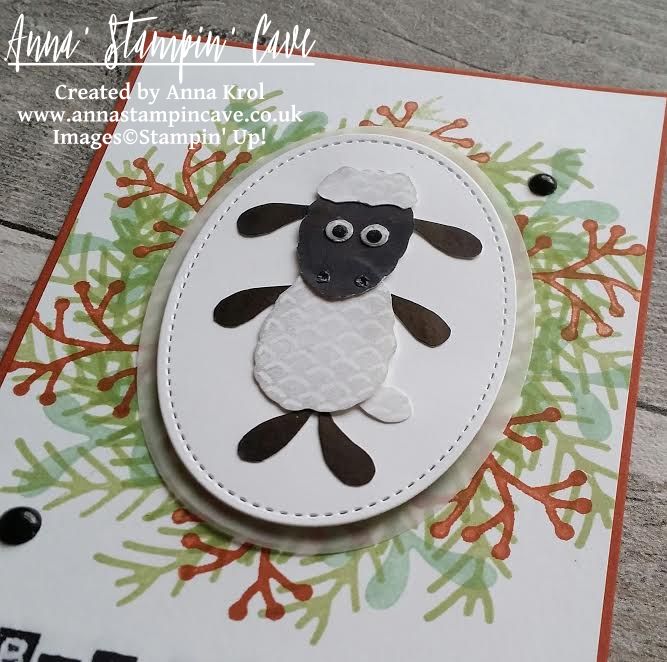
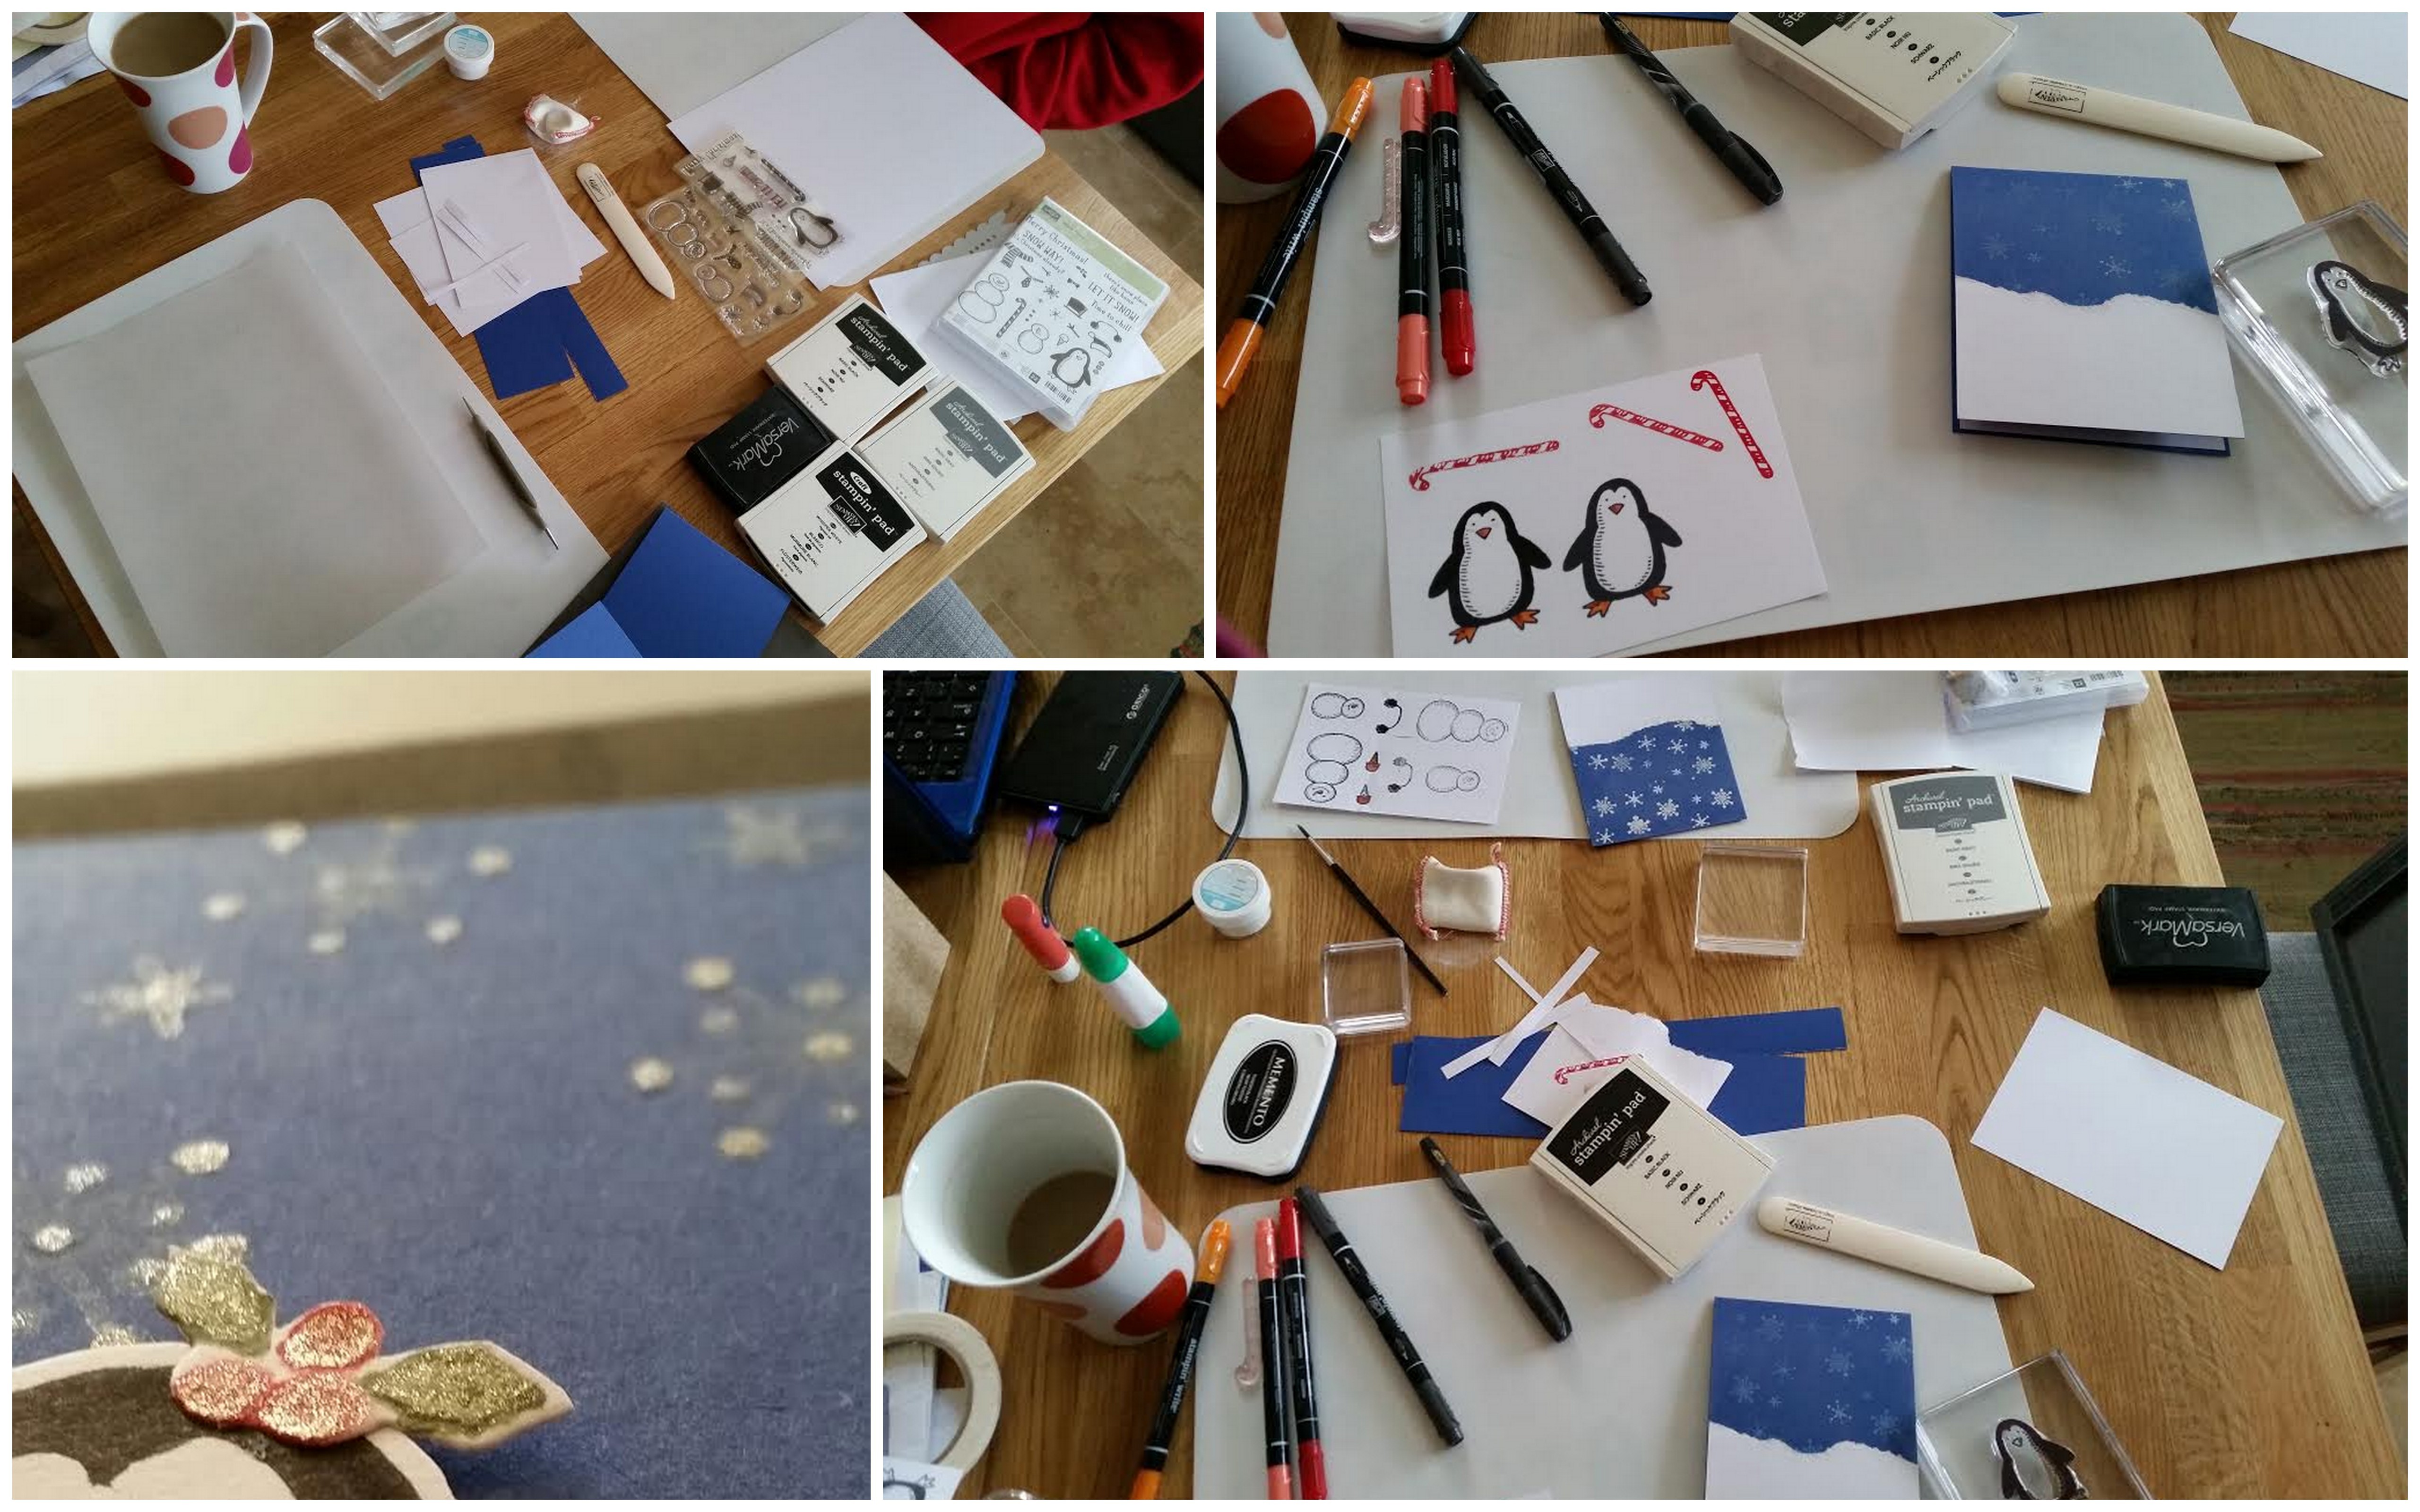
First, I cut and prepared all my layers and run the Whisper White panel with Polka Dot Basics embossing folder through my Big Shot.

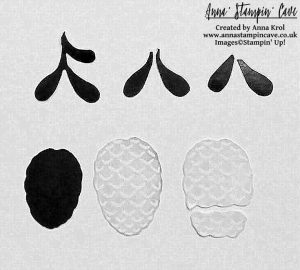
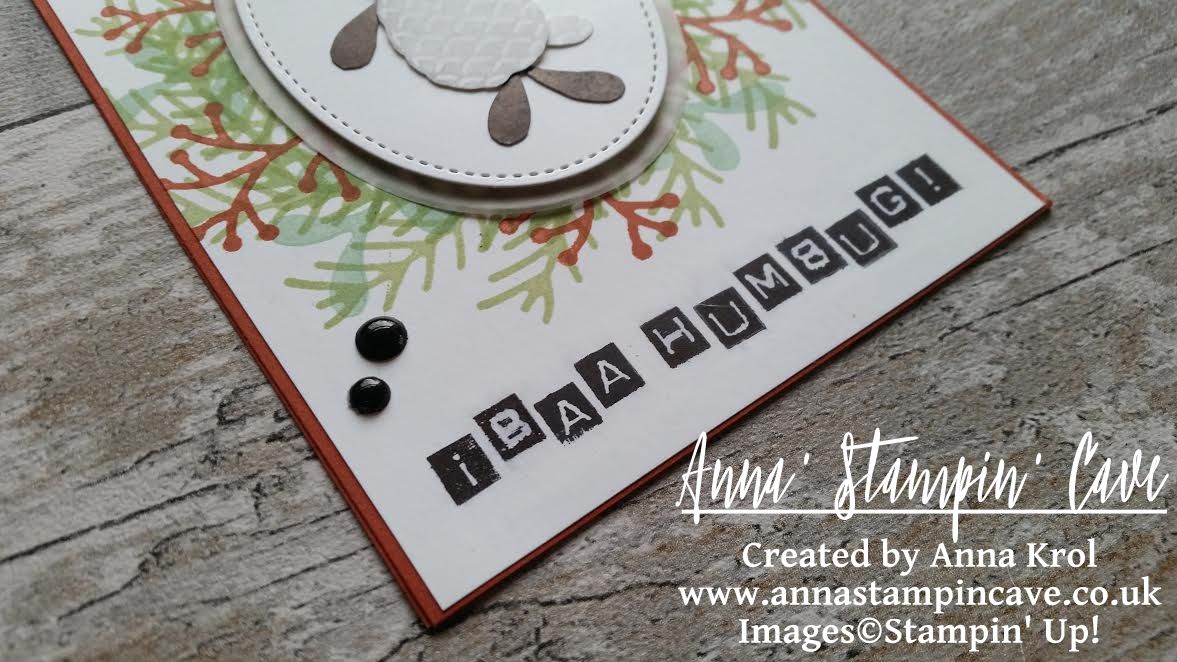
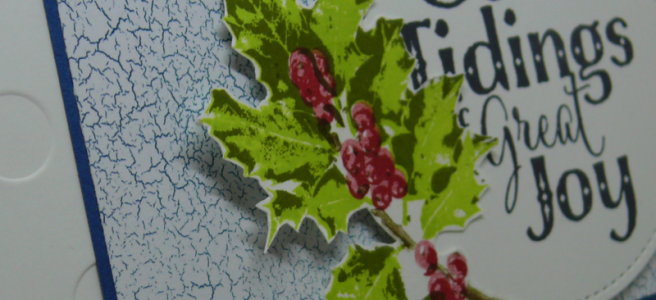
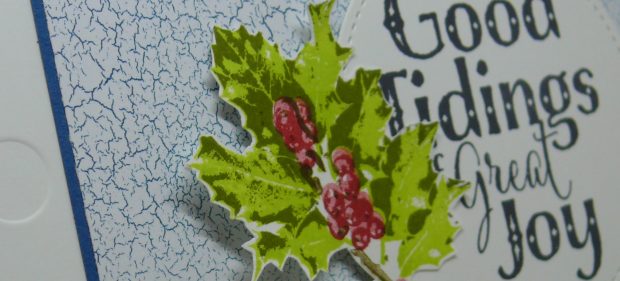
Next, I stamped all my images. For the leaves, I’ve used Old Olive and Lemon Lime Twist ink pads. Holly berries are stamped in Real Red. For the first step image I stamped it off, the second image is at full strength. The branch is stamped in Soft Suede. And again for 1st image, it’s stamped off, and 2nd image at full strength.

The sentiment is stamped in Memento Black and die-cut using the largest circle from Stitched Shapes Framelits Dies.

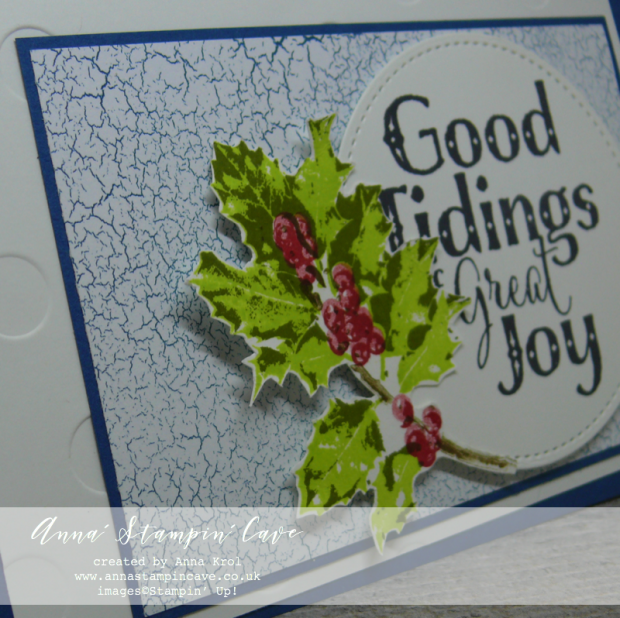
I fussy-cut the holly berry branch and assembled my card. I’ve used snail adhesive for the layers/panels and stampin’ dimensionals for a circle with the sentiment.

I didn’t forget about the inside of my card.

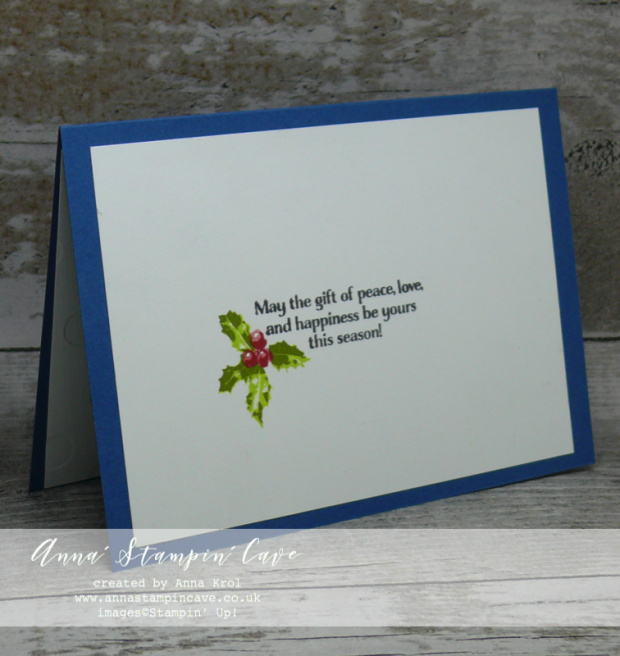
I stamped the smaller sentiment from the same stamp set in the middle of my Whisper White panel in Memento Black.

To add some interest, I also stamped the smaller holly berry images in the left bottom corner of the sentiment. using same colours.

And that’s my card done. I really hope you like it.

I’ve entered my card in the:

If you wish to purchase any of products I have used, simply click the images below to go directly to my online store and don’t forget to enter the hostess code GK3G3AR3 to receive a gift from me

Just a reminder: Good Tidings Photopolymer Stamp Set is still available at a fraction of a price! But only until the 2 January. After 2 January 2018, it will no longer be available. So if you waited for a better moment to buy this set – this moment is now.

Thank you for stopping by and have a blessed day,

The Creative Flow Blog Hop -Shaun The Sheep Punch Art

Anna’ Stampin’ Cave – The Creative Flow Blog Hop -Shaun The Sheep Punch Art

the-creative-flow-header

Thank you for joining us on our Creative Flow Blog Hop. Each month we are set a challenge to creatively stretch our imaginations. The products we have used are all available in the current Annual and/or seasonal Stampin’ Up!® catalogues. To hop along, please use the buttons at the bottom of the post to keep hopping.

Hello hello! This is our very first The Creative Flow Blog Hop, and I’m really excited to be a part of it. Today’s theme was a quite a stumper. We’ve been set a challenge to create an ‘animal’ project using Pretty Pines Thinlits Dies. Yes, I know!?!? How is that even possible!!! 😀 But hey, with a little bit of imagination everything is possible!

anna-stampin-cave-shaun-the-sheep-bah-humbug-christmas-card-punch-art-stampin-up

Because not every one of us had these dies, our lovely Jerim has sent some of us (including me) a foam die-cuts so we could actually use them as stamps! How cool! Thank you, Jerim, you are a ⭐

So I’ve spent some time looking at these shapes and…nothing sparked! Typical, right? And then one day: Eureka!!! I saw a sheep 😉 But not just normal, ordinary sheep. I saw Shaun the Sheep, how wicked is that lol Yet I had to figure out how to bring him to life, not literally of course 😉 After few attempts and different combinations I knew exactly which shapes will become Shaun the Sheep. At this point, I wasn’t sure yet what occasion for this card would be.


First, for tummy, ‘curls’ and tail, I stamped one of the large pinecones twice, using Smoky Slate Ink Pad. I stamp-it-off twice for a lighter shade. To create ‘curls’ for my Shaun the Sheep I cut off the bottom of one of the pinecones. I used what’s left to hand cut his little tail. For the head, I stamped the smallest pinecone using Basic Black Archival Ink Pad. To create legs, rams and ears I’ve used larger mistletoe branch. I stamped it three times, also in Basic Black Archival Ink and cut them apart. For his eyes, I punched two 3/16″ circles from Whisper white cardstock using Crop-a-Dile, and two Basic Black tiny circles using Owl Builder Punch. When I had all my pieces ready I assembled my Shaun the Sheep using liquid glue. To make his eyes ‘pop’ I added Fine-Tip Glue to them. I also used Fine-Tip Glue Pen to create his nostrils.

anna-stampin-cave-shaun-the-sheep-punch-art-stampin-up

So now, when I had my sheep created I had to decide what kind of card/sentiment I want to make. And I have to tell you my mind went blank. I only knew it has to be something fun. And while looking for some fun ‘sheepy’ sentiment (if it’s even a word lol) I came across this ‘Christmassy’ sentiment: ‘Bah humbug’ or even ‘Baa humbug’ haha. Yes! That was it! Let it be a Christmas (kinda) card then.

I took a piece of Whisper White cardstock that measures 4″ x 5-6/8″ and stamped a wreath using following colours: Pear Pizzaz and Wild Wasabi for fir branches, Mint Macaron for mistletoe and Cajun Craze for twigs. Mint Macaron and Cajun craze has been stamped off. The sentiment is stamped at the bottom of my panel using Labeler Alphabet stamp set in Basic Black Archival Ink.

anna-stampin-cave-shaun-the-sheep-bah-humbug-christmas-card-punch-art-stampin-up

I die-cut two ovals: one from vellum using largest of the Layering Ovals Framelits Dies, and the second one from Whisper White cardstock using the largest Oval Stitched Die. I assembled them using dimensionals and adhered Shaun the Sheep on top. I adhered my panel to the Cajun Craze card base.

anna-stampin-cave-shaun-the-sheep-bah-humbug-christmas-card-punch-art-stampin-up

For the final touch, I took three White Perfect Accents, paint them in black using nail polish (couldn’t find my sharpie doh) and added them to the card. I think it really finished the look of the card. I like how this card turned out. It’s quirky and fun. I hope you like it too. Please let me know in the comments below. I would love to hear from you.

Your next stop is lovely Keila  go and see what she has made for you. Thank you for stopping by and have a blessed day

the-creative-flow-previous-button the-creative-flow-next-button

You Put The Merry In My Christmas

Anna’ Stampin’ Cave – You Put The Merry In My Christmas


Hello, and welcome! Today I’ve got for you a couple of rather traditional Christmas cards. As you probably remember we are showcasing My Hero RMHC Stamp Set by Stampin’ Up!®

stampin-up-my-hero-rmhc-stamp-set-you-put-the-merry-in-my-christmas

Aren’t they lovely?! And they are so easy to make.

The card base is standard top folded A6 in Very Vanilla and I’ve used beautiful This Christmas Specialty Designer Series Paper for my panels. These were supposed to be simple, straightforward cards, but then again, I can’t make things that are too easy, can I?! So I decided to turn them into a split panels cards.

The panels I prepared earlier were 4 x 5-6/8″ in size. To create split panels, I cut them diagonally into 3 and removed the middle piece. I cut narrow strips of Garden Green and Cherry Cobbler cardstock and glued them underneath my split panels to accent the’split’. I adhered the panels to the base using snail adhesive.

stampin-up-my-hero-stamp-set-you-put-the-merry-in-my-christmas-cherry-cobbler

Using my Stamp-A-Ma-Jig I stamped the sentiment in the ‘split’ area. Next, I created these uber cute mini Christmas trees. To make them, I die cut a scalloped circle from a sheet of the same DSP, just a different design. I cut it in half, fold it into ‘tree’ and secured my folds with mini glue dots.

stampin-up-my-hero-stamp-set-you-put-the-merry-in-my-christmas-cherry-cobbler-2

Because design on this paper is quite ‘busy’, you couldn’t really see the trees, once attached to the card. So I die cut 2 scalloped circles in Very Vanilla and run them through my big shot with Festive Embossing Folder.

stampin-up-my-hero-stamp-set-you-put-the-merry-in-my-christmas-garden-green

Next, I die cut 2 slightly bigger scalloped circles: one in Garden Green and one in Cherry Cobbler to create mats for Very Vanilla pieces. Adhered them together (de-bossed side up) and then added my trees on top.

stampin-up-my-hero-stamp-set-you-put-the-merry-in-my-christmas-garden-green-2

First I thought to pop my circles up with dimensionals. But because these cards got quite of dimension anyway, I adhered them to the base with snail adhesive.

Super easy, aren’t they? I hope you like them. As always, if you wish to purchase any of the products I have used, simply click the images below to go directly to my online shop and don’t forget to enter the hostess code for the month of September RKW34AHD, to receive a gift from me.

I’m also adding my card to Craftyhazelnut’s Patterned Paper September 2016 challenge

Thank you for stopping by and have a blessed day,

Pinkies Stampin’ Up! Autumn Winter 2016 Blog Hop – Merry Mice

blog hop logo

Thank you for joining us on another Pinkies Blog Hop! We’re showcasing lots of gorgeous projects using products from the new Stampin’ Up!® Autumn/Winter Seasonal Catalogue. Simply use the buttons at the end of each post to keep hopping.

If you arrived here from lovely Hannah at Stampin by Hannah, thank you for stopping by. I hope you enjoy seeing all these beautiful projects and inspiration and continue to hop on through to see what everyone has made.

Here is my project –

merry-mice-stamp-set-shadow-box-christmas-card-2

I wanted to create shadow-box type card for a while but never came around to do it. But when I saw these adorable little mice I thought they are just perfect to do so.

For the base, I’ve used two pieces of Soft Sky cardstock that measures 4-1/8 x 8-1/2″.  scored them both at 1-1/2″ and 3″.  Next, I die-cut a window in my front panel using Layering Ovals Framelits. I used the same die and slightly bigger scalloped oval die to create the frame from Very Vanilla cardstock.

I wanted to add some subtle ‘bling’ to my card base, so I decided to use Heat & Stick Powder with Dazzling Diamond Glitter. I took this little, distressed stamp from Timeless Textures stamp set, and stamped it around the front panel in Versamark. I sprinkled Heat & Stick powder over it, heat set it, sprinkled with Dazzling Diamonds Glitter and heat set it again.

I cut a piece of Whisper White cardstock that measures 4-1/16 x 8-1/2″ and sponged it to create a background for my scene. I wanted to achieve beautiful night sky. To do so I’ve used Daffodil Delight, Pumpkin Pie, Melon Mambo, Pool Party, Bermuda Bay, Island Indigo, Perfect Plum and Night of Navy. I started with lighter colours at the bottom and slowly building up the colour until I was happy with the results.

To create starry night I’ve used irreplaceable Gorgeous Grunge and again Heat & Stick powder with Dazzling Diamonds Glitter. Once the glitter was set,  I took this piece and cut a 1-1/2″strip from it, on the long side, and scored the remaining piece at 4″. I glued the longer piece to my base, to the back panel. The strip I cut off, I adhered on the inside of my front base, so once the card is closed for posting, you can still see the starry night. on the inside panel. And what’s cool about this card: it’s folding down, just like a card in the box, and fits standard A6 envelope

To create front and back inserts, I took 2 strips of Very Vanilla, that measured 2-1/2 x 5 and  I tore them both (one bit smaller) on one side so they look like snowbanks. I’ve added a liquid glue to the torn edges and dabbed it in Dazzling Diamonds Glitter. I scored them both at 1/2″ and 4-1/2″. I adhered the taller one to the background panel.

merry-mice-stamp-set-shadow-box-christmas-card-caroler

Now the fun part: colouring the mice! I stamped singing mouse on a piece of Very Vanilla with Jet Black Stazon ink. I coloured him with Many Marvellous Markers and fussy cut it. Next,  I took a piece of Very Vanilla (2-1/2 x 5″) and marked it at 1″ from the bottom, on the long side. This piece will create our middle insert. I stamped my cute carolers so their feet were touching my 1″ mark. I coloured them in, and fussy-cut them, but only to the 1″ mark. I scored this piece at 1/2″ and 4-1/2″.

I took all my inserts and assembled the card. I adhered the singing mouse on the front of my card with dimensionals. The sentiment underneath comes from the same stamp set. But because of all the ‘busy-ness’ (if it’s even a word haha) of the card, I decided to keep it simple.

merry-mice-stamp-set-shadow-box-card

I’m really happy how this card turned out. Aren’t these mice super cute?! I hope I inspired you a little bit.

Now, be sure to hop along and see more inspiring projects. Your next stop is amazingly talented Jerim from Willow Piggy  go and see what she has made using new products.

next

previous

Thank you for stopping by and have a blessed day,

Snow Friends For The Holidays!

Howdy friends! How’s your weekend going? I had a lovely and quick crafty session with my little sister on Friday morning. She badly wanted to play with Snow Place bundle from Stampin’ Up before back home for a half term break at uni. So I sorted out some time to make a little crafty mess at my kitchen table.

Snow Friends Collage

Last time I used cute little snowmen so this time I decided to use Mr Penguin, or shall I say Mr & Mrs Penguin? haha Yep, I decided to make cute Mrs for our handsome friend, so he’s not feeling lonely at a Christmas time.

Snow Friends by Stampin' Up!

The card layout is pretty straightforward: top-folded base and a piece of the white panel inside for your writing. You also need a piece of white card for snow bank at the front of your card. You can die-cut it or use your scissors, but I just simply tear it. It adds some fun texture to the card.

Snow Friends by Stampin' Up!

You also need a piece of card for your stamping. And I have to mention here that there’s a lot of black in penguin, and it’s not that easy to get perfect impression/coverage. I tried two black ink pads I have: Memento Black and new Archival Stampin’ Up! Basic Black to get the best possible image. And although I love my Memento Black the best black and the really crisp impression I got while using Basic Black Archival ink.

Snow Friends by Stampin' Up!

When we had all of our images stamped we took it to my studio to die cut it with matching framelits. If you don’t have framelits or die-cutting machine fear not. Images are so simple that you can easily cut them by hand with a pair of good scissors. I actually hand-cut leaves with berries that Mrs Penguin has in her hair lol

I also used clear Wink Of Stella Glitter Brush to add shimmer to snowflakes, berries and leaves, Mrs Penguin’s beak and cheeks as well as white stripes on the candy cane.

Now just wanted to show you a project that my sister created. Firstly she wanted to make a cute card for her boyfriend. But when the card was finished she asked if there’s a way to make it into gift card holder, haha But hey, everything is possible! So I made a pocket to hold a gift card and attached it inside of her card. It may not be perfect but it’s made with love and that is what really matters.

That’s it from me for today. I really hope you like our cute little projects. We definitely had lots of fun crafting, getting inky and making a mess.

Have a blessed day,