Stampin’ Dreams June Blog Hop

Anna' Stampin' Cave - Soft Watercolours using Accented Blooms Stamp Set with Tailored Tag Punch from Stampin' Up!

Anna’ Stampin’ Cave – Stampin’ Dreams June Blog Hop

Welcome to the monthly Stampin’ Dreams Blog Hop. This month’s theme is Birthday. You are currently visiting Anna from the UK. I hope you enjoy my project.

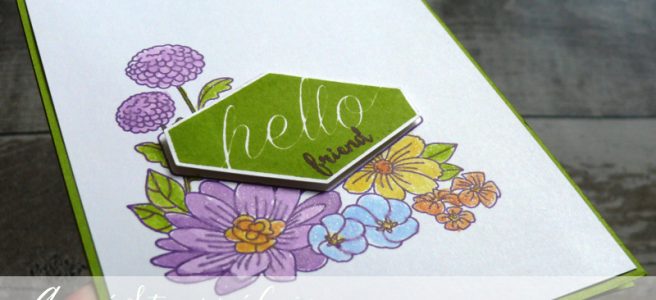
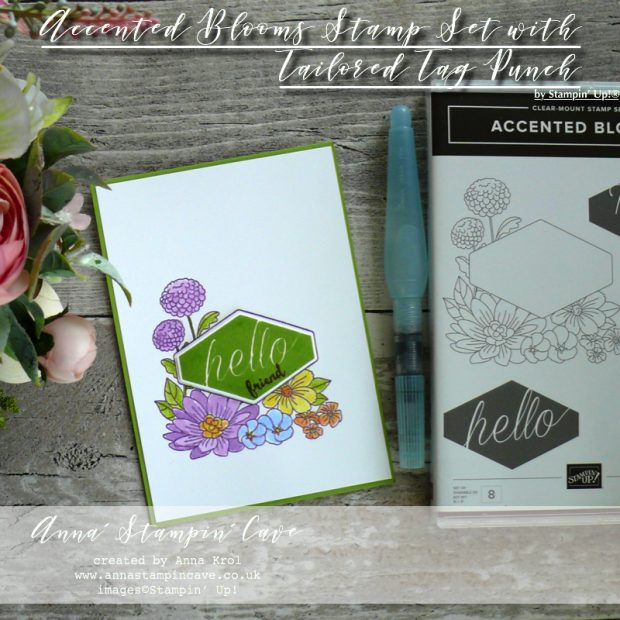
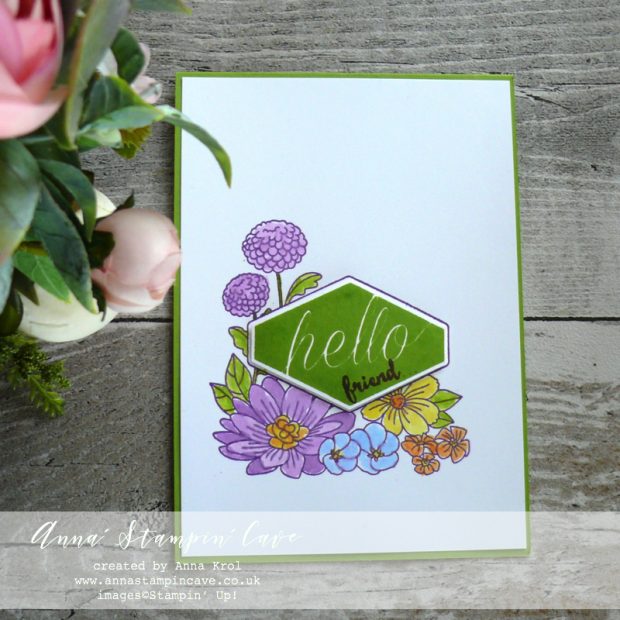
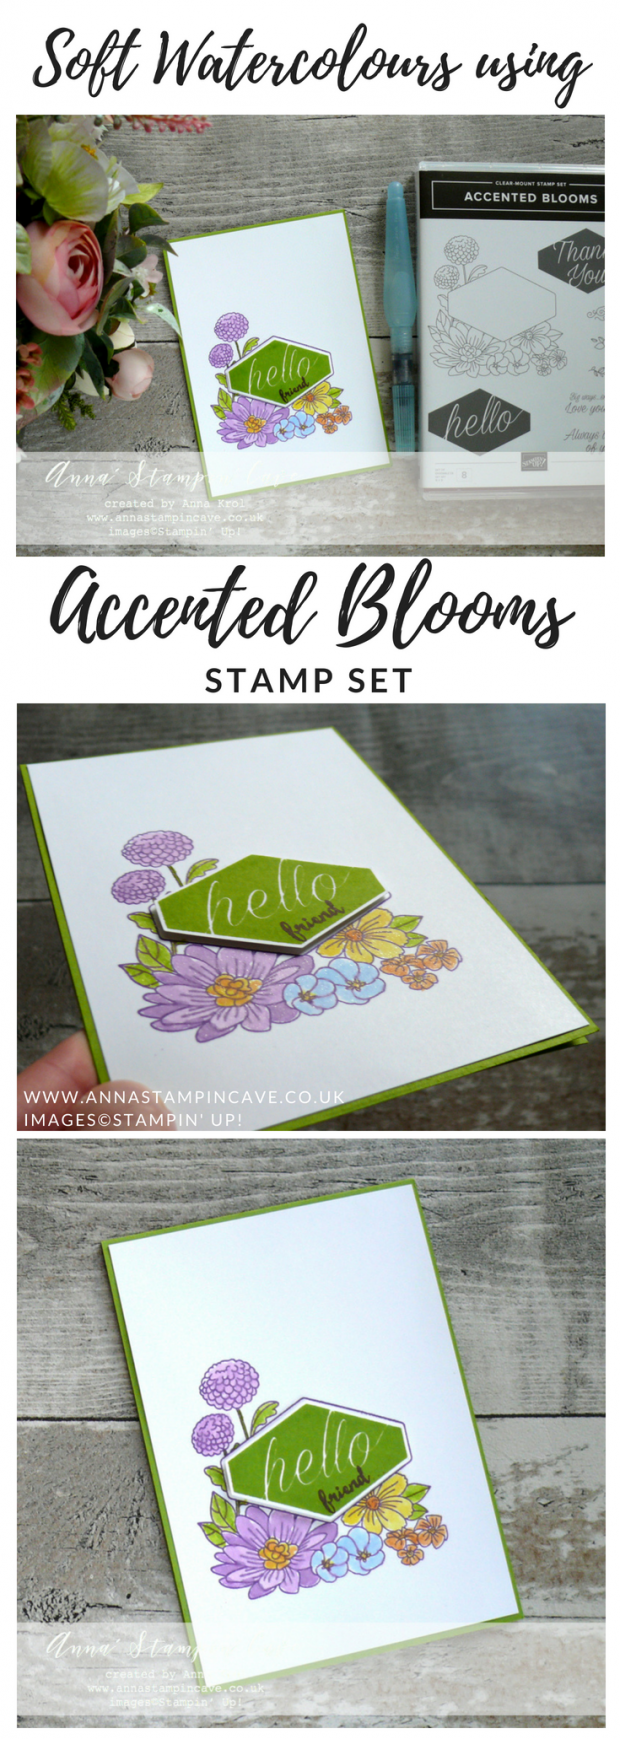
For my project today I decided to use one of the new stamp sets called Accented Blooms to create a beautiful card for my bestie’s birthday.

Anna' Stampin' Cave - Soft Watercolours using Accented Blooms Stamp Set with Tailored Tag Punch from Stampin' Up!

Hello, Friend card dimensions:

  • Granny Apple Green Cardstock: 11-6/8″ x 4-1/8″ scored in half at 5-7/8″ (29.7 x 10.5 cm scored in half at 14.8 cm)
  • Whisper White regular cardstock two pieces measuring: 5-3/4″ x 4″ (14.5 cm x 10.2 cm)
  • Whisper White regular cardstock for punching the shape

First, I scored the base so it’s ready. I took one of the Whisper White panels and adhered it inside of the card for a birthday wishes.

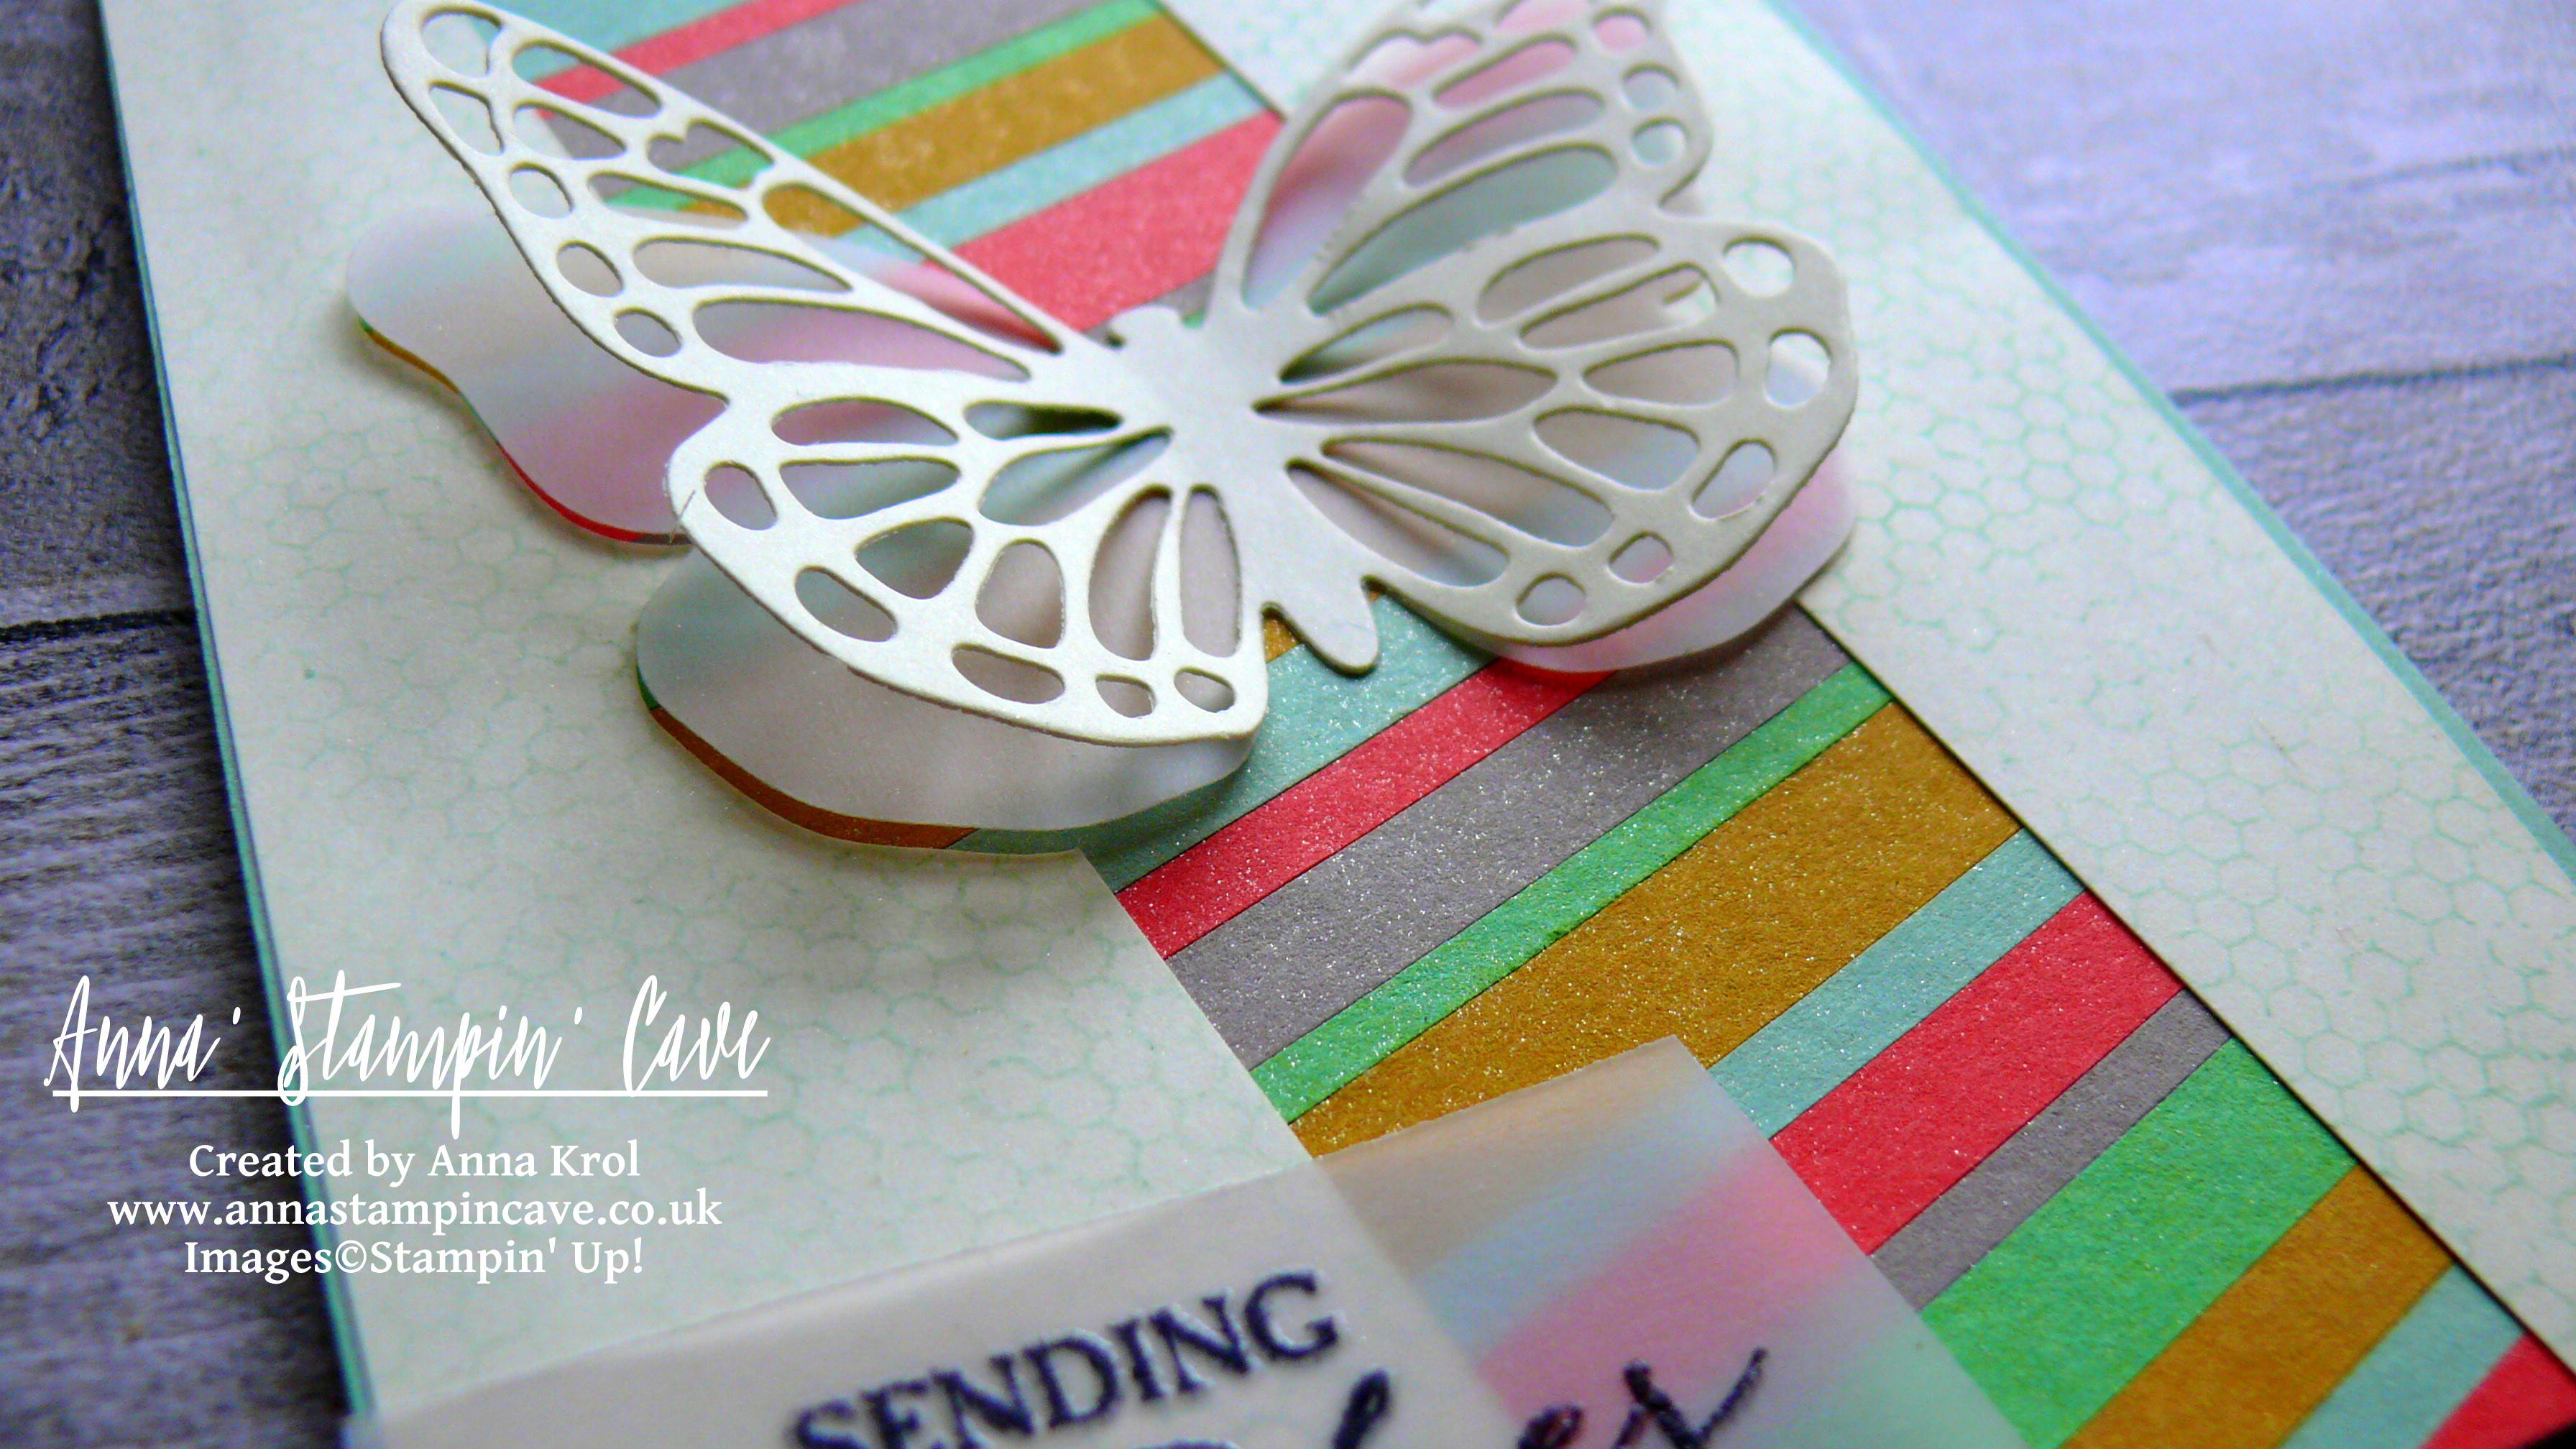
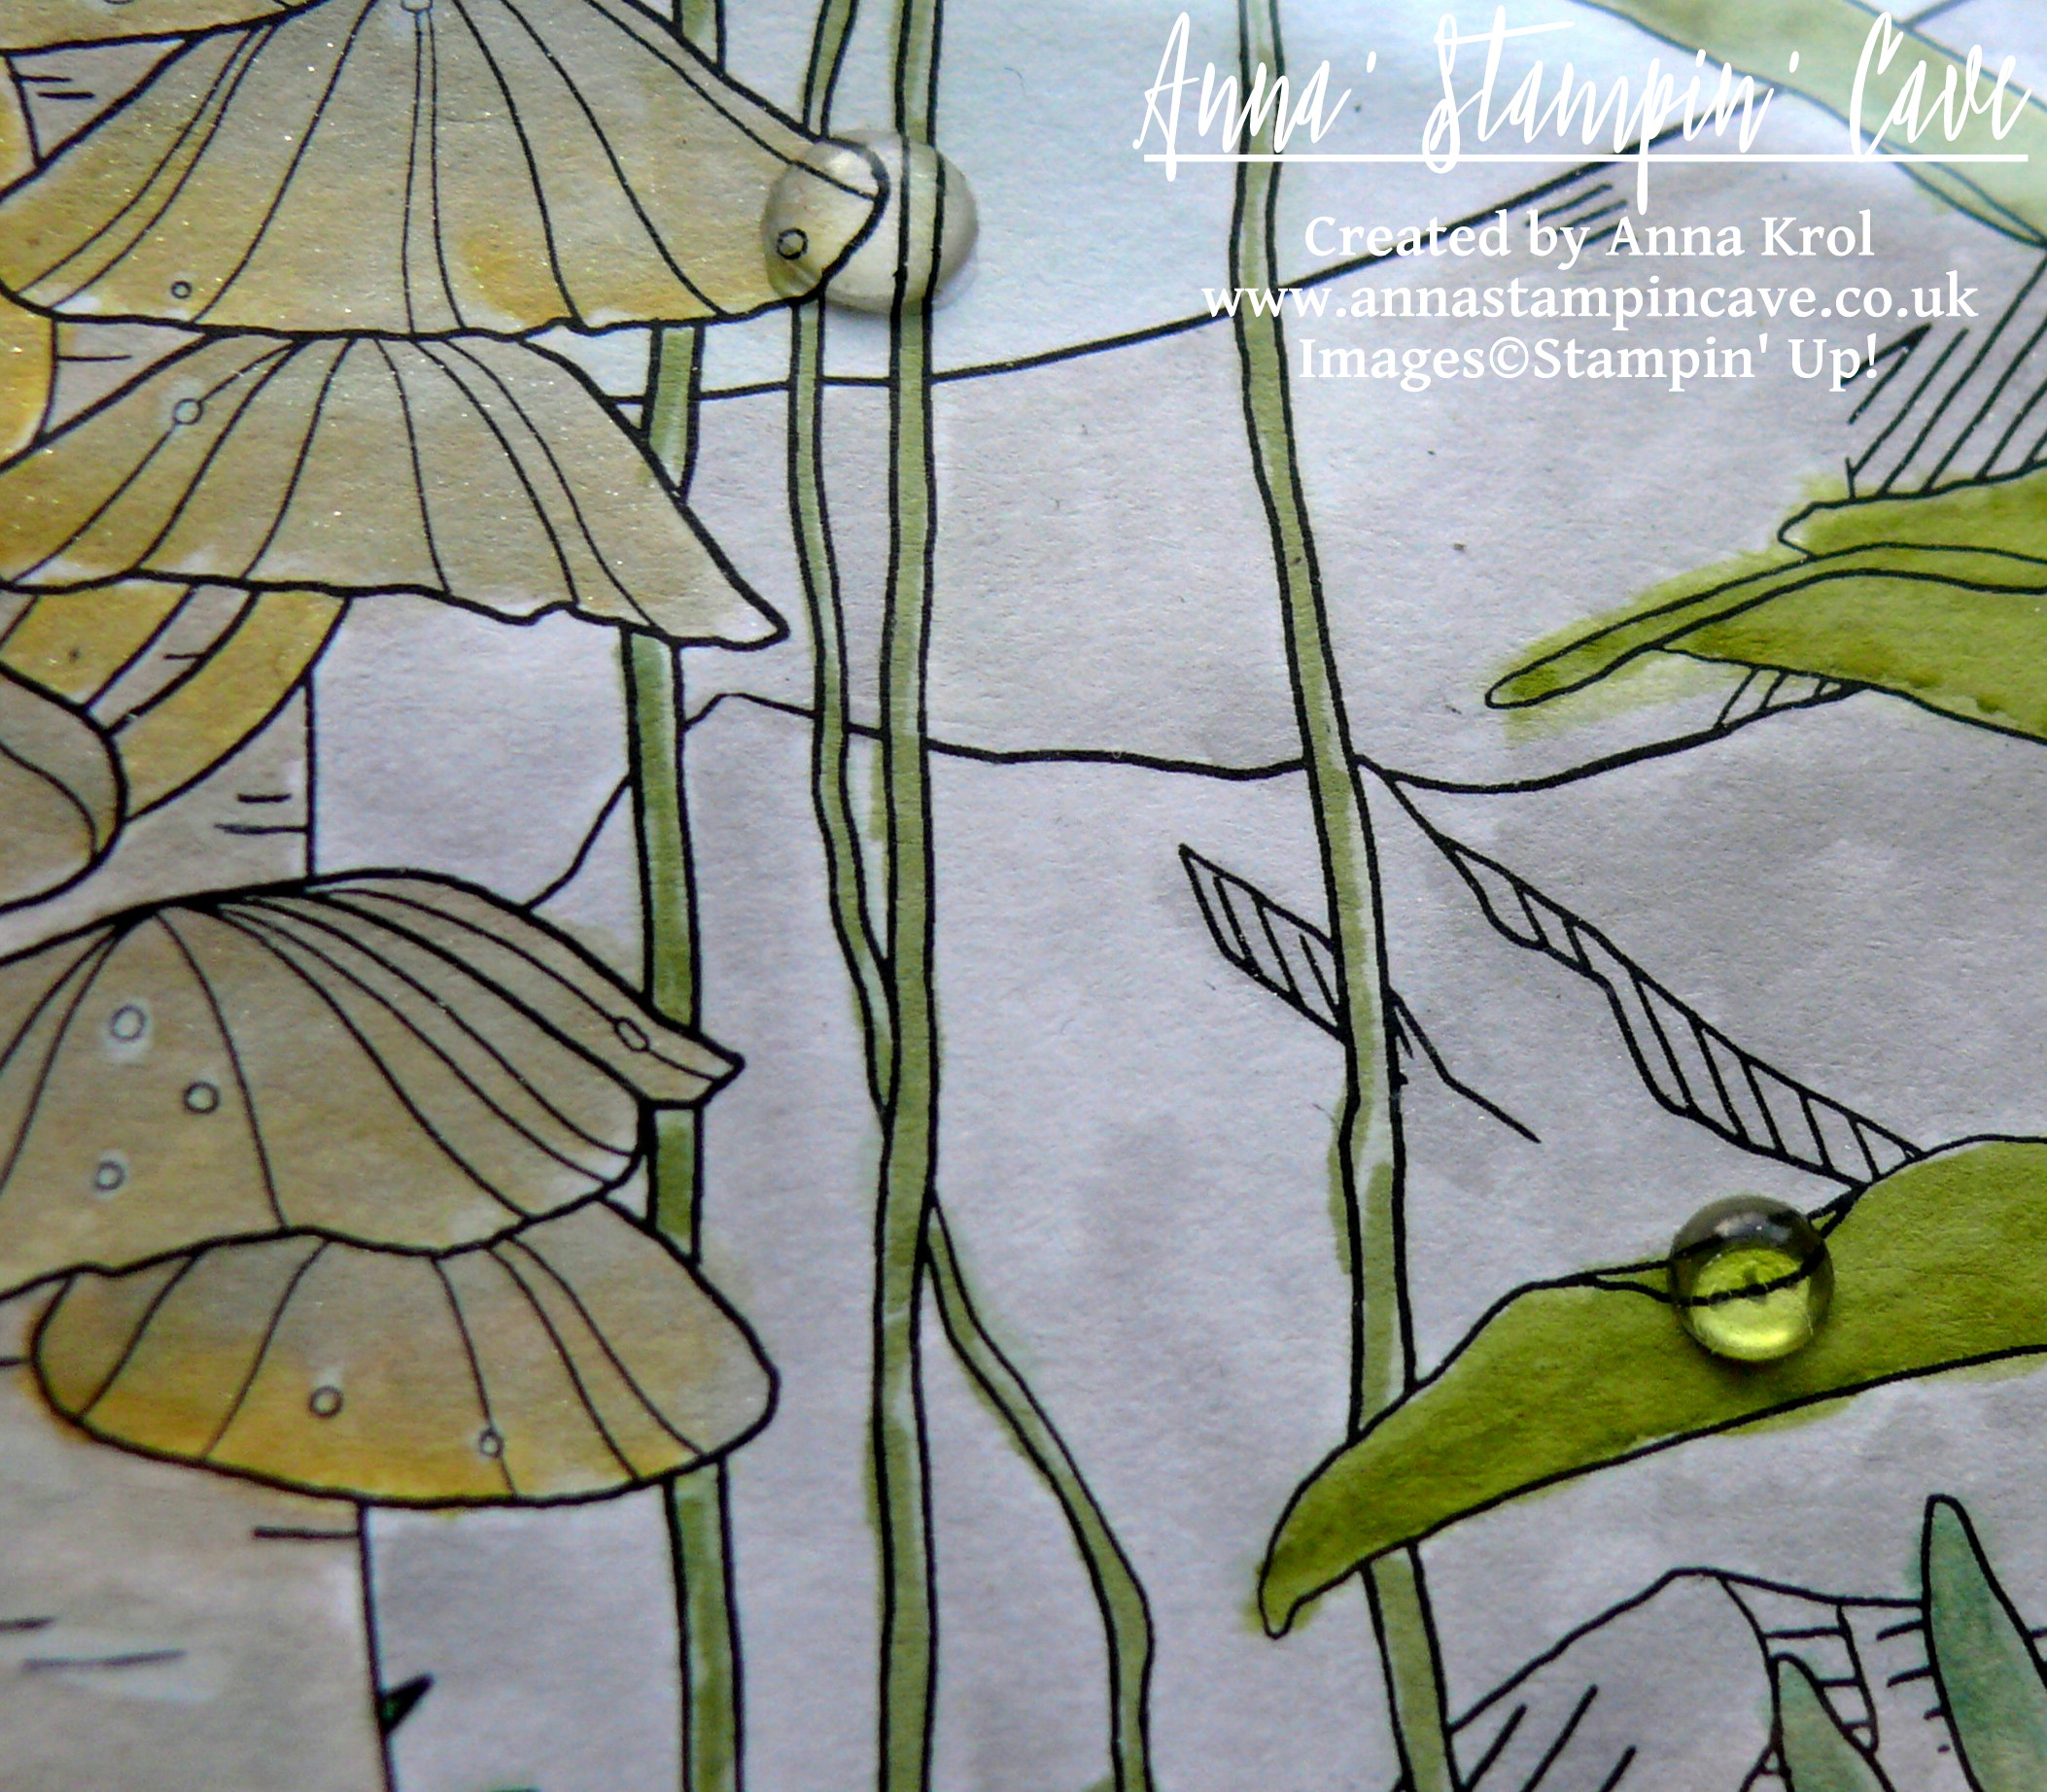
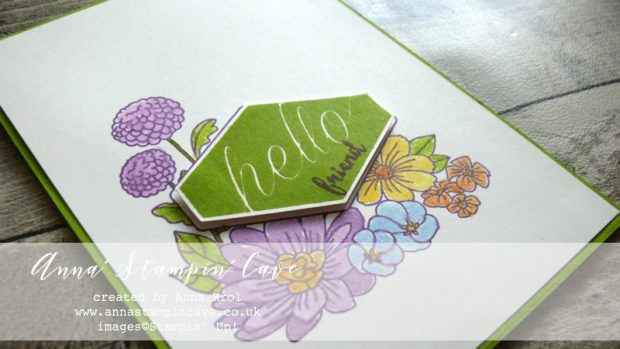
Next, I took a Gorgeous Grape ink pad, inked floral arrangement image from Accented Blooms Stamp Set and stamped it on my second panel.

Anna' Stampin' Cave - Soft Watercolours using Accented Blooms Stamp Set with Tailored Tag Punch from Stampin' Up!

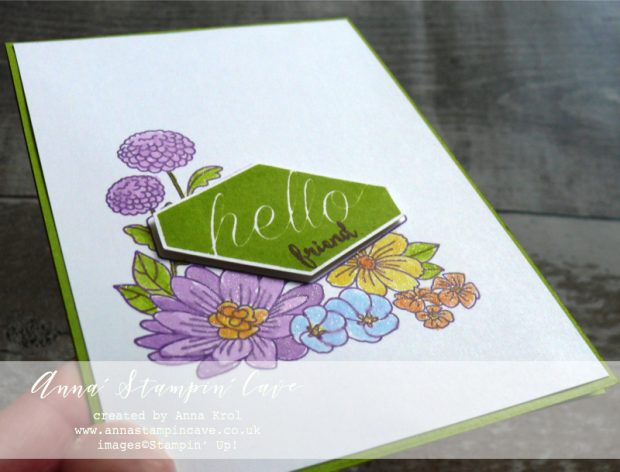
I’ve used Granny Apple Green ink pad and I stamped ‘Hello’ sentiment on a piece of Whisper White cardstock and punched it with a coordinating Tailored Tag punch.

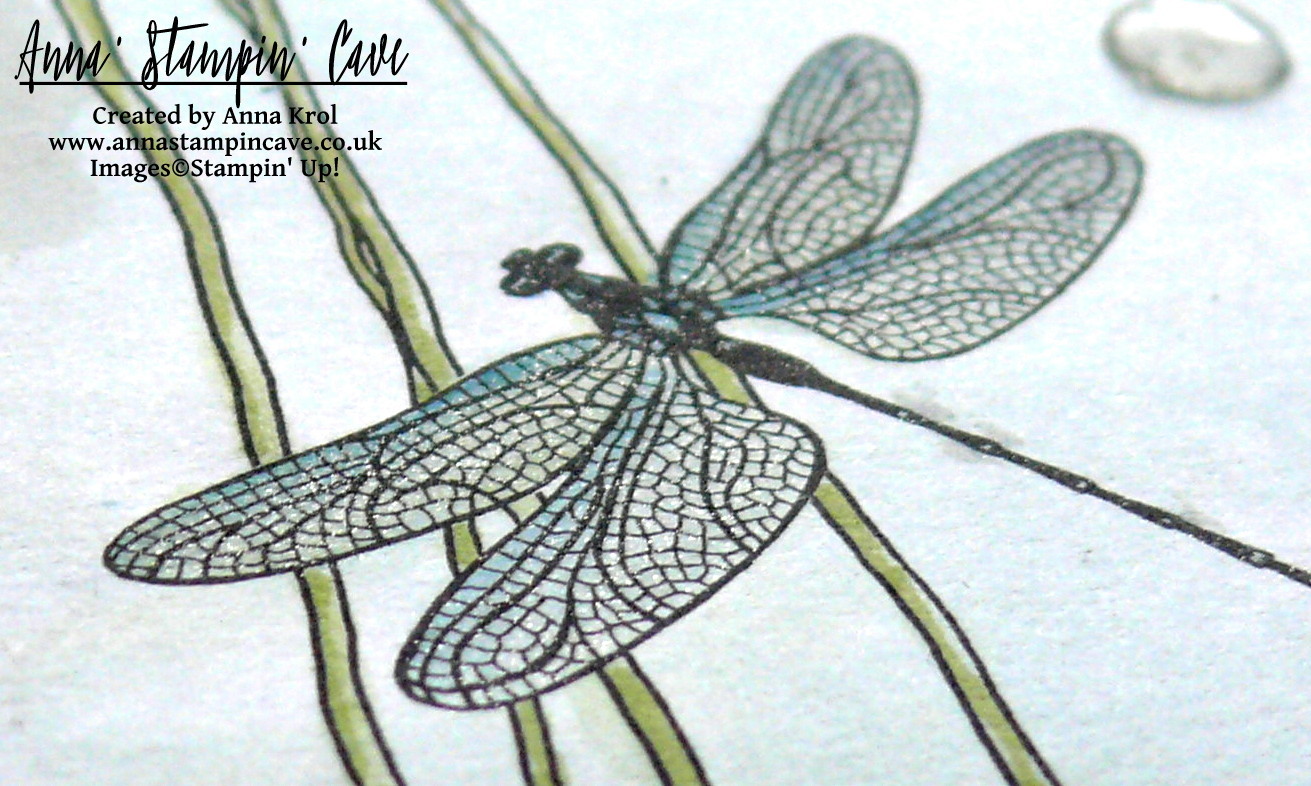
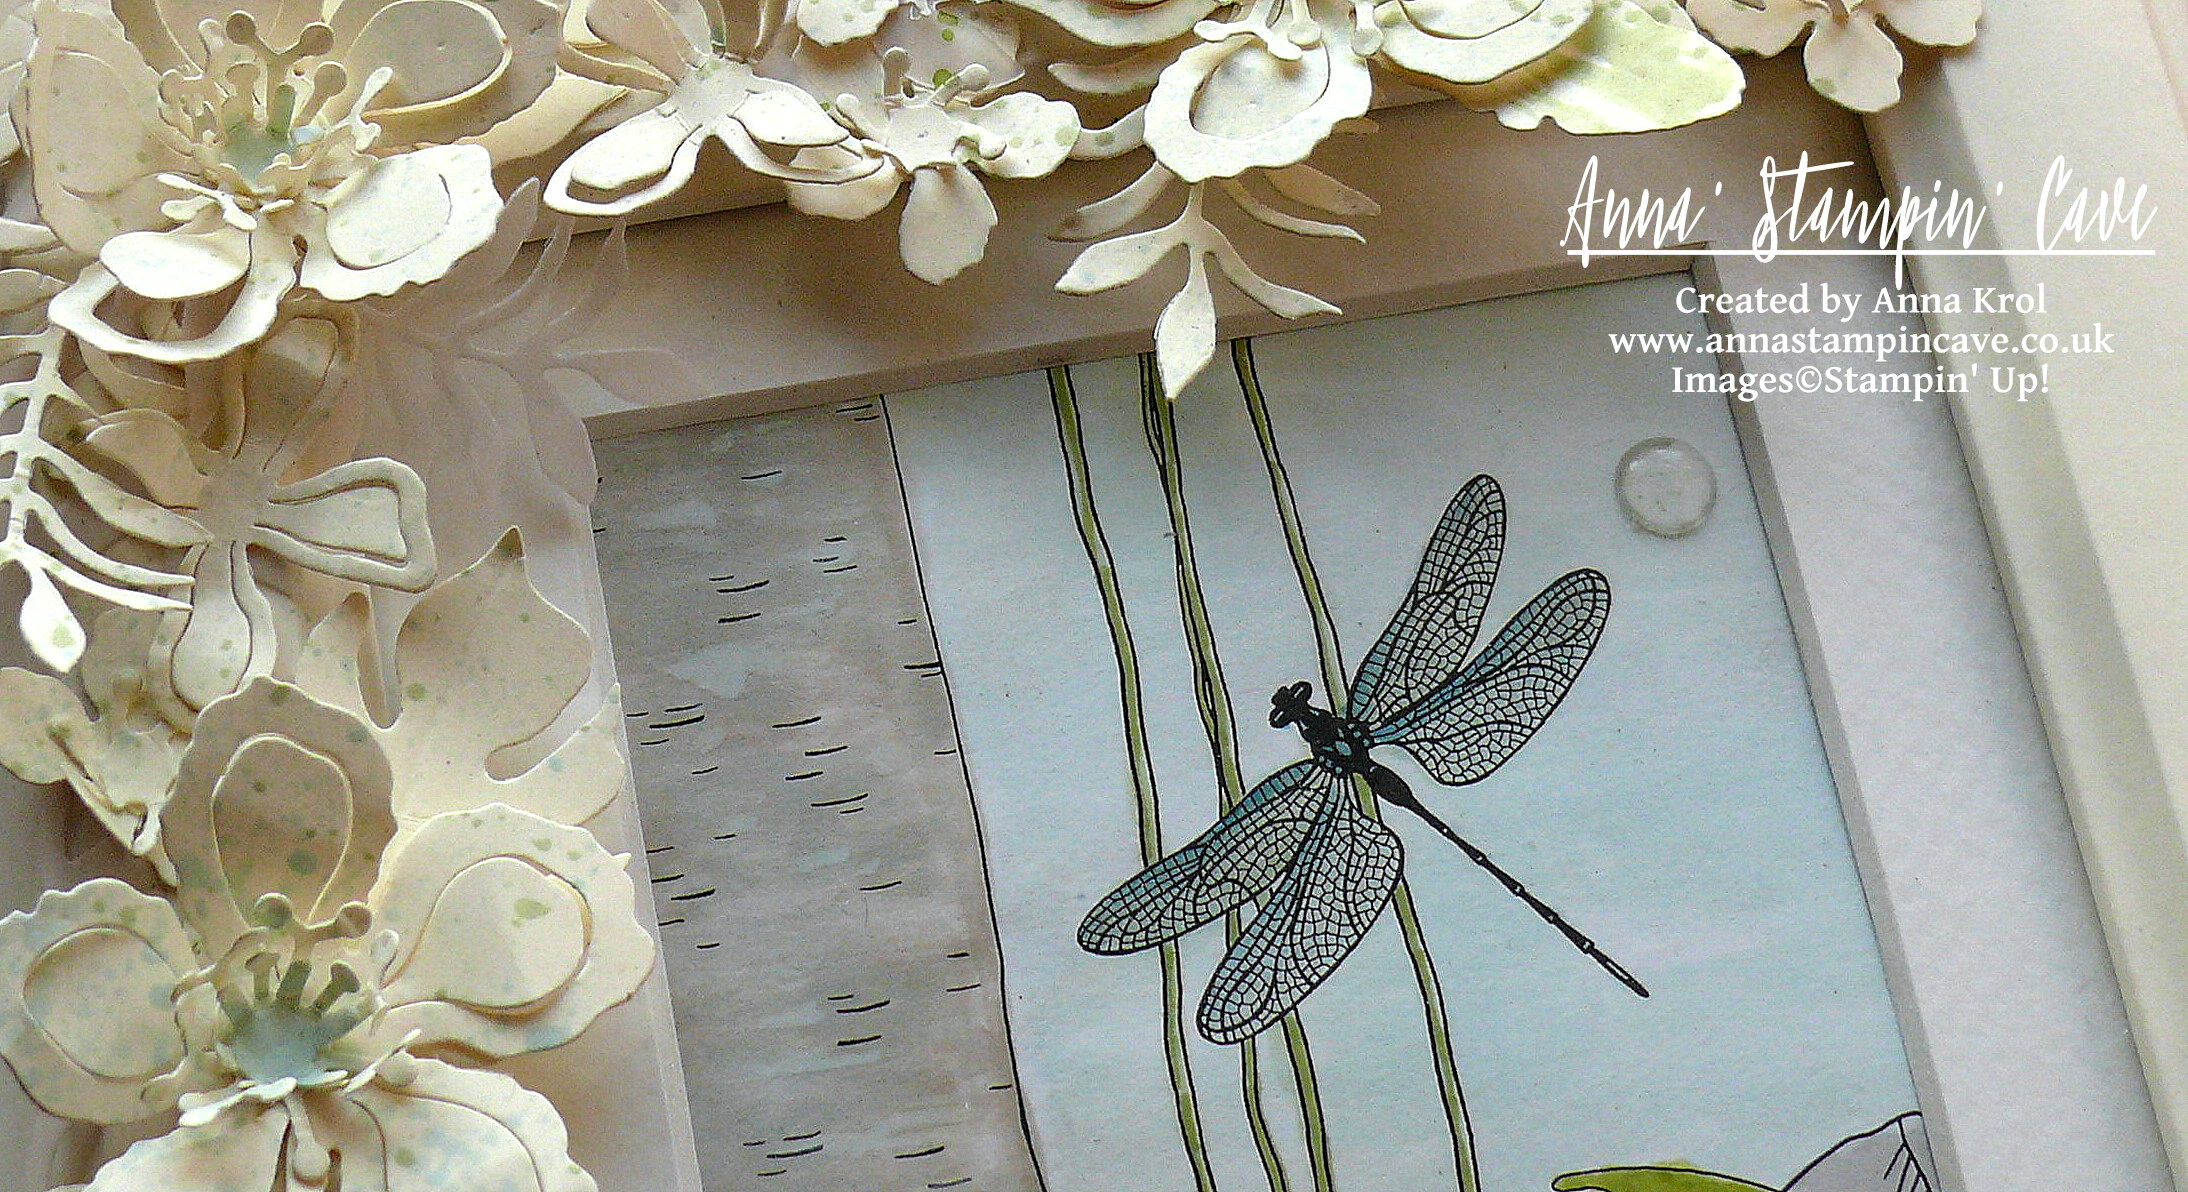
Next, from a Dragonfly Dreams stamp set I took a stamp that says “To my wonderful friend”, inked just the ‘friend’ word in Gorgeous Grape and stamped it just below the word ‘hello’. I adhered it to my panel using dimensionals and adhered the whole panel to the base.

Anna' Stampin' Cave - Soft Watercolours using Accented Blooms Stamp Set with Tailored Tag Punch from Stampin' Up!

Firstly, I wanted to leave it just as is, but then I decided I could add a little colour to my floral arrangement.

Using aqua painter, Granny Apple Green, Gorgeous Grape and few new in colors®, I watercoloured the image. And yes, you can watercolour on a regular Whisper White cardstock. You just need to be careful and use way less water. A bit of clear Wink of Stella finished off my card.

Anna' Stampin' Cave - Soft Watercolours using Accented Blooms Stamp Set with Tailored Tag Punch from Stampin' Up!

I really hope you enjoyed visiting my blog today and I would love to encourage you to hop along with us and see the rest of beautiful projects designed by amazing artists. Please be sure to continue to hop using the list below. You don’t want to miss any!

I’m also adding this card to the fun challenge:

As always, if you wish to purchase any of products I have used, simply click the images below to go directly to my online store.

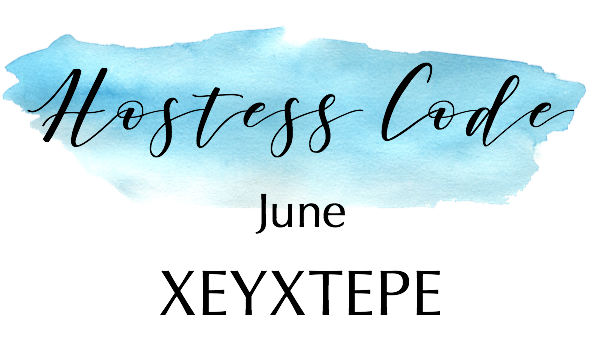
Host Code for the month of June is XEYXTEPE. Orders of £50+ (excl. p&p) will receive a Surprise Thank You Gift from me. You won’t be disappointed!

Thank You Gifts will be shipped in the first 2 weeks of the following month they were earned (mid-July).

Aqua Painters

£15.50

Clear Block E

£11.00

Pin me

Summary of the project which gives all the views of the card in one photo. I’d love if you pinned and called by on Pinterest xx

Anna' Stampin' Cave - Soft Watercolours using Accented Blooms Stamp Set with Tailored Tag Punch from Stampin' Up!


UPDATE

There was a number of products that due to unexpected shipping delays weren’t available when the catalogue went live. But I’m happy to announce that the following products are now in stock and available for purchase.


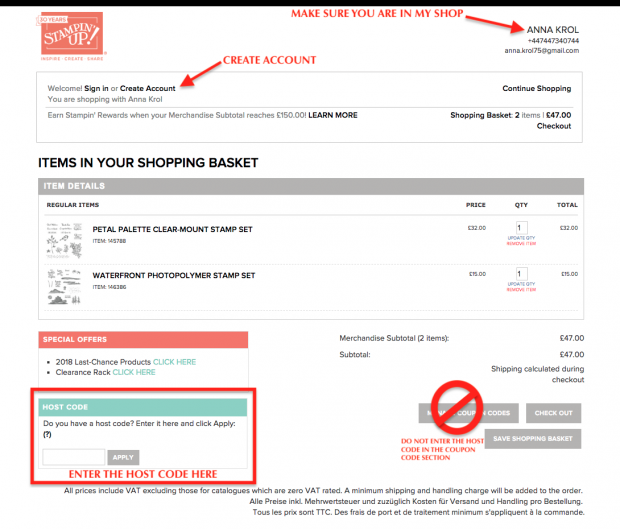
HOW TO USE HOSTESS CODE


I would also love to invite you to join my team which is called Serendipity Crew.  We are a part of one of the biggest teams in the UK – a really wonderful group of women, of whom many have become dear friends of mine. We all support and inspire each other. So when you join my crew, you don’t get just me to help and support you, we all are a big friendly group! And we would love to welcome you.

Thank you for stopping by and have a blessed day,

Colourful Striped Background For Global Design Project – I am Guest Designer

Anna’ Stampin’ Cave – Colourful Striped Background For Global Design Project – I am Guest Designer

Hello, my friends! I am so excited as today I am a Guest Designer for Global Design Project. How amazing is that?! I’m so humbled and honoured that GDP team has chosen me to join them for this week’s Colour Challenge. And boy, what a great colours we have to play with!

Choose your fav three wasn’t an option for me because I love all of these and wouldn’t know which to choose, to be honest. So I decided to be a rebel and for my project today I’ve used all five. Let’s say this post is a farewell to these beautiful In Colours.

Colourful Striped Background card dimensions:

  • Mint Macaron cardstock: 11-6/8″ x 4-1/8″ scored in half at 5-7/8″ (29.7 x 10.5 cm scored in half at 14.8 cm)
  • Very Vanilla cardstock: two panels, one for the card front, one for the inside of the card 5-7/8″ x 4″ (14.8 cm x 10.2 cm) each
  • cardstock for building the background: 5-7/8″ x 3-1/2″ (14.8 cm x 8.9 cm)
  • scraps of cardstock in colours: Mint Macaron, Delightful Dijon, Watermelon Wonder, Cucumber Crush and Tip Top Taupe
  • White Vellum for stamping and die-cutting

I started my card by creating this fun and colourful striped background. I took my scraps of cardstock of 2015-2017 In Colours and I cut it into strips of different widths. Next, I took a piece of cardstock (random colour as it won’t be seen anyway), covered it in glue,  using snail adhesive, and adhered my strips diagonally, mixing colours and widths, making sure there’s no space left in-between the strips. When the whole panel was covered, I trimmed any overhanging stripes.

Can you see the shimmer on this panel? I took empty spritzer bottle and fill it with water. Next, I took Clear Wink of Stella Glitter Brush and squeezed pretty few drops of it into the spritzer. I shake it really well, spritz my entire panel with this glittery mist and let it dry.

I took the Very Vanilla panel and die-cut this intricate butterfly from Butterflies Framelits Dies in the middle of it. I also die-cut solid butterfly from vellum using Bold Butterfly Framelit Dies.

Using t-ruler, I draw two diagonal (and parallel) lines at the back of my panel. Using these lines as guides, I cut my panel into three and discarded the middle piece. Next, I stamped this lovely chicken wire (kinda) pattern from Butterfly Basics Stamp Set all over the other two pieces. I stamped it in Mint Macaron and to create this faded look I stamp off twice before I stamped on the cardstock.

I adhered my Very Vanilla pieces to the background panel, with butterflies inlaid between them: vellum butterfly at the bottom and vanilla one on the top, and added the whole panel to the card base with liquid adhesive.

For the sentiment, I chose “Sending Wishes Your Way”, also from Butterfly Basics Stamp Set. I prepared vellum with embossing buddy, dabbed my stamp in Versamark and straight away in Basic Black Archival ink, and stamped it onto vellum. Sprinkled it with clear embossing powder and heat set it.  Adhered it to the card with few tiny drops of Fine-Tip Glue Pen. All that’s left was to add second Very Vanilla panel inside of the card. Done!

Once again I wanted to thank amazing GDP team for this opportunity and privilege, that I could showcase my project alongside such wonderful artists. Thank you from the bottom of my heart.

As always, I really want to encourage you to visit the Global Design Project challenge and play along. You too have a chance to be the next Guest Designer

Thank you for stopping by and have a blessed day,

Inside The Lines Altered Photo Frame

Anna’ Stampin’ Cave – Inside The Lines Altered Photo Frame

In my project today I decided to create altered photo frame with beautiful, Inside The Lines Designer Series Paper. With an ever-growing trend in adult colouring books, this paper is just spot on.

inside-the-lines-dsp

I don’t know about you, but I love these bold botanical designs. They coordinate with Dragonfly Dreams Stamp Set & Dies, but you can use them on their own too. Colour them in with markers, inks or watercolour pencils – it’s fun and very therapeutic…or leave them black&white. Whatever tickles your fancy.

anna-stampin-cave-stampin-up-sale-a-bration-inside-the-lines-dsp-frame

The frame is from Ikea and is called Virserum. It measures 7-1/2 x 9-1/2″ (19 x 24 cm) and comes with inside mount, hence I only needed 4″x 6″ (10 x 15 cm) piece of DSP to fit inside.

I’ve chosen this lovely, jungle-like design and cut it into 4″x 6″ rectangle. Because I was aiming for a subtle look I decided to watercolour my piece.

Bear in mind this is not watercolour paper so you can’t add too much water to it.

For the foliage, because it’s such a small area, I’ve used Stampin’ markers: Pear Pizzazz, Wild Wasabi, Old Olive, Garden Green and Always Artichoke. First, I scribbled my markers on a craft mat. I also spritz some water on my craft mat, next to the markers. I did it deliberately, to have more control of how much water I use. Next, I took dry aqua painter, picked up some water with its brush, next picked up some colour from the mat and started colouring my foliage. I was adding more colour and more water to the mat when needed. There are 4-5 layers of colour on leaves, each layer added when the first one was dry.

anna-stampin-cave-stampin-up-sale-a-bration-dsp-inside-the-lines

To colour in the rest of the image, I’ve used ink pads as my palettes.

I’ve used Soft Sky for sky and dragonfly (with a little dab of Island Indigo marker). Mountains are coloured with Smoky Slate.

For the tree trunk, I’ve used Tip Top Taupe ink pad. To add some highlights I’ve used Whisper White Craft Ink (yes, I’ve used it with aqua painter too).

anna-stampin-cave-stampin-up-sale-a-bration-inside-the-lines

Polypores or conks (I’m not sure how they are called in the UK so forgive me if I’m wrong) are watercoloured with a mix of Sahara Sand, Crushed Curry and again some white craft ink for highlights.

For the final touch, I’ve added White Perfect Accents as dew drops (one on the sky is hiding a little boo-boo). And as a must, I had to add some shimmer with clear of Wink of Stella to the dragonfly, mountain tops, and polypores. Sadly it’s really hard to capture this lovely shimmer on photos. But now to the frame.

anna-stampin-cave-stampin-up-sale-a-bration-inside-the-lines-dragonfly

Believe it or not, this is my first ever altered photo frame. I knew I want flowers, but for a long time, I couldn’t decide on a colour. First, I wanted to go with quite a feminine look, so pinks and oranges. But once I had all my flowers ready I didn’t really like it. Typical haha. But no worries, I will use them to something else. And then I had this revelation: how about Very Vanilla?! Genius!

I die-cut oodles of flowers and leaves from Very Vanilla and Vellum cardstock. Arranged them around the frame and once I was happy with the placing, I adhered them with glue dots.

anna-stampin-cave-stampin-up-sale-a-bration-inside-the-lines-dsp-picture-frame

But as you may know me already, nothing can be too easy haha And when I looked at my frame something was missing, in my humble opinion. Oh right, it was too ‘clean’, too ‘white’. I needed some ‘controlled mess’.

I pressed Pear Pizzazz and Soft Sky ink pads next to each other on the craft mat and spritz it with water. I covered the glass with a piece of paper, and using a clean brush I added random and less random splatters to the flowers and leaves. And I have to say I love it now! And I hope you like my little project too.

I also want to add this project to the #071 Theme Challenge over at Global Design Project Challenge Blog. This weeks theme is ‘3D Or Off The Page’

gdp071

As always, if you wish to purchase any of products I have used, simply click the images below to go directly to my online store.

Thank you for stopping by and have a blessed day!


Inside The Lines Designer Series Paper

Inside The Lines Designer Series Paper
[143830]
£0.00

Botanical Builder Framelits Dies

Botanical Builder Framelits Dies
[140625]
£30.00

Very Vanilla A4 Card Stock

Very Vanilla A4 Card Stock
[106550]
£8.25

White Vellum A4 Card Stock

White Vellum A4 Card Stock
[106584]
£6.00

Many Marvelous Markers

Many Marvelous Markers
[131264]
£99.00

Crushed Curry Classic Stampin' Pad

Crushed Curry Classic Stampin’ Pad
[131173]
£6.00

Pear Pizzazz Classic Stampin' Pad

Pear Pizzazz Classic Stampin’ Pad
[131180]
£6.00

Tip Top Taupe Classic Stampin' Pad

Tip Top Taupe Classic Stampin’ Pad
[138325]
£6.00

Sahara Sand Classic Stampin' Pad

Sahara Sand Classic Stampin’ Pad
[126976]
£6.00

Smoky Slate Classic Stampin' Pad

Smoky Slate Classic Stampin’ Pad
[131179]
£6.00

Soft Sky Classic Stampin' Pad

Soft Sky Classic Stampin’ Pad
[131181]
£6.00

Whisper White Craft Stampin' Pad

Whisper White Craft Stampin’ Pad
[101731]
£7.25

Clear Wink Of Stella Glitter Brush

Clear Wink Of Stella Glitter Brush
[141897]
£7.25

Aqua Painters

Aqua Painters
[103954]
£15.50

White Perfect Accents

White Perfect Accents
[138416]
£4.50

Liquid Multipurpose Glue

Liquid Multipurpose Glue
[110755]
£3.75

Glue Dots

Glue Dots
[103683]
£4.75

Stampin' Trimmer

Stampin’ Trimmer
[129722]
£27.00

Big Shot

Big Shot
[143263]
£99.00

Elegant Monochromatic With Pop Of Colour

Anna’ Stampin’ Cave – Elegant Monochromatic With Pop Of Colour

Wow! It’s hard to believe, but today is last day with My Hero Stamp Set from Stampin’ Up! Yep, 5 weeks have passed!

For my final project, I’ve created this striking yet elegant, almost monochromatic card, in shades of grey but with a pop of colour in form of dainty orange flowers.

stampin-up-botanical-builder-framelits-my-hero-stamp-set

For the base of my card I took an A4 sheet of Smoky Slate cardstock, cut it in half at 4-1/8″ and folded in half at 5-7/8″. I run the front of the base through Big Shot with Festive Embossing Folder. The panel is a piece of Basic Grey cardstock that measures 2″ x 5-7/8″. I adhere it to the base with Multipurpose Liquid Adhesive.

Next, I created my floral composition using Botanical Builder Framelits Dies. I die cut a couple of leaves from vellum and six flowers: three tiny flowers and three small 3D flowers from a scrap of Whisper White cardstock.

Savvy Tip: Don’t know what to do with random off cuts that are to small to use on cards or to punch anything out of them? Don’t throw them away! I save all my off cuts and use them up when need to die cut small elements, flowers, etc using framelits dies

To add a little bit of colour to my flowers I sponged the edges of the tiny flowers with Watermelon Wonder. For 3D flowers, I decided for more ‘dramatic’ look I sponged entire flowers using Pumpkin Pie ink pad and a dab of Watermelon Wonder to the centres. I also added a large rhinestone to each centre. You can’t really tell from the photos (blame the awful English weather) but I’ve added a touch of shimmer using Clear Wink Of Stella Glitter Brush to each flower (tiny ones too).

stampin-up-botanical-builder-framelits-my-hero-stamp-set

Next, I took a strip of vellum ( 1/2″ x 4-1/8″) and stamped a ‘Celebrate’ from My Hero Stamp Set in Versamark. Of course, I’ve used an Embossing Buddy prior to stamping. I heat embossed the sentiment with Silver Stampin’ Emboss Powder.

Tip: For best results with heat embossing always treat your cardstock, dsp, vellum, etc with embossing buddy. I takes off the statick from the surface of your paper, and makes the powder stick only to the areas you stamped.
Tip 2: If you don’t have an embossing buddy or any other antistatic tool you can use cornflour instead. Just sprinkle a little amount of flour over the surface of your cardstock, spread it with fingers or paint brush, and shake off the excess. Now you can stamp and heat emboss.

I assembled my composition using Glue Dots and liquid adhesive. Two tiny flowers on the vellum banner are hiding adhesive that I’ve used to adhere the banner to the card base.

stampin-up-botanical-builder-framelits-my-hero-stamp-set

I really like how this card turned out. I love the monochromatic, cold look of greys with a pop of bright orange. And what do you think about this colour combination? Do you like it? I would love to hear from you in comments below.

Thank you for stopping by and have a blessed day,

You Send Me Soaring

I love the vintage feel to Sky is the Limit stamp set from Stampin’ Up! and I’ve used it recently to create cute Valentine’s Day cards perfect for men in our lives.

sky is the limit 3

First card I’ve made for a card-swap in our group of demonstrators. As all stampers, we love to swap! Swapping lets you share your creativity, enjoy the creativity of other stampers, and gather and collect ideas.

sky is the limit 7

The base of my card is Watermelon Wonder cardstock. For the layer, I cut two pieces of Typeset Specialty DSP (each measure 5-7/8″ x 1-3/8″) and a strip of Very Vanilla cardstock that measure 5-7/8″ x 1-1/4″. Before I adhered them on my base I stamped my images on Very Vanilla using Basic Black Archival Stampin’ Pad, as I was planning to do a little colouring. Our archival ink pads are perfect for watercolouring as they do not bleed. I coloured heart using Watermelon Wonder ink pad and a blender pen and added a little shimmer with clear Wink of Stella Glitter Brush. Yeah, I know that most of the guys do not like a bling. But come on: he loves you, so you can sneak a little shimmer here and there, and he won’t say a word 😉 I stamped the sentiment on a piece of vellum and heat embossed in black. Cut it into a banner and attached to the card using a regular stapler.

For the second card base, I chose cardstock in my favourite neutral colour – Crumb Cake.

sky is the limit 6

For the layer again I reached for Typeset DSP. But this time I stamped directly onto my designer paper. I also added some splotches from Gorgeous Grunge stamp set and sponged the edges to add to the vintage look. This time I stamped sentiment onto a piece of Crumb Cake instead of vellum. I attached everything to the base using snail adhesive. The plan for the heart was to leave it blank this time, but when the card was put together I’ve changed my mind. I colour the heart using a Real Red marker and then filled it with Crystal Effects. I have to say I love how a little of Crystal Effects makes the heart just POP! sky is the limit 4

It’s been ages since last time I’ve made masculine cards, so rather pleased how these turned out. I was wondering which of the finishes get more votes: Wink of Stella or Crystal Effects. So I’ve asked my fellow crafters (showing them just a hearts sneak peek) what they think. And I’m not surprised that Crystal Effects gets more votes. And which finish do you prefer? Let me know in the comments below.

Thank you for stopping by and have a great day,