Best Guy Ever Clean & Simple Masculine Card

Anna’ Stampin’ Cave – Best Guy Ever Clean & Simple Masculine Card

International-Highlights-header-vote-fav

Thanks for coming to my blog today! We are being highlighted internationally by Kylie Bertucci and you are able to VOTE for my project. The top ten winners will get to be part of an international blog hop so please vote for my project. You can do it here or use a button at the end of my post.

This month we have a theme that, I think, most of cardmakers struggling with – MASCULINE.

I know that for some it’s hard if you can’t use pink, glitter or rhinestones on the card. Not to mention flowers. I even heard that masculine cards are boring! What?! Today I will show you that masculine cards can be fun and not boring at all.

Best Guy Ever card dimensions:

  • Delightful Dijon cardstock: 11-6/8″ x 4-1/8″ scored in half at 5-7/8″ (29.7 x 10.5 cm scored in half at 14.8 cm)
  • Early Espresso cardstock: 5-6/8″ x 4″ (14.6 cm x 10.2 cm)
  • Delightful Dijon cardstock for sentiment: 1-3/8″ x 2″
  • White Vellum cardstock mat: 1-5/8″ x 2-2/8″
  • Early Espresso, Delightful Dijon and White Vellum scraps for die cutting

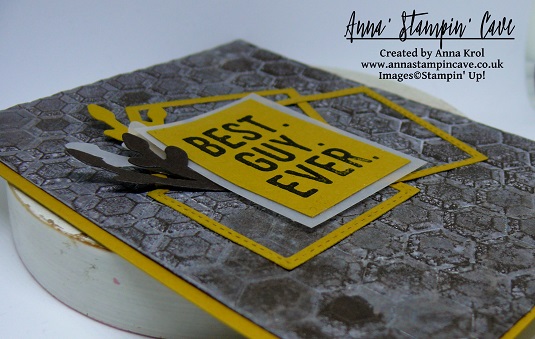
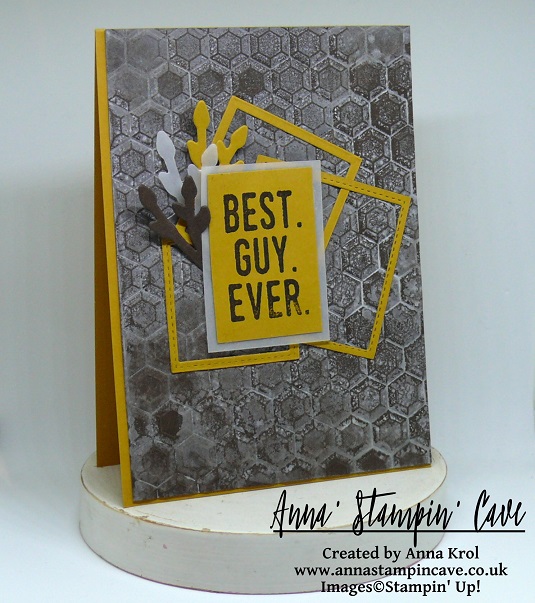
To achieve this fun texture on my Early Espresso panel I spritzed it with water to soften the fibre. Next, I dabbed Hexagons Dynamic Embossing folder with Whisper White Craft Ink, put Early Espresso cardstock inside, run it through the Big Shot and let it dry. When it dried I adhered it to the card base.

Next, I die cut various size frames from Delightful Dijon cardstock using squares from Stitched Shapes Framelits Dies and Layering Squares Framelits Dies. You can mix and match these as you wish. Glued them to my card with liquid adhesive.

I also die cut three ‘branches’ using one of the dies from Everyday Jars Framelits Dies: one from vellum, one from Delightful Dijon and one from Early Espresso cardstock.

The sentiment I chose for my card is brilliant and can be used for any occasion really. And I love the bold font. I stamped it on a piece of Delightful Dijon in Early Espresso and matted it with a piece of vellum.

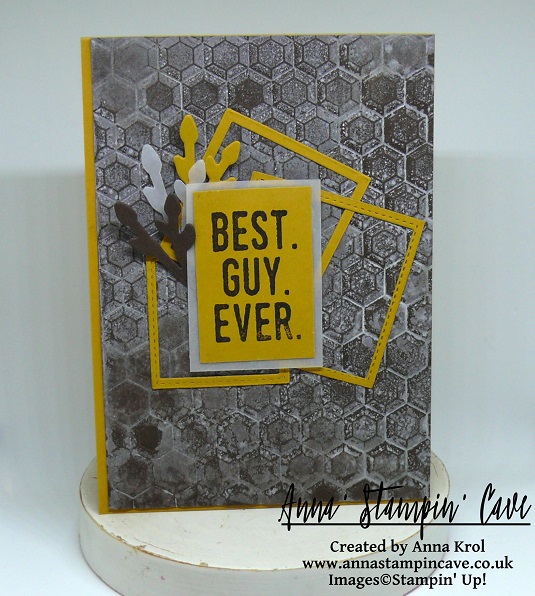
I adhered my sentiment to the card with a couple of dimensionals. For a final touch, I added my ‘branches’ to the card. I glued their ends under the sentiment panel. And this is my card done. I hope I inspired you today.

Thanks for visiting my blog today and make sure you head over to Kylie’s blog to check all lovely projects and vote for your favourites. Hope you like my project enough to give it some love ?

Vote for me Kylie's Highlights Badge

Thank you for stopping by and have a blessed day,

Floral Wings By Stampin’ Up! And Pootlers Blog Hop

pootlers blog hop

Thank you for joining us on our second Pootler’s Blog Hop! This Blog Hop is all about new Stampin’ Up!® Annual Catalogue so prepare yourself for lots of beautiful projects and tonnes of inspiration. Simply use the buttons at the end of each post to keep hopping!

If you have arrived here from Keren’s blog thank you for stopping by. I hope you enjoy seeing the inspiration from our team and continue to hop on through to see what everyone has made.

It’s actually my very first blog hop so I’m a little bit nervous but hey – let’s have some fun!

For today’s projects, I’ve chosen gorgeous new hostess set Floral Wings. The idea for today’s cards was born the minute I saw our new 6×6″ Brick Wall Embossing Folder.

blog hop roz 2

For my top layer, I stamped the vine and roses first before embossing it with Brick Wall TIEF. But I wanted to watercolour my panel so needed my images to be water-proof. To achieve it I ink vines stamp in Versamark first, followed by Pear Pizzazz ink pad – this way once stamped Versamark was on top and I could emboss it with clear embossing powder. I did the same with roses, just used one of our new In Colors: Watermelon Wonder ink pad. The sentiment is stamped in another new In Color: Tip Top Taupe.

Floral Wings Stamp Set

I’ve used embossing resist technique to create the background. I applied Versamark onto the ridges of embossing folder ( on the side that says Sizzix) and run it through the Big Shot with a piece of Whisper White. Then I heat embossed it with clear embossing powder. I used Pink Pirouette, Blushing Bride and Watermelon Wonder to watercolour my panel, and added few Gorgeous Grunge splotches.

Floral Wings Stamp Set

I die cut butterfly from Whisper White and embossed it using Iridescent Ice embossing powder for some sparkle. Tiny bit of new Silver Metallic Thread (L.O.V.E. this stuff!!!) and my card was done 🙂

My second card measures 4×4″ and background (panel) is made using the same technique.

blog hop square 2

This time for the focal point I’ve used this gorgeous three-step butterfly stamp from Floral Wings set. First I stamped wings in Tip Top Taupe. Next roses in Watermelon Wonder. Leaves are the third step. I’ve used (again) Pear Pizzazz. I die cut the butterfly using new Bold Butterfly Framelits, but if you don’t have dies you can also fussy cut it. The second butterfly is die cut from vellum, this time with Butterfly Thinlits Die. I layered them together to add some more interest and dimension to the card.

blog hop square

My last card for today uses same technique and stamp set like previous cards – just completely different style and different colours. I also used new background stamp A World Of Thanks and Cotton Paper. And again – I love this stuff! I know that many people got mixed feelings about it but I truly, deeply love it 🙂 Cotton paper is quite thin, like a tissue paper, but is much, much stronger. Really hard to tear it’s perfect for making flowers. It die-cuts beautifully but if you want to use punches (like me in this project) bear in mind that you need to punch through several layers at a time, otherwise it won’t punch. But enough talking – here’s my card:

blog hop blue 2

I won’t go into details how I made the entire card, but…

blog hop blue

For flowers, I’ve used Bermuda Bay cotton paper and three different punches: Pansy Punch for the largest one (six layers), Petite Petals Punch for medium flowers (six layers) and little flower from Itty Bitty Accents Punch Pack for the tiny ones (three layers for each flower).

blog hop blue 3

To make leaves I’ve used Petite Petals and Flower Medallion punches and Cucumber Crush cotton paper. For the flower centres, I’ve used 2/8″ wide and around 2″ long strips of Crushed Curry cotton paper. I do not own fringe scissors however it wasn’t that hard to make tiny cuts (halfway) through those strips. Adhered them with Tombow glue.

I really hope you’ve enjoyed my projects today. Which one is your favourite? Feel free to leave a comment below. Next stop is lovely Jerim at Willow Piggy. I’m sure she’s made something beautiful for you.

   next blog

previous blog

Thank you for stopping by,