The Creative Flow Blog Hop -Shaun The Sheep Punch Art

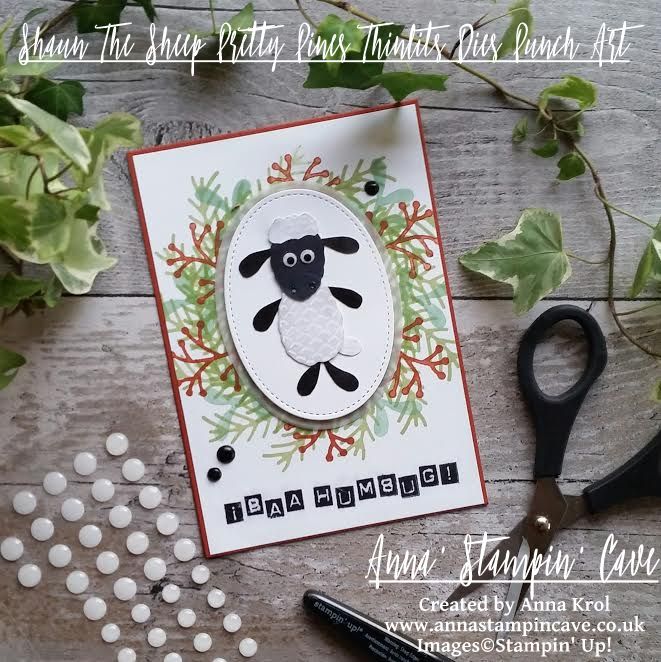
Anna’ Stampin’ Cave – The Creative Flow Blog Hop -Shaun The Sheep Punch Art

the-creative-flow-header

Thank you for joining us on our Creative Flow Blog Hop. Each month we are set a challenge to creatively stretch our imaginations. The products we have used are all available in the current Annual and/or seasonal Stampin’ Up!® catalogues. To hop along, please use the buttons at the bottom of the post to keep hopping.

Hello hello! This is our very first The Creative Flow Blog Hop, and I’m really excited to be a part of it. Today’s theme was a quite a stumper. We’ve been set a challenge to create an ‘animal’ project using Pretty Pines Thinlits Dies. Yes, I know!?!? How is that even possible!!! 😀 But hey, with a little bit of imagination everything is possible!

anna-stampin-cave-shaun-the-sheep-bah-humbug-christmas-card-punch-art-stampin-up

Because not every one of us had these dies, our lovely Jerim has sent some of us (including me) a foam die-cuts so we could actually use them as stamps! How cool! Thank you, Jerim, you are a ⭐

So I’ve spent some time looking at these shapes and…nothing sparked! Typical, right? And then one day: Eureka!!! I saw a sheep 😉 But not just normal, ordinary sheep. I saw Shaun the Sheep, how wicked is that lol Yet I had to figure out how to bring him to life, not literally of course 😉 After few attempts and different combinations I knew exactly which shapes will become Shaun the Sheep. At this point, I wasn’t sure yet what occasion for this card would be.


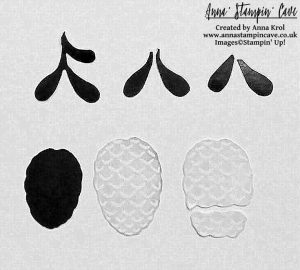
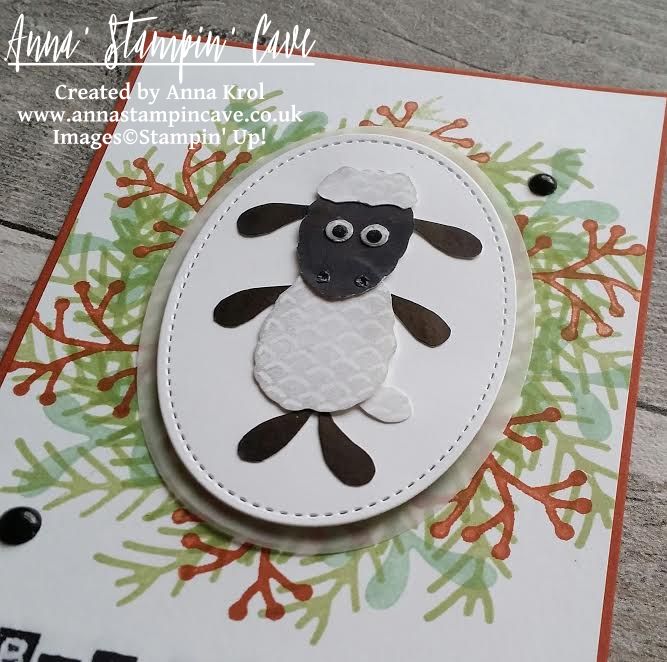
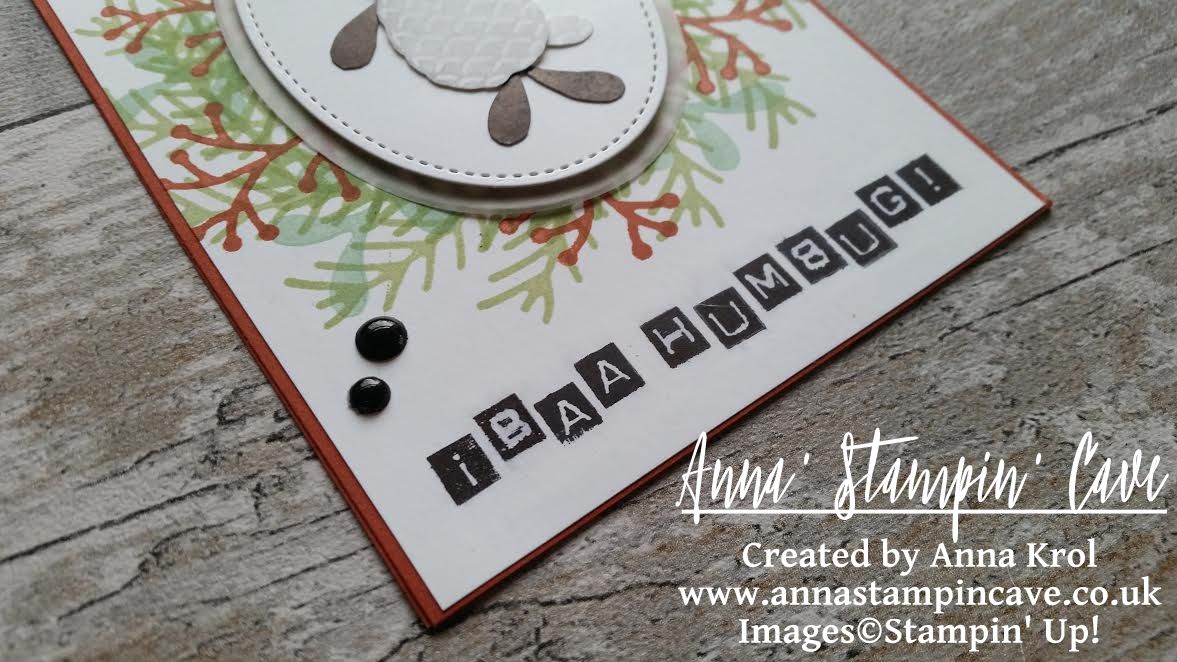
First, for tummy, ‘curls’ and tail, I stamped one of the large pinecones twice, using Smoky Slate Ink Pad. I stamp-it-off twice for a lighter shade. To create ‘curls’ for my Shaun the Sheep I cut off the bottom of one of the pinecones. I used what’s left to hand cut his little tail. For the head, I stamped the smallest pinecone using Basic Black Archival Ink Pad. To create legs, rams and ears I’ve used larger mistletoe branch. I stamped it three times, also in Basic Black Archival Ink and cut them apart. For his eyes, I punched two 3/16″ circles from Whisper white cardstock using Crop-a-Dile, and two Basic Black tiny circles using Owl Builder Punch. When I had all my pieces ready I assembled my Shaun the Sheep using liquid glue. To make his eyes ‘pop’ I added Fine-Tip Glue to them. I also used Fine-Tip Glue Pen to create his nostrils.

anna-stampin-cave-shaun-the-sheep-punch-art-stampin-up

So now, when I had my sheep created I had to decide what kind of card/sentiment I want to make. And I have to tell you my mind went blank. I only knew it has to be something fun. And while looking for some fun ‘sheepy’ sentiment (if it’s even a word lol) I came across this ‘Christmassy’ sentiment: ‘Bah humbug’ or even ‘Baa humbug’ haha. Yes! That was it! Let it be a Christmas (kinda) card then.

I took a piece of Whisper White cardstock that measures 4″ x 5-6/8″ and stamped a wreath using following colours: Pear Pizzaz and Wild Wasabi for fir branches, Mint Macaron for mistletoe and Cajun Craze for twigs. Mint Macaron and Cajun craze has been stamped off. The sentiment is stamped at the bottom of my panel using Labeler Alphabet stamp set in Basic Black Archival Ink.

anna-stampin-cave-shaun-the-sheep-bah-humbug-christmas-card-punch-art-stampin-up

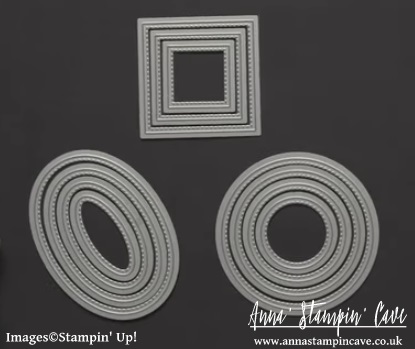
I die-cut two ovals: one from vellum using largest of the Layering Ovals Framelits Dies, and the second one from Whisper White cardstock using the largest Oval Stitched Die. I assembled them using dimensionals and adhered Shaun the Sheep on top. I adhered my panel to the Cajun Craze card base.

anna-stampin-cave-shaun-the-sheep-bah-humbug-christmas-card-punch-art-stampin-up

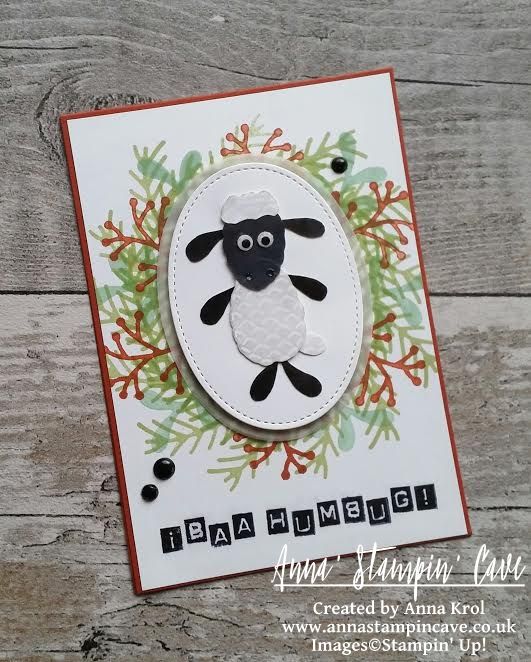
For the final touch, I took three White Perfect Accents, paint them in black using nail polish (couldn’t find my sharpie doh) and added them to the card. I think it really finished the look of the card. I like how this card turned out. It’s quirky and fun. I hope you like it too. Please let me know in the comments below. I would love to hear from you.

Your next stop is lovely Keila  go and see what she has made for you. Thank you for stopping by and have a blessed day

the-creative-flow-previous-button the-creative-flow-next-button

…And The Greatest Of These Is Love – Embossed Impression Technique

Hello and welcome!

Today, I’ve got for you card using beautiful Bloomin’ Heart Thinlits Dies. I’ve made various cards using this die in the past, but this time I wanted to try something new: an Embossed Impression Technique. This is very easy, yet effective technique. And great way to stretch your dies too.

stampin-up-embossing-stamping-with-bloomin-heart-thinlits-dies

I’ve used Stampin’ Up! White Shimmery cardstock for this technique, as I planned to do a bit of water colouring later on. I prepared my Big Shot sandwich: Big Shot on Tab 1 -> Cutting Plate -> Silicon {embossing) mat -> cardstock (I swiped the cardstock with embossing buddy). Next, I tapped Versamark over the cutting edge of the die very gently, and placed the die, cutting edge down, on my cardstock. Remember, once it’s on the paper don’t move it or you will mess up your image. I then carefully placed the second cutting plate over the top and run it through the big shot.

Because I put Versamark Ink on the die, now I had that ink in all the ‘valleys’ of the impression I just made. So I sprinkled Gold Stampin’ Emboss Powder over it and heat embossed it.

stampin-up-embossing-stamping-with-bloomin-heart-thinlits-dies

I love those tiny gold lines! Next, I made few watercolour washes over my piece, using Mint Macaron ink pad and Pool Party reinker. Once dry, I cut my panel to 3-7/8″x 4-3/8″.

I also die cut five flowers, two large and three small, from Whisper White cardstock (I probably should have used Shimmery White cardstock for them too), and adhered them to my piece with glue dots. I’ve added some soft Mint Macaron watercolour wash to the flowers to add some depth to them

stampin-up-embossing-stamping-with-bloomin-heart-thinlits-dies

My card base is Very Vanilla. I stamped ‘Love’ in Mint Macaron using Brushwork Alphabet stamp set. I adhered my embossed panel with liquid glue to a piece of Mint Macaron mat (4″x 4-1/2″), and add them both to the card base with dimensionals.

To finish off my card I’ve added some shimmer to the flowers with Clear Wink of Stella Glitter Brush and put a rhinestone in each flower centre.

I hope you like my card, and that you give this technique a try.

As always, if you wish to purchase any of the products I have used, simply click the images below to go directly to my online shop.

Thank you for stopping by and have a blessed day

Brushwork Alphabet Photopolymer Stamp Set

Brushwork Alphabet Photopolymer Stamp Set
[141772]
£23.00

Bloomin' Heart Thinlits Dies

Bloomin’ Heart Thinlits Dies
[140621]
£22.00

Very Vanilla A4 Card Stock

Very Vanilla A4 Card Stock
[106550]
£8.25

Shimmery White A4 Card Stock

Shimmery White A4 Card Stock
[121717]
£7.25

Mint Macaron A4 Cardstock

Mint Macaron A4 Cardstock
[138344]
£7.25

Whisper White A4 Card Stock

Whisper White A4 Card Stock
[106549]
£8.25

Mint Macaron Classic Stampin' Pad

Mint Macaron Classic Stampin’ Pad
[138326]
£6.00

Pool Party Classic Stampin' Ink Refill

Pool Party Classic Stampin’ Ink Refill
[122933]
£3.00

Versamark Pad

Versamark Pad
[102283]
£7.75

Embossing Buddy

Embossing Buddy
[103083]
£5.50

Clear Wink Of Stella Glitter Brush

Clear Wink Of Stella Glitter Brush
[141897]
£7.25

Gold Stampin' Emboss Powder

Gold Stampin’ Emboss Powder
[109129]
£4.50

Rhinestone Basic Jewels Embellishments

Rhinestone Basic Jewels Embellishments
[119246]
£4.50

Aqua Painters

Aqua Painters
[103954]
£15.50

Stampin' Dimensionals

Stampin’ Dimensionals
[104430]
£3.75

Liquid Multipurpose Glue

Liquid Multipurpose Glue
[110755]
£3.75

Silicone Craft Sheet

Silicone Craft Sheet
[127853]
£5.50

Heat Tool - Uk Plug

Heat Tool – Uk Plug
[129054]
£27.00

Big Shot

Big Shot
[143263]
£99.00


Simply Sketched Saturday Challenge #15 – Follow Your Dreams

Anna’ Stampin’ Cave – Simply Sketched Saturday Challenge #15 – Follow Your Dreams

SSSC Header

Thank you for joining us for another Simply Sketched Saturday Challenge!  We are so excited to be sharing this hop with you. The products used are all available in the current Annual, or seasonal, Stampin’ Up!®  Catalogues*. Simply use the buttons at the bottom of the post to keep hopping!

Welcome to our 15th sketch challenge blog hop! This month it was me who had a pleasure to create a sketch we are gonna work with. Here it is:

sssc-15

When creating this sketch, I won’t be lying, I had our new Stitched Shapes Framelits Dies in mind. And however I don’t have these dies yet myself, I hope to see them used a lot through this blog hop.

I know that in the ‘age’ of everything ‘clean and simple‘ and ‘less is more‘ in crafting world, layered, ‘busy’ and distressed cards are kinda faux pas. But I can’t help I love them the most! I love all the organic, (sometimes messy) creative process of designing a card.

stampin-up-follow-your-dreams

For my card base, I’ve used Island Indigo cardstock (standard top folding A6 size). The first layer is Vellum that measures 4”x 5-5/8” and next one is Whisper White 3-7/8”x 5-1/2” panel which I stamped using Hardwood background stamp in Sahara Sand. But because it felt rather ‘boring’ I also added few ‘splotches’ from Gorgeous Grunge stamp set in Mint Macaron, stamping them off a couple of times. I distressed the edges of my panel using regular scissors.

I also created a similar panel for the inside of the card, but this time I also stamped off the Hardwood image few times, so it wasn’t as crisp as the one on the card front.

follow-your-dreams

I took two pieces of Blooms & Bliss DSP, which measure 4”x 1” each, and cut them into banners. One of the banners I adhered flat down using a fast fuse and a second one I pop with dimensionals with few lengths of Linen Thread underneath.

To create large roses I punched six flowers using Pansy punch from Mint Macaron cardstock (three flowers create one rose). For white tiny roses, I punched nine flowers using Petite Petals punch (again three flowers create one rose). I also punched one petite petals flower from Mint Macaron cardstock to create tiny leaves: I cut the shape apart so I end up with two double ‘leaves’ and one single ‘leaf’. White roses appeared bit ‘blunt’ so I decided to add some interest to them: using Island Indigo ink and a small paint brush I added some ‘speckles’ to them.

I also decided to add some sparkle to my flowers. I dipped the edges of petals first in watered-down Multipurpose Liquid Glue and next in Dazzling Diamonds glitter, and let it dry. Once they were ready I adhered them to the card with glue dots.

stampin-up-follow-your-dreams-handmade-roses

For the sentiment, I decided to use this awesome quote you probably have seen many times on the net: “Follow your dreams”. We might don’t have a stamp set with this sentiment, but this is where our amazing various alphabet sets come in handy.

Using Labeler Alphabet stamp set and Basic Black Archival ink pad, I stamped “follow your” on a 2/8” wide strip of Whisper White cardstock and cut it apart. Next, using Brushwork Alphabet stamp set and Basic Black Archival ink pad again, I stamped “Dreams” on a Whisper White panel that measures 7/8”x 3-1/2”, and heat embossed it with clear embossing powder for extra oomph. I pop ‘narrow’ part of the sentiment with dimensionals. For a wider piece, I created a vellum mat that measures 3-5/8”x 1”, and adhered them to the card front with a fast fuse.

anna-stampn-cave-stampin-up-follow-your-dreams

Do you like my project?! If so, please leave me a comment. I would love to hear from you!

Now, be sure to hop along and see more inspiring projects. Your next stop is Jillian’s blog  go and see what she has made for you.

Thank you for stopping by and have a blessed day,

SSSC Previous   SSSC Next Blog

New Stitched Shapes Framelits Dies

Anna’ Stampin’ Cave – New Stitched Shapes Framelits Dies

anna-stampin-cave-stitched-shapes-framelits-dies-by-stampin-up

Not only stitches are a classic trend, they illustrate the quality, precision, and extra care is taken when creating a piece. Giving a stitched gift shows just how much you value that relationship.

Now you have the opportunity to purchase Stitched Shapes Framelits ahead of their official release in the 2017-2018 annual catalogue and get 25% off coordinating stamp sets.

With Stitched Shapes Framelits you can make paper stitches in seconds, turning any project into one that is stitched from the heart.

And there’s more great news…although the 25% off stamps sets ends 30 November, you will still be able to get the Stitched Shapes Framelits after that date.

anna-stampin-cave-stitched-shapes-framelits-dies-by-stampin-up
25% off stamps sets ends 30 November. I will post all the stamps sets with clickable images and links at the very end of this post

anna-stampin-cave-stitched-shapes-framelits-dies-by-stampin-up

There are 12 pieces all together in the Stitched Shapes Framelits Dies. You get 4 each of the squares, circles, and ovals.

stampin-up-stitched-shapes-framelits-dies-2

They are sized for the stamped images that you tend to use the most.

stampin-up-stitched-shapes-framelits-dies-3

The stitched shape sits approximately 1/6″ from the edge of the cutout, making the stamp-able dimensions roughly 1/8″ smaller than the cut-out.

Here are all the sizes:

Squares
1-3/16”
1-5/8”
2-1/8”
2-5/8”

Circles
1-3/8”
1-7/8”
2-3/8”
2-7/8”

Ovals
1-3/4” x 13/16”
2-1/4” x 1-5/16”
2-3/4” x 1-13/16”
3-1/4” x 2-5/16”

Here are few of the projects from Stampin’ Up! to showcase the versatility of Stitched Shapes Framelits Dies.

stitched-shapes-framelits-dies-by-stampin-up

stampin-up-stitched-shapes-framelits-dies

stampin-up-stitched-shapes-framelits-dies-4

Stampin' Up! Stitched Shapes Framelits Dies 7.jpg

Stitched Shapes Framelits Dies are not reserved for cardmaking only…

stampin-up-stitched-shapes-framelits-dies-5

…and here’s a close up

Stampin' Up! Stitched Shapes Framelits Dies 6.jpg

Negative Die-Cutting

Anna’ Stampin’ Cave – Negative Die-Cutting


Hello everyone and welcome! Today I’ve got for you super cool & easy technique to try out: negative die-cutting. Just a reminder: each week we are using Ronald McDonald House stamp set ‘My Hero’.

anna-stampin-cave-my-hero-stamp-set-with-negative-die-cutting

For today’s project, I’ve decided to use this lovely umbrella image. To create my card I started with a Very Vanilla card base and a Very Vanilla panel, slightly smaller than my base. First, I arranged the layout of my card using the Umbrella Weather Framelits. When I was happy with the placing, I die cut the umbrella first and the handle next, from my panel. But instead of using the die-cut piece on the card (as we usually do, don’t we?), I’ve used the negative image. Savvy tip: Don’t throw your die cuts away. You can use them for your next project.

I took my panel, placed it on the card base without adhering it, and I stamped the umbrella and the handle through a die cut holes. Stamp-A-Ma-Jig ( I love this tool!!!) was a big help to position my stamps perfectly. To create an ombre effect on umbrella image, I coloured the stamp with Crushed Curry and Tangerine Tango Stampin’ Markers (Crushed Curry to the top and Tangerine Tango in the middle). And, because I don’t own the 2015-2017 In Colour Stampin’ Markers, I carefully dabbed Watermelon Wonder ink pad to the bottom of the stamp.

my-hero-stamp-set-with-negative-die-cutting-2

When I was done with the stamping, I trimmed my layer at slightly ‘wonky’ angles, and run it through the Big Shot with a Seaside embossing folder. This folder is intended to imitate the waves, but if you turn it aside, it looks like rain streaks on a window, which is totally cool 🙂

I took a piece of Watermelon Wonder DSP from 2015-2017 In Color Designer Paper Stack (there are four different designs to choose from, but I’ve gone for dots). It was slightly bigger than my top layer, but I  didn’t want to use it all on my card. I only wanted it to peek from underneath my top layer where the ‘wonky’ angles were. So I measured it up, trimmed the piece and adhered it to the base. next, using dimensionals, I’ve added the top layer.

my-hero-stamp-set-with-negative-die-cutting

I decided not to use any additional sentiment on my card, as I think the one on the umbrella says it all. To embellish the card I’ve used White Perfect Accents. But hey, you say, these are clear, right? But did you know that you can peel off the white, sticky backing from your  White Perfect Accents, and you get these super awesome clear, perfectly round embellishments?! It’s cool or what?! But, of course, once you peel the backing off, you need to use glue to adhere them.

pootlers-design-team-week-2

So, did you liked my project?! I hope I inspired you to give this technique a go. It’s really cool and you will be hooked in no time!

Thank you for stopping by and have a blessed day,