Teachers Thank You Gift Using Stampin’ Up! Tropical Chic Bundle

Anna' Stampin' Cave - Teacher's Thank You Gift Fridge Magnet and Thank You card using Tropical Chic Stamp Set and Tropical Thinlits Dies from Stampin' Up!

Anna’ Stampin’ Cave – Teachers Thank You Gift Using Tropical Chic Bundle

Thanks for coming to my blog today! We are being highlighted internationally by Kylie Bertucci and you are able to vote for my project. The top ten winners will get to be part of an international blog hop so please vote for my project. My project is under the number 20. You can do it here or use a button at the end of my post.

A theme for this month’s highlight is ‘Teachers Gifts’. And however, it’s been a long time since our daughter finished primary school (she starts Uni after summer break) I thought why not make a cute little set of a fancy fridge magnet and a mini 3×3″ Thank You card.

To make these I’ve used Stampin’ Up! Tropical Chic Stamp Set & Tropical Thinlits Dies. I also used coordinating Tropical Escape DSP.

Anna' Stampin' Cave - Teacher's Thank You Gift Fridge Magnet and Thank You card using Tropical Chic Stamp Set and Tropical Thinlits Dies from Stampin' Up!

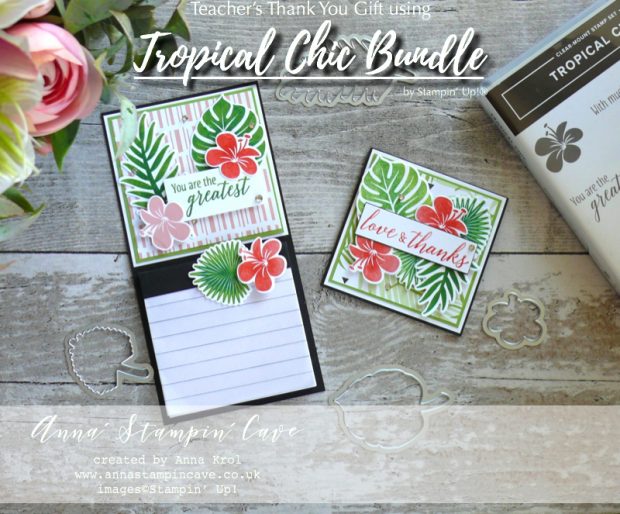
Teachers Gift Fridge Magnet dimensions:

  • Basic Black cardstock for the base: 3-1/4″ x 6-1/2″
  • Basic Black cardstock for the notebook: 1-1/2″ x 3″
  • Whisper White cardstock: 3-1/8″ x 3-1/8″
  • Granny Apple Green cardstock: 3″ x 3″
  • Tropical Escape DSP: 2-7/8″ x 2-7/8″
  • Whisper White cardstock for stamping & die-cutting
  • Rhinestones
  • magnet sheet 3″ x 4″

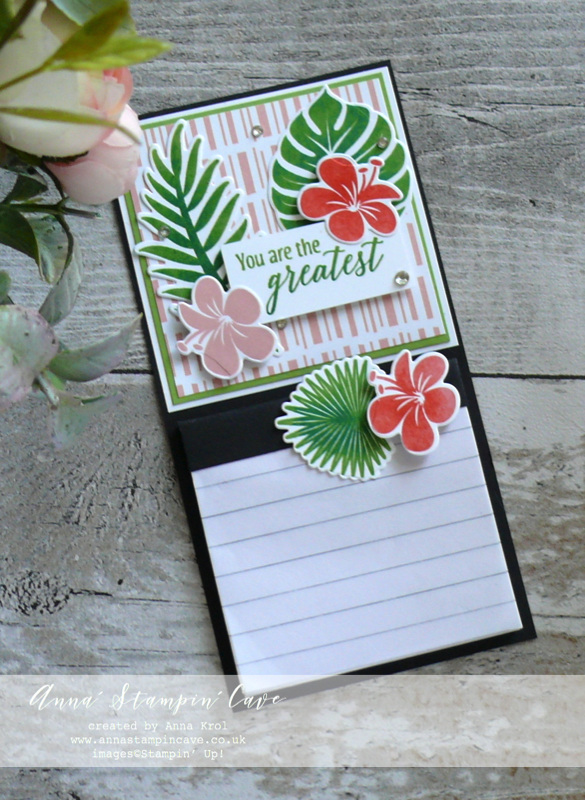
Teachers Thank You Card dimensions:

  • Basic Black cardstock: 3″ x 6″
  • 2x Whisper White cardstock: 2-7/8″ x 2-7/8″
  • Granny Apple Green cardstock: 2-6/8″ x 2-6/8″
  • Tropical Escape DSP: 2-5/8″ x 2-5/8″
  • Whisper White cardstock for stamping & die-cutting
  • Rhinestones

Anna' Stampin' Cave Teacher's Thank You Gift Fridge Magnet using Tropical Chic Stamp Set and Tropical Thinlits Dies from Stampin' Up!

First, I created the base for my magnet: I cut Basic Black cardstock to 3-1/4″ x 6-1/2″ and using liquid glue I adhered the magnetic sheet at the back. Next, I created the notes area. I have found this little notebook in my drawer but it had a navy spine and was a little too long (3″ x 4″) and I needed a square one. So I removed the old spine and shortened notebook using the guillotine.

To create new spine I cut a 1-1/2″ x 3″ piece of Basic Black cardstock and scored it at 7/8″ and 1″. Adhered it to the notebook and adhered notebook to the base.Anna' Stampin' Cave Teacher's Thank You Gift Fridge Magnet using Tropical Chic Stamp Set and Tropical Thinlits Dies from Stampin' Up!

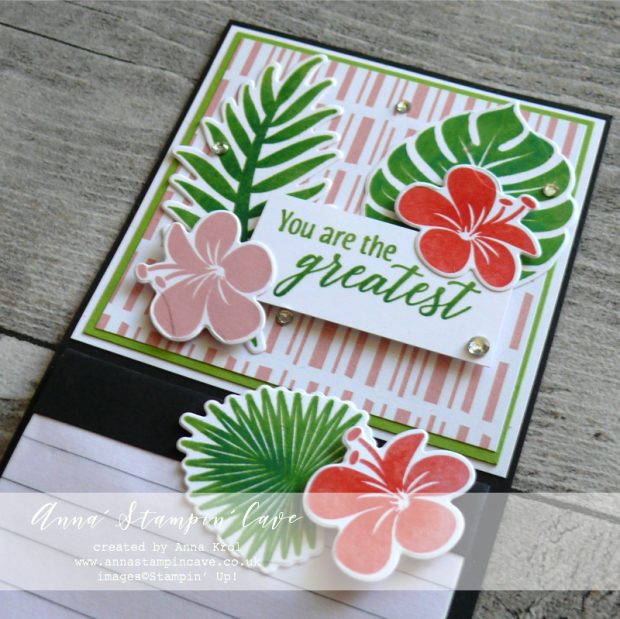
To finish off the top of my magnet, I took a Whisper White cardstock square, glued Granny Apple Green on top and layered a slightly smaller square of Tropical Escape DSP and adhered them all to the base.

For stamping the foliage I’ve used Stamparatus: I stamped each greenery image in Granny Apple Green ink, followed by Shaded Spruce but dabbed off some colour from the edges of the images.

I did the same with flowers but I used Blushing Bride with Poppy Parade. I decided to leave one flower just in Blushing Bride. I die cut all my images using coordinating dies, arranged and adhered them to the magnet using liquid glue and dimensionals.

For the sentiment, again, I’ve used Granny Apple Green with Shaded Spruce.

Anna' Stampin' Cave - Teachers Thank You card using Tropical Chic Stamp Set and Tropical Thinlits Dies from Stampin' Up!

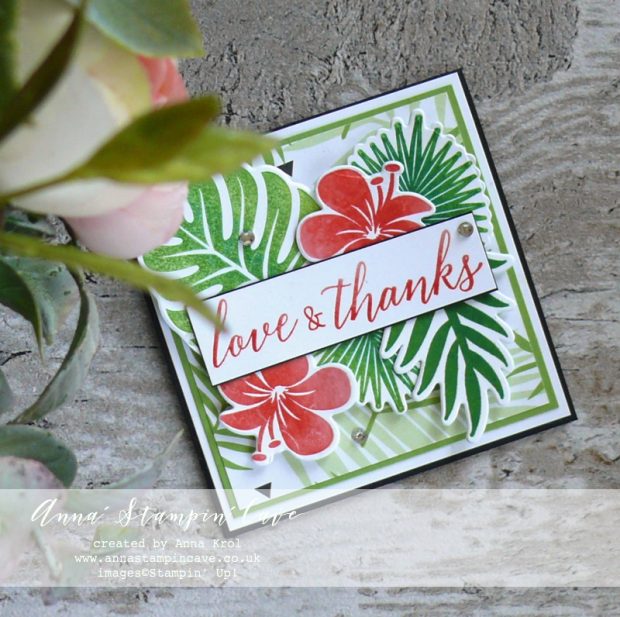
For the card, I’ve used a 3″ x 6″ piece of Basic Black, scored at 3″. Same as with a magnet piece, I layered Whisper White with Granny Apple Geen and Tropical Escape DSP on top and adhered them all to the card base.

Anna' Stampin' Cave - Teacher's Thank You Gift Fridge Magnet and Thank You card using Tropical Chic Stamp Set and Tropical Thinlits Dies from Stampin' Up!

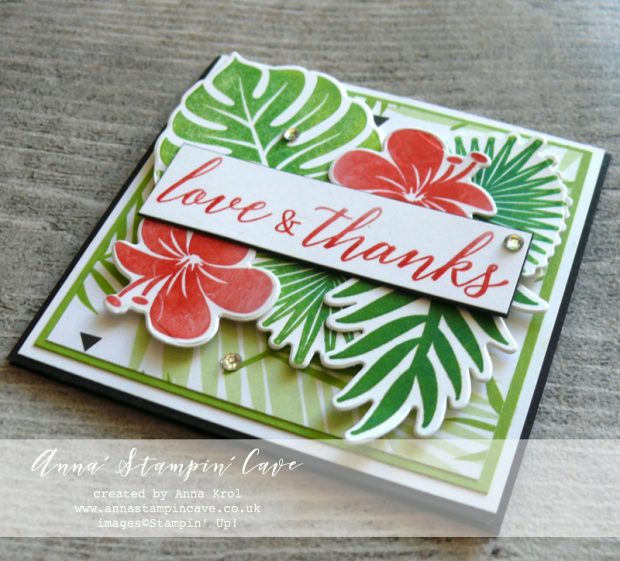
Using Stamparatus, again, I stamped each of my images and die cut them using coordinating dies.

The sentiment comes from the same stamp set but I stamped only ‘Love & Thanks’ with Blushing Bride at full strength and Poppy Parade dabbed off for gradient look.

Few rhinestones finish off my little projects.

I truly hope you’ve enjoyed coming to my blog today.

Now, make sure you head over to Kylie’s blog to check all lovely projects and vote for your favourites. Hope my project will be among them. My project is under number 20!

As always, if you wish to purchase any of the products I have used, simply click the images below to go directly to my online store.

My exclusive special offer this month only: FREE Stampin’ Up! Pearlised Doilies

How it works…

  • Place a product order of £50 or more (excl. shipping) in my online store in the month of August. 
  • Add Host Code U6KK4ACY. To claim your reward you must include this code in your ordering process.
  • This August Special Offer will be applied to all qualifying orders placed through my shop using Host Code U6KK4ACY between 1 August – 31 August.
  • If your order is £150 or more do not use Host Code. You will earn your own Host Rewards to spend.
  • IMPORTANT:  My FREE Special Host Gift giveaways are mailed separately from any order and will arrive mid-September.

Stamparatus

£46.00

Big Shot

£102.00

Pin me

Summary of the project which gives all the views of the card in one photo. I’d love if you pinned and called by on Pinterest xx

Anna' Stampin' Cave - Teacher's Thank You Gift Fridge Magnet and Thank You card using Tropical Chic Stamp Set and Tropical Thinlits Dies from Stampin' Up!

DON’T FORGET TO CHECK

Request Autumn/Winter Catalogue below –

Stampin' Up! Autumn Winter 2018 Catalogue

How can you get a FREE copy of the new Autumn/Winter 2018 Catalogue?

For those living in the UK and Northern Ireland, you may request a catalogue using the form below and I will add you to my mailing list for this catalogue.

You can also opt-in to receive my customer email newsletter, featuring tips, product shares, news of Stampin’ Up! specials and my personal promotions.

  • Do not forget to give your full address
  • It’s open to the United Kingdom and Northern Ireland only.

Earn in August – redeem in September –> click here for more details

All-new, limited-time Colour Your Season products – Products available while supplies last or until 31 August 2018 – order yours today –> click here

Pinkies Stampin’ Up! Autumn Winter 2016 Blog Hop – Merry Mice

blog hop logo

Thank you for joining us on another Pinkies Blog Hop! We’re showcasing lots of gorgeous projects using products from the new Stampin’ Up!® Autumn/Winter Seasonal Catalogue. Simply use the buttons at the end of each post to keep hopping.

If you arrived here from lovely Hannah at Stampin by Hannah, thank you for stopping by. I hope you enjoy seeing all these beautiful projects and inspiration and continue to hop on through to see what everyone has made.

Here is my project –

merry-mice-stamp-set-shadow-box-christmas-card-2

I wanted to create shadow-box type card for a while but never came around to do it. But when I saw these adorable little mice I thought they are just perfect to do so.

For the base, I’ve used two pieces of Soft Sky cardstock that measures 4-1/8 x 8-1/2″.  scored them both at 1-1/2″ and 3″.  Next, I die-cut a window in my front panel using Layering Ovals Framelits. I used the same die and slightly bigger scalloped oval die to create the frame from Very Vanilla cardstock.

I wanted to add some subtle ‘bling’ to my card base, so I decided to use Heat & Stick Powder with Dazzling Diamond Glitter. I took this little, distressed stamp from Timeless Textures stamp set, and stamped it around the front panel in Versamark. I sprinkled Heat & Stick powder over it, heat set it, sprinkled with Dazzling Diamonds Glitter and heat set it again.

I cut a piece of Whisper White cardstock that measures 4-1/16 x 8-1/2″ and sponged it to create a background for my scene. I wanted to achieve beautiful night sky. To do so I’ve used Daffodil Delight, Pumpkin Pie, Melon Mambo, Pool Party, Bermuda Bay, Island Indigo, Perfect Plum and Night of Navy. I started with lighter colours at the bottom and slowly building up the colour until I was happy with the results.

To create starry night I’ve used irreplaceable Gorgeous Grunge and again Heat & Stick powder with Dazzling Diamonds Glitter. Once the glitter was set,  I took this piece and cut a 1-1/2″strip from it, on the long side, and scored the remaining piece at 4″. I glued the longer piece to my base, to the back panel. The strip I cut off, I adhered on the inside of my front base, so once the card is closed for posting, you can still see the starry night. on the inside panel. And what’s cool about this card: it’s folding down, just like a card in the box, and fits standard A6 envelope

To create front and back inserts, I took 2 strips of Very Vanilla, that measured 2-1/2 x 5 and  I tore them both (one bit smaller) on one side so they look like snowbanks. I’ve added a liquid glue to the torn edges and dabbed it in Dazzling Diamonds Glitter. I scored them both at 1/2″ and 4-1/2″. I adhered the taller one to the background panel.

merry-mice-stamp-set-shadow-box-christmas-card-caroler

Now the fun part: colouring the mice! I stamped singing mouse on a piece of Very Vanilla with Jet Black Stazon ink. I coloured him with Many Marvellous Markers and fussy cut it. Next,  I took a piece of Very Vanilla (2-1/2 x 5″) and marked it at 1″ from the bottom, on the long side. This piece will create our middle insert. I stamped my cute carolers so their feet were touching my 1″ mark. I coloured them in, and fussy-cut them, but only to the 1″ mark. I scored this piece at 1/2″ and 4-1/2″.

I took all my inserts and assembled the card. I adhered the singing mouse on the front of my card with dimensionals. The sentiment underneath comes from the same stamp set. But because of all the ‘busy-ness’ (if it’s even a word haha) of the card, I decided to keep it simple.

merry-mice-stamp-set-shadow-box-card

I’m really happy how this card turned out. Aren’t these mice super cute?! I hope I inspired you a little bit.

Now, be sure to hop along and see more inspiring projects. Your next stop is amazingly talented Jerim from Willow Piggy  go and see what she has made using new products.

next

previous

Thank you for stopping by and have a blessed day,

Pootler’s Autumn-Winter Catalogue Blog Hop – Christmas Bauble Shaker Card!

pootler's blog hop

Thank you for joining us again on Pootler’s Blog Hop! This is our team Blog Hop to showcase products from new Stampin’ Up!® Autumn-Winter Catalogue. So prepare yourself for lots of beautiful projects and tonnes of inspiration. Simply use the buttons at the end of each post to keep hopping!

If you have arrived here from Lea’s blog thank you for stopping by. I hope you enjoy seeing the inspiration from our team and continue to hop through to see what everyone has made.

My little project features pretty few of new products from our seasonal catalogue, but I just simply couldn’t decide which one to choose 🙂

Does it happen to you that when you see a new product, it “talk to you”? haha. No, I’m not crazy! Just the moment I saw Delicate Ornaments Thinlits Dies it screamed to me: shaker card!

Christmas Bauble Shaker Card 2.1

I wanted to keep my card in soft, washed colours. The base of the card, as well as the top layer, is Whisper White. To break a little bit all the whiteness I added pattern to my base. I took one of the stencils (fancy dots) from Happy Patterns set and sponged over the stencil with Soft Sky. But I only sponged on the edges, leaving the centre white for stamping.

For the layer, I took a piece that measures 5-3/8 x 3-6/8″ so my sponged base could slightly peek around the edges. I run it through Big Shot with new Softly Falling 6×6″ Embossing Folder. I love how it adds gentle texture to the card. Next, I run it through the Big Shot with a bauble die from Delicate Ornament Thinlits Dies, to create a “window” for my shaker.

Christmas Bauble Shaker Card 4

Winter scene comes from Happy Scenes stamp set. Snow on the ground is “swoosh” stamp from Work Of Art. For my shakers I used Metallics Sequin Assortment, Lost Lagoon stars punched with Confetti Stars Border punch and seed beads from my stash. To create shaker I used edges from dimensionals and a piece of acetate. If you don’t have dimensionals you could use foam tape.

Christmas Bauble Shaker Card 3

To keep rest of the card simple the only “embellishment” on my card is Poinsettia flower. I was so excited to use Festive Flower Builder Punch together with Reason for the Season stamp set. I punched poinsettia leaves from Whisper White cardstock. I used five large leaves, five medium, five small ones (I cut them in half) and three centres to build my poinsettia. Each leaf was stamped in Sky Blue but I stamp it off first so the colour was even softer. I curl each leaf with a bone folder and assembled it using Tombow glue.

Christmas Bauble Shaker Card 2.2

This gorgeous sentiment comes from Embellished Ornaments stamp set. I cut it into a banner and backed it with a piece of silver glimmer paper. As I had it out I also die-cut a little fixing for my bauble from glimmer paper too.

Now that you’ve seen my project please use the buttons below to keep “hopping”. Next in our hop is Sarah, and I know she has a lovely project to share with you. Once again thank you for stopping by.

Have a blessed day,

previous pootler blog 

Pinkies Autumn-Winter Catalogue Blog Hop! Feat. Happy Scenes Stamp Set And Hearth & Home Framelits Dies By Stampin’ Up!

Blog hop logo

Thank you for joining us on another Pinkies Blog Hop! We’re showcasing lots of gorgeous projects using products from the new Stampin’ Up!® Autumn/Winter Seasonal Catalogue. Simply use the buttons at the end of each post to keep hopping!

If you arrived here from Swathi blog thank you for stopping by. I hope you enjoy seeing all these beautiful projects and inspirations.

For my project today I’ve used Happy Scenes stamp set with Hearth & Home Thinlits Dies. The moment I saw these in the catalogue I knew I want to make this card. And they come in a bundle too.

Happy Scenes

For the base, I chose beautiful Mossy Meadow card stock. I layered it with a piece of DSP from Merry Moments Designer Series Paper Stack. I die-cut window and flower box from a piece of Crumb Cake. I sponged the edges of the window with Early Espresso and flower box is Tangelo Twist, to add some interest. Then, using die-cut, I measured where I want my window to be. I cut out a square in my card base and adhered my window with flower box.

Happy Scenes

For the inside of the card, I took a piece of Whisper White and stamped my autumn scene from Happy Scenes in Memento Tuxedo Black. I coloured leaves and pumpkins in Pumpkin Pie and Cajun Craze. For the “ground” I used Mossy Meadow ink pad and “swoosh” stamp from Work Of Art. I stamped it off twice for a lighter shade. The sentiment comes from Happy Scenes. I stamped it various times to create a panel. Then I stamped it one more time, cut it out and attached it (slightly crooked) onto the panel using dimensionals.

To finish off my card I die cut tiny leaves using a die from Square Pillow Box Thinlits. I used Whisper White card stock and colour them with Tangelo Twist. Then I crumple my leaves a little bit and glued them to the card.

Happy Scenes

I’m really pleased how my card turned out. It’s super cute. And I’m sure I will use this set many many times.

You can find a complete list of supplies at the very bottom of this post.

Now that you’ve seen my project, be sure to hop along and see more inspiring projects. Next in our hop is amazing Angélique.

Blog hop next

Blog hop previous


Have a blessed weekend!