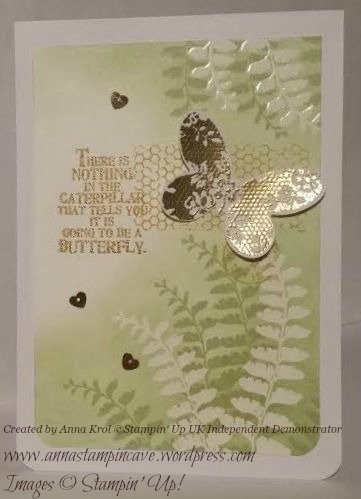
Oh, so happy I finally get to play with some new products: Butterfly Basics stamp set and coordinating thinlits.The cards I’ve made today are bit edgy because I really like a slightly distressed look. Backgrounds for all cards are sponged using different shades of green. For some of those cards, I’ve used colour resist technique. I’ve stamped leaves with Versamark and then heat embossed them with clear embossing powder.
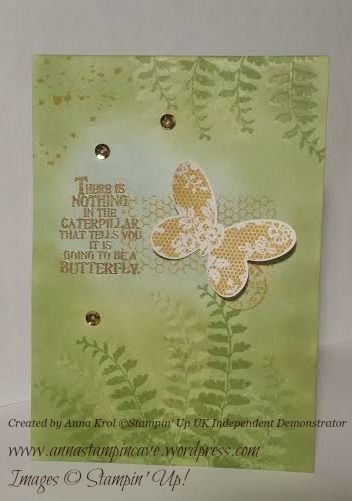
With second card I also stamped leaves with Versamark but this time I didn’t heat-emboss it. As you can see Versamark resist colour even if it’s not embossed, but the effect is more gentle. The only layer in this card is a butterfly 🙂
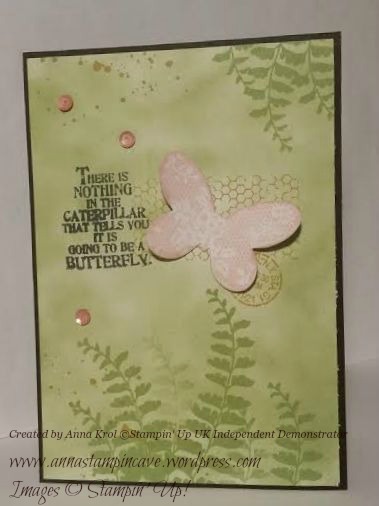
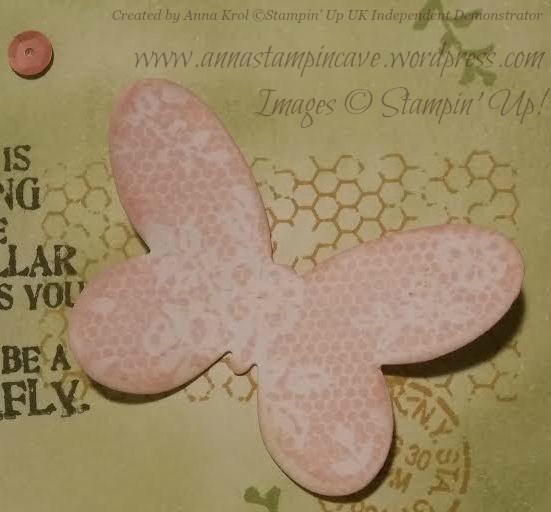
Some leaves have been also stamped off first to get a lighter shade. Filigree honeycomb-kind-of image and little circle are stamped in Hello Honey.
To add some interest to the cards I’ve stamped some “splatters” from Gorgeous Grunge (Hello Honey again)
I just love this sentiment! So versatile. You can use it for thank you cards, birthdays, scrapbook pages, decorations, frames, shadowboxes, etc
For a final touch, I’ve added some beautiful sequins from In Color Sequin Assortment. Easy yet effective 🙂
Last two cards are mounted on black base. I just couldn’t decide which one I like the most: white, black or none 🙂 And which one is your favourite?
I hope you like my today’s cards. I surely had lots of fun making them.
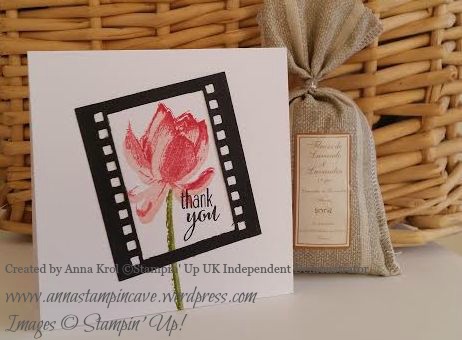
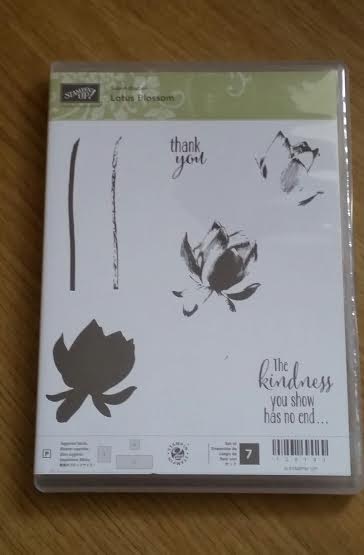
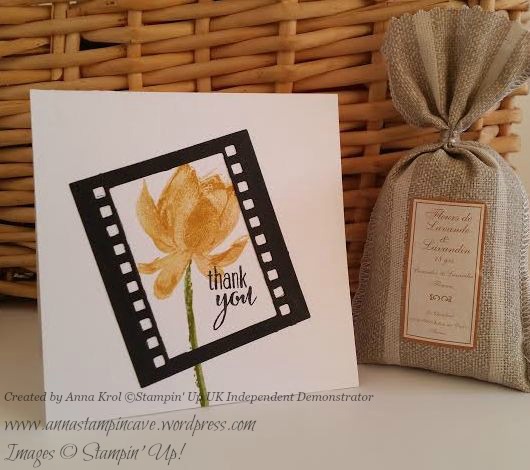
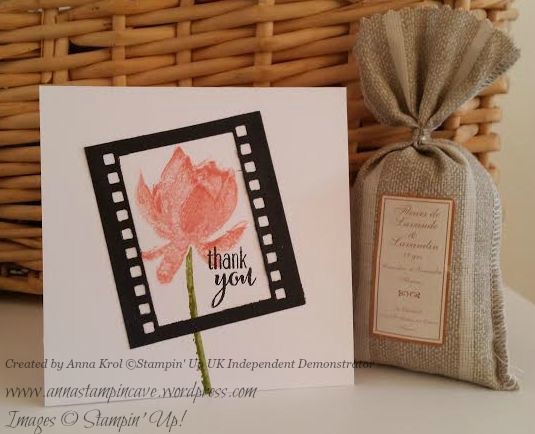
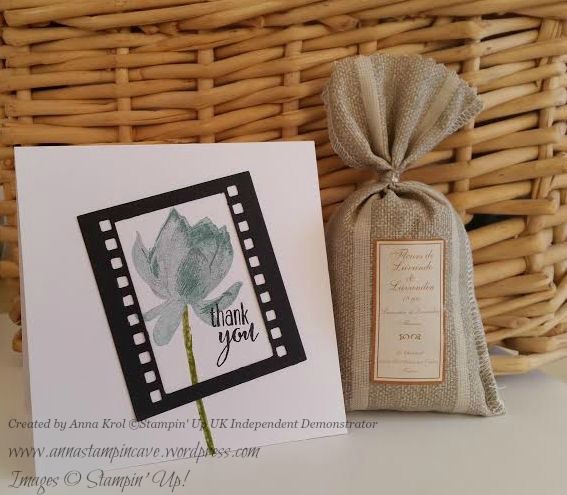
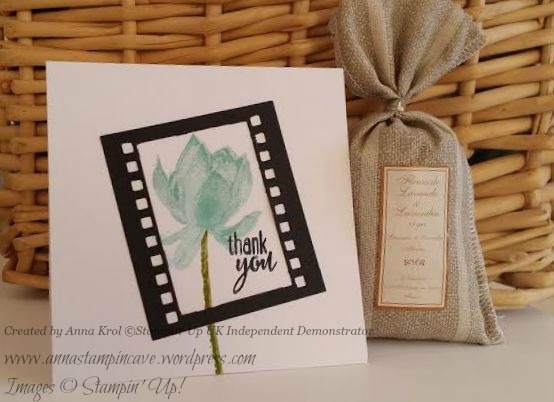
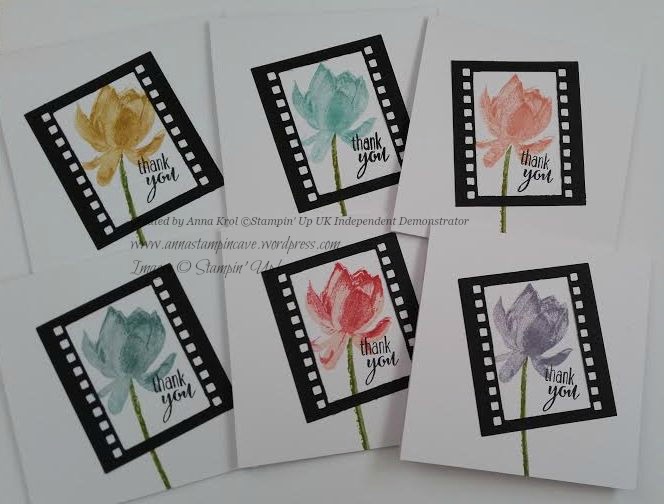
Today I’ve got some cool 4×4″ cards to share with you. These are Thank You cards I made for my customers and they showcasing Lotus Blossom – one of the stamp sets you can choose as your freebie during Sale-a-Bration.
Isn’t it gorgeous?! I’m in love with this set! It’s a 3 part stamp (3 step stamping) but all you really need for the flower is just ONE ink pad! Really! So all yesterday evening I’ve been playing with different colours to get different looks. I have to admit that lighter colours work best
Wisteria Wonder
Hello Honey
Crisp Cantaloupe
But with stamping off technique you can use the richer colours too
Lost Lagoon
Coastal Cabana
Or even you can mix colours like in this one
I stamped first and second part in Strawberry Slush ( second part I stamped off once) and third is stamped in Blushing Bride. All stems are stamped in Pear Pizzazz and Old Olive. To finish off the cards I stamped thank you (comes with set) with black Memento ink pad. Then I die cut film photo frames, attached them with liquid glue. Easy, and I really like how they turned out. Hope my customers will like them too 🙂
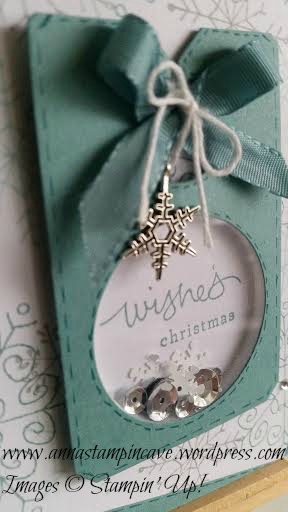
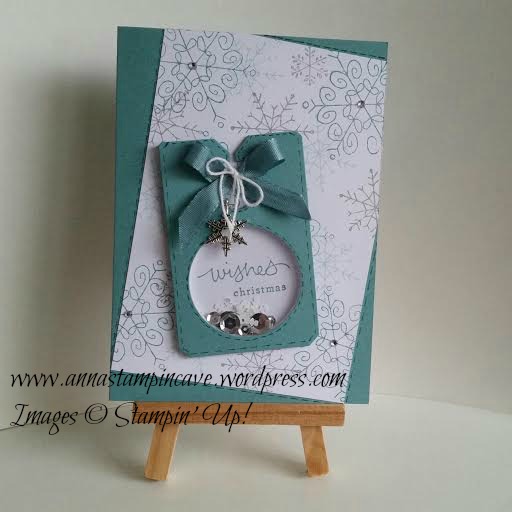
Yep. It’s just about a time for me to try something I haven’t tried before 🙂 A shaker card! If I can be honest the idea for this card poped out to me while surfing the internet. I’ve seen so many beautiful shaker cards. And one day it happened I came across gorgeous card by Amy White. I’ve changed some colours used plus instead of punched stars I’ve used silver sequins and white snowflakes by Stampin’ Up.
For the background, same as Amy, I’ve used Endless Wishes. But I chosed Lost Lagoon, Smoky Slate and Soft Sky ink pads. The shaker bit is made from Chalk Talk framelit, piece of window sheet, 1 3/4″ circle punch and the largest of shaker frames. It’s attached to the card with piece of Lost Lagoon Ribbon, Whisper White Bakers Twine and beautiful Snowflake Embellishment which is available in our Autumn/Winter Catalogue.
The background is slightly “kicked” 😉 and attached to the Lost Lagoon base. The fake stiching around the background and shaker is made using Pool Party Stampin’ Marker.
Really hope you like my shaker card with sequins. Thank you for stopping by
Good evening everyone. It’s Saturday – only week away from us moving a home! Yes, finally 🙂 There was so many things coming out in over a month that I thought it will never happen for us to moving hahaha. But finally everything gets into place. The whole new bathroom suite is waiting to be fixed, floor is bought, new soil pipe is on it’s place and the plumbing work will be finished on Tuesday. Plasterboards are nearly done as well – yay! I will tell you more in a coming week 🙂
Today’s project is not today’s for the true. It’s been waiting to be posted for few days now but always something get me distracted. But because I’ve got free hour or so I thought I will post it tonight 🙂
I don’t have to tell you I love Festival of Trees by Stampin’ Up! Do I?! 😀 I absolutely adore this stamp set, and I will tell you it’s not the last project I will make using it 🙂
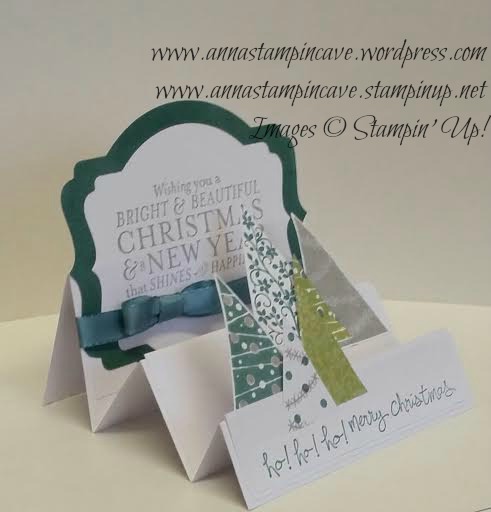
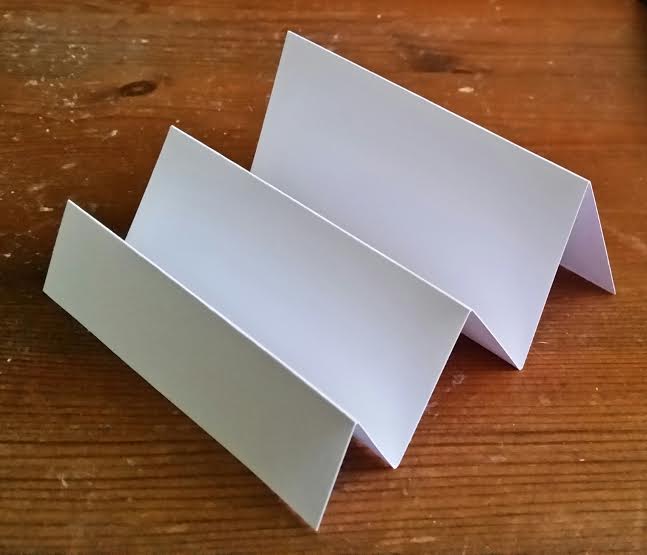
This is simple Stair Step Card. For the base you need piece of card stock that measure 9 x 4 1/8 inches (22.8×10.5 cm). Then score it at 1, 2, 3 4/8, 5, 7 inches (2.5, 5, 8.9 , 12.8 and 17.8 cm) making “hills and valleys” same as on the picture:
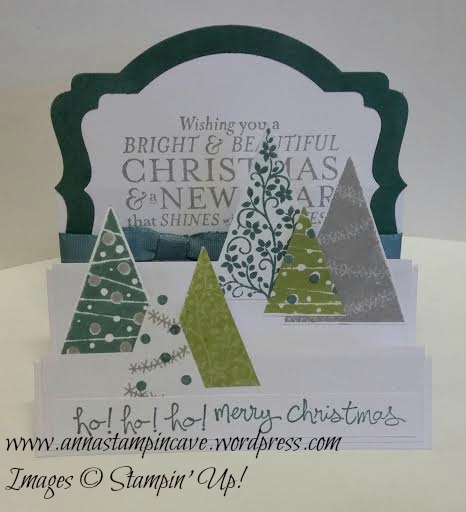
For two first “stairs” I cut two pieces of card stock that measures as follows: smallest 4 x 1″ (10 x 2.5 cm) and medium piece 4 x 1.5″ (10 x 3.8 cm). I glued them to the base 1/16″ higher then each “stair” starts. In imperial it’s around 2 mm higher. For the last stair I’ve cut the piece of cardstock which measure 4 x 3 4/8″. One half of that piece I run through the Big Shot using the biggest Deco Label. Then I took a piece of Lost Lagoon cs slighty wider and run it through the Big Shot again using the same size Deco Label to make a frame for the sentiment.
I’ve stamped six different trees using Lost Lagoon, Smoky Slate and Pear Pizzazz. I used different tree designs from Festivals of Trees. Also, for the “chain” stamp, I’ve used Versamark pad making so called resistant stamping technique where you stamp the details with Versamark and then stamp solid image on the top. The image stamped as first will resist the ink from second stamping 🙂 Then I’ve cut all the trees with coordinating punch. At the end I used the trimmer ( you can use scissors too) to shorten all of the trees so each one have different lenght now. I’ve attached them to the card with Tombow glue: three on the smallest stair and three on the medium one.
I took the piece of Whisper White (which I’ve run through the Big Shot before) and using stamp-a-ma-jig and Smoky Slate I’ve stamped the sentiment from Bright & Beautiful stamp set.
Then I’ve glued the frame and a piece of Lost Lagoon Silky Taffeta Ribbon. To add more interest I’ve tied a little bow. Now I could glue it all to the card. It really looked good. But something seemed to be missing. So I took a strip of Whisper White and I’ve stamped “ho-ho-ho” and “merry christmas” from Good Greetings. For this sentiment I’ve used Lost Lagoon. I glued that strip to the first stair just below trees.
Et voila – the card is done 🙂 I really think this stamp set is awesome. And even though for this card you can use different colours, different designs of trees or even different sentiments, but it’s still pretty awesome card! Don’t you think?! 🙂 If you like it (or not 😉 ) please leave a comment below.
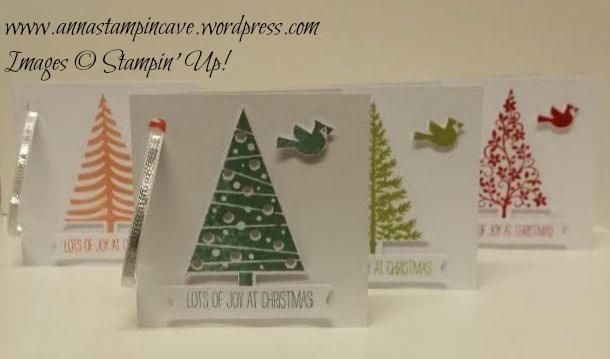
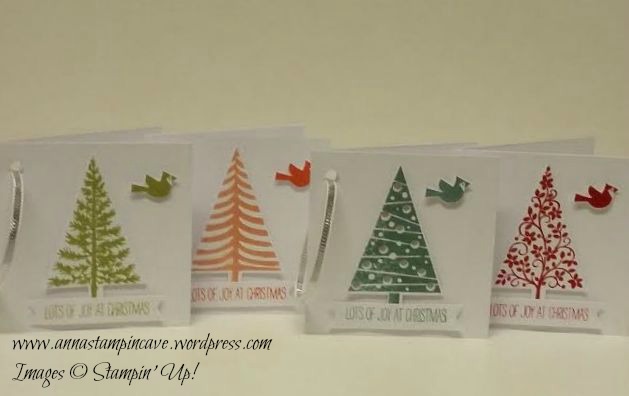
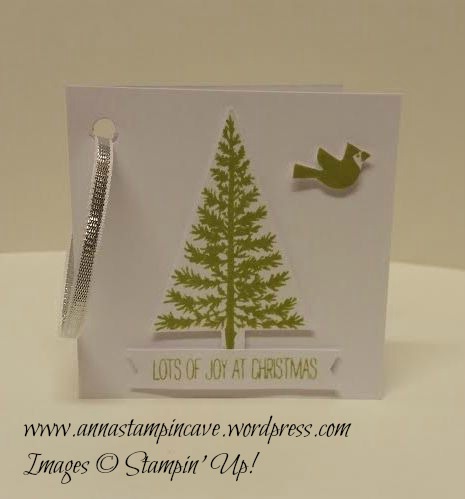
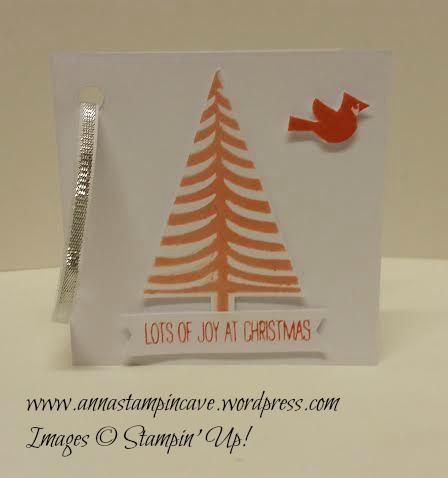
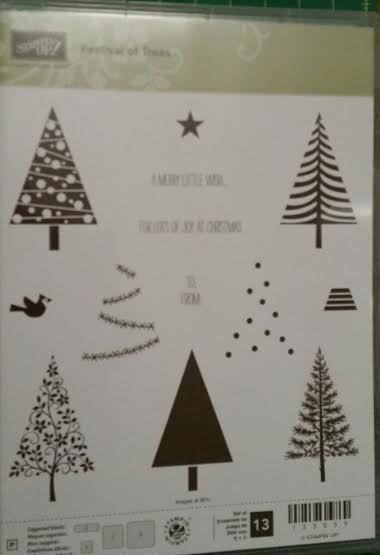
Hello everyone! A quick post from me today – or tonight I shall say 😉 I’ve been playing with Festival of Trees stamp set lately and I have to tell you I’m addicted!!! In a positive way of course 😉 I think this stamp set is very versatile and I’m sure I’m gonna use it many more times. But today I wanted to show you some tags.
Aren’t they darn cute??!! To make them you don’t need any fancy equipment. All you need is a piece of card stock, ink pad, pair of scissors, Festival of Trees stamp set and coordinating punch, some dimensionals and ribbon.
For the base of each tag you need a piece of card stock that measure 2 6/8 x 5 4/8″ which is 7 x 14 cm. You can use any colour you like but I have used Whisper White.
When it comes to stamping possibilities are endless with this set. For the tags I show you today I’ve used not typical christmas colours: Pear Pizzazz, Crisp Cantaloupe, Real Red and Lost Lagoon. And for each one I’ve used different stamp from Festival of Trees. This set consist 13 stamps and is fabulous 🙂
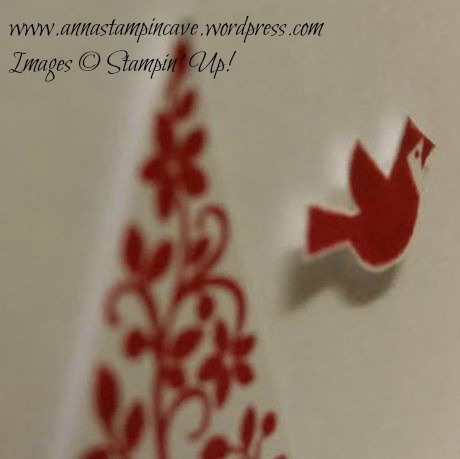
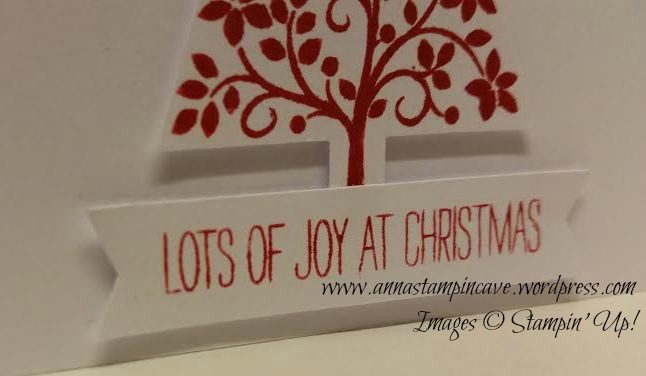
Now you only need to punch the trees out. If you don’t have a punch you can use scissors, but trust me the punch will make your life way much easier 🙂 To jazz up my tags a little bit I’ve stamped the sentiment and a bird that comes with a set using the same colours I’ve used with a trees. I fussy cut the birds…
…and sentiments turned into nice tiny banners 🙂
I’ve assembled tags using dimensionals, but if you want everything more flat you can use any adhesive. But I really wanted them to stand out. Now just punch a little hole, tread some ribbon and tags are done! For mine I’ve used a piece of silver 1/8″ ribbon.
I really hope you like my little project. It really doesn’t take much time to put a bunch of these together. So if you like it please live a comment. Or maybe you want to try them yourself? Please share your pictures with me on my facebook page