Elegant Monochromatic With Pop Of Colour

Anna’ Stampin’ Cave – Elegant Monochromatic With Pop Of Colour

Wow! It’s hard to believe, but today is last day with My Hero Stamp Set from Stampin’ Up! Yep, 5 weeks have passed!

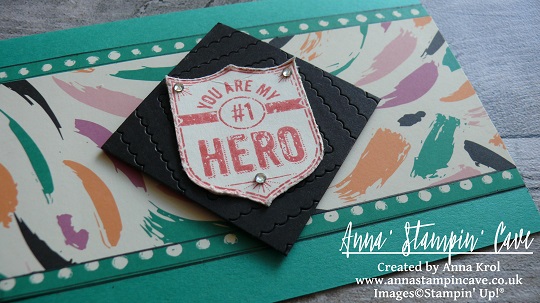
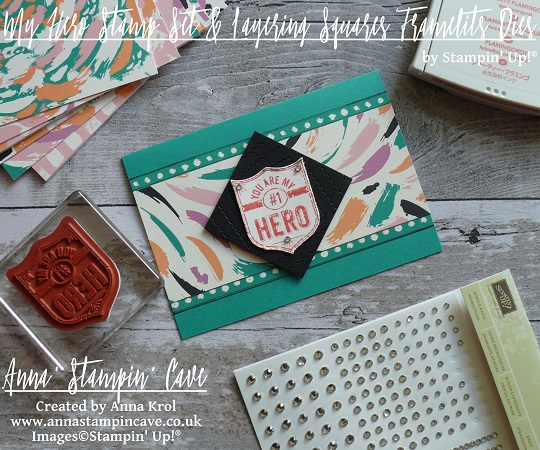
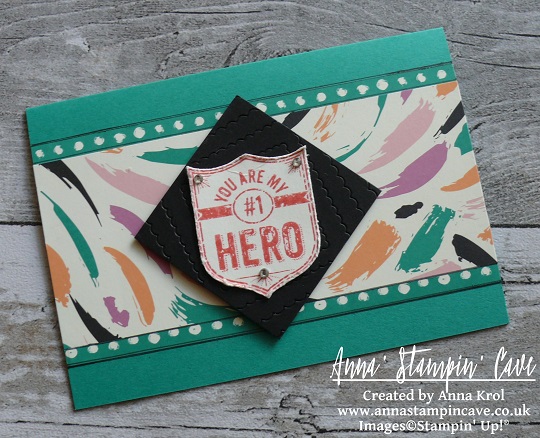
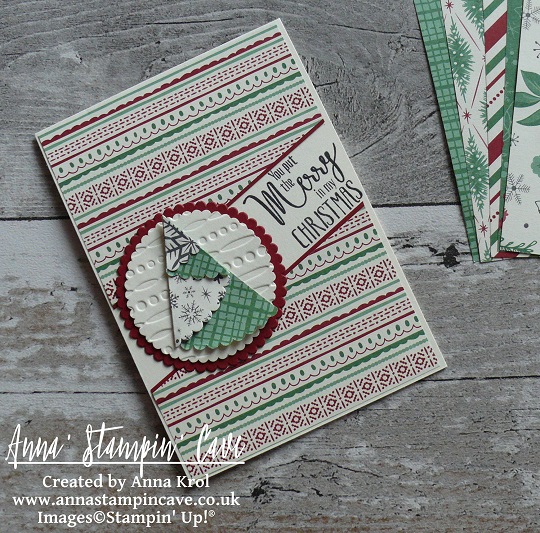
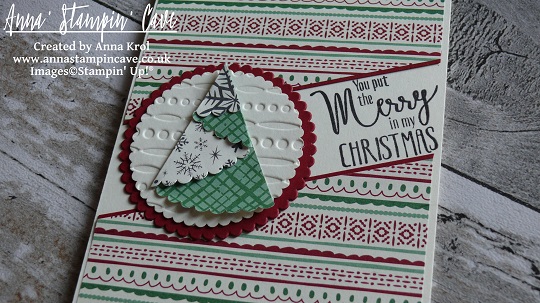
For my final project, I’ve created this striking yet elegant, almost monochromatic card, in shades of grey but with a pop of colour in form of dainty orange flowers.

stampin-up-botanical-builder-framelits-my-hero-stamp-set

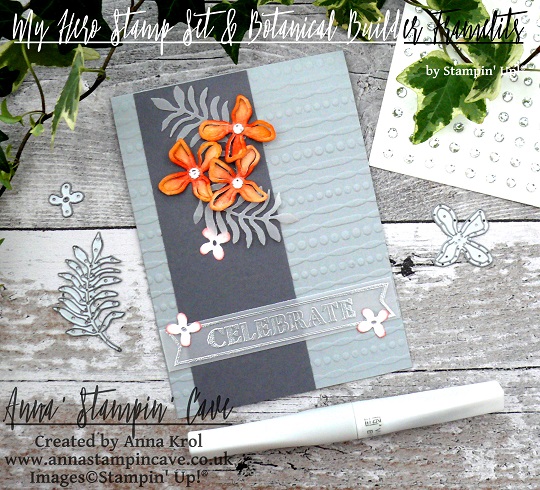
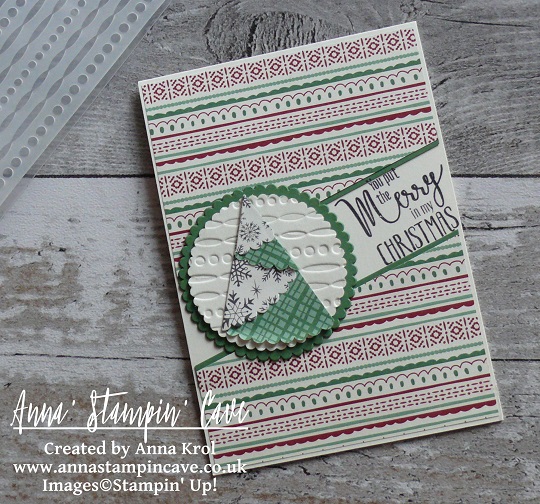
For the base of my card I took an A4 sheet of Smoky Slate cardstock, cut it in half at 4-1/8″ and folded in half at 5-7/8″. I run the front of the base through Big Shot with Festive Embossing Folder. The panel is a piece of Basic Grey cardstock that measures 2″ x 5-7/8″. I adhere it to the base with Multipurpose Liquid Adhesive.

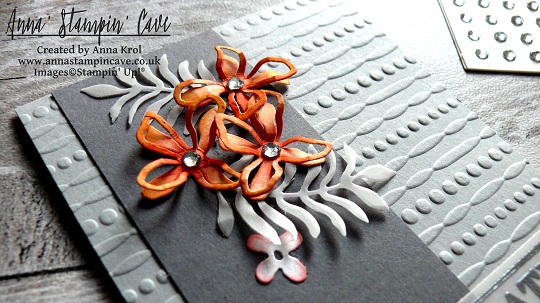
Next, I created my floral composition using Botanical Builder Framelits Dies. I die cut a couple of leaves from vellum and six flowers: three tiny flowers and three small 3D flowers from a scrap of Whisper White cardstock.

Savvy Tip: Don’t know what to do with random off cuts that are to small to use on cards or to punch anything out of them? Don’t throw them away! I save all my off cuts and use them up when need to die cut small elements, flowers, etc using framelits dies

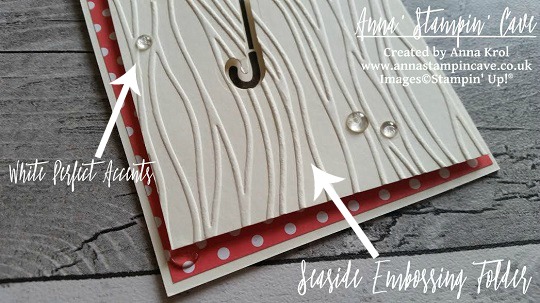
To add a little bit of colour to my flowers I sponged the edges of the tiny flowers with Watermelon Wonder. For 3D flowers, I decided for more ‘dramatic’ look I sponged entire flowers using Pumpkin Pie ink pad and a dab of Watermelon Wonder to the centres. I also added a large rhinestone to each centre. You can’t really tell from the photos (blame the awful English weather) but I’ve added a touch of shimmer using Clear Wink Of Stella Glitter Brush to each flower (tiny ones too).

stampin-up-botanical-builder-framelits-my-hero-stamp-set

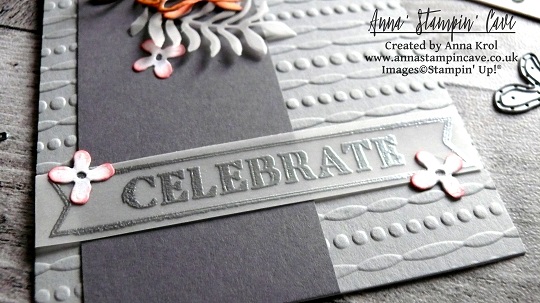
Next, I took a strip of vellum ( 1/2″ x 4-1/8″) and stamped a ‘Celebrate’ from My Hero Stamp Set in Versamark. Of course, I’ve used an Embossing Buddy prior to stamping. I heat embossed the sentiment with Silver Stampin’ Emboss Powder.

Tip: For best results with heat embossing always treat your cardstock, dsp, vellum, etc with embossing buddy. I takes off the statick from the surface of your paper, and makes the powder stick only to the areas you stamped.
Tip 2: If you don’t have an embossing buddy or any other antistatic tool you can use cornflour instead. Just sprinkle a little amount of flour over the surface of your cardstock, spread it with fingers or paint brush, and shake off the excess. Now you can stamp and heat emboss.

I assembled my composition using Glue Dots and liquid adhesive. Two tiny flowers on the vellum banner are hiding adhesive that I’ve used to adhere the banner to the card base.

stampin-up-botanical-builder-framelits-my-hero-stamp-set

I really like how this card turned out. I love the monochromatic, cold look of greys with a pop of bright orange. And what do you think about this colour combination? Do you like it? I would love to hear from you in comments below.

Thank you for stopping by and have a blessed day,

You Are My Hero

Anna’ Stampin’ Cave – You Are My Hero


Another week has passed by, and it’s that time again when our little group of demonstrators is showcasing you this lovely stamp set called ‘My Hero’. I love the versatility of this set, as it covers all major holidays/occasions throughout the year. But not only that. This is Ronald McDonald House Charities stamp set, which means for every set purchased, Stampin’ Up! donates £2 to the RMHC. Visit www.stampinup.com/giving_uk to learn how you can help too.

For today’s project, I’ve chosen ‘You are my #1 hero’ sentiment. I’ve seen many beautiful samples using this stamp. It’s perfect for all those oh-so-hard-to-make masculine cards. But I decided to make a card with a feminine twist. After all, women can be heroes too.

stampin-up-my-hero-stamp-set-you-are-my-1-hero

This is a very simple card. For the card base, I chose beautiful and very vibrant Emerald Envy cardstock (standard A6 size). Next layer is a piece of DSP from Playful Palette Designer Series Paper Stack. I took half of the sheet of my chosen design ( 3″x 6″) and trimmed 1/4″ from both sides. I adhered the larger piece to the base first and next, those tiny strips on each side of the panel, but reverse side up. Because the base is smaller than 6″ wide, I trimmed any overhanging paper using my scissors. It’s easier, and for sure you won’t end up with a too small panel. Unfortunately, my strips slightly ‘disappeared’, when adhered to the card base. So I draw few black lines along the edges using Project Life Journaling Pens.

Tip: learn from my mistakes! If, like me, you chose a design that has a kinda symmetrical pattern on the reverse, make sure you trim your panel so you have the same pattern on both strips you’ve trimmed.

stampin-up-my-hero-stamp-set-you-are-my-1-hero

Now to the focal point. I stamped my sentiment in Flirty Flamingo, on a piece of Very Vanilla cardstock and fussy cut it. It’s an easy shape to do so. I distressed the edges slightly. To make the sentiment ‘pop’ I decided to add a square Basic Black cardstock underneath. I could dry emboss it but instead, I decided to create a fun panel using Layering Squares Framelits. I’ve seen this idea just recently, on Carolyn Bennie blog and just had to try it myself. Carolyn is an amazing Australian demo. You should definitely check her out.

I arranged five scalloped squares dies on a piece of Basic Black cardstock, but offset them slightly. I secured dies to the paper with washi tape and run it through the big shot. Before I removed my dies, I’ve added washi tape underneath of the panel, to keep the squares together. I took another piece of Basic Black cardstock and adhered my die cut squares to that panel. I trimmed it to the 2-3/8″ square.

stampin-up-my-hero-stamp-set-you-are-my-1-hero

I adhered my fun square to the card base with a couple of dimensionals. Next, I’ve added my sentiment on top of it, with regular snail adhesive. Few rhinestones on the corners of the badge finish off my card.

Thank you for stopping by and have a blessed day,

You Put The Merry In My Christmas

Anna’ Stampin’ Cave – You Put The Merry In My Christmas


Hello, and welcome! Today I’ve got for you a couple of rather traditional Christmas cards. As you probably remember we are showcasing My Hero RMHC Stamp Set by Stampin’ Up!®

stampin-up-my-hero-rmhc-stamp-set-you-put-the-merry-in-my-christmas

Aren’t they lovely?! And they are so easy to make.

The card base is standard top folded A6 in Very Vanilla and I’ve used beautiful This Christmas Specialty Designer Series Paper for my panels. These were supposed to be simple, straightforward cards, but then again, I can’t make things that are too easy, can I?! So I decided to turn them into a split panels cards.

The panels I prepared earlier were 4 x 5-6/8″ in size. To create split panels, I cut them diagonally into 3 and removed the middle piece. I cut narrow strips of Garden Green and Cherry Cobbler cardstock and glued them underneath my split panels to accent the’split’. I adhered the panels to the base using snail adhesive.

stampin-up-my-hero-stamp-set-you-put-the-merry-in-my-christmas-cherry-cobbler

Using my Stamp-A-Ma-Jig I stamped the sentiment in the ‘split’ area. Next, I created these uber cute mini Christmas trees. To make them, I die cut a scalloped circle from a sheet of the same DSP, just a different design. I cut it in half, fold it into ‘tree’ and secured my folds with mini glue dots.

stampin-up-my-hero-stamp-set-you-put-the-merry-in-my-christmas-cherry-cobbler-2

Because design on this paper is quite ‘busy’, you couldn’t really see the trees, once attached to the card. So I die cut 2 scalloped circles in Very Vanilla and run them through my big shot with Festive Embossing Folder.

stampin-up-my-hero-stamp-set-you-put-the-merry-in-my-christmas-garden-green

Next, I die cut 2 slightly bigger scalloped circles: one in Garden Green and one in Cherry Cobbler to create mats for Very Vanilla pieces. Adhered them together (de-bossed side up) and then added my trees on top.

stampin-up-my-hero-stamp-set-you-put-the-merry-in-my-christmas-garden-green-2

First I thought to pop my circles up with dimensionals. But because these cards got quite of dimension anyway, I adhered them to the base with snail adhesive.

Super easy, aren’t they? I hope you like them. As always, if you wish to purchase any of the products I have used, simply click the images below to go directly to my online shop and don’t forget to enter the hostess code for the month of September RKW34AHD, to receive a gift from me.

I’m also adding my card to Craftyhazelnut’s Patterned Paper September 2016 challenge

Thank you for stopping by and have a blessed day,

Pootlers New Seasonal Catalogue Blog Hop – Thankful, Grateful, Blessed With Paisleys & Posies Bundle

pootler's blog hop

Thank you for joining us on another Pootlers Blog Hop! We’re showcasing lots of gorgeous projects using products from the new Stampin’ Up!® Autumn Winter Seasonal Catalogue. Simply use the buttons at the end of each post to keep hopping!

If you arrived here from lovely Louise’s blog, thank you for stopping by. I hope you enjoy seeing all these beautiful projects and inspiration and continue to hop on through to see what everyone has made.

For today’s project, I’ve been using new Paisleys & Posies Stamp Set with Paisley Framelits Dies, and these two are a part of beautiful Petals & Paisleys Product Suite. I used them to create a beautiful contemporary card and matching gift box.

I don’t know about you, but I just love paisley. It is such a trendy design right now, you can find it everywhere: from home decor, through fashion, art and more.

thankful-grateful-blessed-gift-set-with-paisleys-posies-bundle

For my card, I randomly stamped various images from Paisleys & Posies Stamp Set on a piece of Whisper White. It’s like creating your own DSP. To take off the guesswork, I’ve used the colours that coordinate with Petals & Paisleys Suite: Cajun Craze, Rich Razzleberry, Delightful Dijon, Mint Macaron, Soft Suede and Night of Navy.  I adhered it to my card base (Cajun Craze) and added a layer of vellum on the top, to soften the bold colours. Next, I cut a strip of Whisper White and stamped the sentiment from the same stamp set (love this font!), to the left in Cajun Craze. Backed it with a slightly wider piece of Cajun Craze cardstock, and adhered it to the card front. Using Paisley Framelits Dies, I die-cut two intricate leaves, one in Rich Razzleberry and one in Delightful Dijon, and add it to the panel. The final touch for the card was a tiny Rich Razzleberry bow I’ve made using one of the ribbons from new 3/8″ (1 cm) Ribbon Trio Pack.

thankful-grateful-blessed-card-with-paisleys-posies-bundle

Top tip 1: Glue dots are handy to adhere small elements like little bows. Top tip 2: There’s not such a thing as an invisible adhesive for when using vellum; be smart and hide adhesive under panels, die-cuts or embellishments. Savvy tip: To save the precious ribbon, tie a square knot straight from the spool.

For the gift box base, I’ve used, again, Cajun Craze cardstock. It’s really cute dinky little box, with the base being a 2-7/8 x 2-7/8″ square, and 1″ tall. Same as with the card, I created my own piece of DSP to decorate the box. Using dimensionals I slightly elevated the panel that goes on the top of the lid. But panels on the sides of my box are glued flat. Next, I’ve added a panel of vellum to the top of my box, followed by a little banner with a sentiment, and (again) leaves and a bow to match the card.

I don’t make boxes or gift sets too often, but I really like this one. I don’t know why. Perhaps for the autumnal colours and maybe for the paisley design. Whatever the reason, I hope you like it too.

Your next stop is lovely Jerim. Simply click the next button to keep hopping around all the blogs to see lots of new ideas and inspiration.
next pootler blog

previous pootler blog

Thank you for stopping by and have a blessed day,

Negative Die-Cutting

Anna’ Stampin’ Cave – Negative Die-Cutting


Hello everyone and welcome! Today I’ve got for you super cool & easy technique to try out: negative die-cutting. Just a reminder: each week we are using Ronald McDonald House stamp set ‘My Hero’.

anna-stampin-cave-my-hero-stamp-set-with-negative-die-cutting

For today’s project, I’ve decided to use this lovely umbrella image. To create my card I started with a Very Vanilla card base and a Very Vanilla panel, slightly smaller than my base. First, I arranged the layout of my card using the Umbrella Weather Framelits. When I was happy with the placing, I die cut the umbrella first and the handle next, from my panel. But instead of using the die-cut piece on the card (as we usually do, don’t we?), I’ve used the negative image. Savvy tip: Don’t throw your die cuts away. You can use them for your next project.

I took my panel, placed it on the card base without adhering it, and I stamped the umbrella and the handle through a die cut holes. Stamp-A-Ma-Jig ( I love this tool!!!) was a big help to position my stamps perfectly. To create an ombre effect on umbrella image, I coloured the stamp with Crushed Curry and Tangerine Tango Stampin’ Markers (Crushed Curry to the top and Tangerine Tango in the middle). And, because I don’t own the 2015-2017 In Colour Stampin’ Markers, I carefully dabbed Watermelon Wonder ink pad to the bottom of the stamp.

my-hero-stamp-set-with-negative-die-cutting-2

When I was done with the stamping, I trimmed my layer at slightly ‘wonky’ angles, and run it through the Big Shot with a Seaside embossing folder. This folder is intended to imitate the waves, but if you turn it aside, it looks like rain streaks on a window, which is totally cool 🙂

I took a piece of Watermelon Wonder DSP from 2015-2017 In Color Designer Paper Stack (there are four different designs to choose from, but I’ve gone for dots). It was slightly bigger than my top layer, but I  didn’t want to use it all on my card. I only wanted it to peek from underneath my top layer where the ‘wonky’ angles were. So I measured it up, trimmed the piece and adhered it to the base. next, using dimensionals, I’ve added the top layer.

my-hero-stamp-set-with-negative-die-cutting

I decided not to use any additional sentiment on my card, as I think the one on the umbrella says it all. To embellish the card I’ve used White Perfect Accents. But hey, you say, these are clear, right? But did you know that you can peel off the white, sticky backing from your  White Perfect Accents, and you get these super awesome clear, perfectly round embellishments?! It’s cool or what?! But, of course, once you peel the backing off, you need to use glue to adhere them.

pootlers-design-team-week-2

So, did you liked my project?! I hope I inspired you to give this technique a go. It’s really cool and you will be hooked in no time!

Thank you for stopping by and have a blessed day,