Stair Step Card With Festival of Trees

Good evening everyone. It’s Saturday – only week away from us moving a home! Yes, finally 🙂 There was so many things coming out in over a month that I thought it will never happen for us to moving hahaha. But finally everything gets into place. The whole new bathroom suite is waiting to be fixed, floor is bought, new soil pipe is on it’s place and the plumbing work will be finished on Tuesday. Plasterboards are nearly done as well – yay! I will tell you more in a coming week 🙂

Today’s project is not today’s for the true. It’s been waiting to be posted for few days now but always something get me distracted. But because I’ve got free hour or so I thought I will post it tonight 🙂

accordian card 2


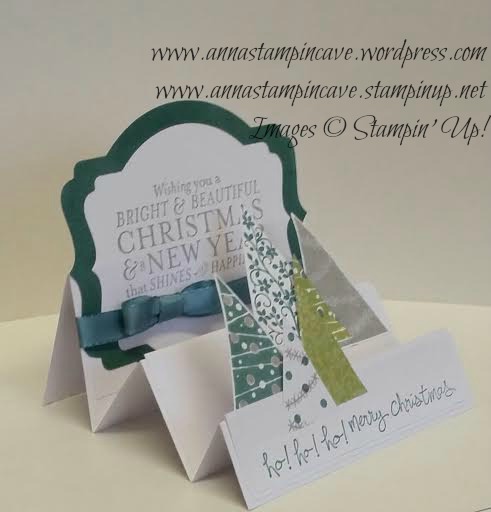
I don’t have to tell you I love Festival of Trees by Stampin’ Up! Do I?! 😀 I absolutely adore this stamp set, and I will tell you it’s not the last project I will make using it 🙂

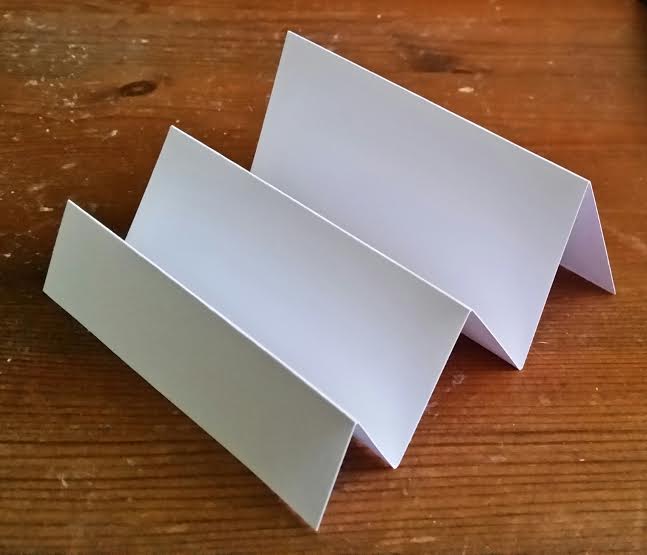
This is simple Stair Step Card. For the base you need piece of card stock that measure 9 x 4 1/8 inches (22.8×10.5 cm). Then score it at 1, 2, 3 4/8, 5, 7 inches  (2.5, 5, 8.9 , 12.8 and 17.8 cm) making “hills and valleys” same as on the picture:

accordian card 1

For two first “stairs” I cut two pieces of card stock that measures as follows: smallest 4 x 1″ (10 x 2.5 cm) and medium piece 4 x 1.5″ (10 x 3.8 cm). I glued them to the base 1/16″ higher then each “stair” starts. In imperial it’s around 2 mm higher. For the last stair I’ve cut the piece of cardstock which measure 4 x 3 4/8″. One half of that piece I run through the Big Shot using the biggest Deco Label. Then I took a piece of Lost Lagoon cs slighty wider and run it through the Big Shot again using the same size Deco Label to make a frame for the sentiment.

I’ve stamped  six different trees using Lost Lagoon, Smoky Slate and Pear Pizzazz. I used different tree designs from Festivals of Trees. Also, for the “chain” stamp, I’ve used Versamark pad making so called resistant stamping technique where you stamp the details with Versamark and then stamp solid image on the top. The image stamped as first will resist the ink from second stamping 🙂 Then I’ve cut all the trees with coordinating punch. At the end I used the trimmer ( you can use scissors too) to shorten all of the trees so each one have different lenght now. I’ve attached them to the card with Tombow glue: three on the smallest stair and three on the medium one.

I took the piece of Whisper White (which I’ve run through the Big Shot before) and using stamp-a-ma-jig and Smoky Slate I’ve stamped the sentiment from Bright & Beautiful stamp set.

accordian card 3

Then I’ve glued the frame and a piece of Lost Lagoon Silky Taffeta Ribbon. To add more interest I’ve tied a little bow. Now I could glue it all to the card. It really looked good. But something seemed to be missing. So I took a strip of Whisper White and I’ve stamped “ho-ho-ho” and “merry christmas” from Good Greetings. For this sentiment I’ve used Lost Lagoon. I glued that strip to the first stair just below trees.

accordian card 4

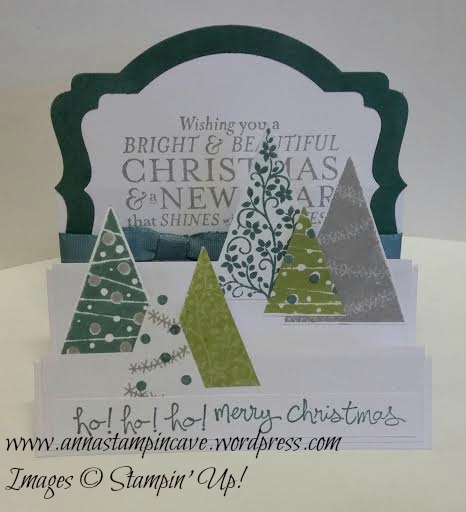
Et voila – the card is done 🙂 I really think this stamp set is awesome. And even though for this card you can use different colours, different designs of trees or even different sentiments, but it’s still pretty awesome card! Don’t you think?! 🙂 If you like it (or not 😉 ) please leave a comment below.

Thank you for stopping by,

Masculine Birthday Card with Hexagon Hive Thinlits Die by Stampin’ Up!

Hello everyone. Today I will share with you the masculine card I’ve made for a friend request. He needed something special for his brother’s birthday. What I knew about the recipient is that he loves his little boys, Manchester United and heavy metal 😉 I’ve decided to go for the football club colours: black, yellow and red, and to use Stampin’ Up! Hexagon Hive Thinlits Die.

The base is Basic Black cardstock. The background is made on Whisper White cardstock. How I did it? It’s such a cool and effective technique.

 dla neila 5

 I took a stamping clear block and simply I stamped the entire Real Red inkpad on the block, then spritz it with a water and stamped it on the cardstock. I repeat it few times till get the right intense shade. I did dry it in between. Then I’ve done the same with Crushed Curry ink pad for yellow. and to finish it I’ve randomly stamped some stamps from Gorgeous Grunge set. I took a piece of Basic Black cardstock and Hexagon Hive Thinlits and run it through the Big Shot. I’ve attached my background to the base with snail and hexagon die cut on the top with Tombow glue. But then I’ve thought it needs some more twist. I took “happy happy”, “happy birthday” and “chevron” mini stamps from Honeycomb Hello (coordinates with Hexagon Hive Thinlits) and stamp them in the little hexagons on the background.

dla neila 4

For the first sentiment I’ve taken a piece of Whisper White cardstock (watercoloured in Real Red same technique as the background) and a piece of basic black, cut them into mini banners and layer them together. The sentiment is from Something To Say and punched using Word Window Punch. The second sentiment is totally awesome! It’s one of the stamps from Just Saying set and cut out with coordinating framelits from Word Bubbles. Stamped it in Real Red of course in a piece of Whisper White and attached it with dimensionals. Oh, and a black button for that extra touch.

I really love how this card turned out. All supplies I’ve used are Stampin’ Up! except for the button. I know I’ve used lots of different stamp sets and accessories for one card but I’m just starting so don’t have a wide variety of coordinating stamps, punches, framelits etc. But I’m getting there slowly 🙂

Hope you like this project. Thank you for stopping by and happy crafting,

Wedding Card using Scalloped Tag Topper Punch by Stampin’ Up!

Hello everyone! Few days ago I’ve been asked to make a Wedding Day card. The only problem I only had 24 hrs to design and make it.  So I’ve decided to go with Smoky Slate, Pink Pioruette and Whisper White for the colours. The stamp sets I’ve used are (sadly) retired En Francais and Everything Eleanor for the background.

wedding 1

Greetings are from Chalk Talk and Label Love ( used coordinating framelits and punch). I’ve also made a translucent banner with vellum. And who can spot a little SNEAK-PEAK from Autumn-Winter Catalogue? I’ve used new stamp set Four Feathers, heat embossed the image in silver on a piece of vellum and cut it with matching framelits. For the closing as you can see I’ve used my favourite Scalloped Tag Topper Punch. A friend who asked for the card really loved it and so I hope the bride will love it too 🙂

Thank you for stopping by

Who said….

So who said that “Zoo Babies” is a stamp set for babies? 😉 I’m telling you: absolutely not! And here’s the proof 🙂

love ya 1

This is super cute 3×3 note card. You can give your friend, daughter or mum – truly you can give it to anyone who’s got that special spot in your heart – justso they know they’re important for you! 🙂

love ya 2

The base of thi card is 3×3 Basic Black cardstock. I’ve also used a piece of Whisper White cardstock. The sentiment is from “Just Sayin” stamp. I’ve stamped it with Whisper White Pigment Ink. Make sure that ink is completely dry or you will smudge it…just like I did – patience is not my virtue 😉 But you can always use heat gun to speed it up. I’ve used coordinating Word Bubbles framelits to cut out the sentiment.

love ya 3

From “Zoo Babies” I’ve picked the elephant and little rhino and stamped them using Wisteria Wonder, Crumb Cake and one of new in-colours Lost Lagoon. Envelope Punch Board helped me to round the corners of white pieces, then I sponged the edge and taa daaah!  🙂

And at the very end just to add bit of interest I’ve used little stamps from “Something To Say” with coordinating Itty Bitty Accents punch pack and stick them using dimensionals. Oh and bubbles with sentiments are attached using dimensionals too.

Hope you like my little project. Please leave the comments below.

Thank you for stopping by and happy crafting