Pootlers New Seasonal Catalogue Blog Hop – Thankful, Grateful, Blessed With Paisleys & Posies Bundle

pootler's blog hop

Thank you for joining us on another Pootlers Blog Hop! We’re showcasing lots of gorgeous projects using products from the new Stampin’ Up!® Autumn Winter Seasonal Catalogue. Simply use the buttons at the end of each post to keep hopping!

If you arrived here from lovely Louise’s blog, thank you for stopping by. I hope you enjoy seeing all these beautiful projects and inspiration and continue to hop on through to see what everyone has made.

For today’s project, I’ve been using new Paisleys & Posies Stamp Set with Paisley Framelits Dies, and these two are a part of beautiful Petals & Paisleys Product Suite. I used them to create a beautiful contemporary card and matching gift box.

I don’t know about you, but I just love paisley. It is such a trendy design right now, you can find it everywhere: from home decor, through fashion, art and more.

thankful-grateful-blessed-gift-set-with-paisleys-posies-bundle

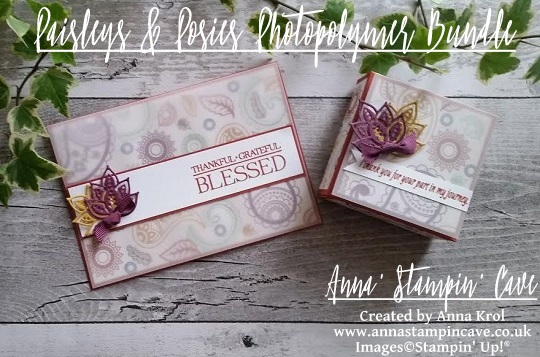
For my card, I randomly stamped various images from Paisleys & Posies Stamp Set on a piece of Whisper White. It’s like creating your own DSP. To take off the guesswork, I’ve used the colours that coordinate with Petals & Paisleys Suite: Cajun Craze, Rich Razzleberry, Delightful Dijon, Mint Macaron, Soft Suede and Night of Navy.  I adhered it to my card base (Cajun Craze) and added a layer of vellum on the top, to soften the bold colours. Next, I cut a strip of Whisper White and stamped the sentiment from the same stamp set (love this font!), to the left in Cajun Craze. Backed it with a slightly wider piece of Cajun Craze cardstock, and adhered it to the card front. Using Paisley Framelits Dies, I die-cut two intricate leaves, one in Rich Razzleberry and one in Delightful Dijon, and add it to the panel. The final touch for the card was a tiny Rich Razzleberry bow I’ve made using one of the ribbons from new 3/8″ (1 cm) Ribbon Trio Pack.

thankful-grateful-blessed-card-with-paisleys-posies-bundle

Top tip 1: Glue dots are handy to adhere small elements like little bows. Top tip 2: There’s not such a thing as an invisible adhesive for when using vellum; be smart and hide adhesive under panels, die-cuts or embellishments. Savvy tip: To save the precious ribbon, tie a square knot straight from the spool.

For the gift box base, I’ve used, again, Cajun Craze cardstock. It’s really cute dinky little box, with the base being a 2-7/8 x 2-7/8″ square, and 1″ tall. Same as with the card, I created my own piece of DSP to decorate the box. Using dimensionals I slightly elevated the panel that goes on the top of the lid. But panels on the sides of my box are glued flat. Next, I’ve added a panel of vellum to the top of my box, followed by a little banner with a sentiment, and (again) leaves and a bow to match the card.

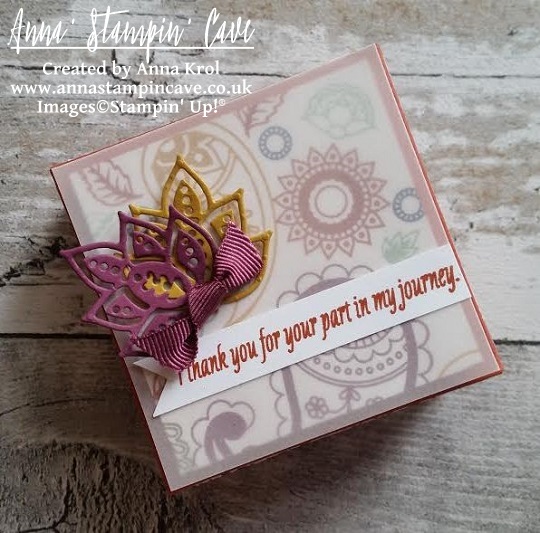
I don’t make boxes or gift sets too often, but I really like this one. I don’t know why. Perhaps for the autumnal colours and maybe for the paisley design. Whatever the reason, I hope you like it too.

Your next stop is lovely Jerim. Simply click the next button to keep hopping around all the blogs to see lots of new ideas and inspiration.
next pootler blog

previous pootler blog

Thank you for stopping by and have a blessed day,

Pinkies Stampin’ Up! Autumn Winter 2016 Blog Hop – Merry Mice

blog hop logo

Thank you for joining us on another Pinkies Blog Hop! We’re showcasing lots of gorgeous projects using products from the new Stampin’ Up!® Autumn/Winter Seasonal Catalogue. Simply use the buttons at the end of each post to keep hopping.

If you arrived here from lovely Hannah at Stampin by Hannah, thank you for stopping by. I hope you enjoy seeing all these beautiful projects and inspiration and continue to hop on through to see what everyone has made.

Here is my project –

merry-mice-stamp-set-shadow-box-christmas-card-2

I wanted to create shadow-box type card for a while but never came around to do it. But when I saw these adorable little mice I thought they are just perfect to do so.

For the base, I’ve used two pieces of Soft Sky cardstock that measures 4-1/8 x 8-1/2″.  scored them both at 1-1/2″ and 3″.  Next, I die-cut a window in my front panel using Layering Ovals Framelits. I used the same die and slightly bigger scalloped oval die to create the frame from Very Vanilla cardstock.

I wanted to add some subtle ‘bling’ to my card base, so I decided to use Heat & Stick Powder with Dazzling Diamond Glitter. I took this little, distressed stamp from Timeless Textures stamp set, and stamped it around the front panel in Versamark. I sprinkled Heat & Stick powder over it, heat set it, sprinkled with Dazzling Diamonds Glitter and heat set it again.

I cut a piece of Whisper White cardstock that measures 4-1/16 x 8-1/2″ and sponged it to create a background for my scene. I wanted to achieve beautiful night sky. To do so I’ve used Daffodil Delight, Pumpkin Pie, Melon Mambo, Pool Party, Bermuda Bay, Island Indigo, Perfect Plum and Night of Navy. I started with lighter colours at the bottom and slowly building up the colour until I was happy with the results.

To create starry night I’ve used irreplaceable Gorgeous Grunge and again Heat & Stick powder with Dazzling Diamonds Glitter. Once the glitter was set,  I took this piece and cut a 1-1/2″strip from it, on the long side, and scored the remaining piece at 4″. I glued the longer piece to my base, to the back panel. The strip I cut off, I adhered on the inside of my front base, so once the card is closed for posting, you can still see the starry night. on the inside panel. And what’s cool about this card: it’s folding down, just like a card in the box, and fits standard A6 envelope

To create front and back inserts, I took 2 strips of Very Vanilla, that measured 2-1/2 x 5 and  I tore them both (one bit smaller) on one side so they look like snowbanks. I’ve added a liquid glue to the torn edges and dabbed it in Dazzling Diamonds Glitter. I scored them both at 1/2″ and 4-1/2″. I adhered the taller one to the background panel.

merry-mice-stamp-set-shadow-box-christmas-card-caroler

Now the fun part: colouring the mice! I stamped singing mouse on a piece of Very Vanilla with Jet Black Stazon ink. I coloured him with Many Marvellous Markers and fussy cut it. Next,  I took a piece of Very Vanilla (2-1/2 x 5″) and marked it at 1″ from the bottom, on the long side. This piece will create our middle insert. I stamped my cute carolers so their feet were touching my 1″ mark. I coloured them in, and fussy-cut them, but only to the 1″ mark. I scored this piece at 1/2″ and 4-1/2″.

I took all my inserts and assembled the card. I adhered the singing mouse on the front of my card with dimensionals. The sentiment underneath comes from the same stamp set. But because of all the ‘busy-ness’ (if it’s even a word haha) of the card, I decided to keep it simple.

merry-mice-stamp-set-shadow-box-card

I’m really happy how this card turned out. Aren’t these mice super cute?! I hope I inspired you a little bit.

Now, be sure to hop along and see more inspiring projects. Your next stop is amazingly talented Jerim from Willow Piggy  go and see what she has made using new products.

next

previous

Thank you for stopping by and have a blessed day,

Negative Die-Cutting

Anna’ Stampin’ Cave – Negative Die-Cutting


Hello everyone and welcome! Today I’ve got for you super cool & easy technique to try out: negative die-cutting. Just a reminder: each week we are using Ronald McDonald House stamp set ‘My Hero’.

anna-stampin-cave-my-hero-stamp-set-with-negative-die-cutting

For today’s project, I’ve decided to use this lovely umbrella image. To create my card I started with a Very Vanilla card base and a Very Vanilla panel, slightly smaller than my base. First, I arranged the layout of my card using the Umbrella Weather Framelits. When I was happy with the placing, I die cut the umbrella first and the handle next, from my panel. But instead of using the die-cut piece on the card (as we usually do, don’t we?), I’ve used the negative image. Savvy tip: Don’t throw your die cuts away. You can use them for your next project.

I took my panel, placed it on the card base without adhering it, and I stamped the umbrella and the handle through a die cut holes. Stamp-A-Ma-Jig ( I love this tool!!!) was a big help to position my stamps perfectly. To create an ombre effect on umbrella image, I coloured the stamp with Crushed Curry and Tangerine Tango Stampin’ Markers (Crushed Curry to the top and Tangerine Tango in the middle). And, because I don’t own the 2015-2017 In Colour Stampin’ Markers, I carefully dabbed Watermelon Wonder ink pad to the bottom of the stamp.

my-hero-stamp-set-with-negative-die-cutting-2

When I was done with the stamping, I trimmed my layer at slightly ‘wonky’ angles, and run it through the Big Shot with a Seaside embossing folder. This folder is intended to imitate the waves, but if you turn it aside, it looks like rain streaks on a window, which is totally cool 🙂

I took a piece of Watermelon Wonder DSP from 2015-2017 In Color Designer Paper Stack (there are four different designs to choose from, but I’ve gone for dots). It was slightly bigger than my top layer, but I  didn’t want to use it all on my card. I only wanted it to peek from underneath my top layer where the ‘wonky’ angles were. So I measured it up, trimmed the piece and adhered it to the base. next, using dimensionals, I’ve added the top layer.

my-hero-stamp-set-with-negative-die-cutting

I decided not to use any additional sentiment on my card, as I think the one on the umbrella says it all. To embellish the card I’ve used White Perfect Accents. But hey, you say, these are clear, right? But did you know that you can peel off the white, sticky backing from your  White Perfect Accents, and you get these super awesome clear, perfectly round embellishments?! It’s cool or what?! But, of course, once you peel the backing off, you need to use glue to adhere them.

pootlers-design-team-week-2

So, did you liked my project?! I hope I inspired you to give this technique a go. It’s really cool and you will be hooked in no time!

Thank you for stopping by and have a blessed day,

Halloween Treat Holders With Popcorn Box Thinlits Dies

Hello, everyone! From today, for every Thursday, for the next 5 weeks, I’m gonna showcase My Hero Stamp Set by Stampin’ Up!Stampin' Up! My Hero Stamp Set

The stamp set is called ‘My Hero’ and what’s amazing about this particular set is that it’s a Ronald McDonald House Charities Stamp Set.

If you haven’t heard about it, here’s how it works: through the Making a Difference program, which Stampin’ Up! launched back in 2003, we partnered with Ronald McDonald House Charities (RMHC). Each year, Stampin’ Up! design an exclusive stamp set to promote the partnership with RMHC, and donate a portion of the proceeds from each sale of that set. To date over $1.5 million has been donated from RMHC stamp set sales!

But let’s get back to my project. For this week I’ve decided for something fun and created these Halloween treat holders using Popcorn Box Thinlits Dies.

Anna' Stampin' Cave Stampin Up Popcorn Box Die Halloween Treat Holders

Aren’t these cute?!! You won’t believe how quick and easy they are to make. For each holder, you only need one die-cut piece (for the box you need two). Next, you trim the larger flap, varnish well all the score lines and use a strong adhesive. I’ve used Tombow Multipurpose glue.

Anna' Stampin' Cave Stampin Up Popcorn Box Thinlit Dies Halloween Treat Holder

To create panels from Designer Series Paper you just simply die-cut the box and hand cut them following shallow lines created by the die.

For my treat holders, I’ve used two different colour combinations: Basic Black with Pumpkin Pie and Elegant Eggplant with Old Olive. I think these colours suit Halloween perfectly.

I’ve used ‘face’ stamp from My Hero Stamp Set, which I believe supposed to be a pumpkin face (!!?), and created these uber cute spiders. For their legs, I’ve used a wavy die from Popcorn Box Thinlits Dies. And yes, I know that spiders supposed to have 8 legs, but come on! These are mine and they only have six lol The sentiment is stamped using  Brushwork Alphabet Stamp Set and the panels underneath are just cut-outs I have left after die-cutting the box itself. These tiny strips of paper in my treat holders are also created using cut-offs. I love it – cute and frugal! For a final touch, I’ve added a piece of Metallic Foil Doily in Silver and also Basic Black and Silver Metallic Threads under the sentiment.

Anna' Stampin' Cave Stampin Up Popcorn Box Die Halloween Treat Holders Basic Black Pumpkin Pie

Elegant Eggplant with Old Olive treat holders I have turned into cute Frankenstein. For the hair, I die-cut a circle from a piece of Basic Black cardstock and gave him a trim with scissors. Not that I’m talented hairdresser but hey, for Frankenstein it’s just perfect.

Anna' Stampin' Cave Stampin' Up Popcorn Box Die Halloween Treat Holders Elegant Eggplant Old Olive

To create black doilies I took the smallest of Metallic Foil Dollies and deepen them in Basic Black Archival ink pad. Remember to set them aside for a while, as it takes some time before the ink dries. I also added few loops of Gold Metallic Thread under the doily. For the sentiment, I’ve stamped (randomly) ‘sweet treats’ from Teeny Tiny Sentiments Stamp Set on the diagonal white stripes. I put some purple tissue paper into my treat holders. I coloured the smallest dot from White Perfect Accents, using a golden sharpie – it holds the overhung tissue paper in place.

Anna' Stampin' Cave Stampin Up Popcorn Box Die Halloween Treat Holders Pumpkin Pie Basic Black

Anna' Stampin' Cave Stampin Up Popcorn Box Die Halloween Treat Holders Old Olive Elegant Eggplant

So here they are! I really hope you like my little project and that you will try to make these cute treat holders yourself. These would be super cute for Christmas treats too.

Thank you for stopping by and have a blessed day,

Happy Blooming Birthday With Flower Patch Stamp Set

Time flies so quick, I completely forgot to share with you birthday cards I’ve made last month for ladies in our swap group. It was a great opportunity to showcase beautiful Flower Patch Stamp Set and matching Flower Fair Framelits Dies

Stampin' Up! Flower Fair Framelits Dies 133731

_photopolymer layout


For the base of my cards, I’ve used Delightful Dijon cardstock (I really, really like this colour!). And for the mats, I’ve used striped paper from now retired 2015-2017 In-colour Envelope Paper.

Flower Patch

Because I was making several cards, same design at the same time, I cut all my cardstock and paper first. This way I saved lots of time. Next, I stamped big and small flowers and cut them out: I fussy-cut small ones and die-cut big ones. I’ve used Watermelon Wonder, Flirty Flamingo and Blushing Bride for my flowers.

Flower Patch Bundle

When I knew the placing of the flowers I stamped my sentiment in Basic Black Archival Ink. I love this sentiment, it’s so fun 🙂

Flower Patch Stamp Set & Die

I stamped all the foliage using Cucumber Crush and Pear Pizzazz ink pads. I also stamped few random flowers on each panel, using Delightful Dijon (I stamped them off first for lighter shade). To add some pizzazz to my layouts I added few speckles with watered down Watermelon Wonder and Flirty Flamingo.

Flower Patch Stamp Set

Now all I had to do was to assemble my cards. I really love how these turned out. And I truly hope you like them too. As always, if you wish to purchase any of the products I have used, simply click the images below to go directly to my online shop and don’t forget to enter the hostess code for the month of July GUHXWAR6, to receive a gift from me.

Thank you for stopping by and have a blessed day,