You Put The Merry In My Christmas

Anna’ Stampin’ Cave – You Put The Merry In My Christmas


Hello, and welcome! Today I’ve got for you a couple of rather traditional Christmas cards. As you probably remember we are showcasing My Hero RMHC Stamp Set by Stampin’ Up!®

stampin-up-my-hero-rmhc-stamp-set-you-put-the-merry-in-my-christmas

Aren’t they lovely?! And they are so easy to make.

The card base is standard top folded A6 in Very Vanilla and I’ve used beautiful This Christmas Specialty Designer Series Paper for my panels. These were supposed to be simple, straightforward cards, but then again, I can’t make things that are too easy, can I?! So I decided to turn them into a split panels cards.

The panels I prepared earlier were 4 x 5-6/8″ in size. To create split panels, I cut them diagonally into 3 and removed the middle piece. I cut narrow strips of Garden Green and Cherry Cobbler cardstock and glued them underneath my split panels to accent the’split’. I adhered the panels to the base using snail adhesive.

stampin-up-my-hero-stamp-set-you-put-the-merry-in-my-christmas-cherry-cobbler

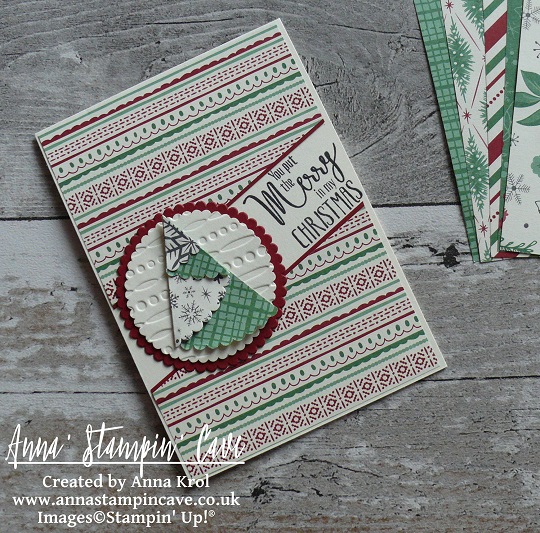
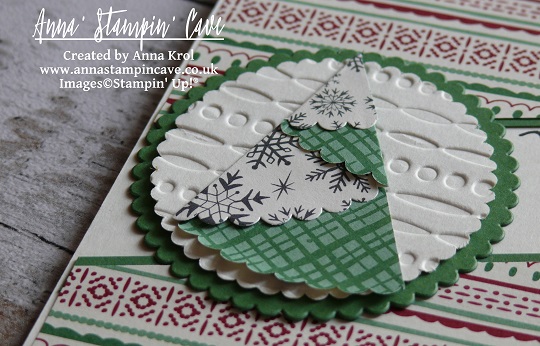
Using my Stamp-A-Ma-Jig I stamped the sentiment in the ‘split’ area. Next, I created these uber cute mini Christmas trees. To make them, I die cut a scalloped circle from a sheet of the same DSP, just a different design. I cut it in half, fold it into ‘tree’ and secured my folds with mini glue dots.

stampin-up-my-hero-stamp-set-you-put-the-merry-in-my-christmas-cherry-cobbler-2

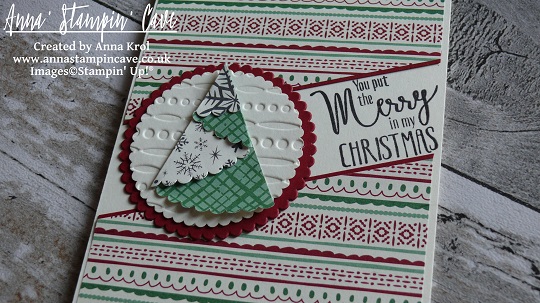
Because design on this paper is quite ‘busy’, you couldn’t really see the trees, once attached to the card. So I die cut 2 scalloped circles in Very Vanilla and run them through my big shot with Festive Embossing Folder.

stampin-up-my-hero-stamp-set-you-put-the-merry-in-my-christmas-garden-green

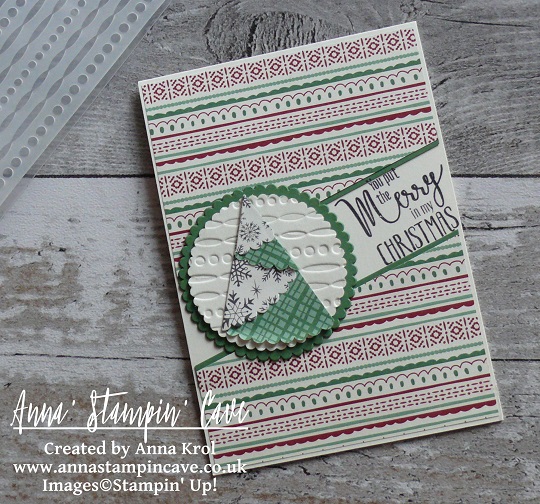
Next, I die cut 2 slightly bigger scalloped circles: one in Garden Green and one in Cherry Cobbler to create mats for Very Vanilla pieces. Adhered them together (de-bossed side up) and then added my trees on top.

stampin-up-my-hero-stamp-set-you-put-the-merry-in-my-christmas-garden-green-2

First I thought to pop my circles up with dimensionals. But because these cards got quite of dimension anyway, I adhered them to the base with snail adhesive.

Super easy, aren’t they? I hope you like them. As always, if you wish to purchase any of the products I have used, simply click the images below to go directly to my online shop and don’t forget to enter the hostess code for the month of September RKW34AHD, to receive a gift from me.

I’m also adding my card to Craftyhazelnut’s Patterned Paper September 2016 challenge

Thank you for stopping by and have a blessed day,

Swirly Scribbles See-Through Window Shaker Card

Anna’ Stampin’ Cave – Simply Sketched Saturday Challenge – Swirly Scribbles See-Through Shaker Card

SSSC Header

Thank you for joining us for another Simply Sketched Saturday Challenge!  We’re so excited to be sharing this hop with you. The products used are all available in the current Annual, or seasonal, Stampin’ Up!®  Catalogues*. Simply use the buttons at the bottom of the post to keep hopping!

The sketch we’re working today with was designed by talented Keren Howell.

SSSC 11

I really like this sketch. And funny how many cards I created recently could fit this sketch perfectly. But today I wanted to make something slightly different: a see-through window shaker card.

Swirly Ccribbles See-Through Window Shaker Card

Don’t you just love Playful Palette Designer Series Paper Stack?! 48 sheets of such fun designs! I couldn’t decide which one to choose. But because I wanted to use Sweet Sugarplum cardstock for my base, these fun, wonky squares were perfect.

I cut out the window in my base first. Next, I traced the “window” on my DSP and cut it out too. Save that piece as you will need it later. I’ve used our new Foam Adhesive Strips to create the shaker. I added them around the window on the base and adhered a piece of acetate. I’ve used more foam strips around the base to adhere my piece of DSP. To finish my shaker window, I added black sequins and adhered another piece of acetate on the inside of the card.

Swirly Ccribbles See-Through Window Shaker Card 2

For the inside, I’ve used a Very Vanilla panel and a piece of DSP that I cut out when creating the window. But this time I’ve used the reverse side of that DSP. The placing is the key, so when the card is closed, you can see that piece through the window. The sentiment “It’s Your Day” was stamped in Basic Black Archival Ink, using Labeler Alphabet Stamp Set (which I truly love). And yes, I stamped it wonky on purpose 😉

Swirly Ccribbles See-Through Window Shaker Card inside

When the shaker bit and the inside of the card were done I could concentrate on the front. I die-cut two wreaths using Swirly Scribbles Thinlits Dies. One in Basic Black, and one in Very Vanilla. I glued them together slightly off-setting, so the Very Vanilla is peeking from underneath. I adhered it to the base with Multipurpose Liquid Glue. My sentiment, again, was stamped using Labeler Alphabet Stamp Set. I stamped it on a piece of Very Vanilla, and hand-cut it leaving a little border around the letters. Adhered it with liquid glue.

For embellishments, I’ve used White Perfect Accents, which I coloured black using a permanent marker. And that finish off my card.

Do you like my project?! If so please leave me a comment. I would love to hear from you!

Now, be sure to hop along and see more inspiring projects. Your next stop is Helen’s blog  go and see what she has made for you.

Thank you for stopping by and have a blessed day,


SSSC Previous   SSSC Next Blog

Stair Step Card With Festival of Trees

Good evening everyone. It’s Saturday – only week away from us moving a home! Yes, finally 🙂 There was so many things coming out in over a month that I thought it will never happen for us to moving hahaha. But finally everything gets into place. The whole new bathroom suite is waiting to be fixed, floor is bought, new soil pipe is on it’s place and the plumbing work will be finished on Tuesday. Plasterboards are nearly done as well – yay! I will tell you more in a coming week 🙂

Today’s project is not today’s for the true. It’s been waiting to be posted for few days now but always something get me distracted. But because I’ve got free hour or so I thought I will post it tonight 🙂

accordian card 2


I don’t have to tell you I love Festival of Trees by Stampin’ Up! Do I?! 😀 I absolutely adore this stamp set, and I will tell you it’s not the last project I will make using it 🙂

This is simple Stair Step Card. For the base you need piece of card stock that measure 9 x 4 1/8 inches (22.8×10.5 cm). Then score it at 1, 2, 3 4/8, 5, 7 inches  (2.5, 5, 8.9 , 12.8 and 17.8 cm) making “hills and valleys” same as on the picture:

accordian card 1

For two first “stairs” I cut two pieces of card stock that measures as follows: smallest 4 x 1″ (10 x 2.5 cm) and medium piece 4 x 1.5″ (10 x 3.8 cm). I glued them to the base 1/16″ higher then each “stair” starts. In imperial it’s around 2 mm higher. For the last stair I’ve cut the piece of cardstock which measure 4 x 3 4/8″. One half of that piece I run through the Big Shot using the biggest Deco Label. Then I took a piece of Lost Lagoon cs slighty wider and run it through the Big Shot again using the same size Deco Label to make a frame for the sentiment.

I’ve stamped  six different trees using Lost Lagoon, Smoky Slate and Pear Pizzazz. I used different tree designs from Festivals of Trees. Also, for the “chain” stamp, I’ve used Versamark pad making so called resistant stamping technique where you stamp the details with Versamark and then stamp solid image on the top. The image stamped as first will resist the ink from second stamping 🙂 Then I’ve cut all the trees with coordinating punch. At the end I used the trimmer ( you can use scissors too) to shorten all of the trees so each one have different lenght now. I’ve attached them to the card with Tombow glue: three on the smallest stair and three on the medium one.

I took the piece of Whisper White (which I’ve run through the Big Shot before) and using stamp-a-ma-jig and Smoky Slate I’ve stamped the sentiment from Bright & Beautiful stamp set.

accordian card 3

Then I’ve glued the frame and a piece of Lost Lagoon Silky Taffeta Ribbon. To add more interest I’ve tied a little bow. Now I could glue it all to the card. It really looked good. But something seemed to be missing. So I took a strip of Whisper White and I’ve stamped “ho-ho-ho” and “merry christmas” from Good Greetings. For this sentiment I’ve used Lost Lagoon. I glued that strip to the first stair just below trees.

accordian card 4

Et voila – the card is done 🙂 I really think this stamp set is awesome. And even though for this card you can use different colours, different designs of trees or even different sentiments, but it’s still pretty awesome card! Don’t you think?! 🙂 If you like it (or not 😉 ) please leave a comment below.

Thank you for stopping by,

Masculine Birthday Card with Hexagon Hive Thinlits Die by Stampin’ Up!

Hello everyone. Today I will share with you the masculine card I’ve made for a friend request. He needed something special for his brother’s birthday. What I knew about the recipient is that he loves his little boys, Manchester United and heavy metal 😉 I’ve decided to go for the football club colours: black, yellow and red, and to use Stampin’ Up! Hexagon Hive Thinlits Die.

The base is Basic Black cardstock. The background is made on Whisper White cardstock. How I did it? It’s such a cool and effective technique.

 dla neila 5

 I took a stamping clear block and simply I stamped the entire Real Red inkpad on the block, then spritz it with a water and stamped it on the cardstock. I repeat it few times till get the right intense shade. I did dry it in between. Then I’ve done the same with Crushed Curry ink pad for yellow. and to finish it I’ve randomly stamped some stamps from Gorgeous Grunge set. I took a piece of Basic Black cardstock and Hexagon Hive Thinlits and run it through the Big Shot. I’ve attached my background to the base with snail and hexagon die cut on the top with Tombow glue. But then I’ve thought it needs some more twist. I took “happy happy”, “happy birthday” and “chevron” mini stamps from Honeycomb Hello (coordinates with Hexagon Hive Thinlits) and stamp them in the little hexagons on the background.

dla neila 4

For the first sentiment I’ve taken a piece of Whisper White cardstock (watercoloured in Real Red same technique as the background) and a piece of basic black, cut them into mini banners and layer them together. The sentiment is from Something To Say and punched using Word Window Punch. The second sentiment is totally awesome! It’s one of the stamps from Just Saying set and cut out with coordinating framelits from Word Bubbles. Stamped it in Real Red of course in a piece of Whisper White and attached it with dimensionals. Oh, and a black button for that extra touch.

I really love how this card turned out. All supplies I’ve used are Stampin’ Up! except for the button. I know I’ve used lots of different stamp sets and accessories for one card but I’m just starting so don’t have a wide variety of coordinating stamps, punches, framelits etc. But I’m getting there slowly 🙂

Hope you like this project. Thank you for stopping by and happy crafting,