Watercolour Wash Using Colorful Seasons Bundle For #GDP088

Phewww! Finally, some air in the air after a heat wave we experienced lately. Don’t get me wrong: I love summertime. I’m just not a fan of hot weather when you can’t do any activity without gasping for the air. And how funny it may sound, in the UK 26C is hardly bearable. But today I woke up very early to the amazingly fresh breeze. I jumped out of bed (well not literally as I still can hardly walk), fixed some quick breakfast to take my medications, got my Bible study done (book of Judges – loveee) and off I go to my ‘cave’ before the ‘house’ woke up.

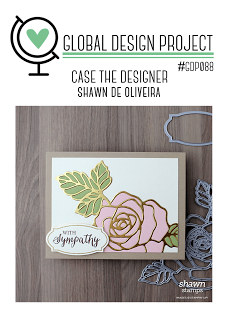
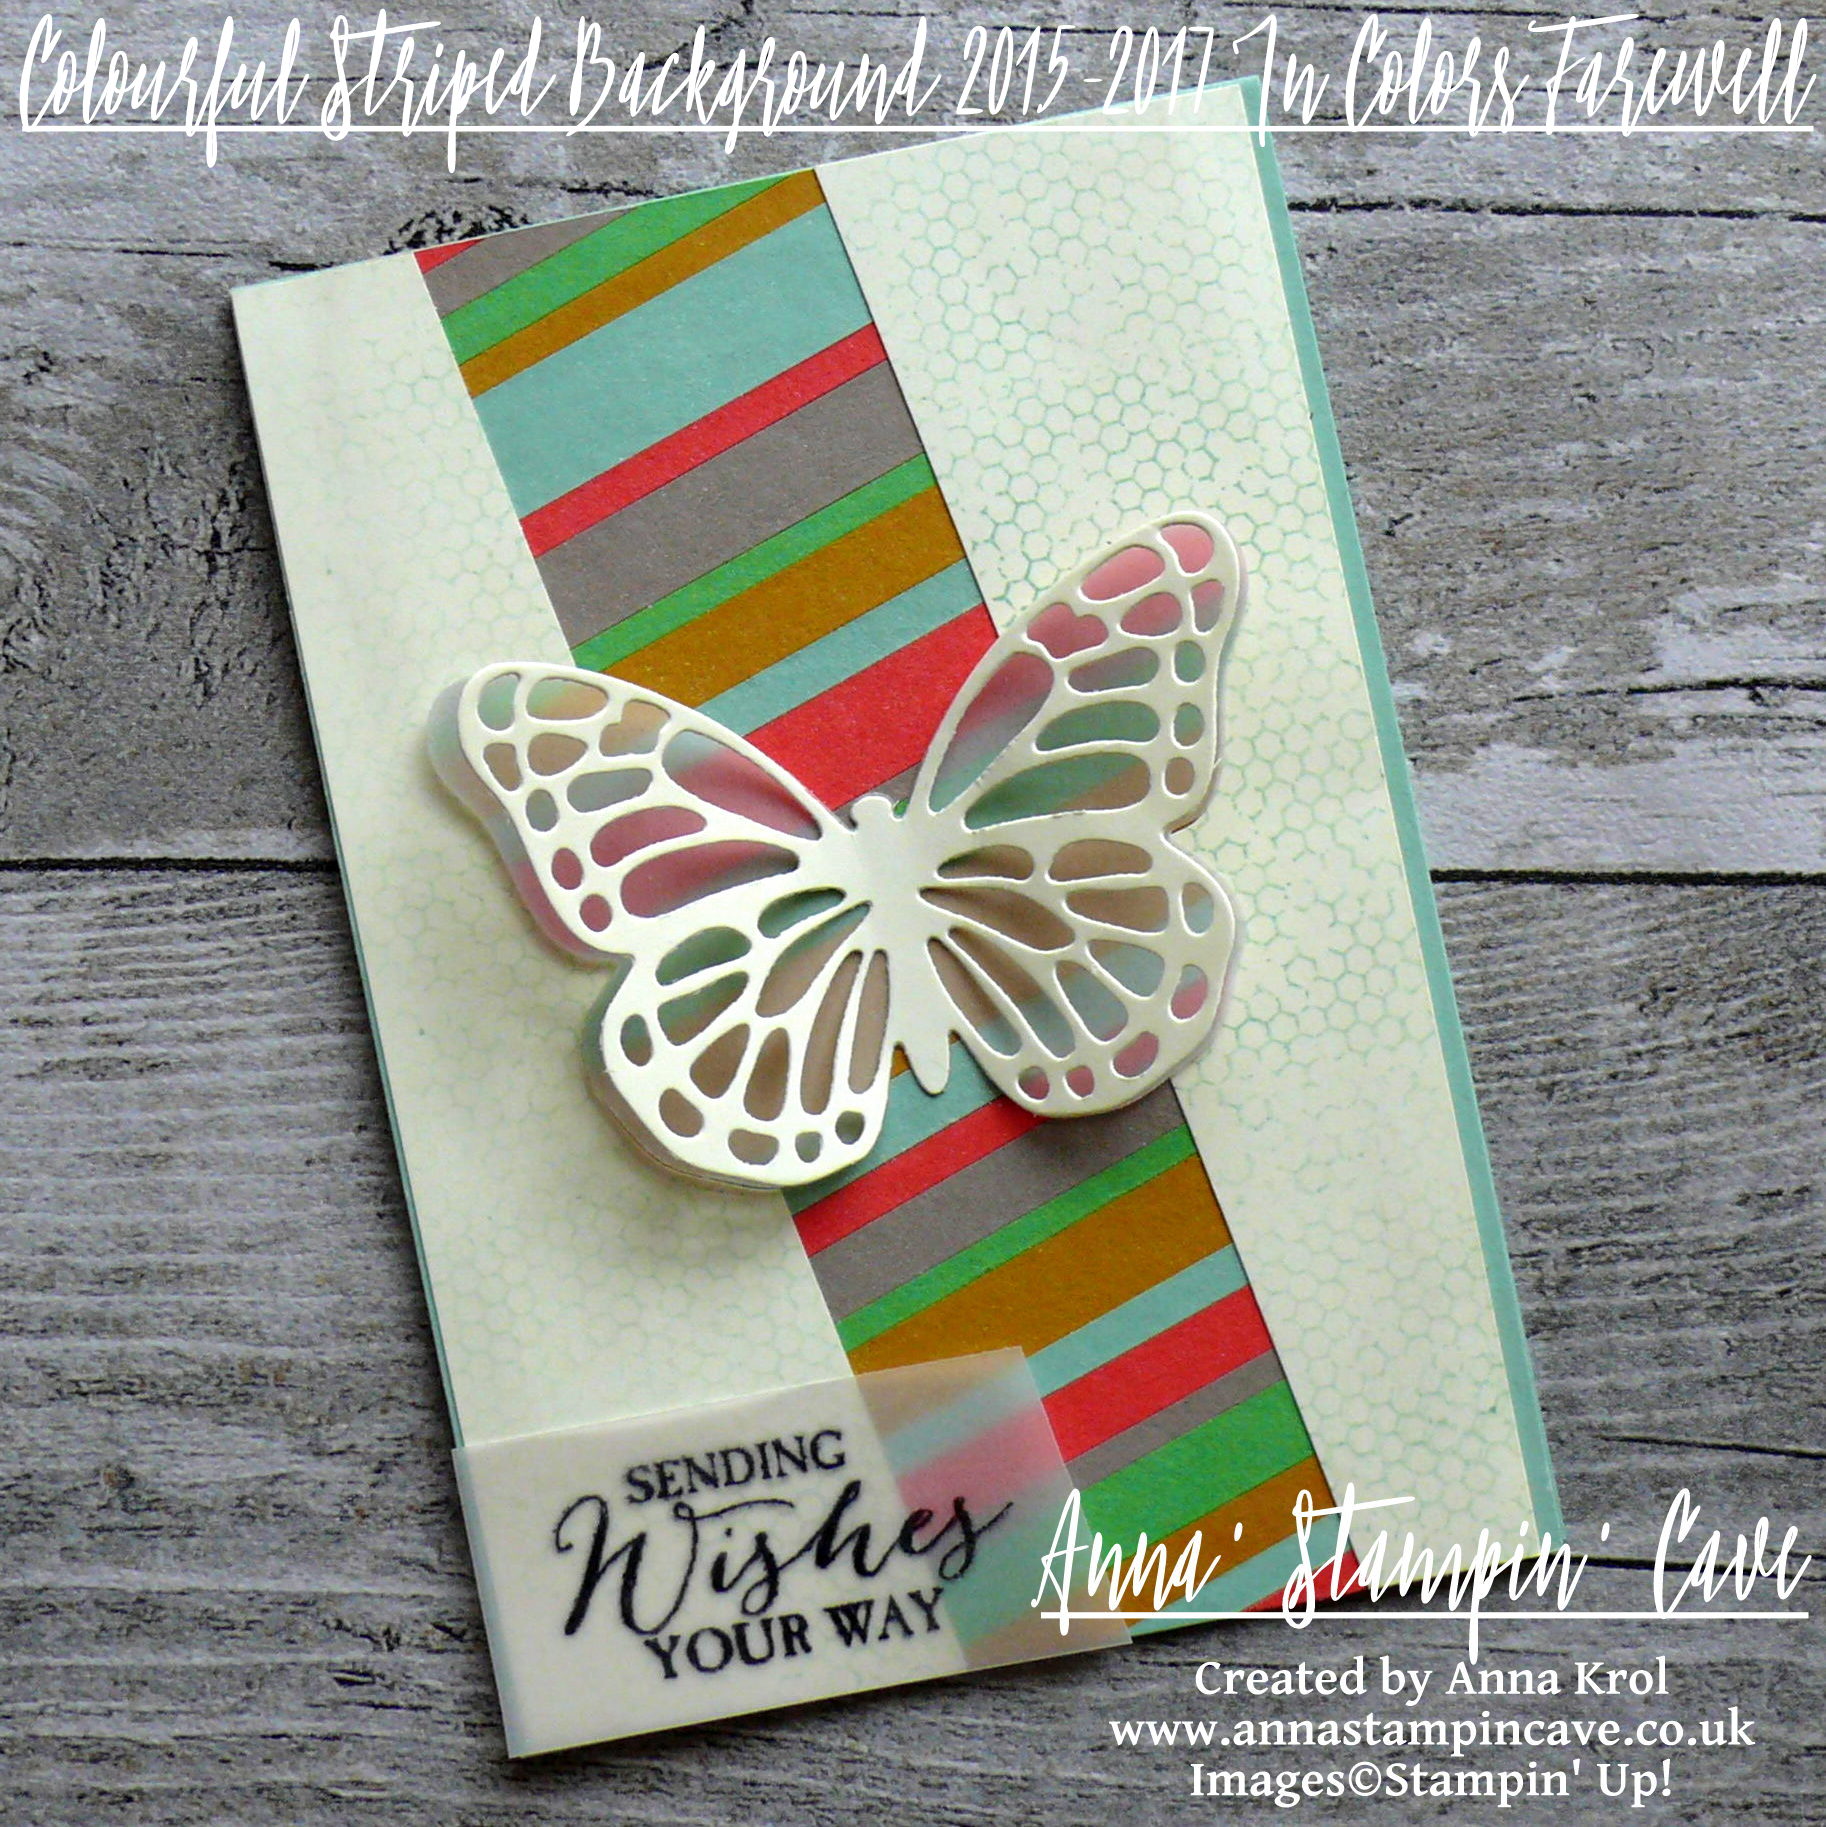
Since over a week, I’ve been ‘dying’ to crack open the Colorful Seasons Photopolymer Stamp Set and coordinating Seasonal Layers Thinlits Dies. And what a better excuse (not that I need one haha) than taking a part in Global Design Project. Especially that this week we are CASE’ing extremely talented, Shawn De Oliveira.

Rose Wonder Stamp Set and Rose Garden Thinlits Dies are one of my favourites from 2016-17 catalogue and I’m really happy that they are staying with us for another year (at least). But for my project today I really wanted to ‘play’ with new products.

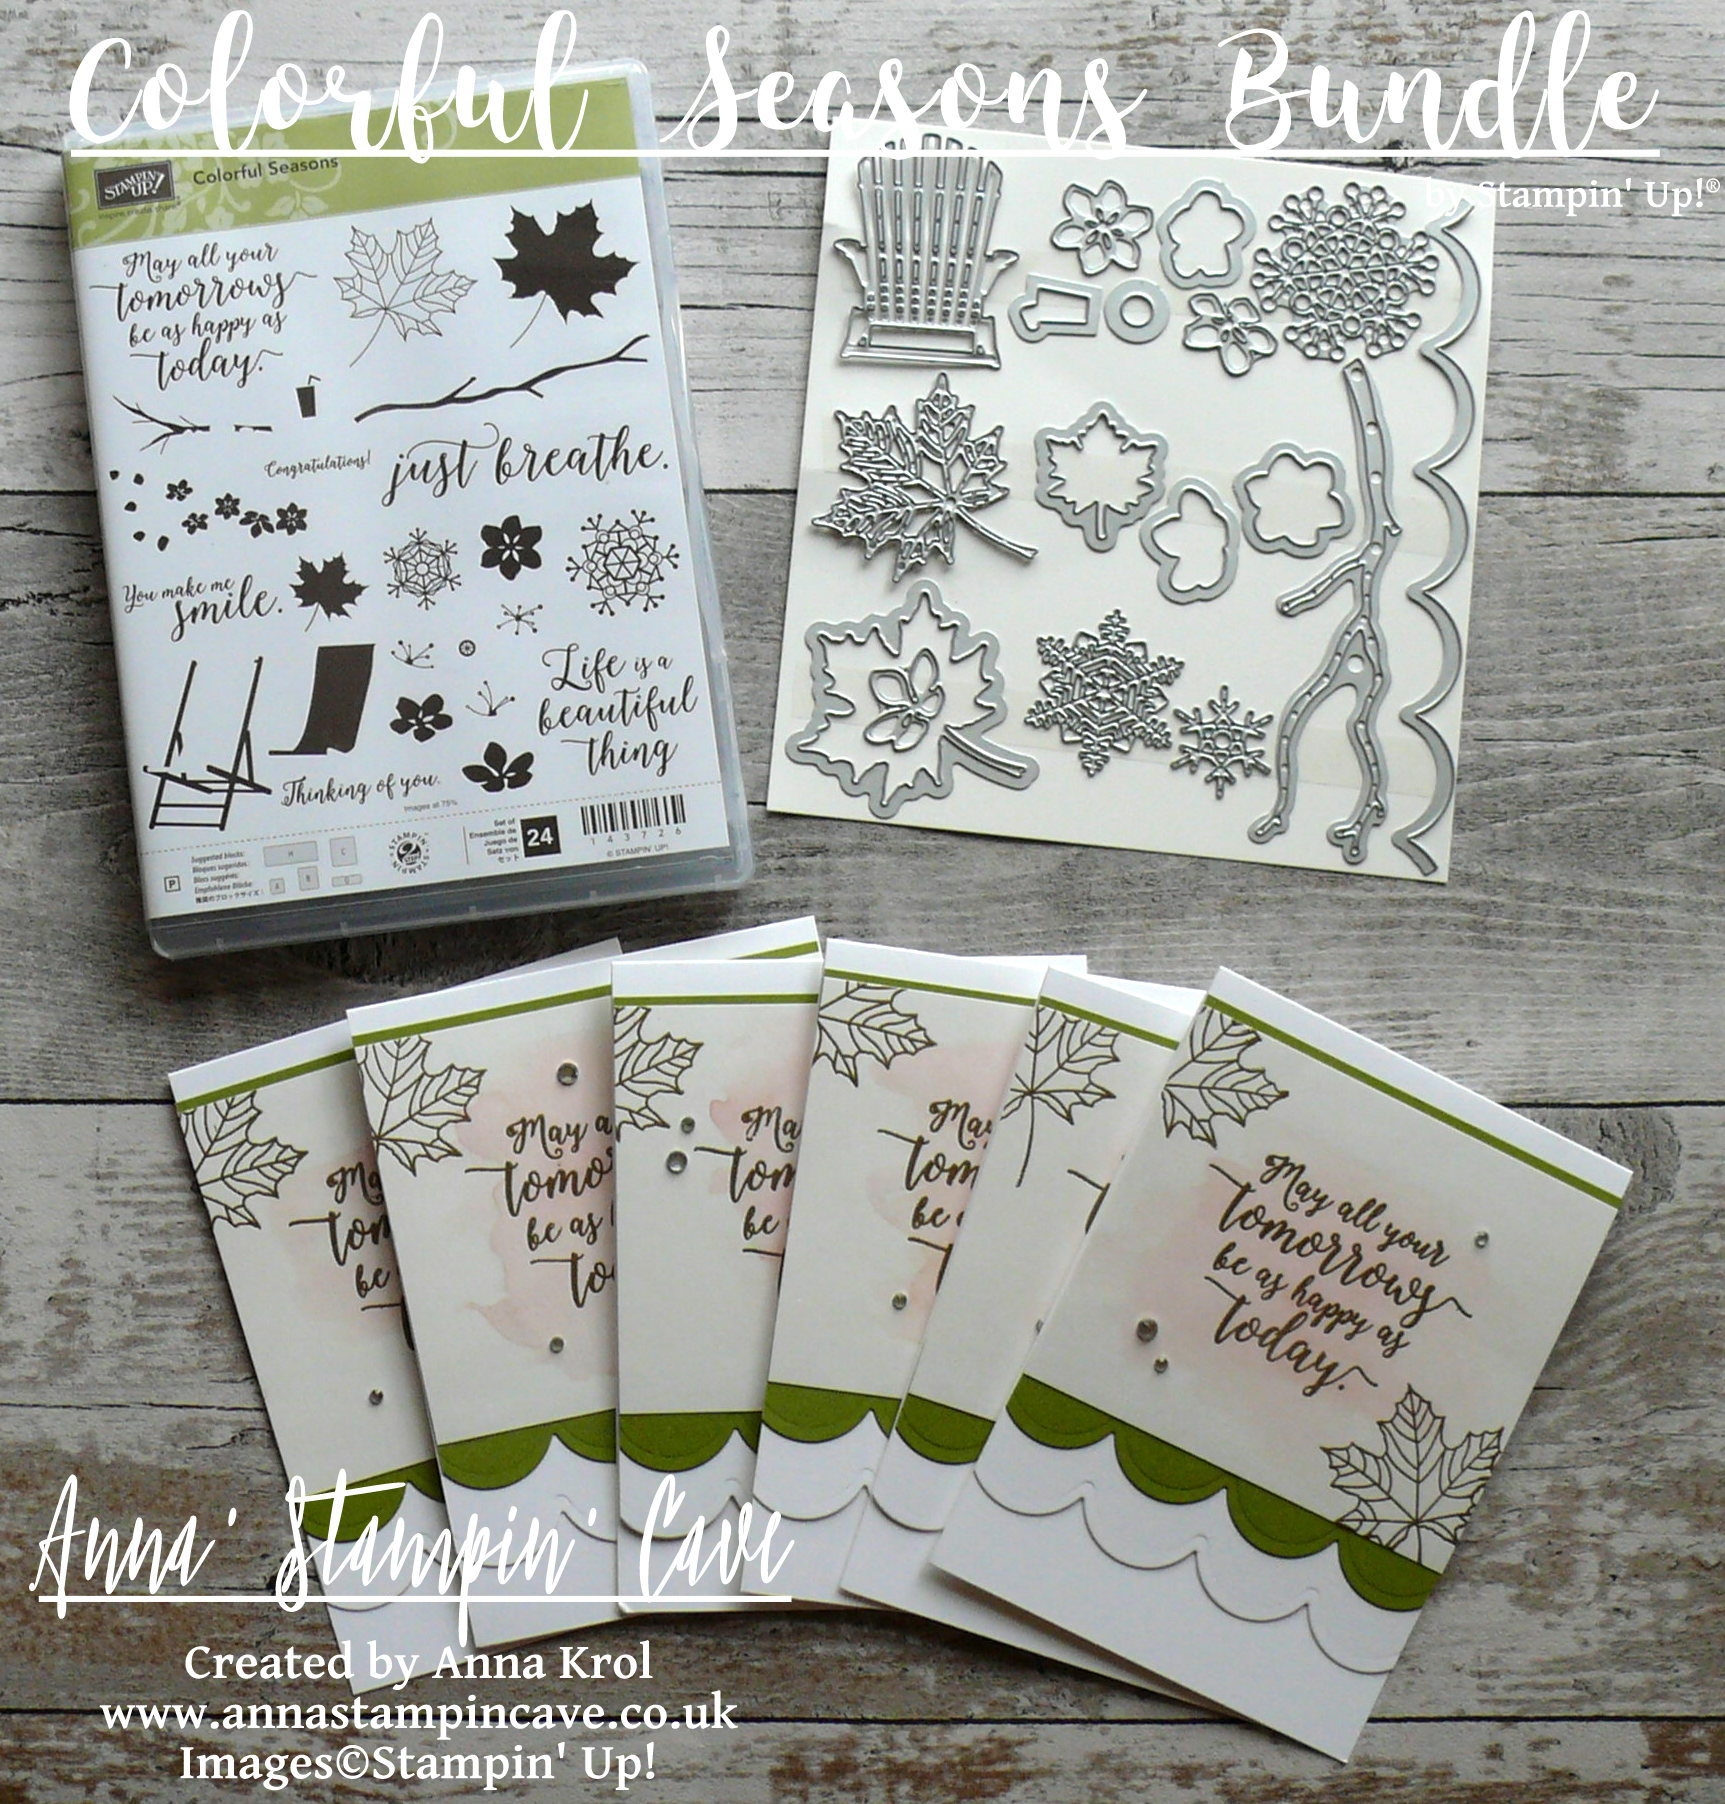
What I ‘borrowed from Shawn’s card is the colour combination of soft pink and green with a touch of gold. And because I had all my supplies out I’ve made not one but six cards. Since a couple of months, I belong to amazing facebook group Random Act Of Kindness, where each month we are sending cards to random recipients. ‘It is more blessed to give than to receive.’ (Acts 20:35)

Colorful Seasons card dimensions:

  • Whisper White Thick cardstock card base: 11-6/8″ x 4-1/8″ scored in half at 5-7/8″ (29.7 x 10.5 cm scored in half at 14.8 cm)
  • Shimmery White cardstock: 3-1/2″ x 4-1/8″ (8.9 cm x 10.5 cm)
  • Old Olive cardstock two stripes: 4-1/8″ x 7/16″(briefly) and 4-1/8″ x 1″ (10.5 cm x 1.2 cm and 10.5 cm x 2.6 cm)
  • white cardboard from the back of DSP: 4-1/16″ x 2-1/2″ (10.4 cm x 6.3 cm)

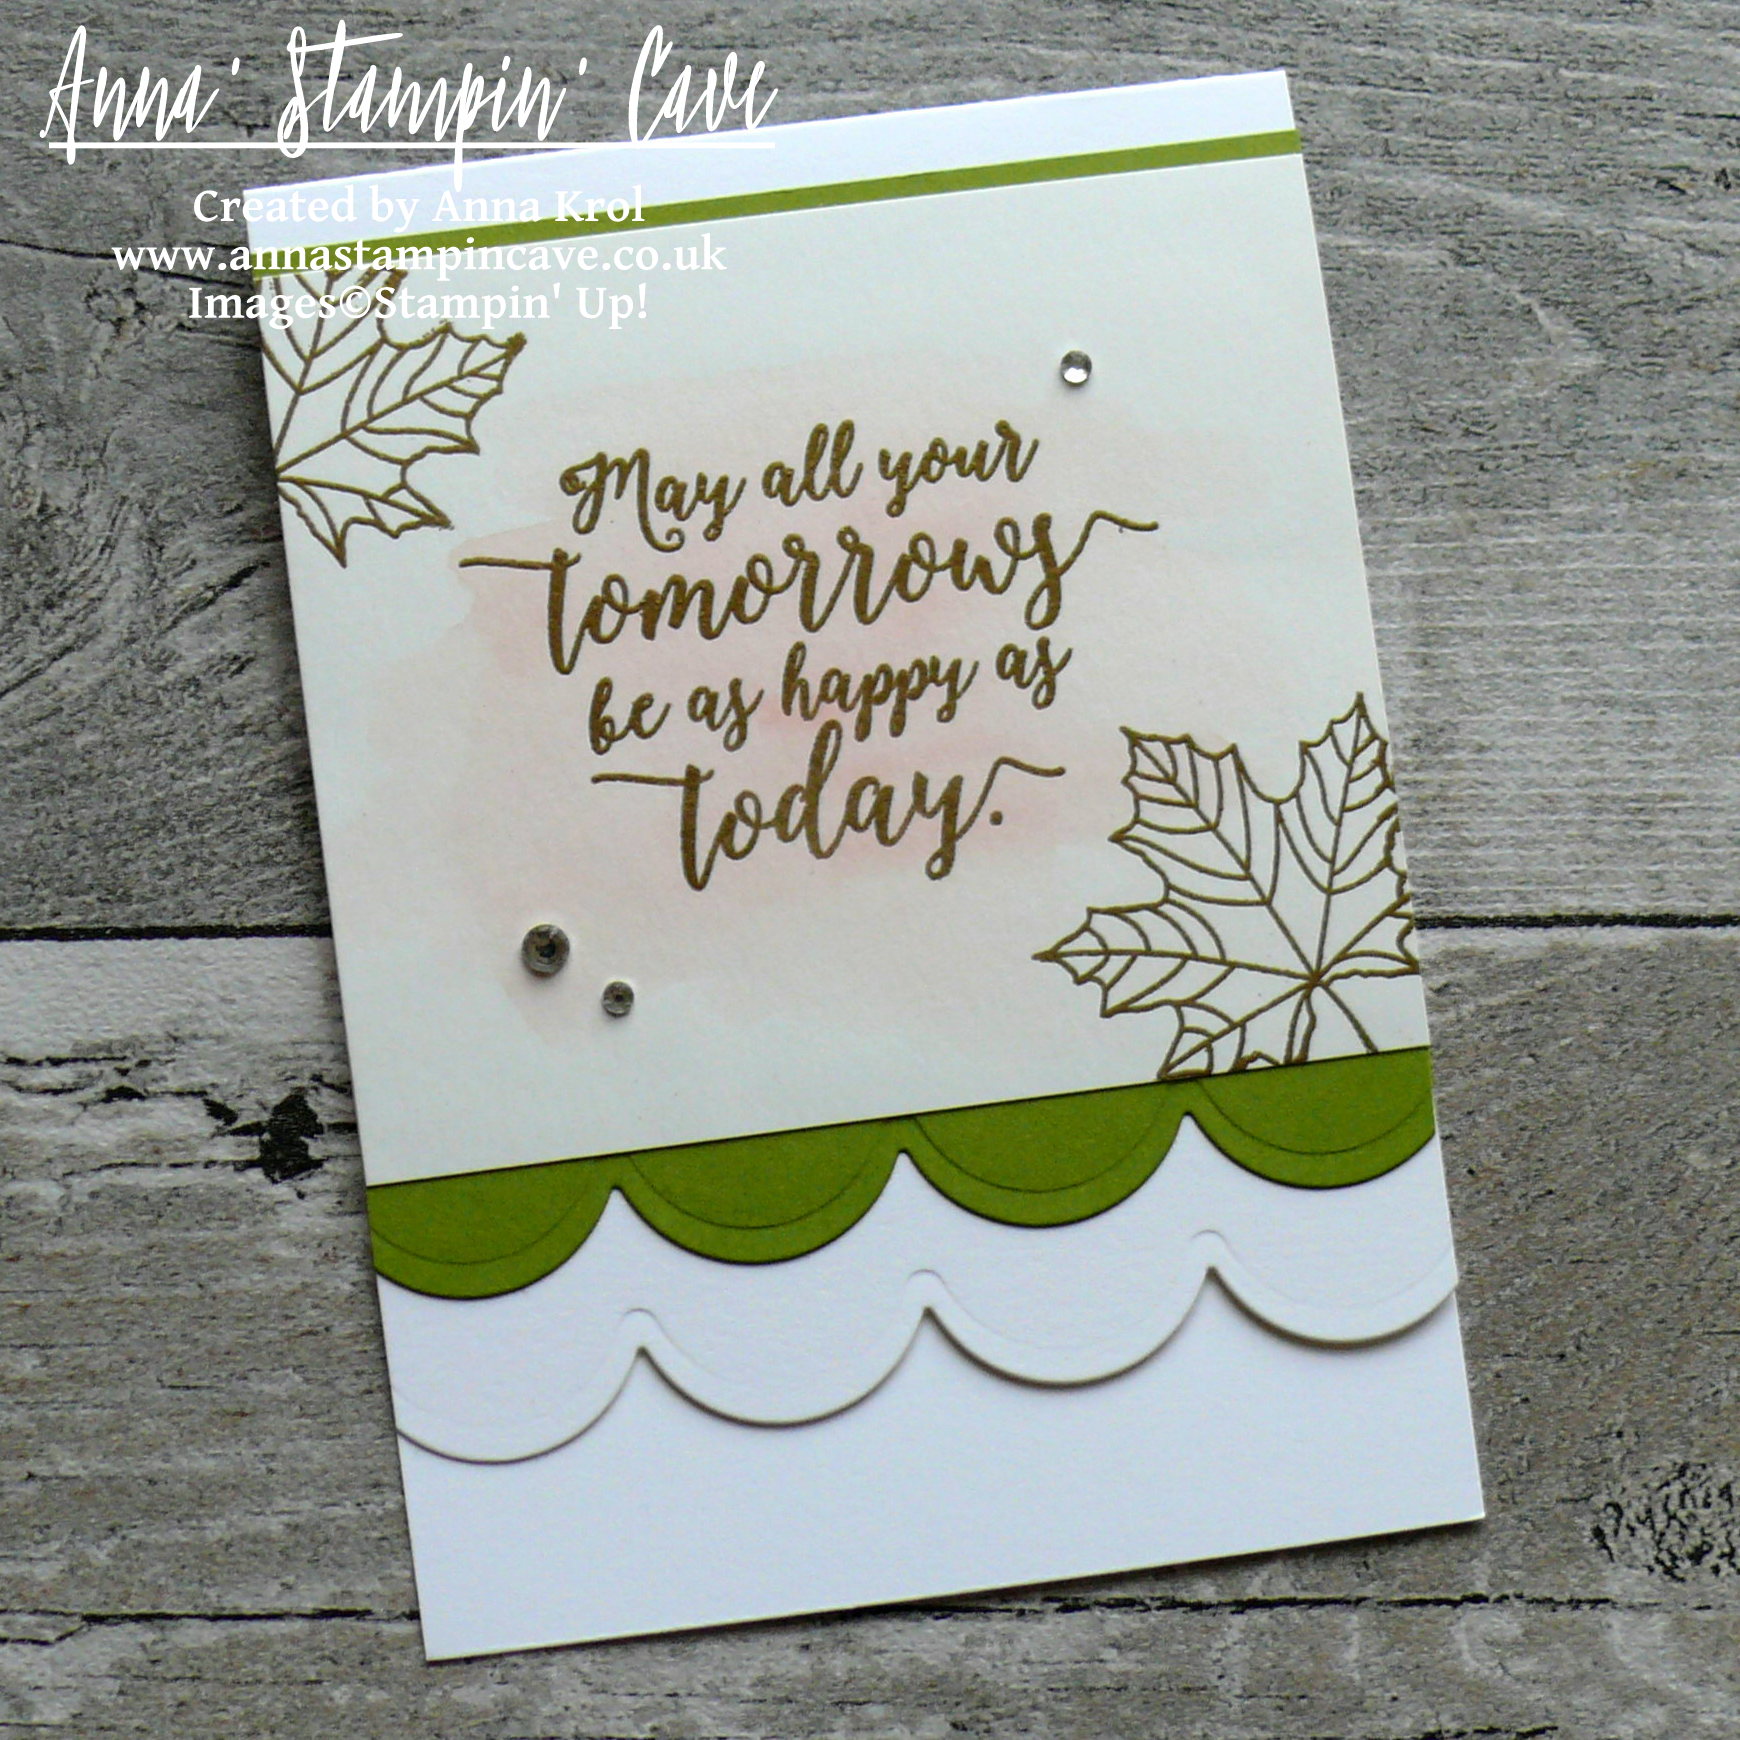
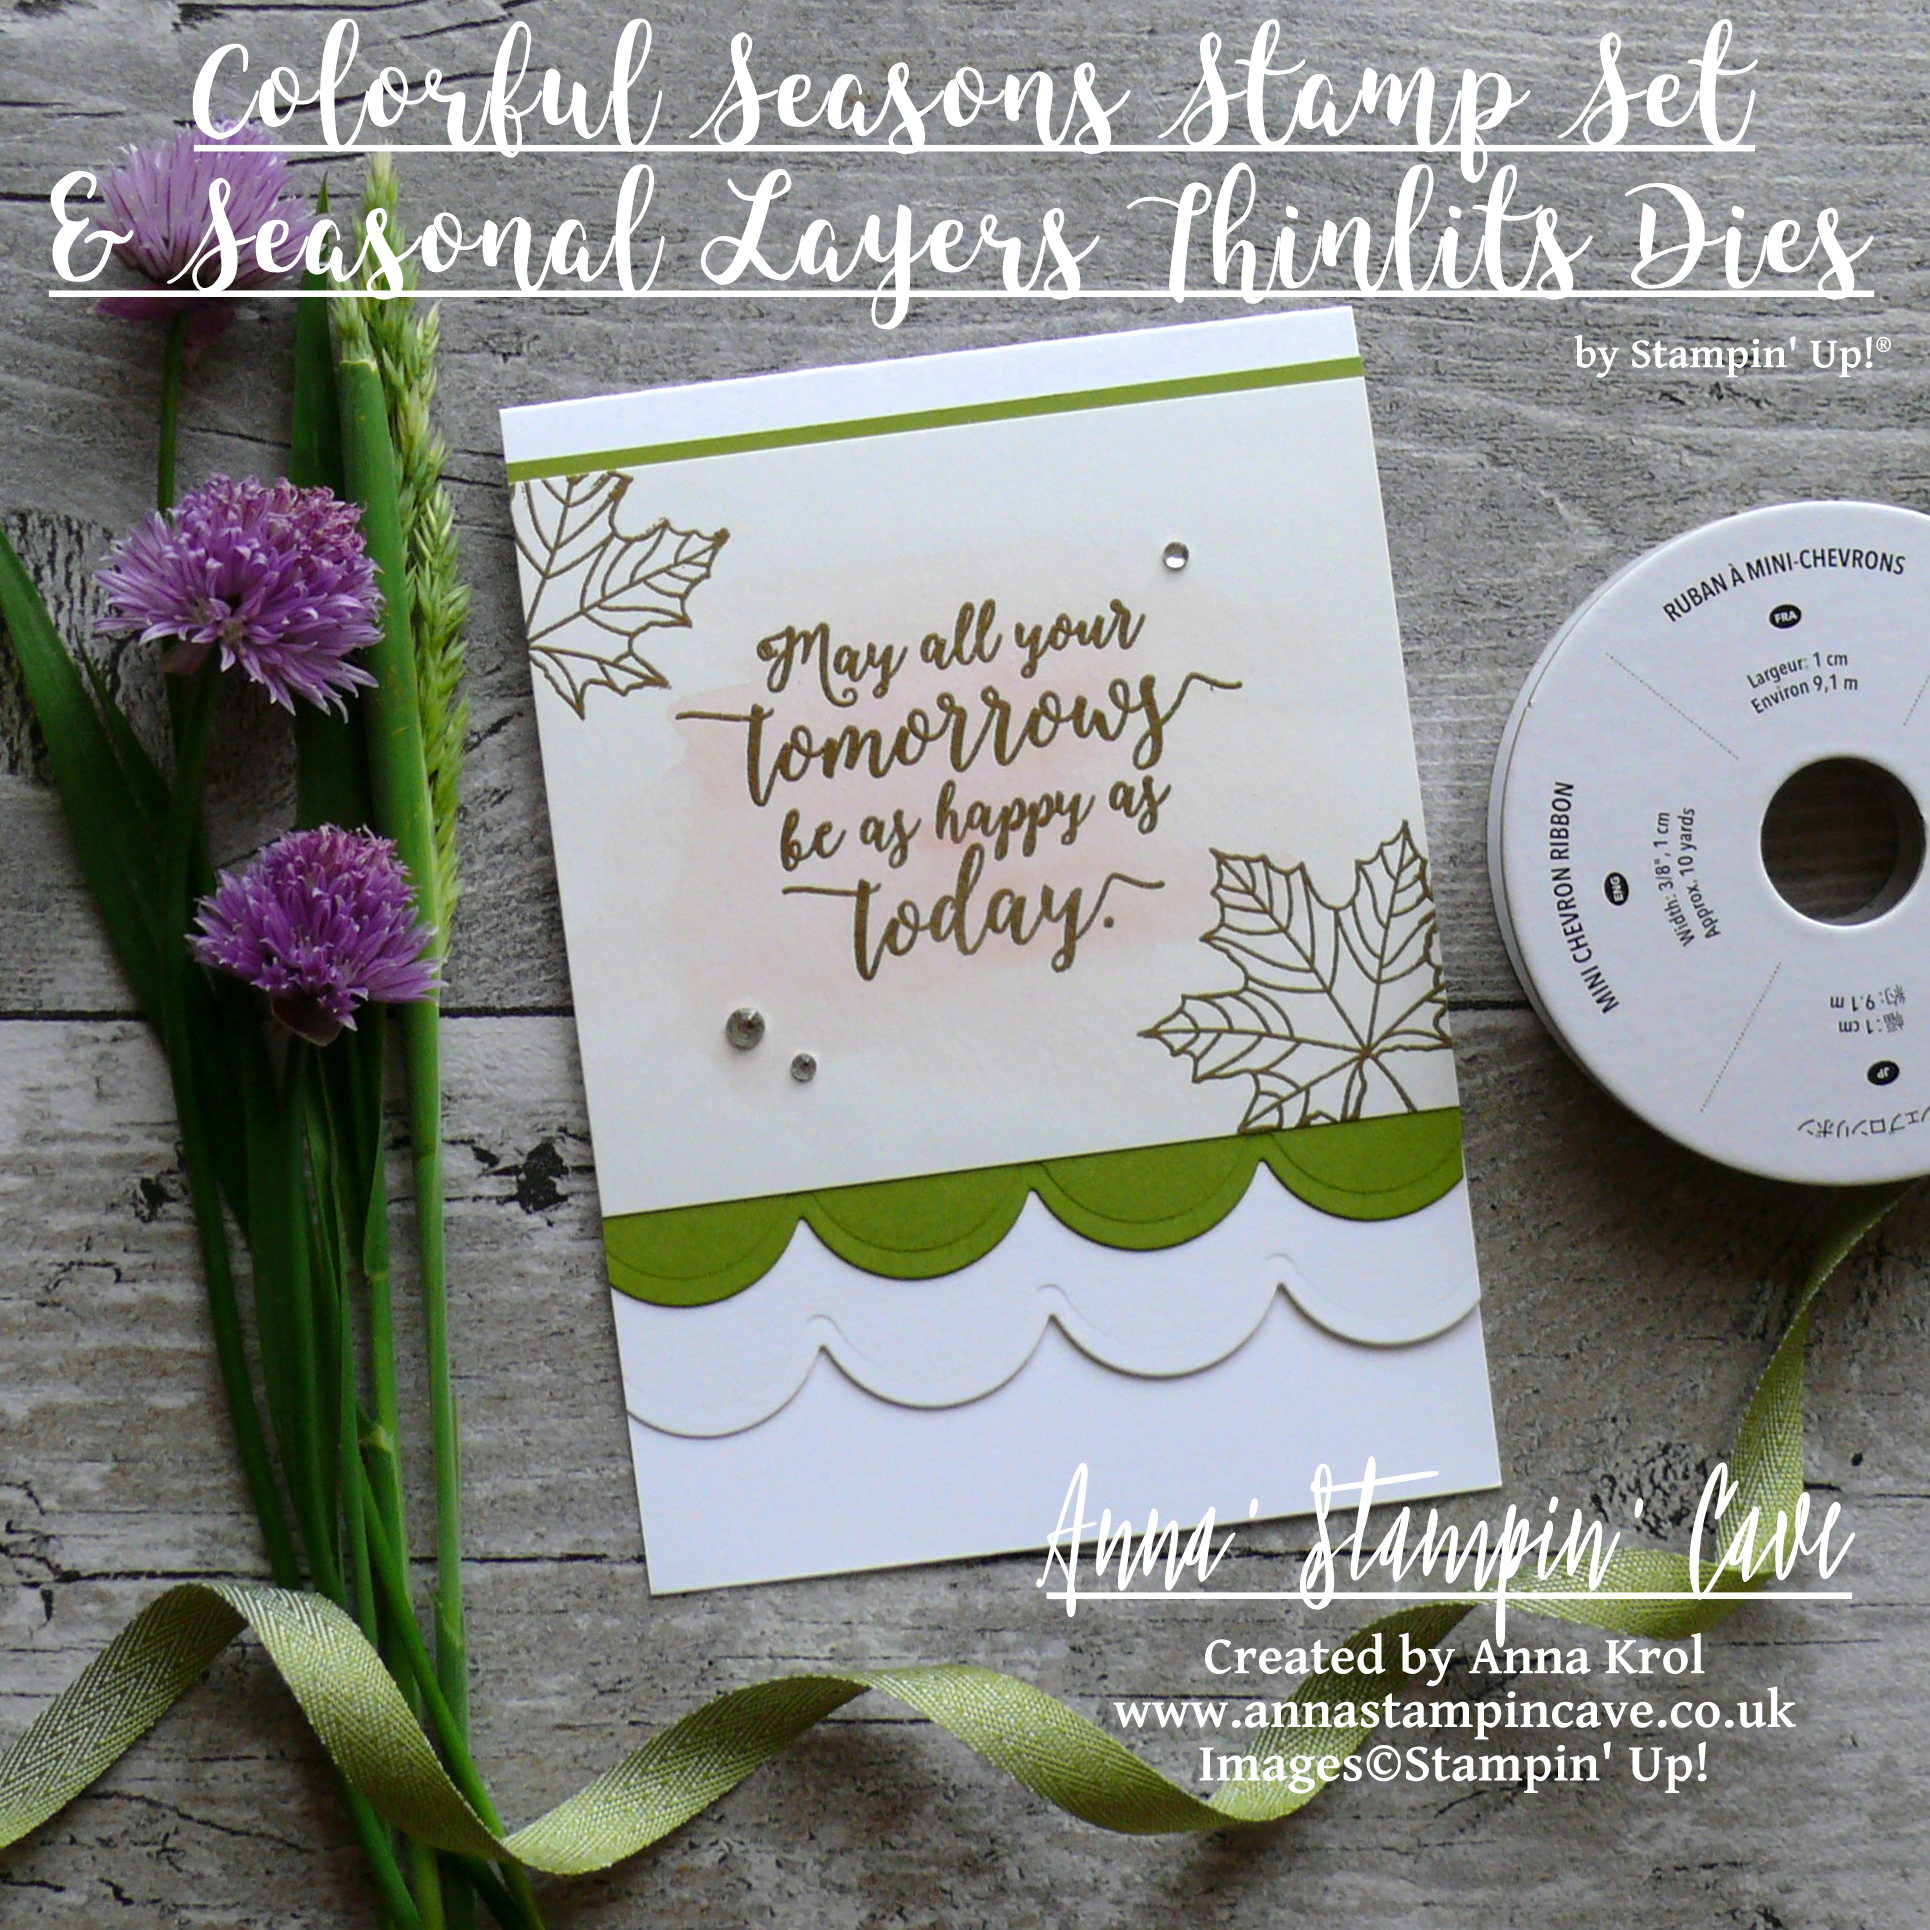
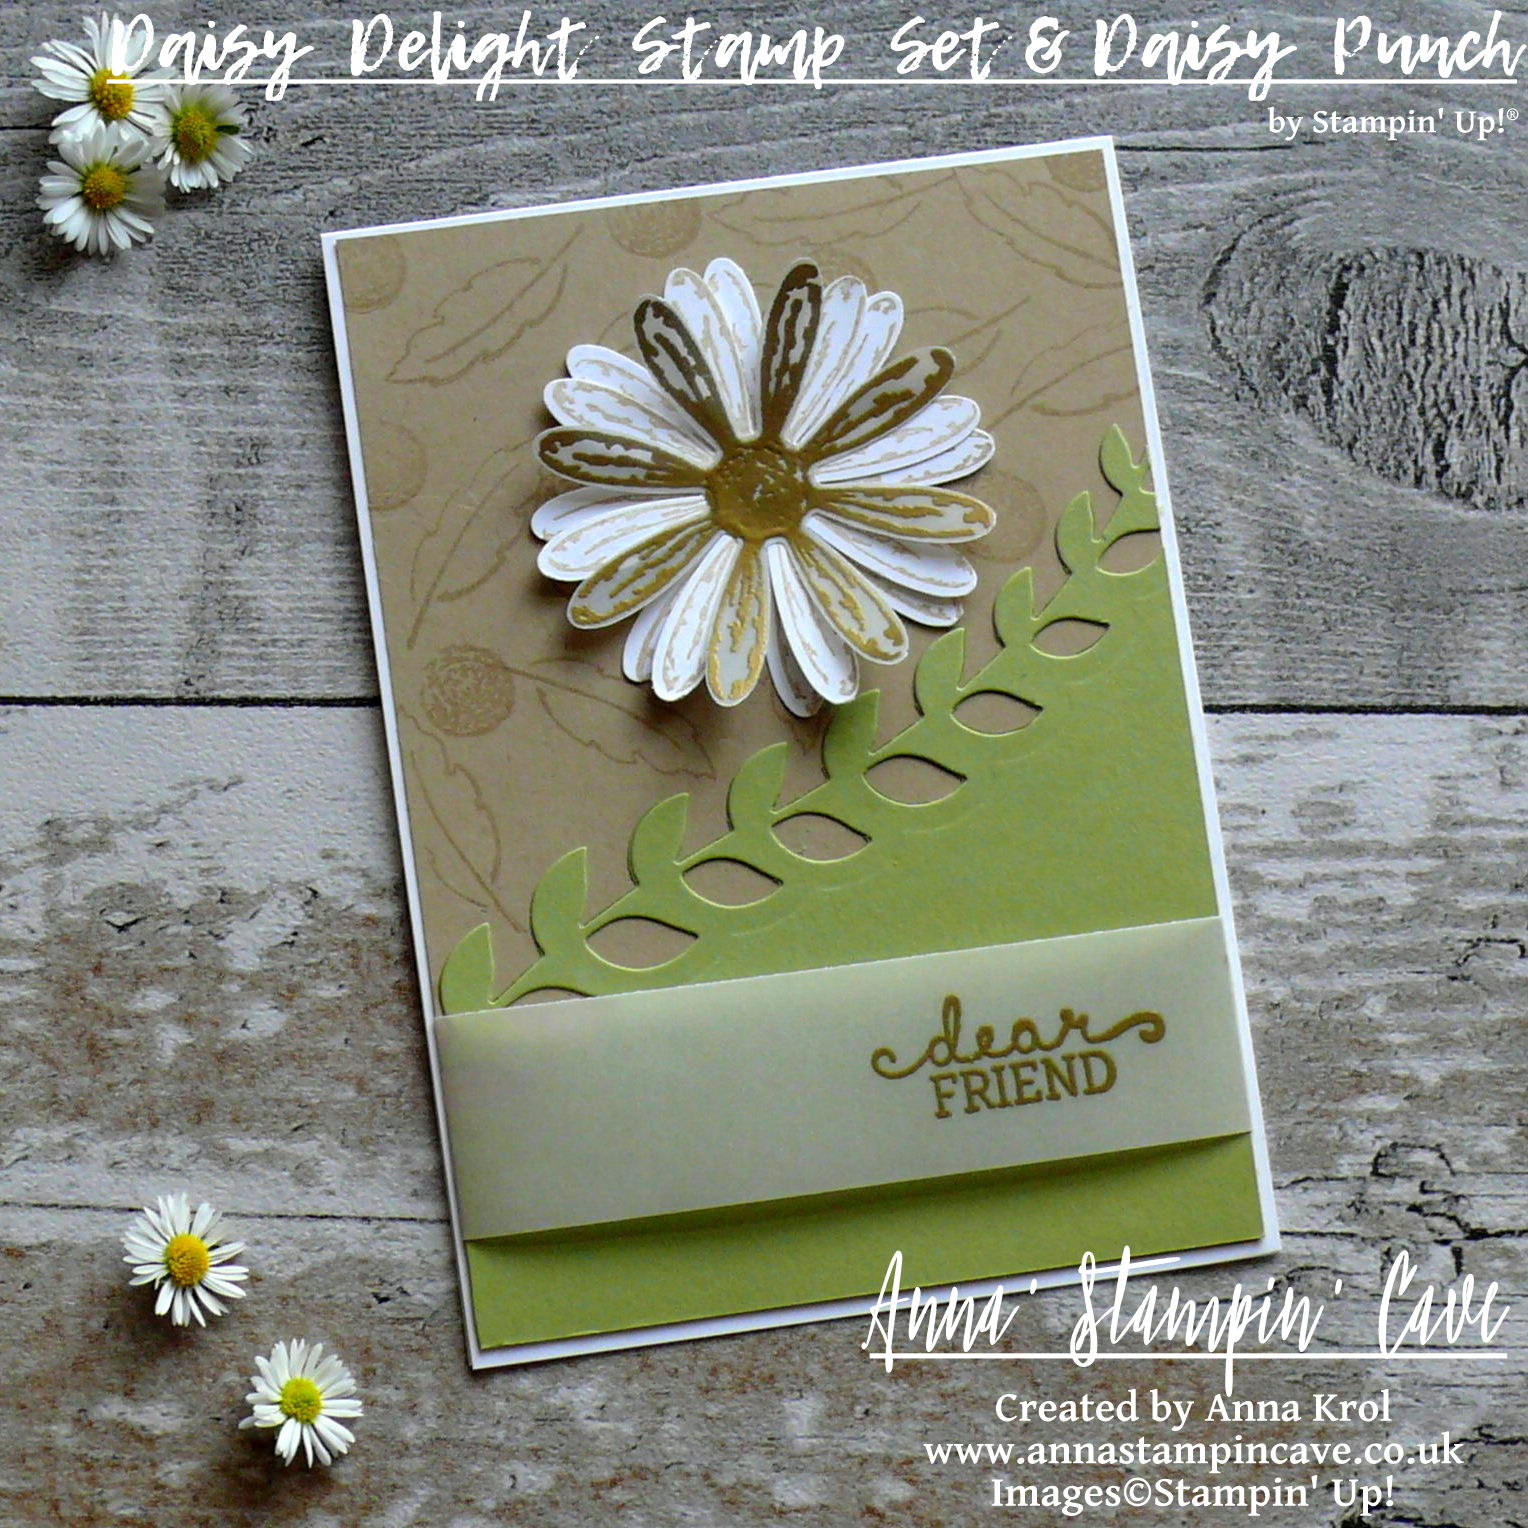
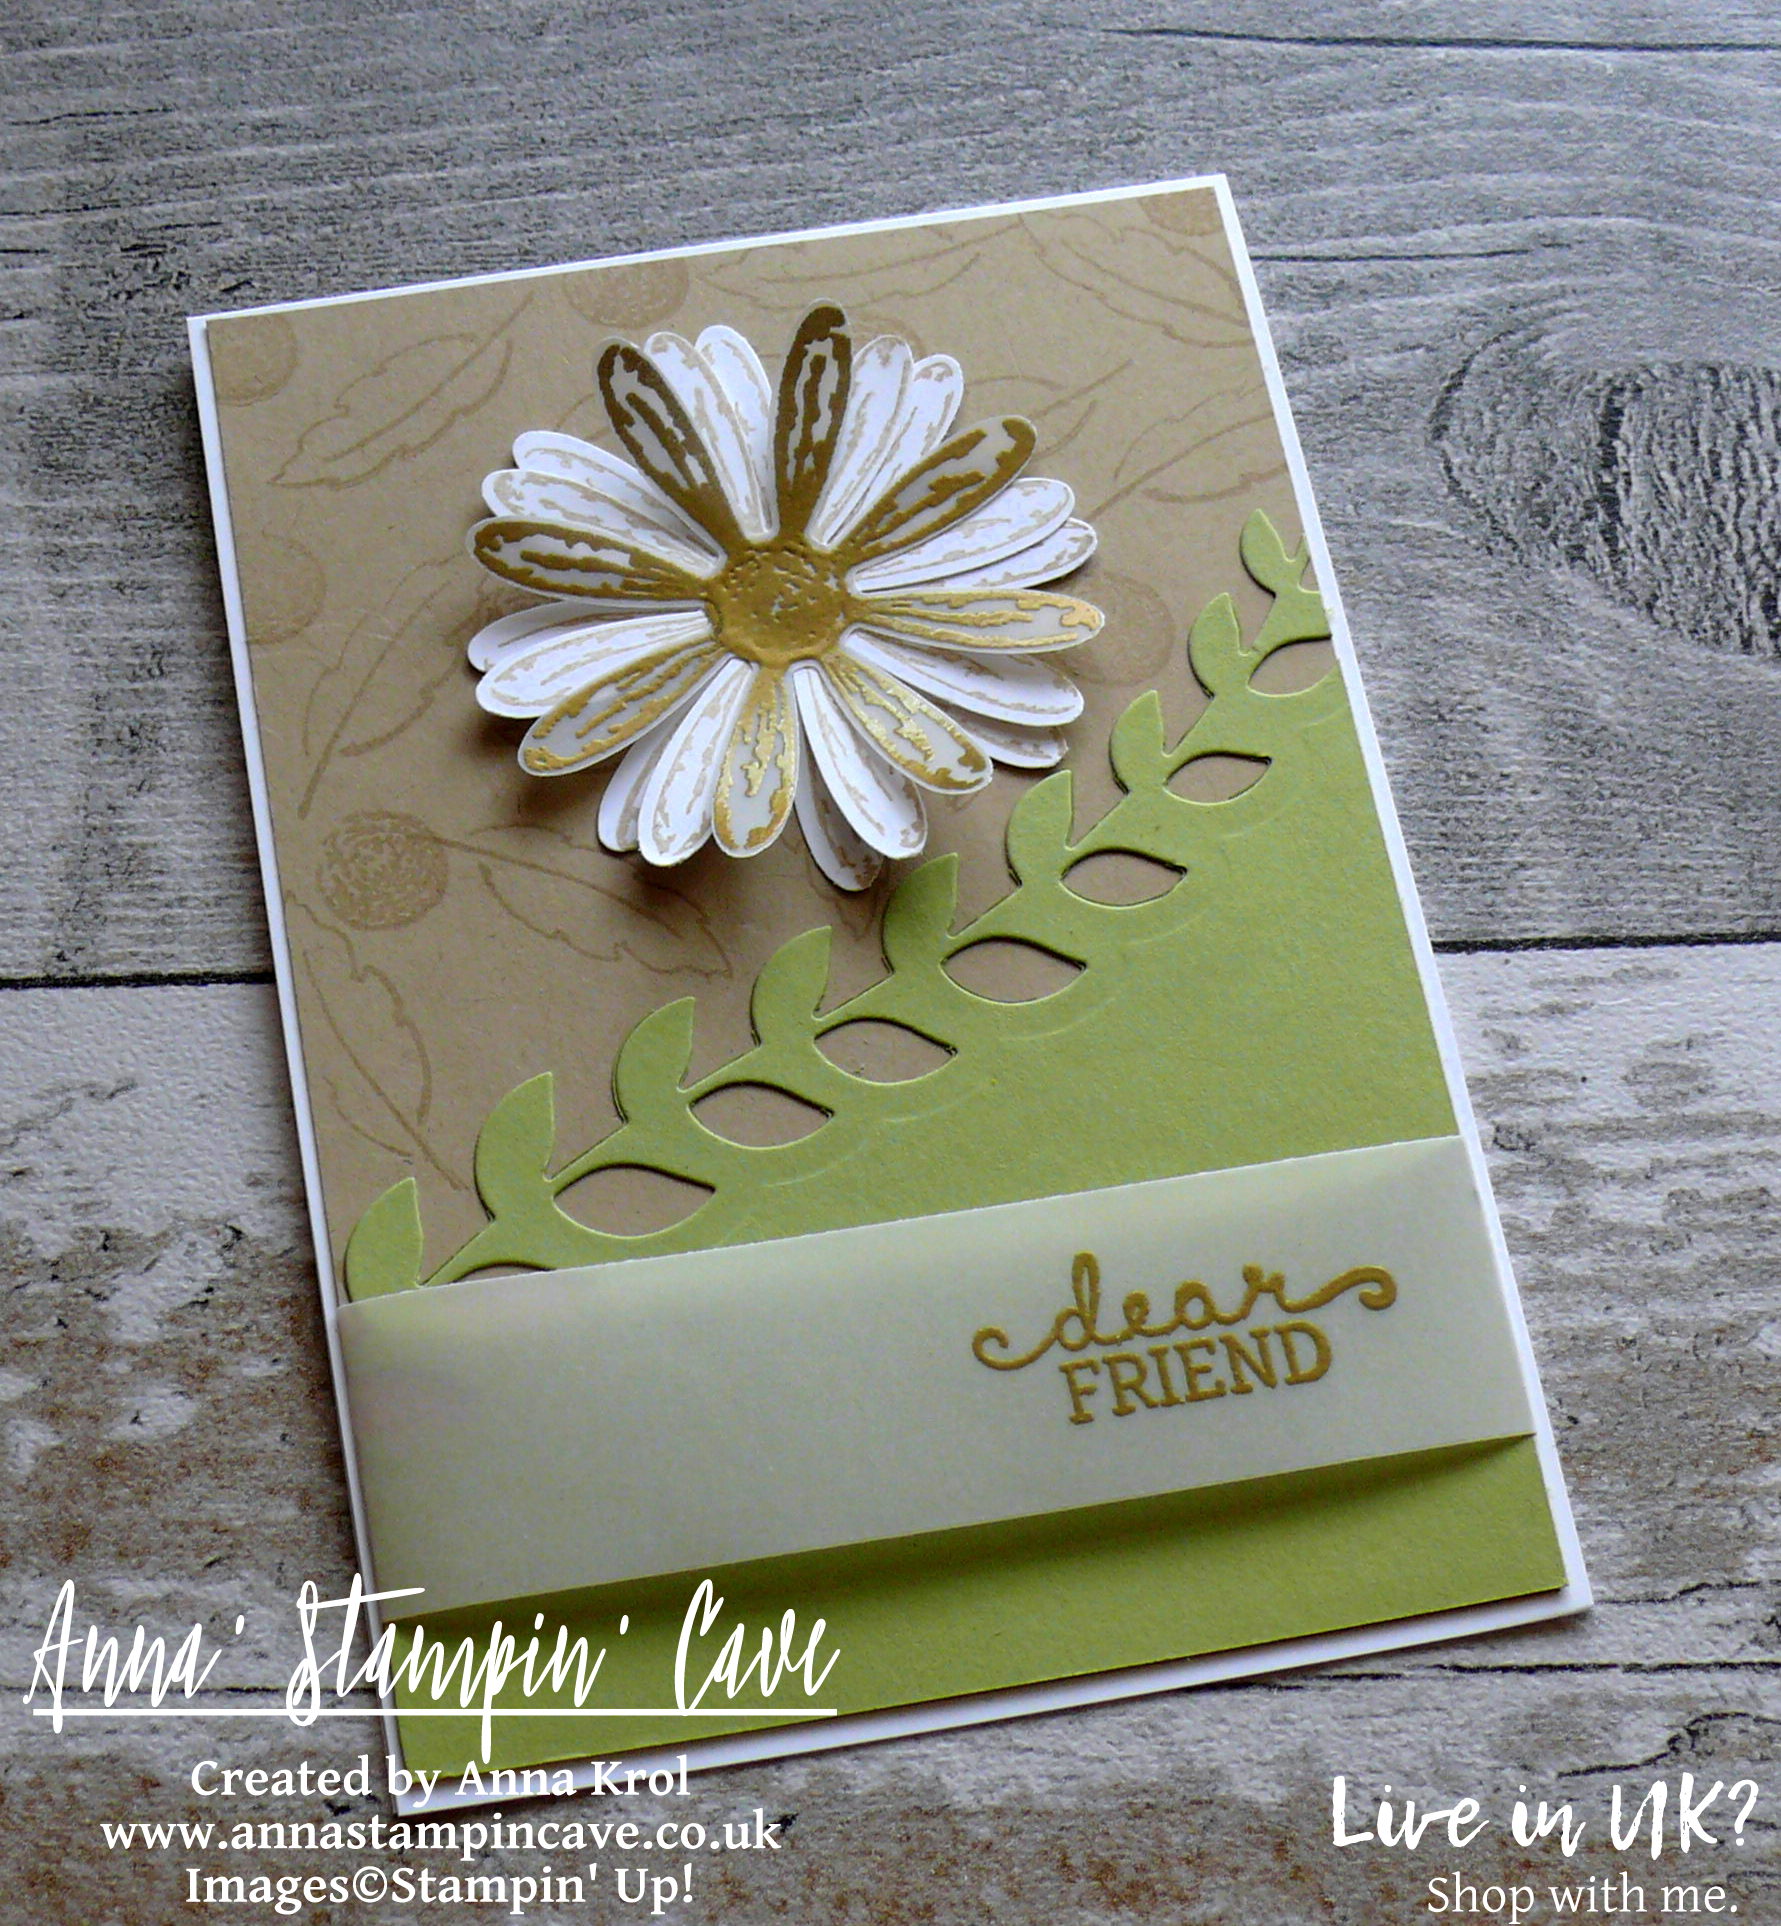
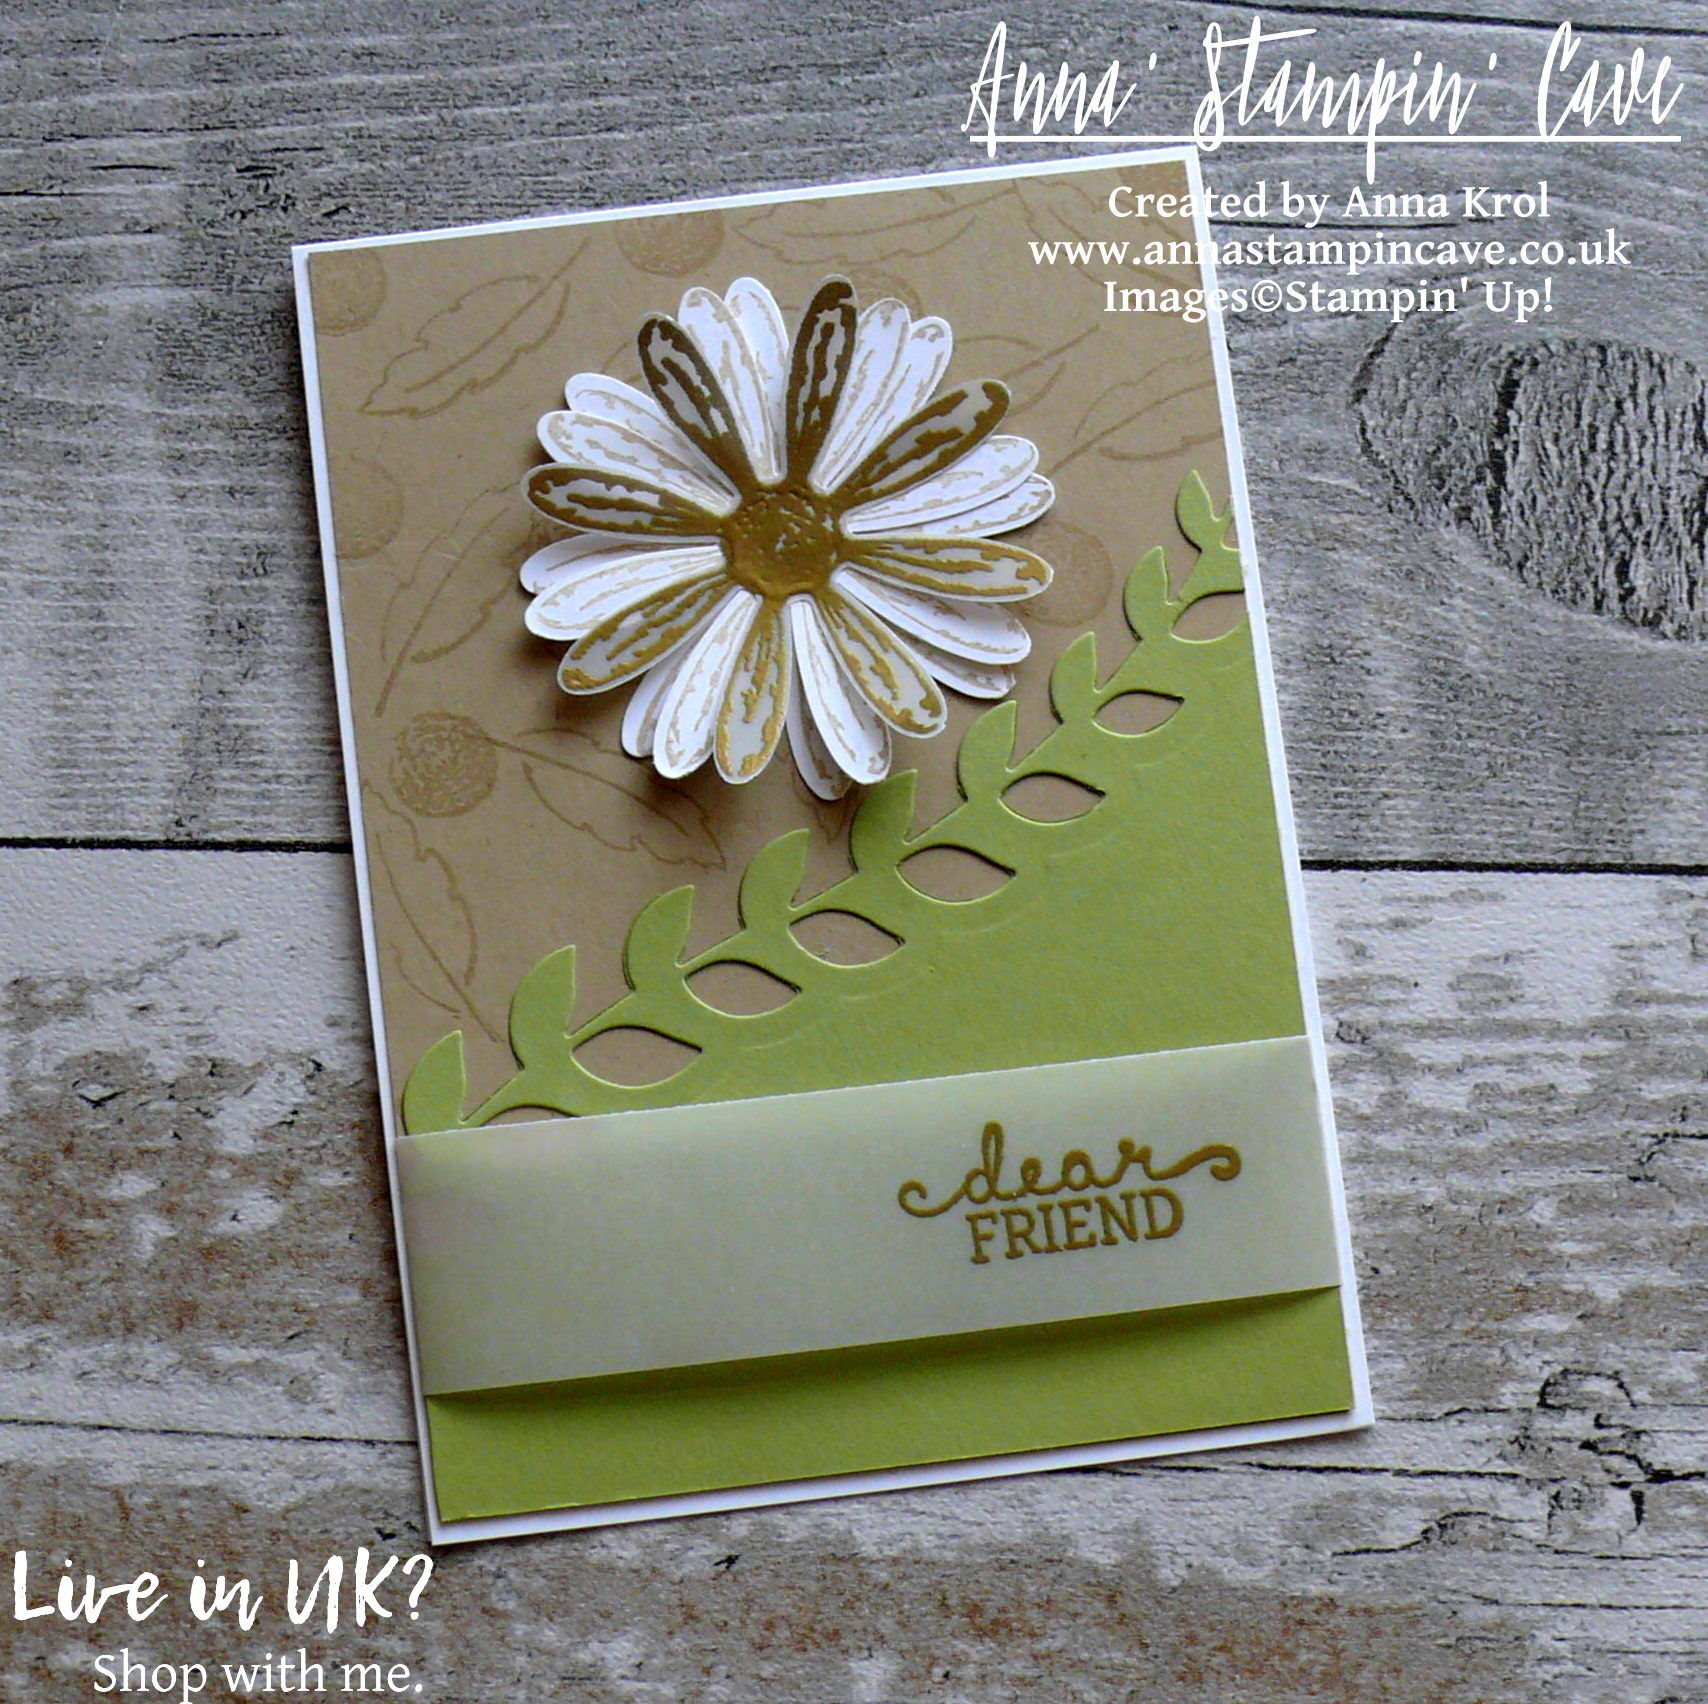
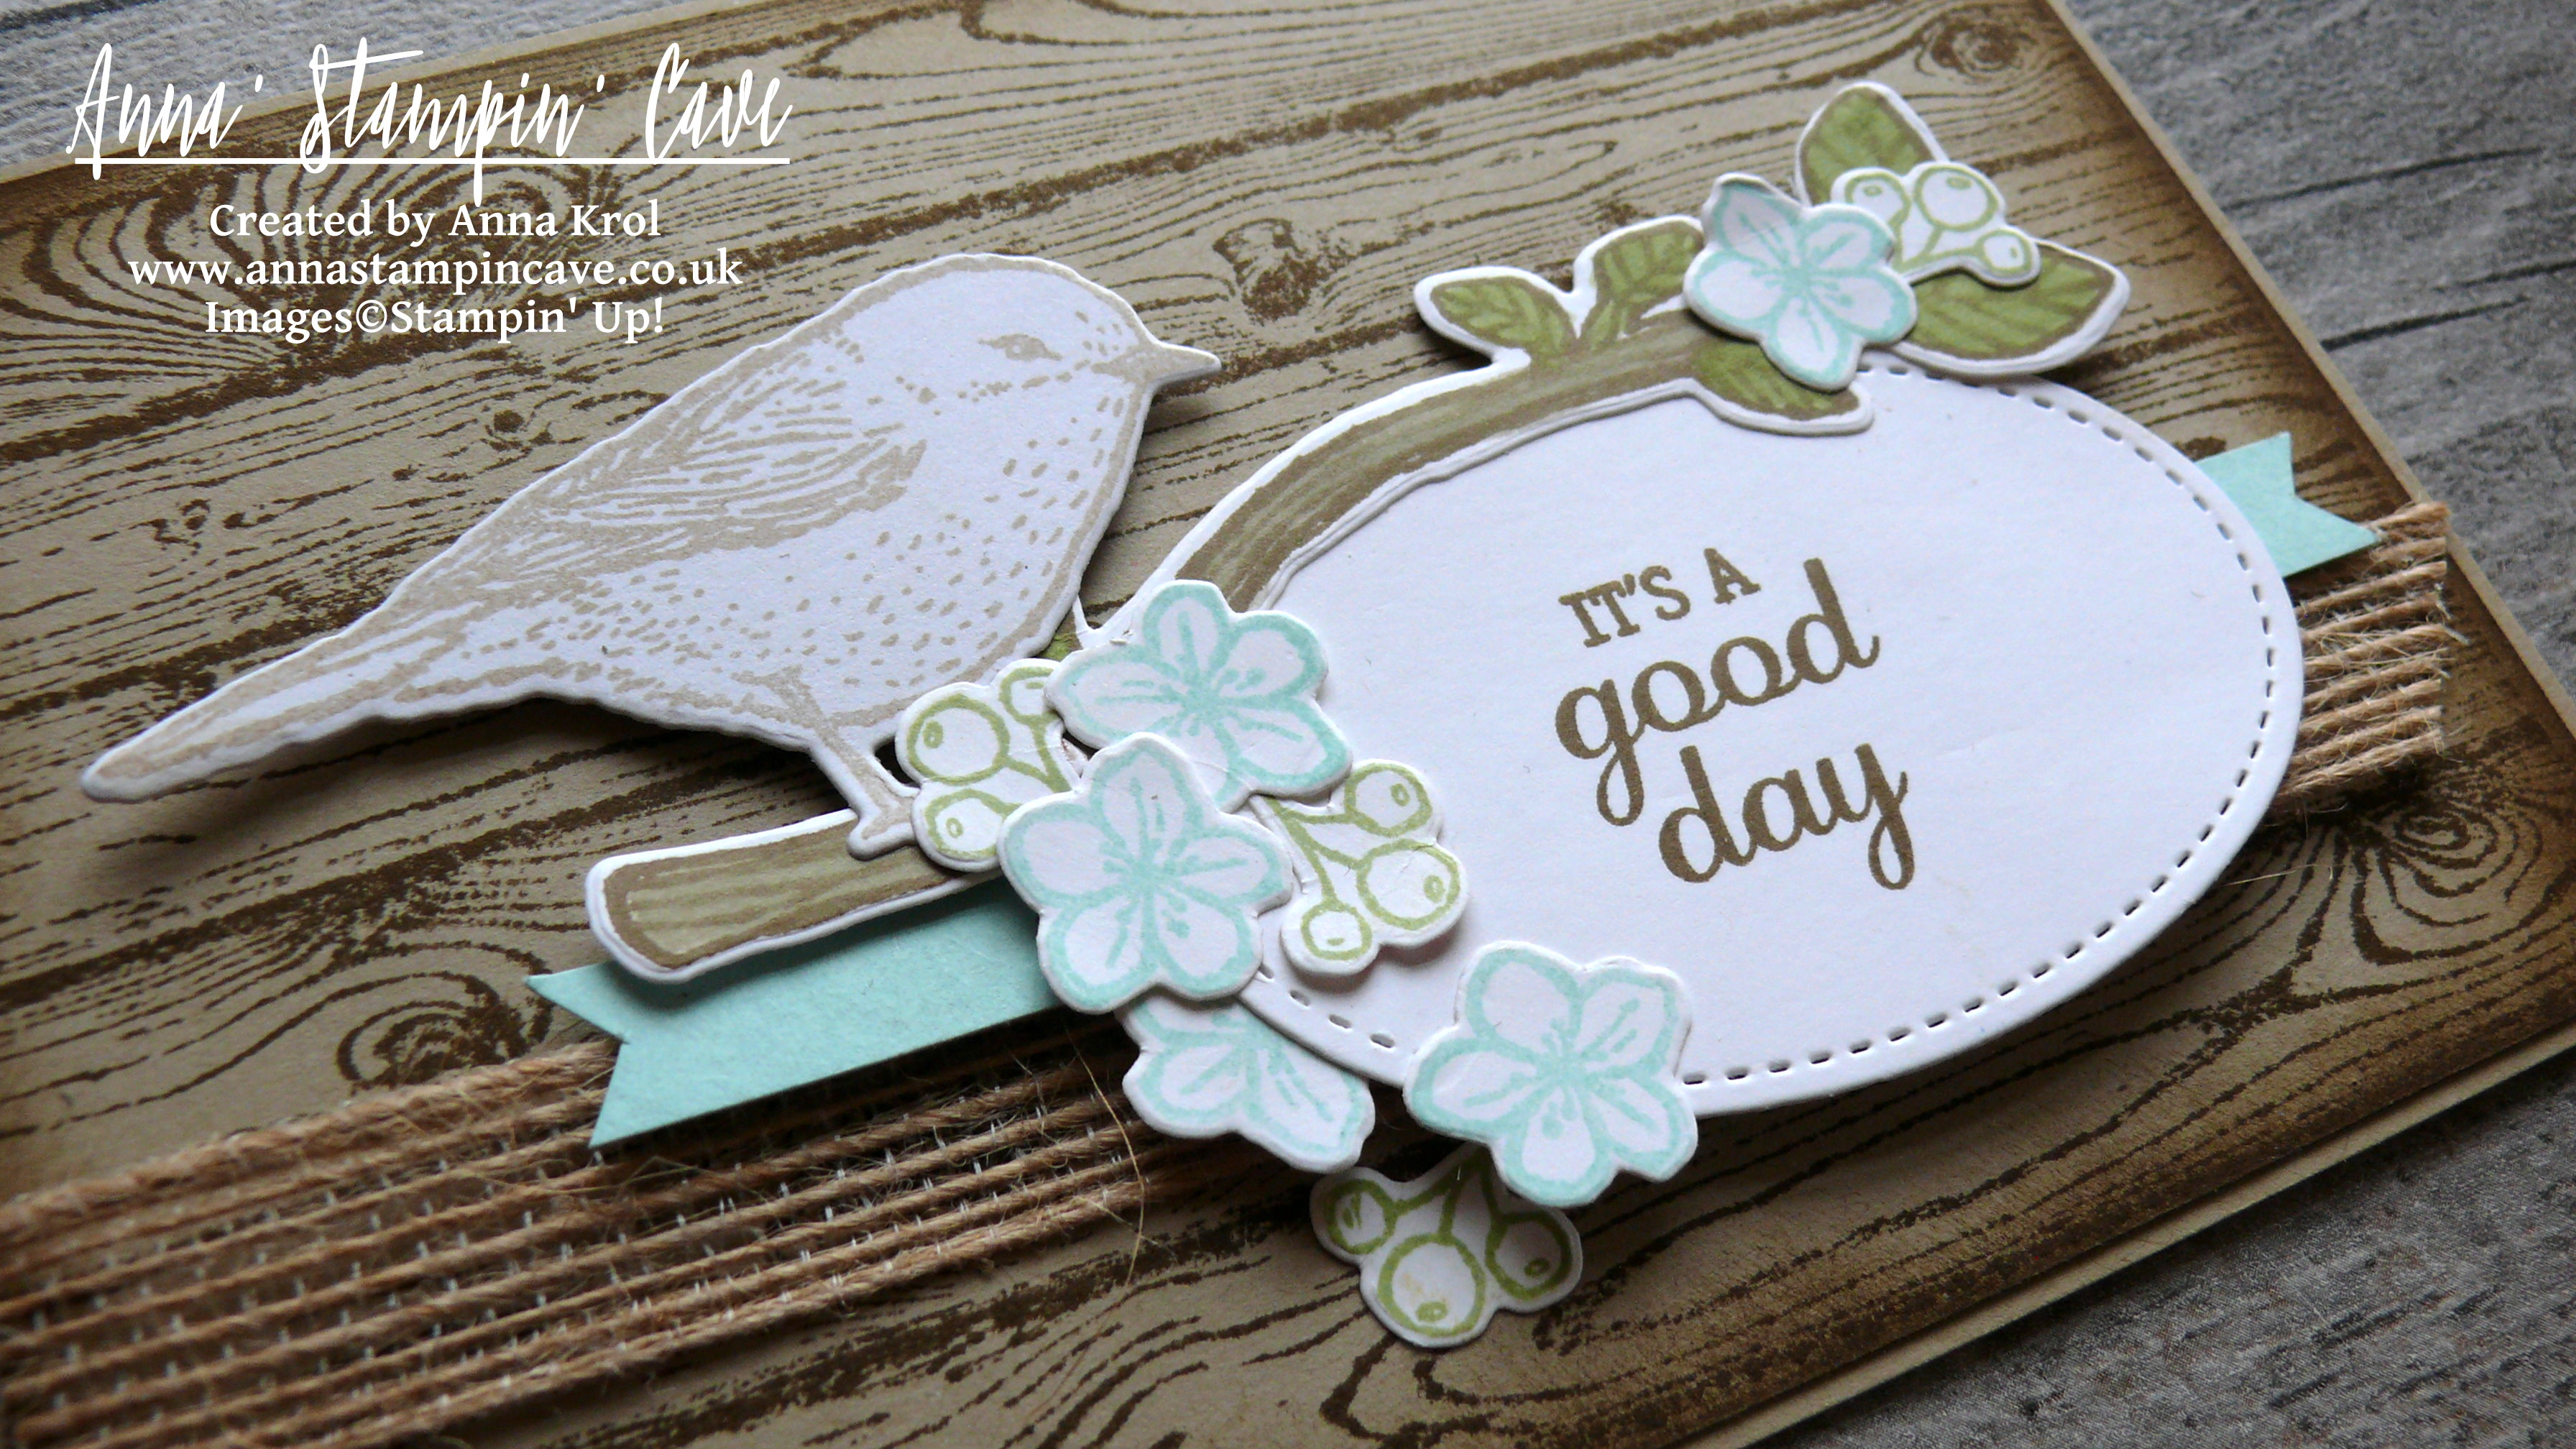
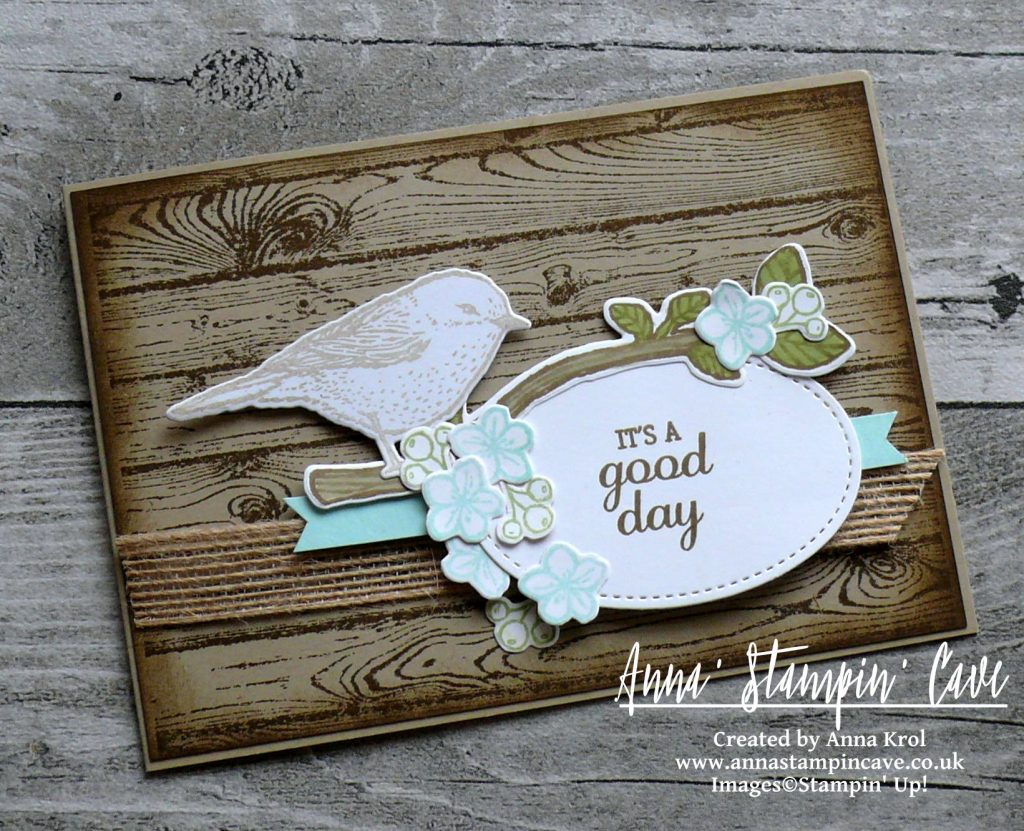
I started with creating a scalloped edge to my card base. On the front of the card base, I measured 1″ from the bottom, centred the scallop edge die and secured it with a piece of washi tape (so it won’t shift) and run it through the big shot. Next, using the same die I created a scalloped edge on the wider strip of Old Olive cardstock.

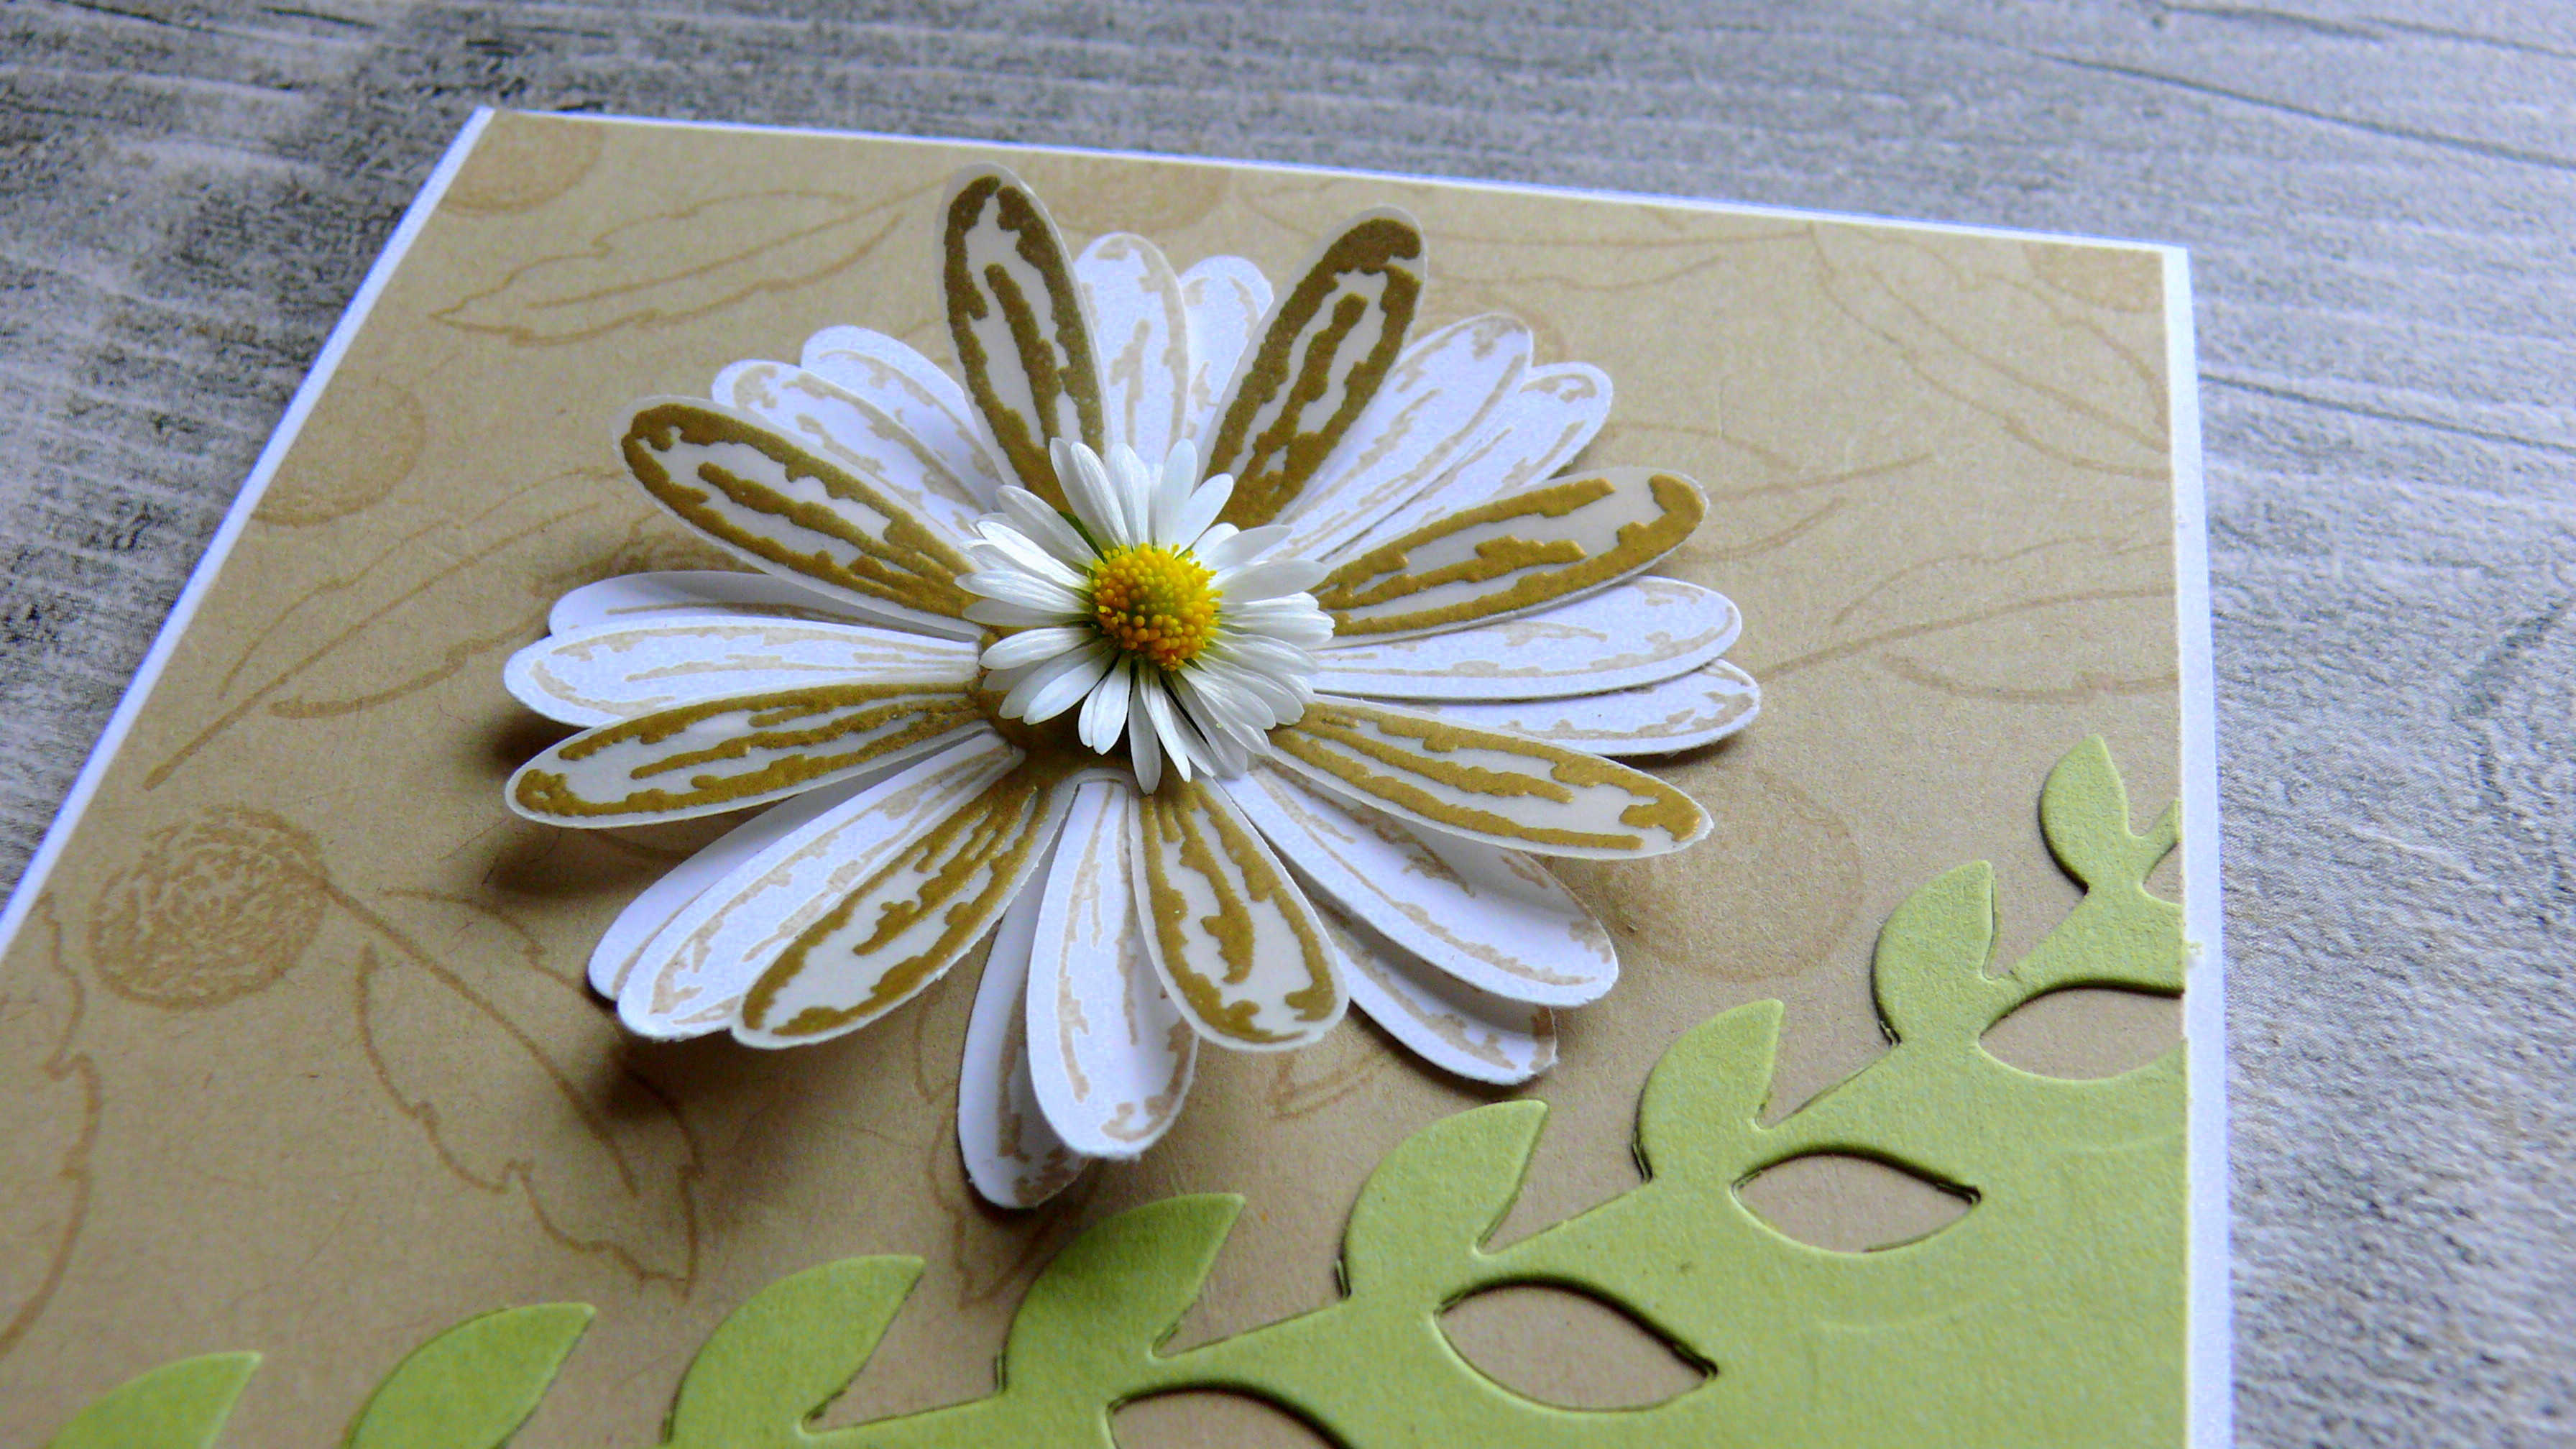
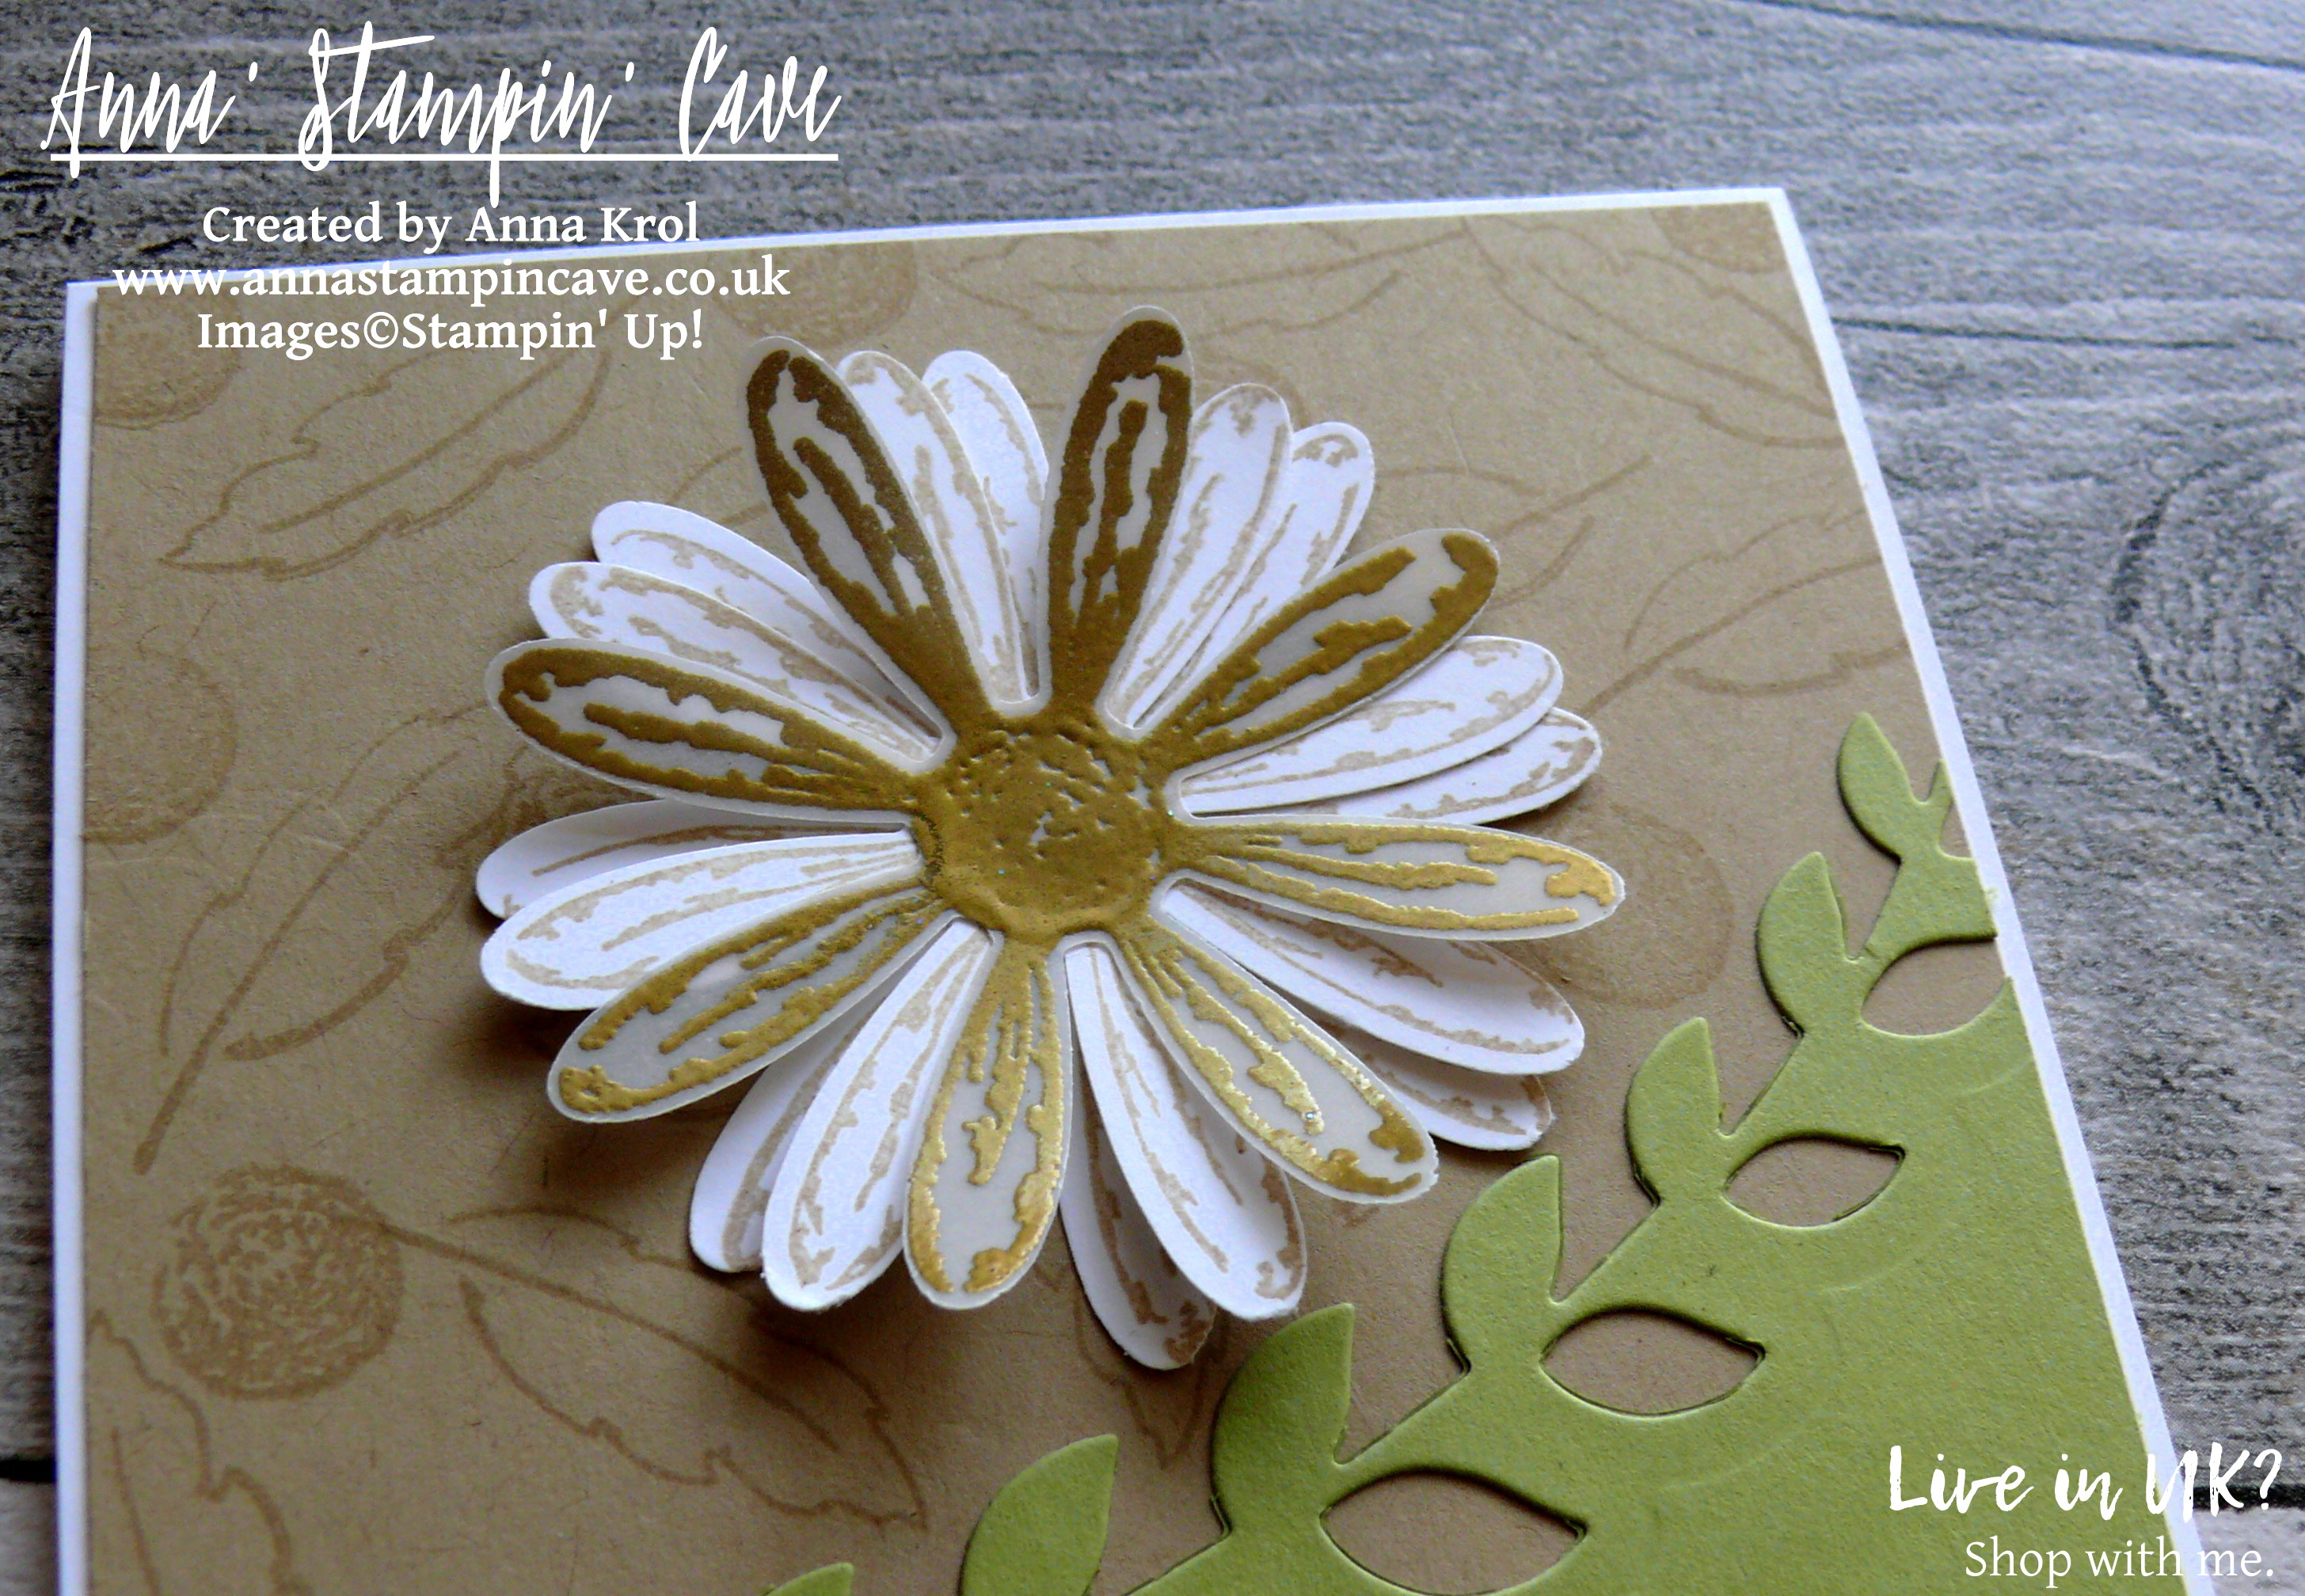
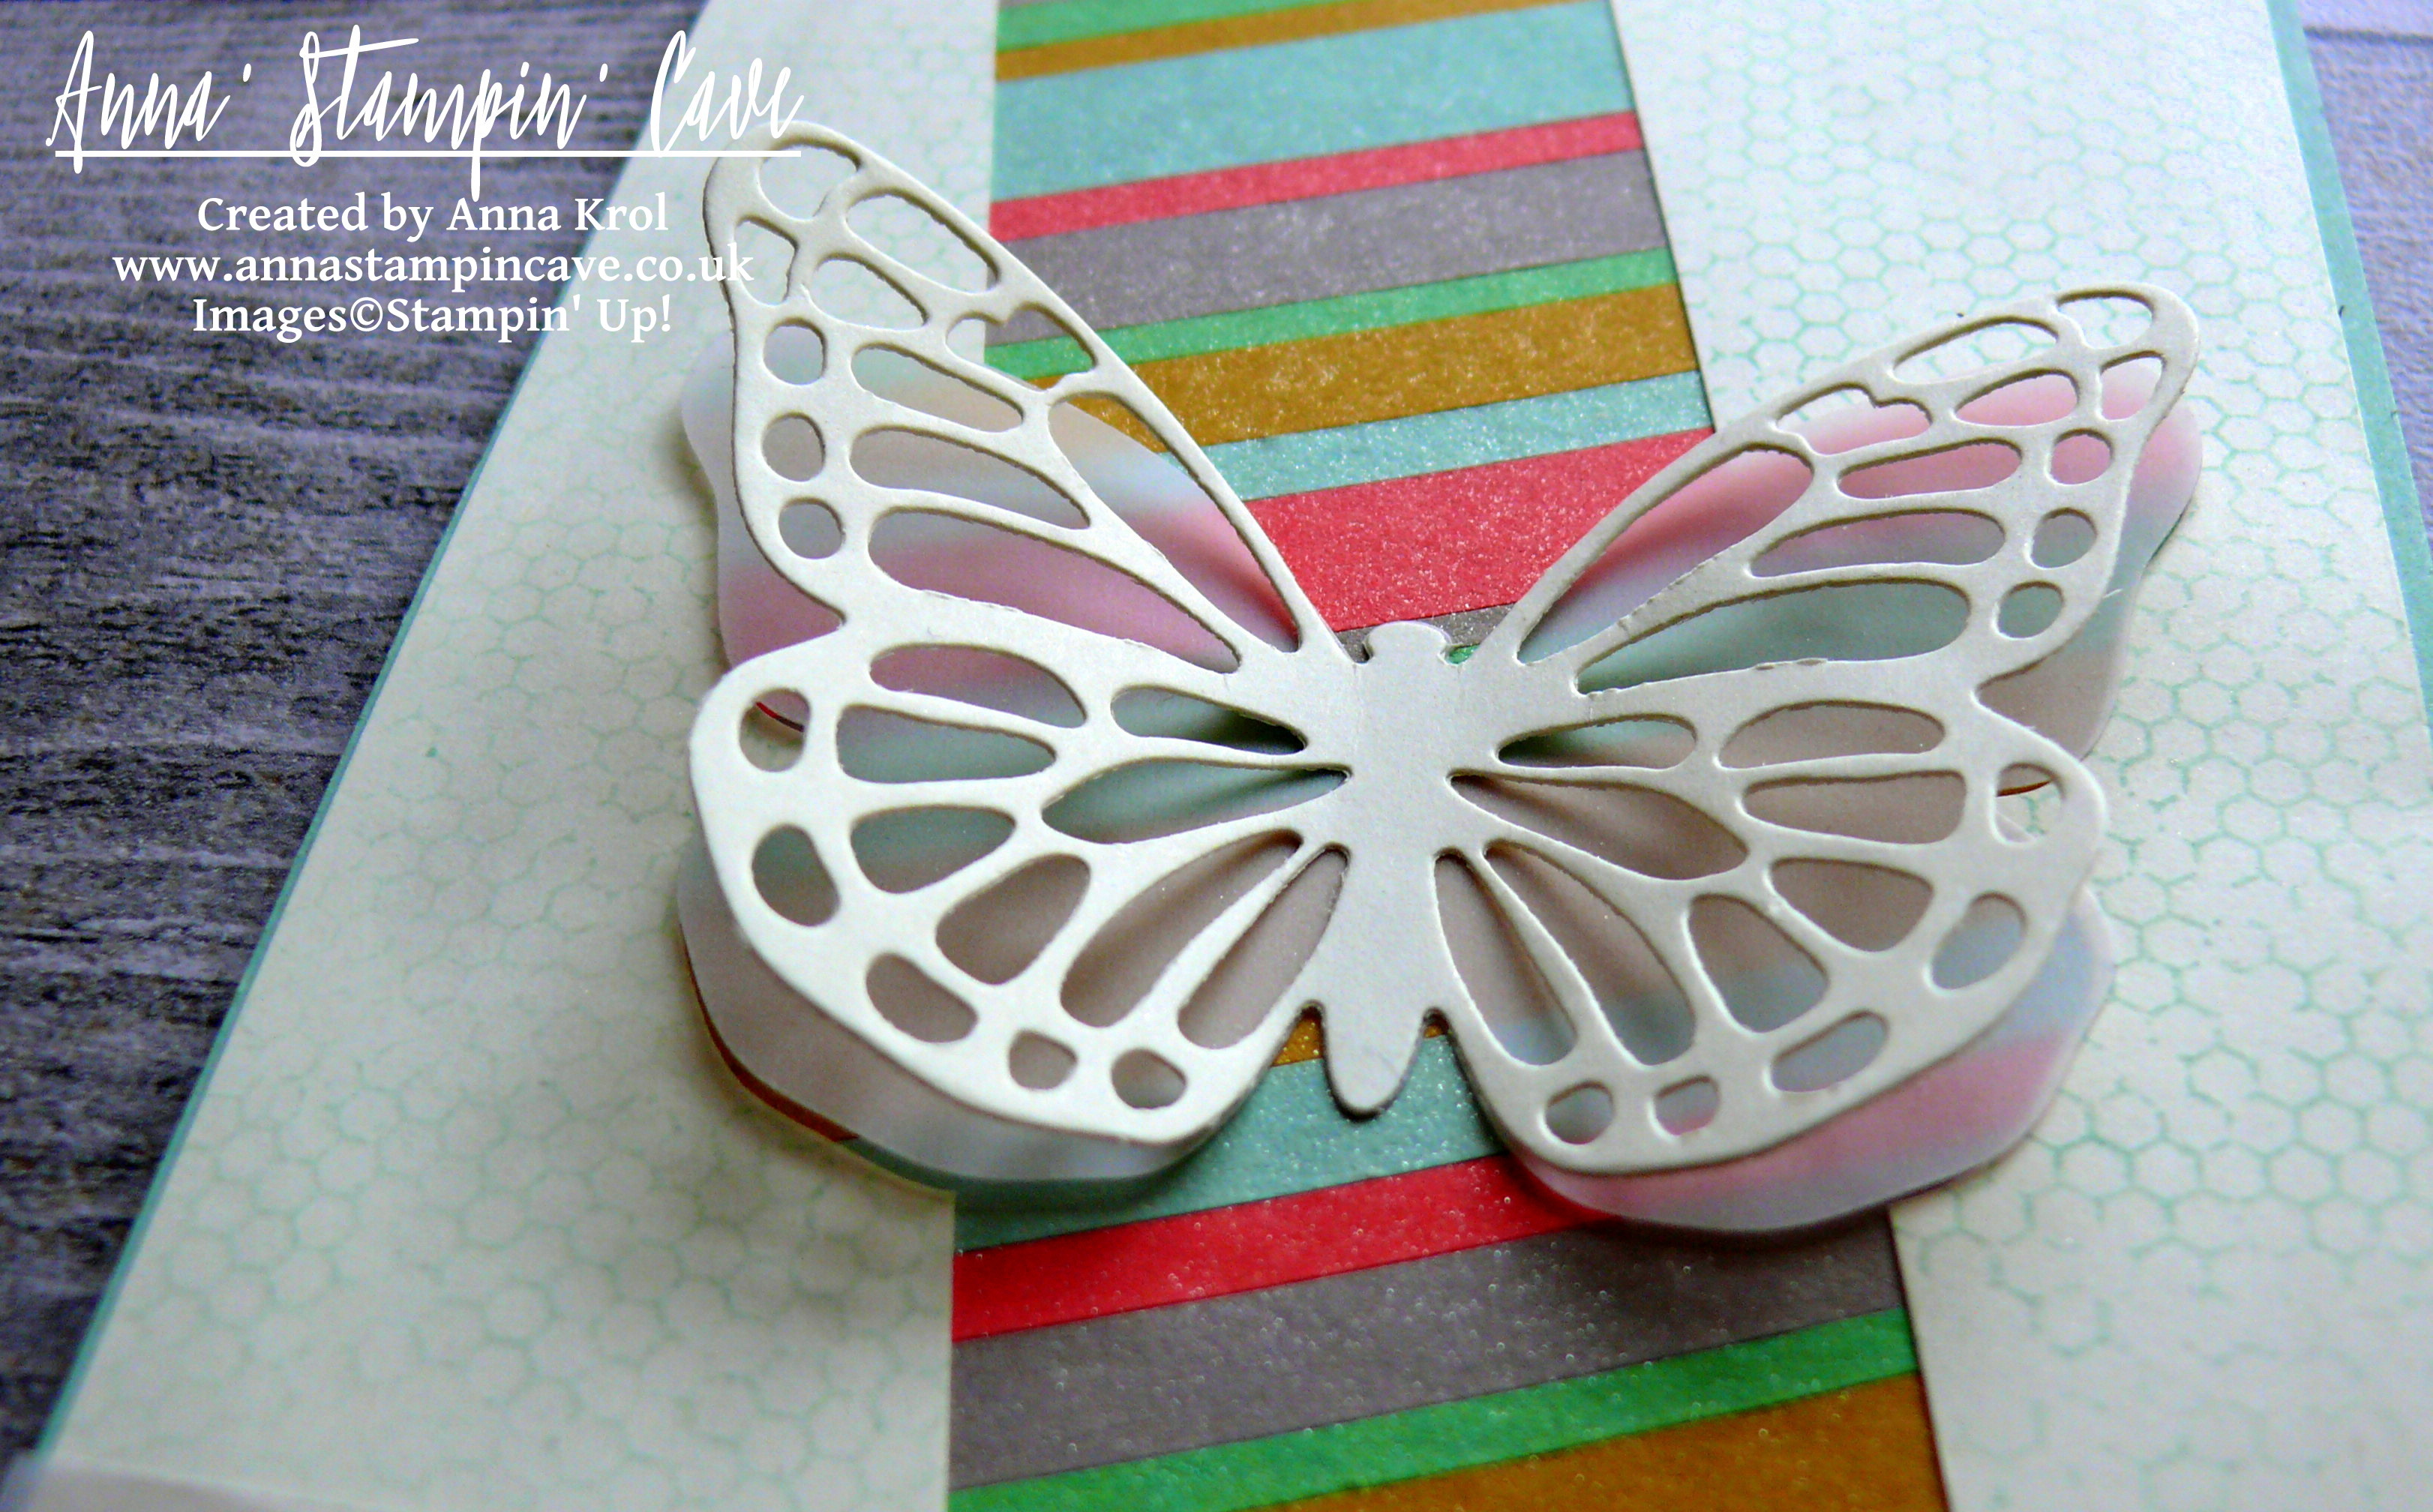
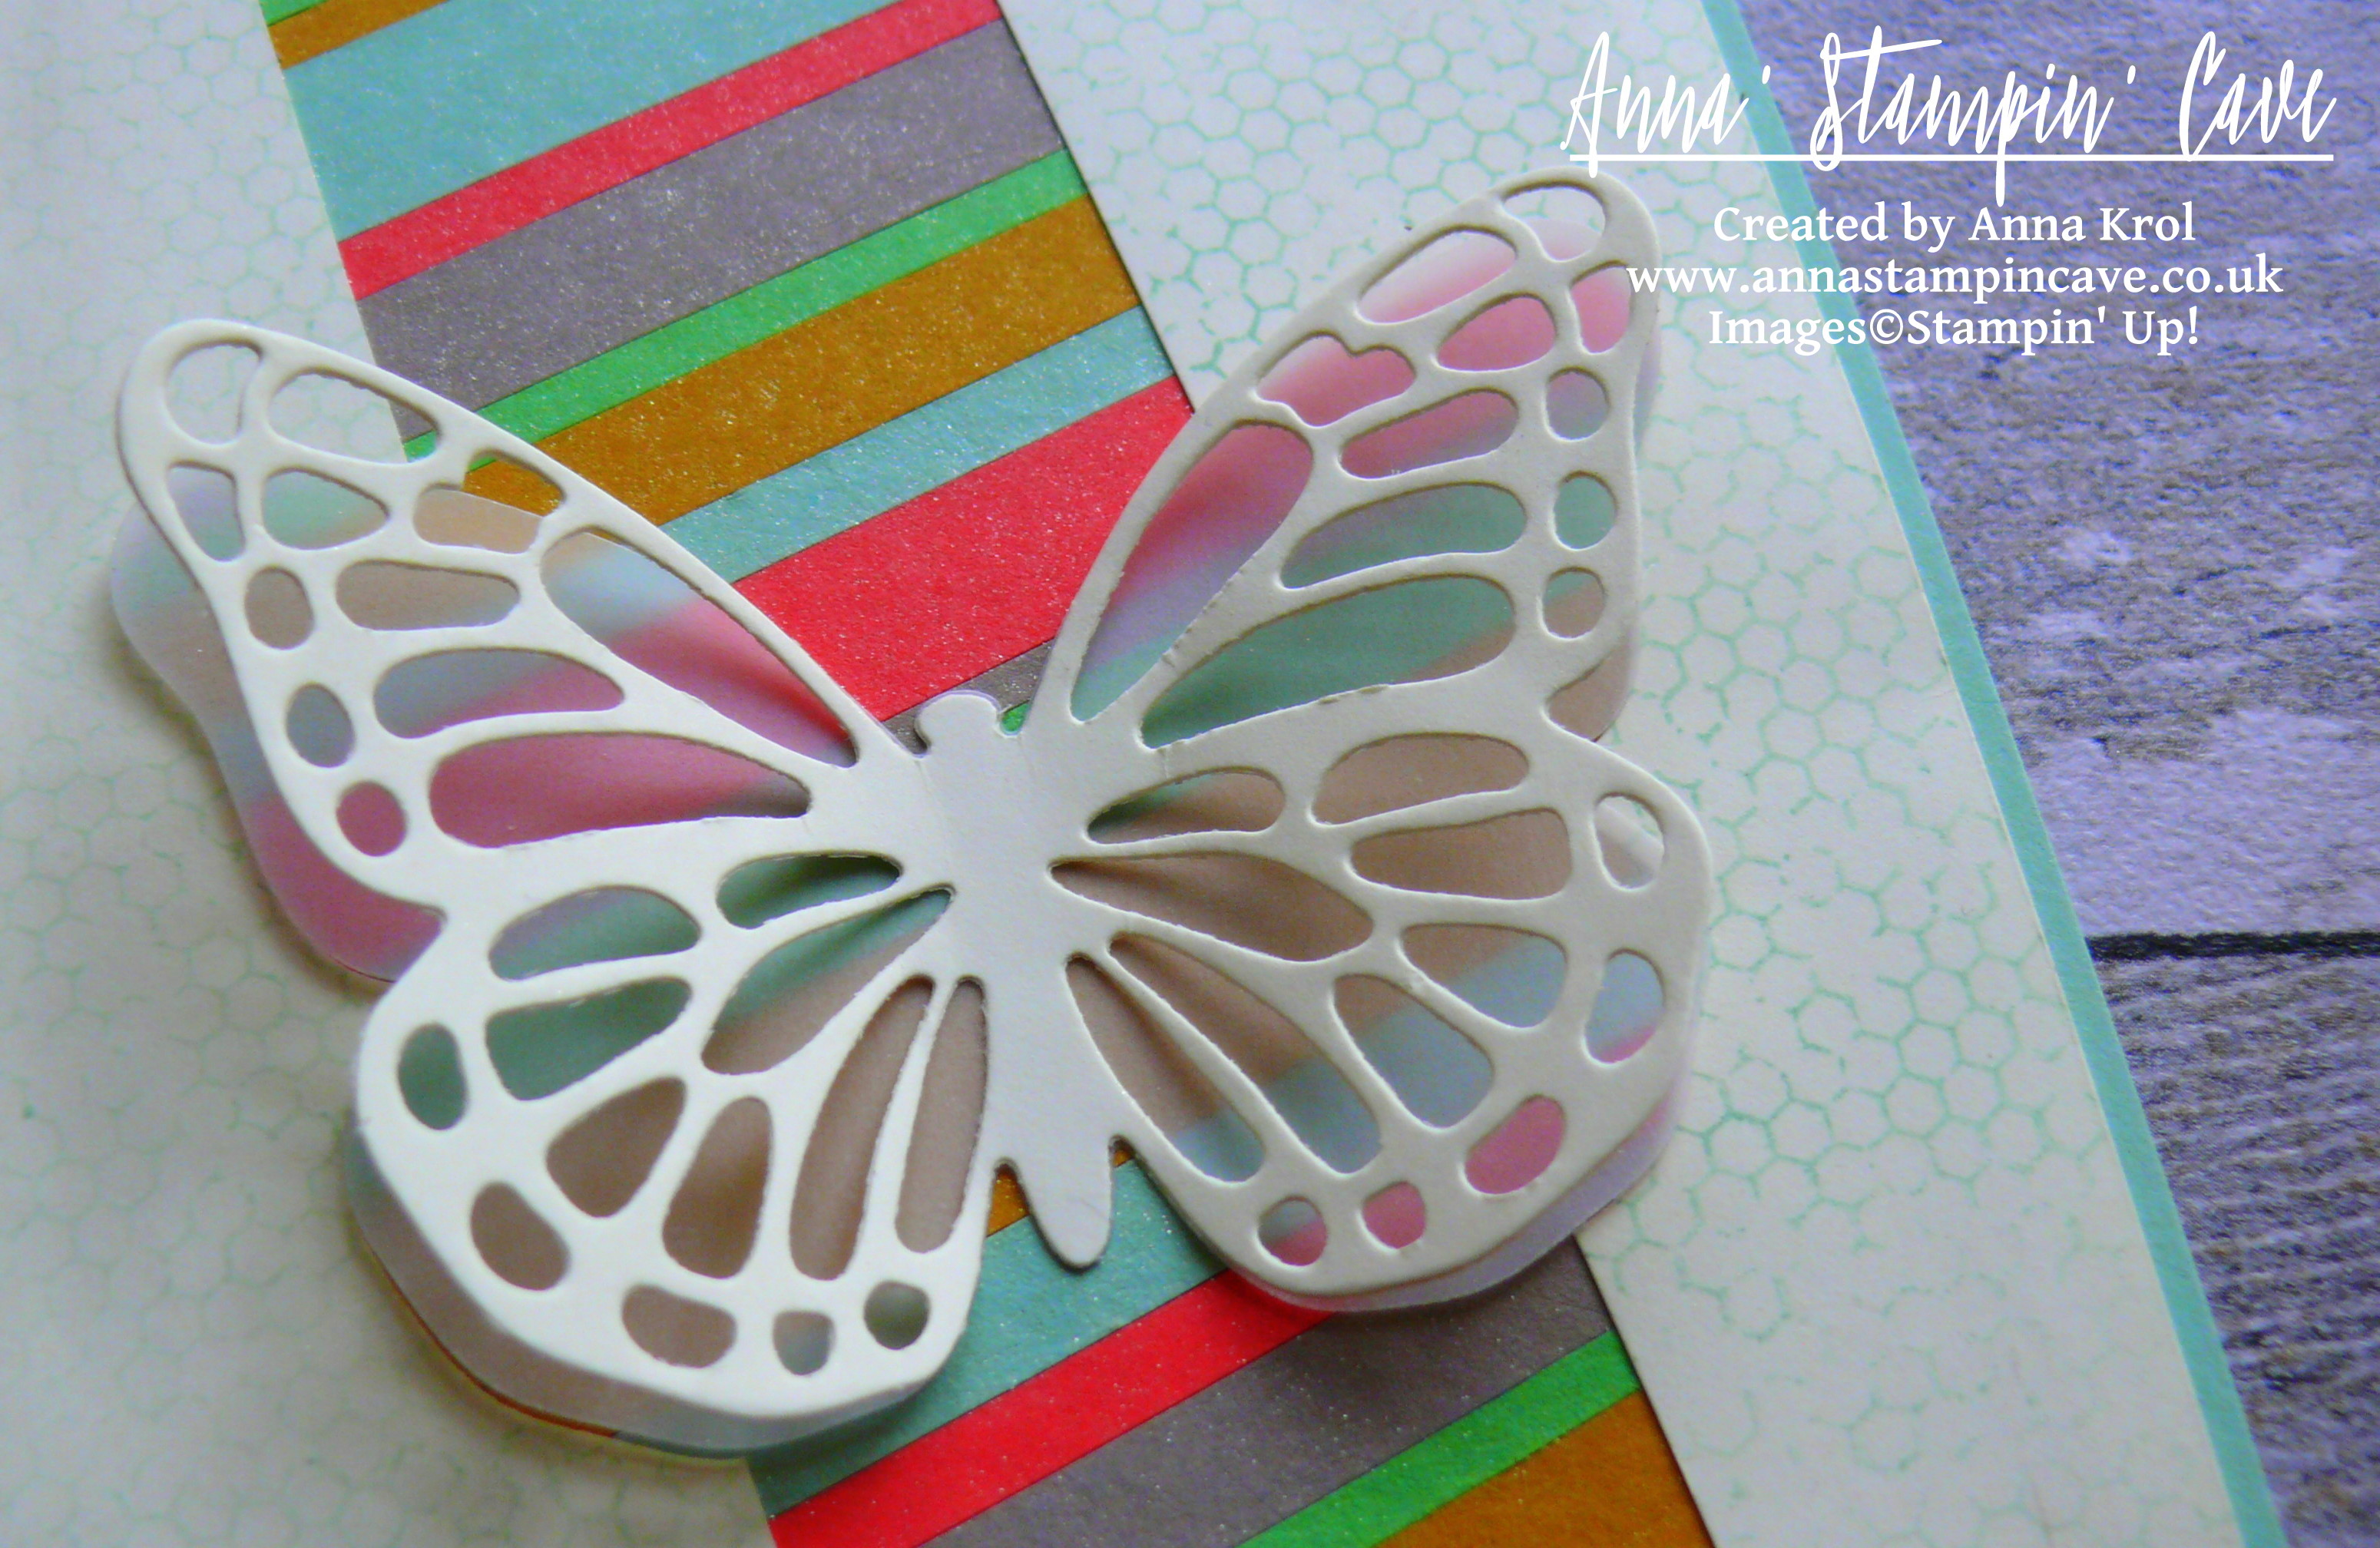
For the watercolour wash, instead of watercolour paper, I’ve used Shimmery White cardstock. It’s beautiful on its own but great for light watercolouring too; plus gives your work delicate shimmery look (hence the name).

Watercolour tip: While your ink pad is closed give the lid a gentle squeeze. It will transfer a little pool of ink from the ink pad into the lid.  Open your ink pad. Now you can pick up the ink with your aqua painter or with the tip of your blender pen.

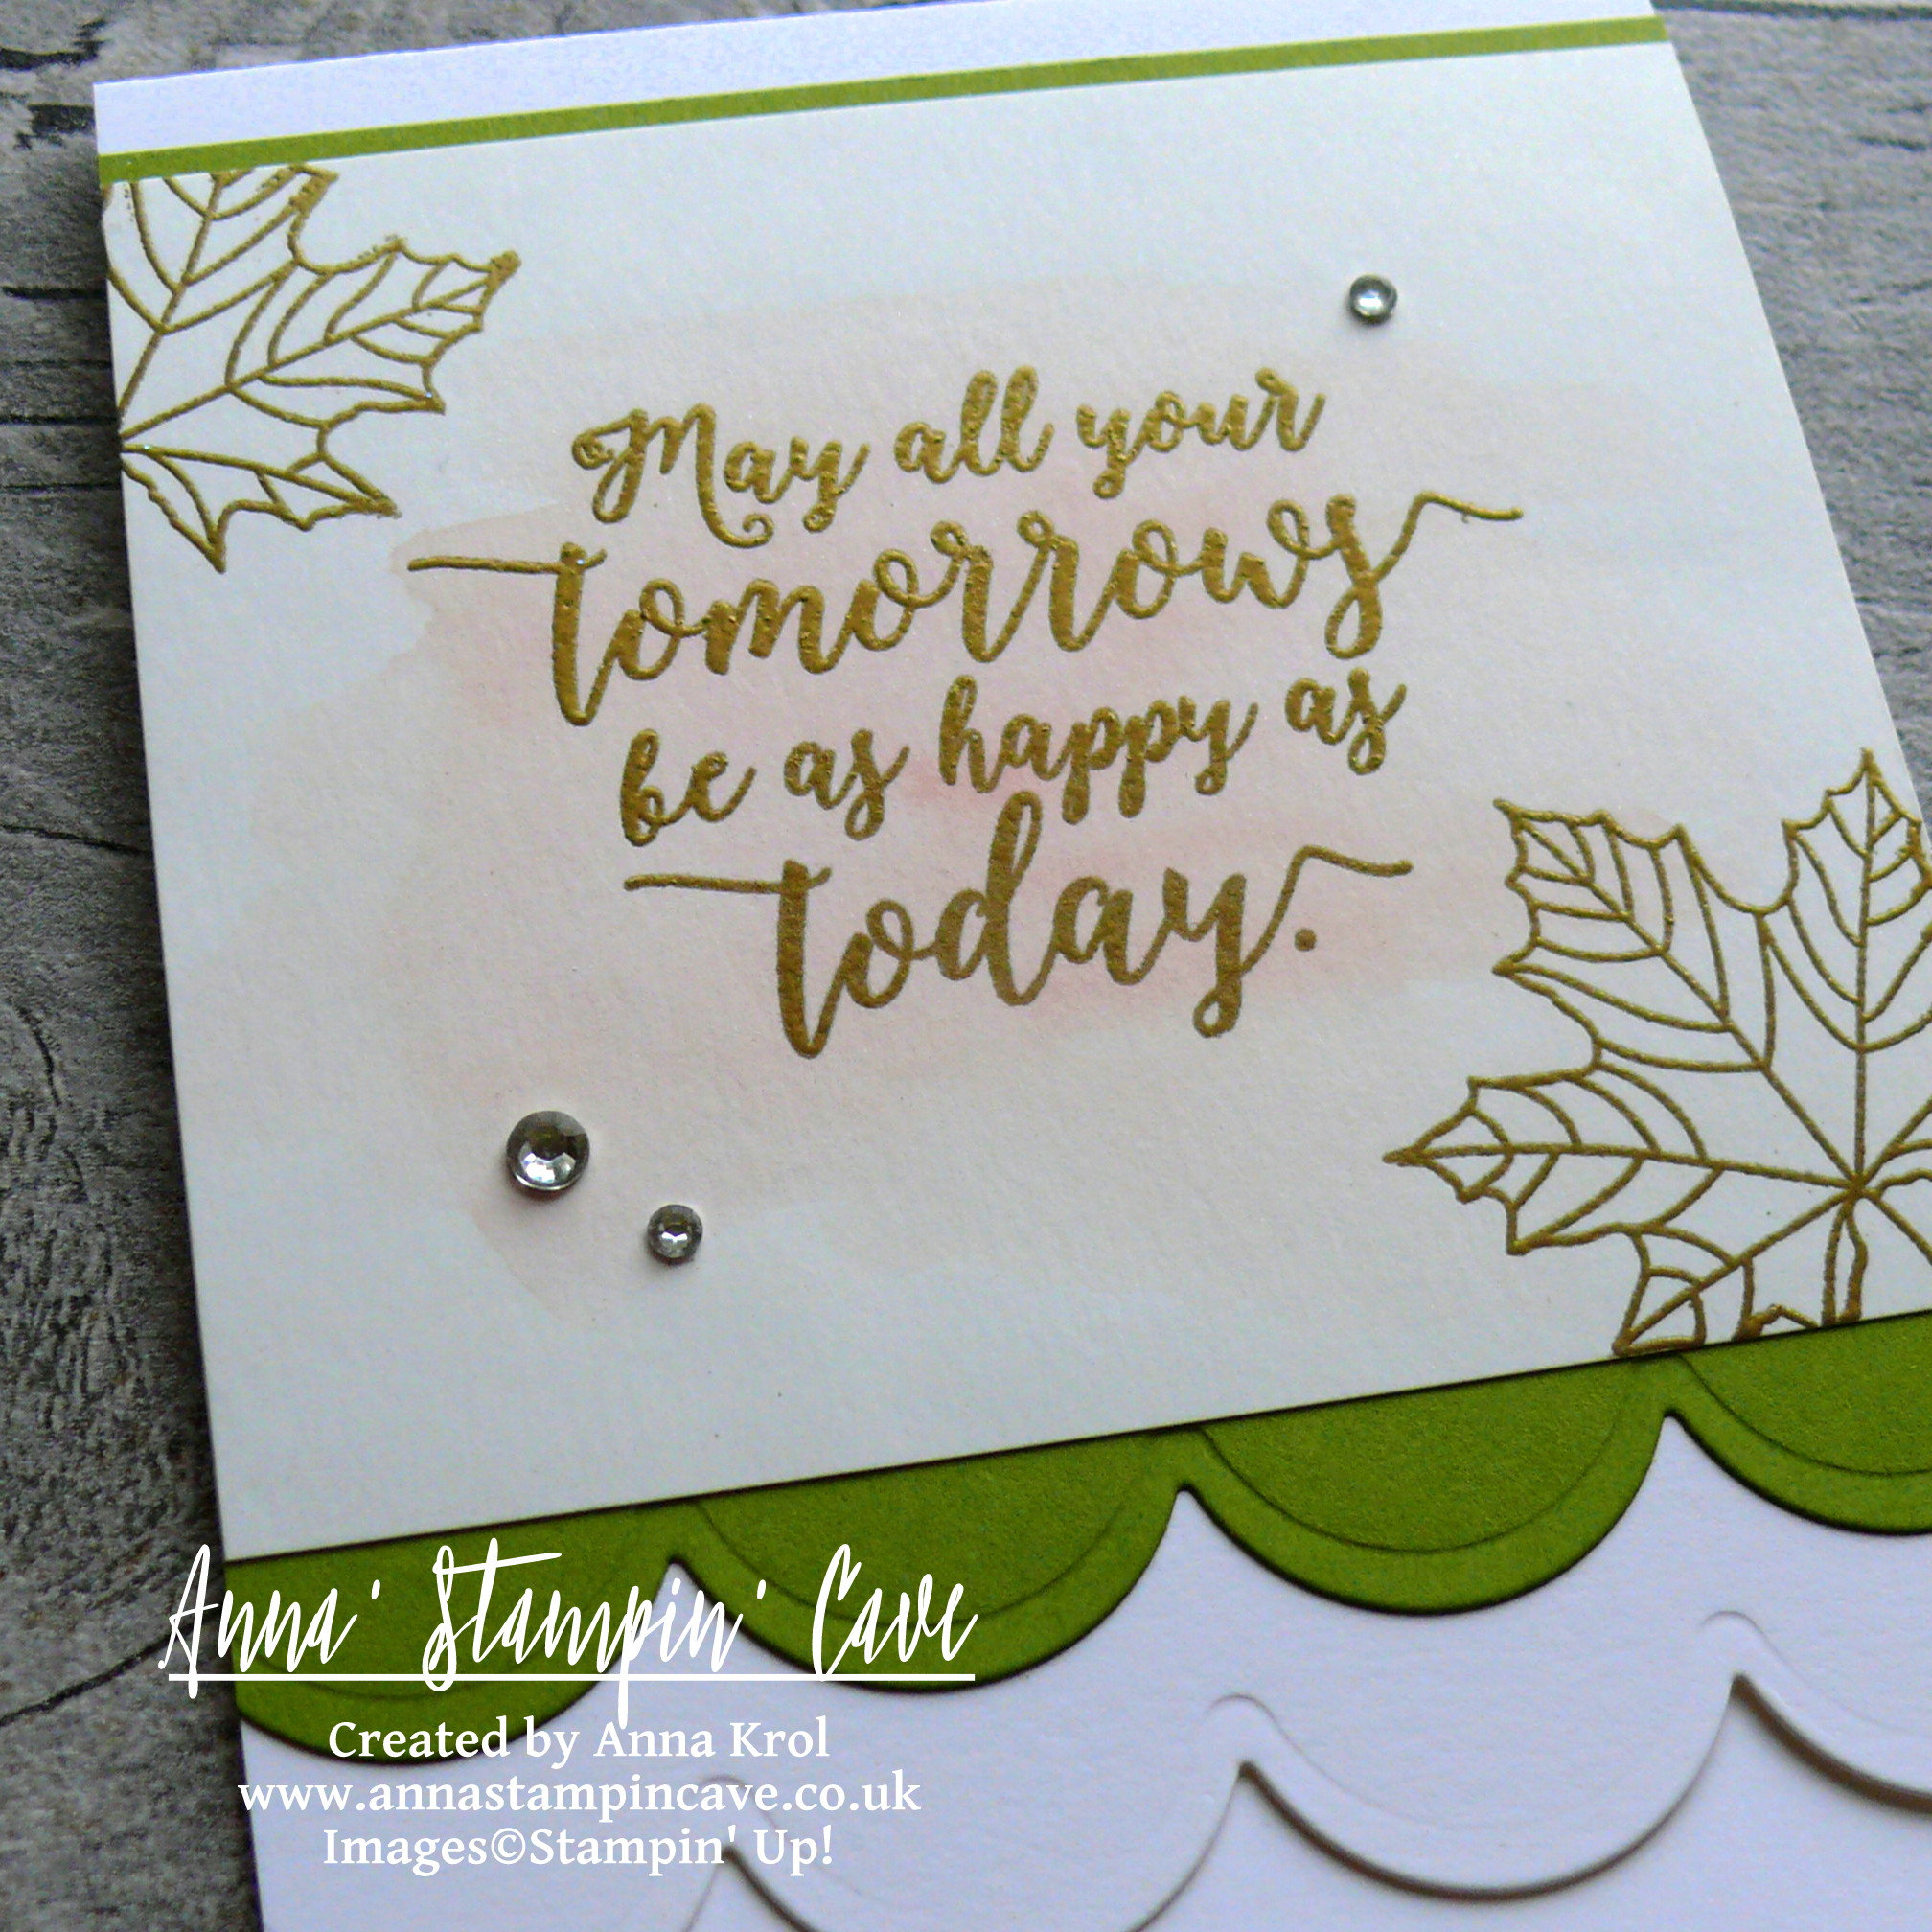
I took aqua painter and I wet the surface of my panel slightly. I didn’t add the water to the entire piece, just to the centre. I picked some Blushing Bride ink with my aqua painter and I’ve done a quick wash of colour over the panel. Dried it with my heat tool.

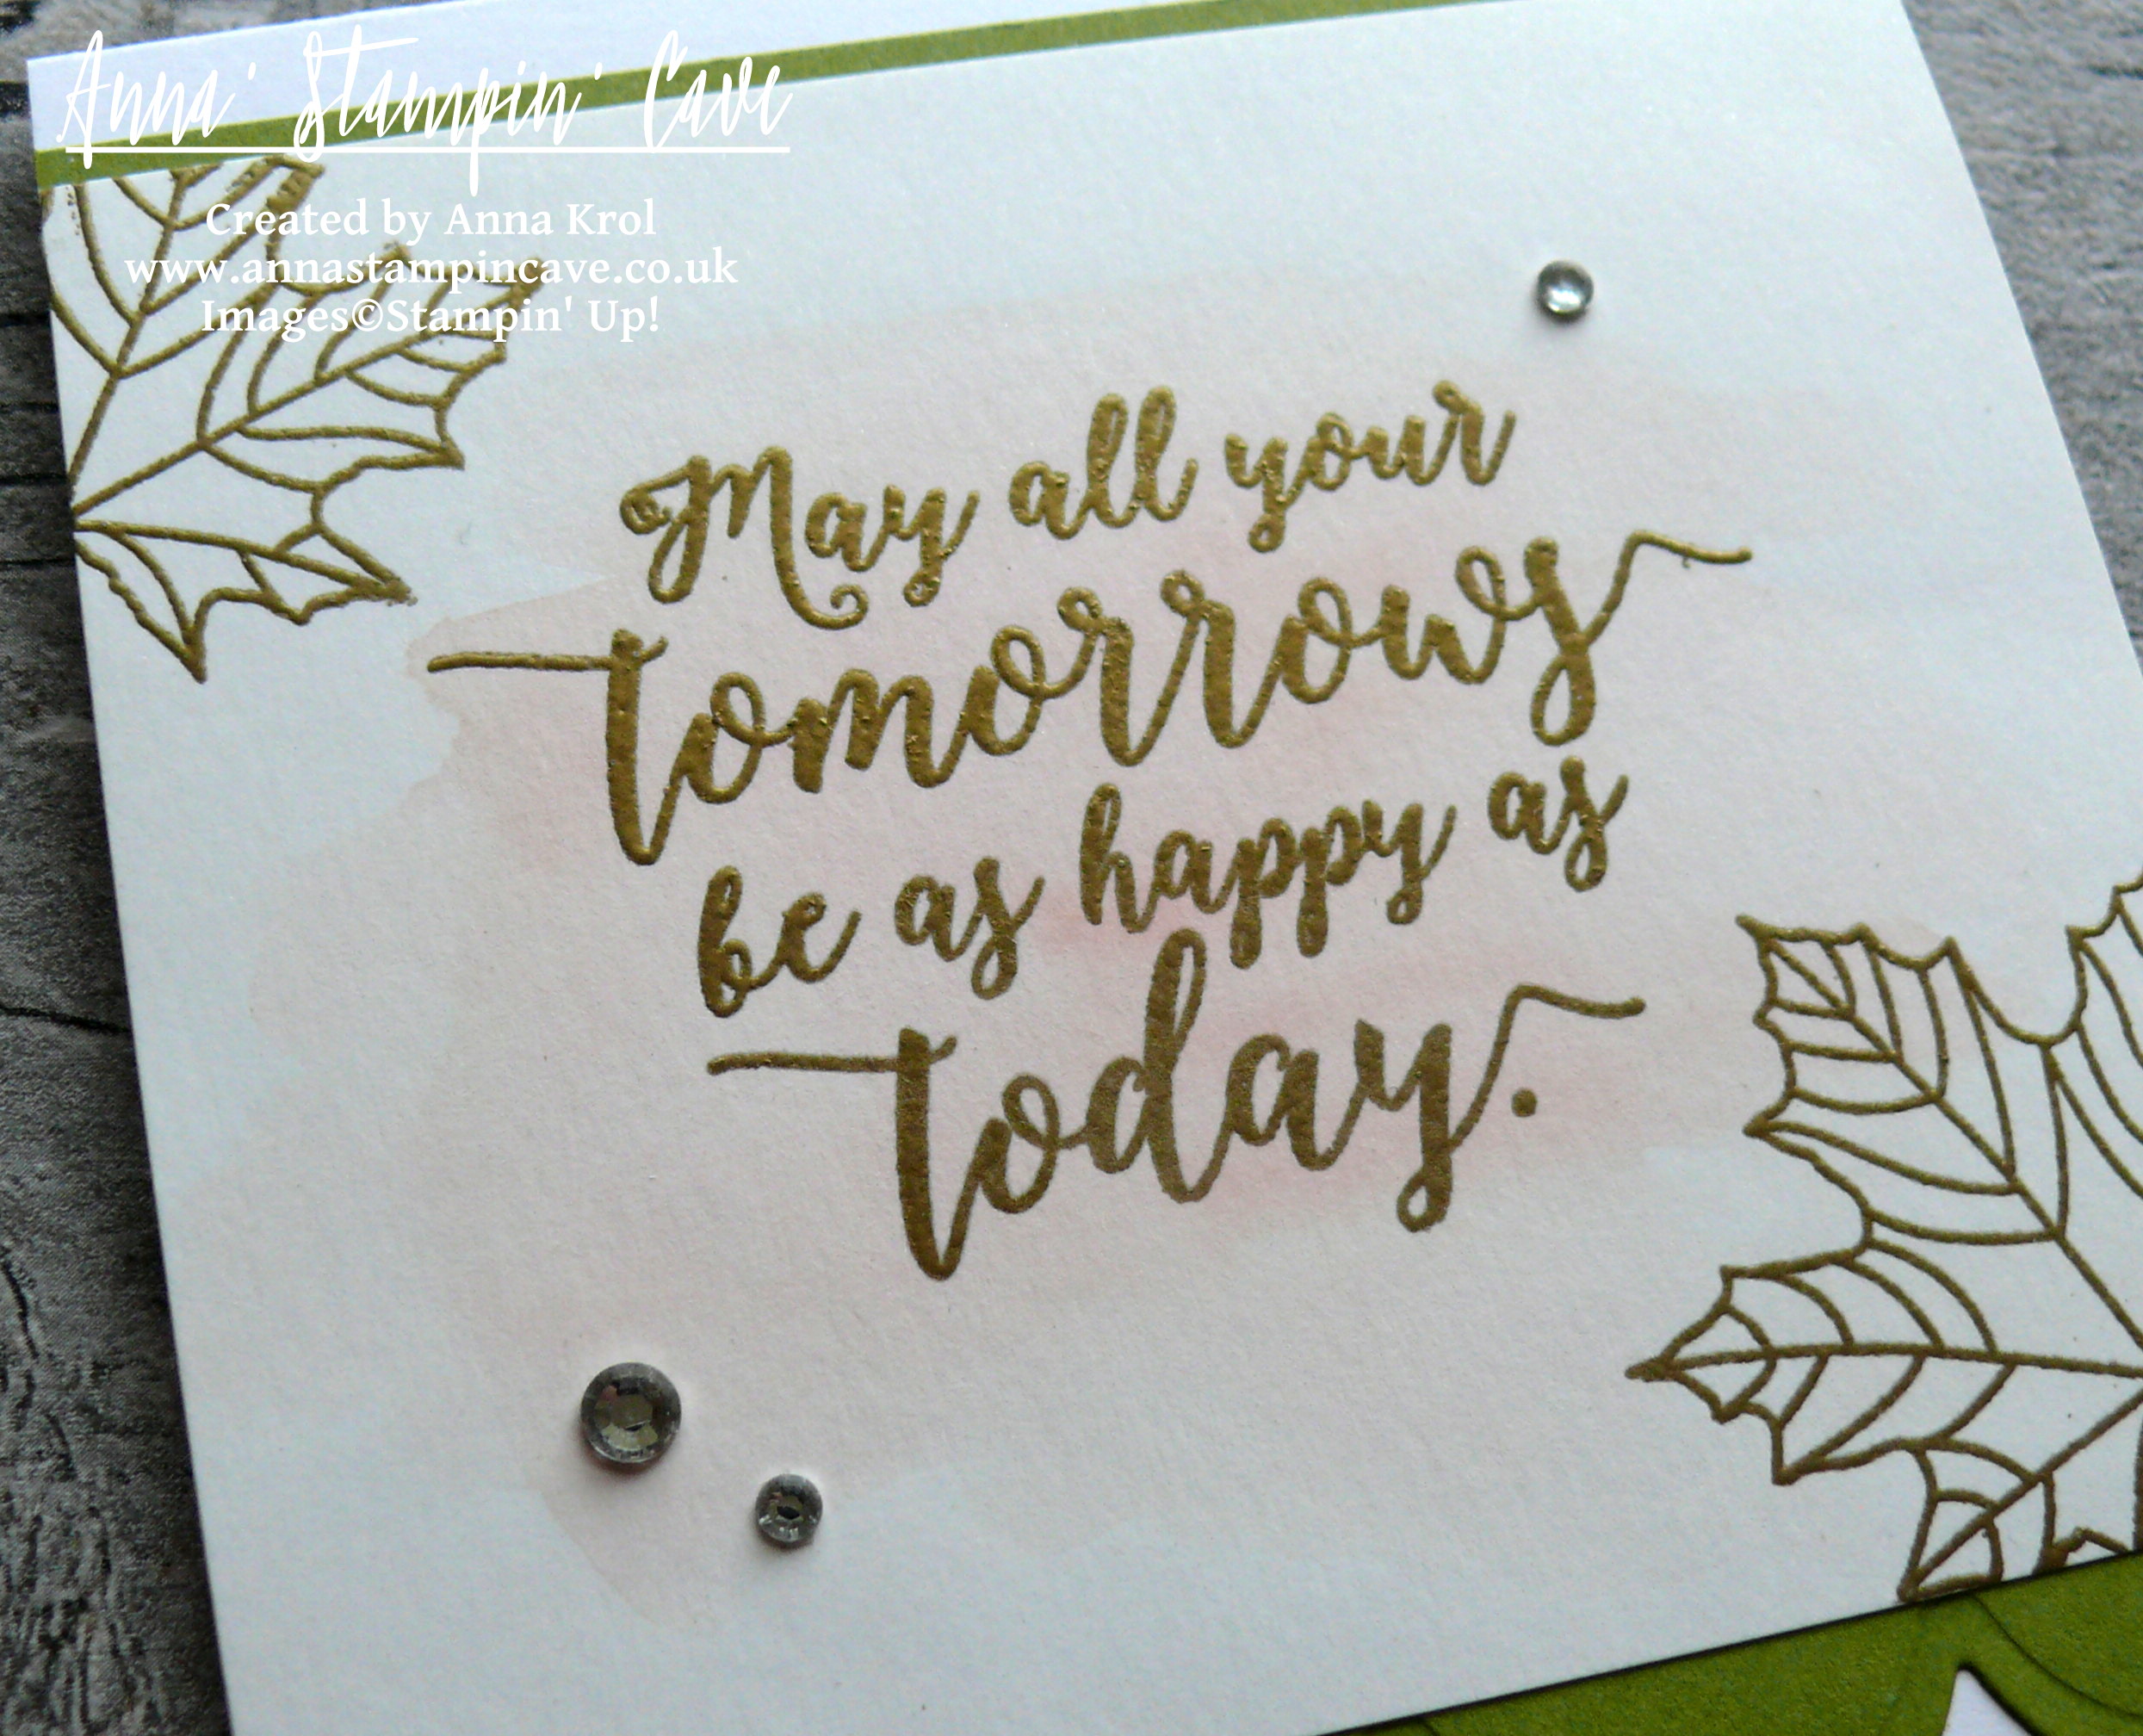
When the panel was completely dry I rubbed it with embossing buddy to make sure embossing powder won’t stick where it shouldn’t. I stamped the sentiment and maple leaves with Versamark ink, covered them with gold embossing powder and heat set it.

I adhered Old Olive stripes behind the watercoloured panel with liquid adhesive. And now the #facepalm moment: paper + water = warping! …what was I thinking?! To rescue my watercolour pieces: strengthen and straighten them up, I cut rectangles from the white cardboard (I always save backings from DSP) and adhered them behind the panels, between two Old Olive pieces, with a fast fuse.

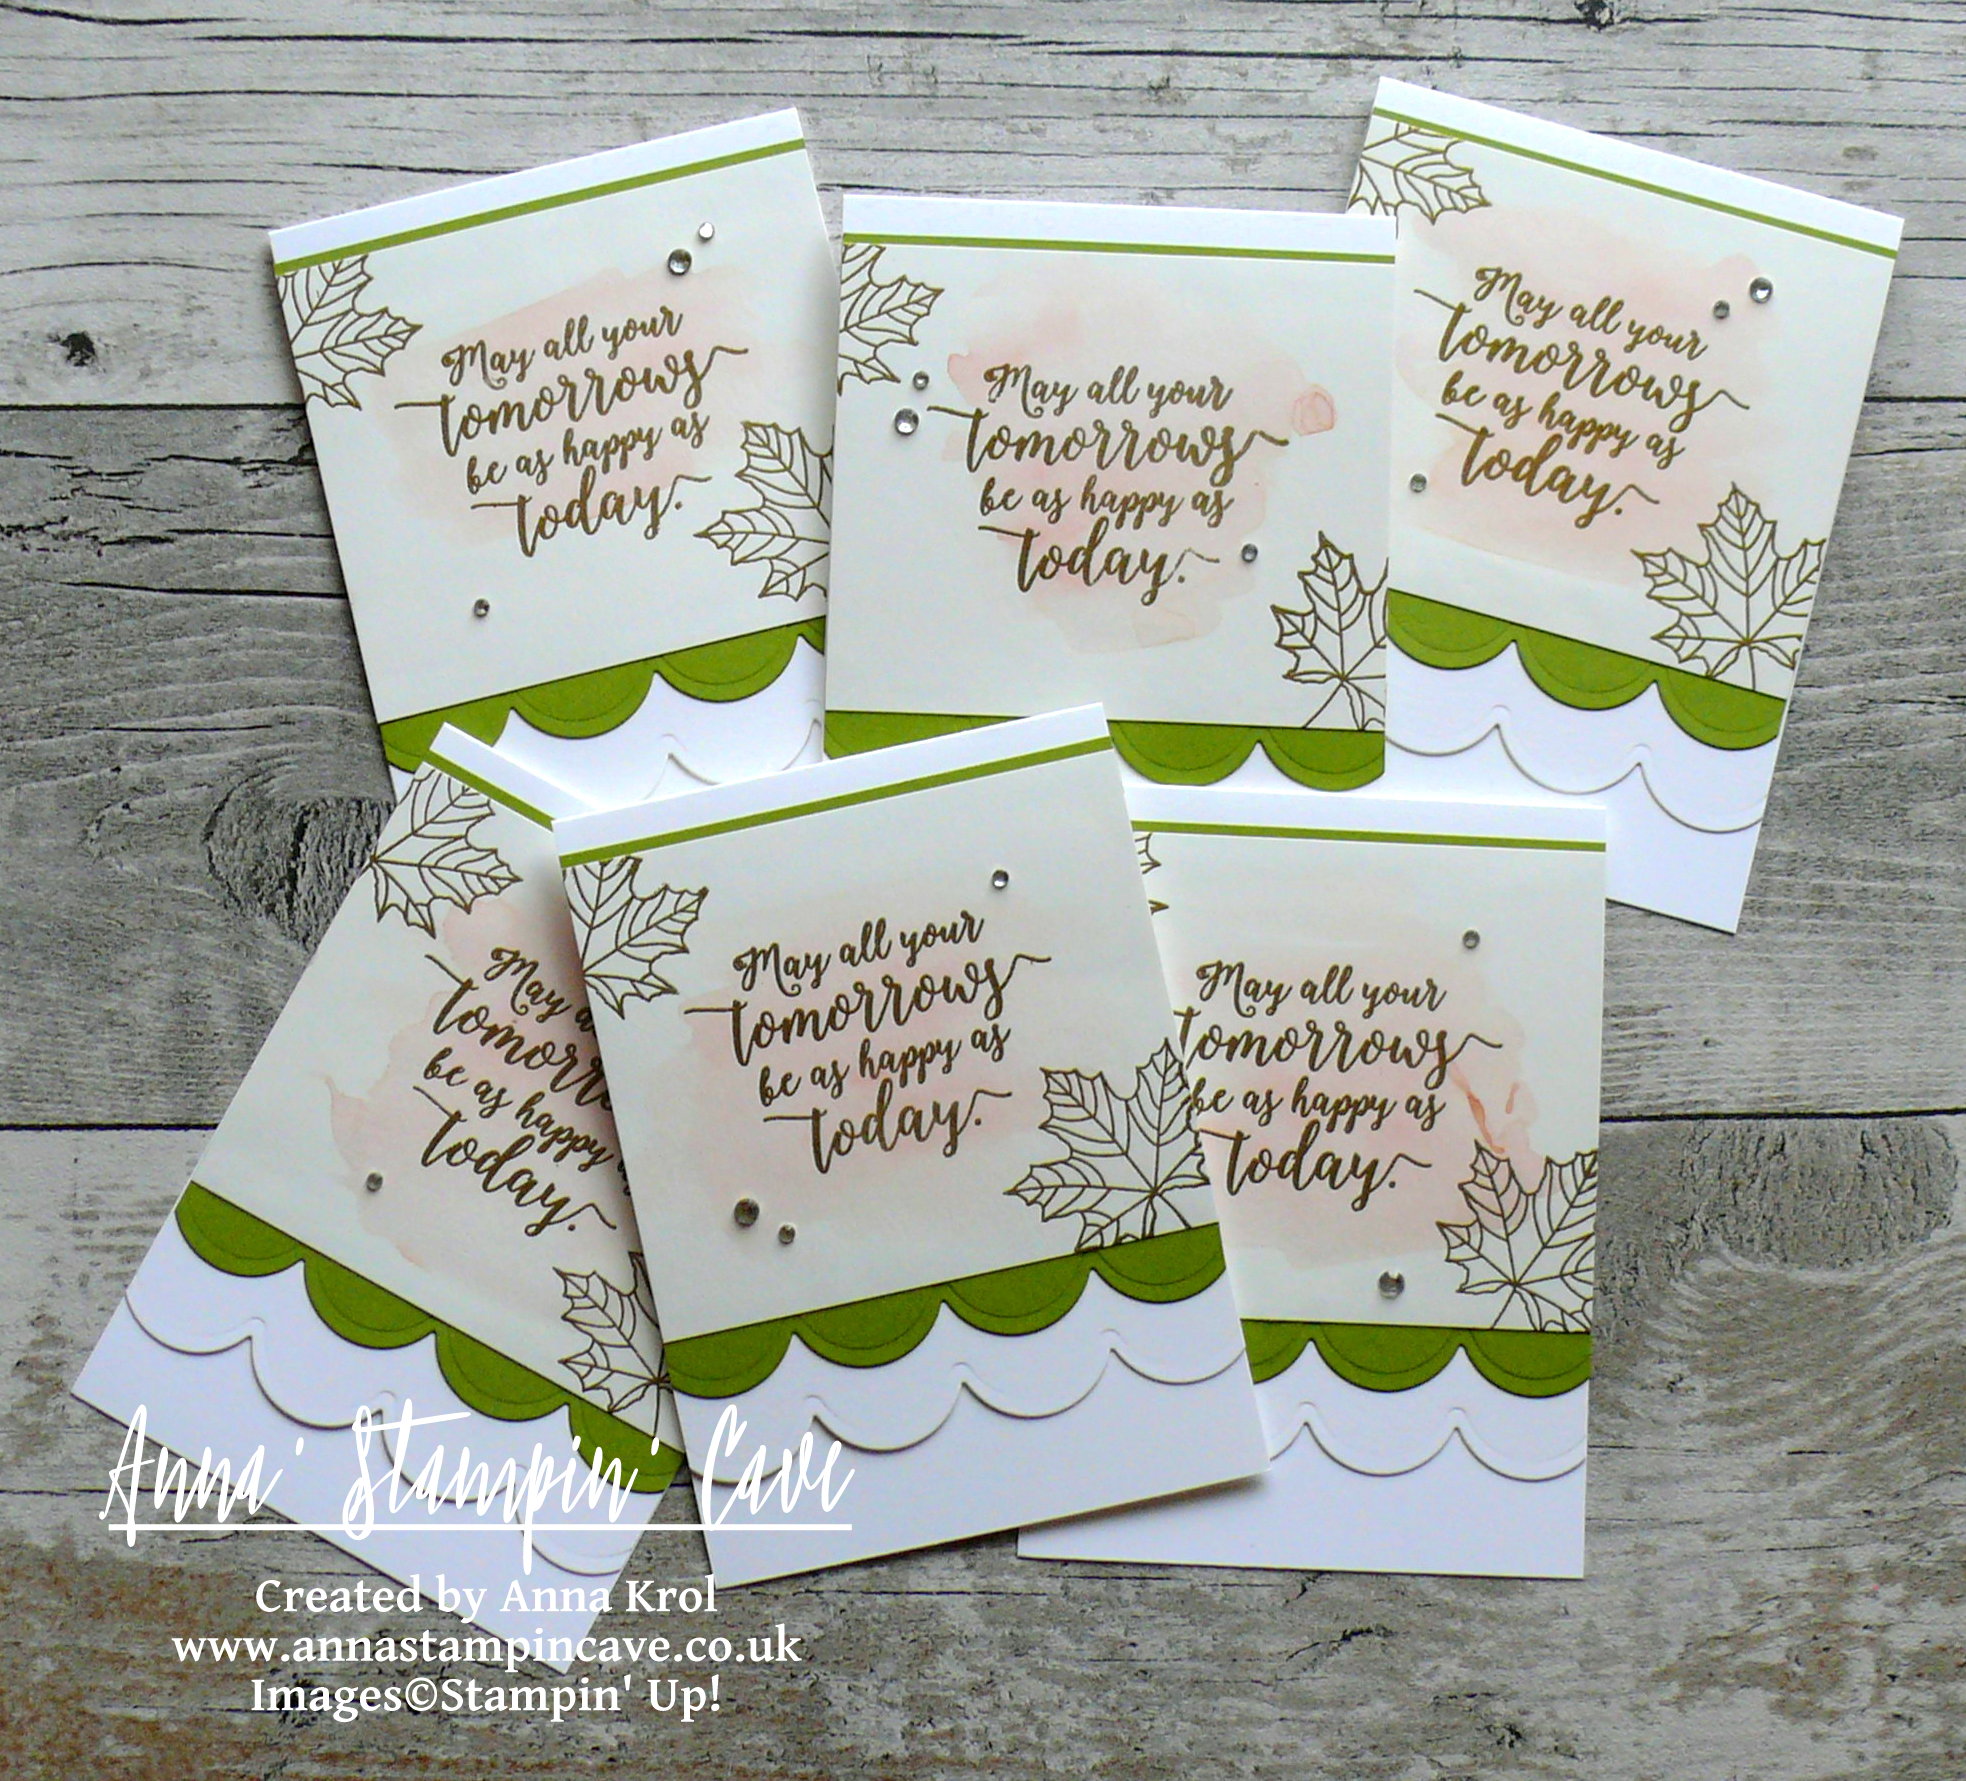
I assembled my cards with liquid glue. For a final touch, I decided to add few rhinestones. And that’s my cards done.

As always, I really want to encourage you to visit the Global Design Project challenge blog to see other beautiful projects from all around the world. Just click on their logo below to visit the website

Thanks for visiting my blog today. Have a blessed day

Best Guy Ever Clean & Simple Masculine Card

Anna’ Stampin’ Cave – Best Guy Ever Clean & Simple Masculine Card

International-Highlights-header-vote-fav

Thanks for coming to my blog today! We are being highlighted internationally by Kylie Bertucci and you are able to VOTE for my project. The top ten winners will get to be part of an international blog hop so please vote for my project. You can do it here or use a button at the end of my post.

This month we have a theme that, I think, most of cardmakers struggling with – MASCULINE.

I know that for some it’s hard if you can’t use pink, glitter or rhinestones on the card. Not to mention flowers. I even heard that masculine cards are boring! What?! Today I will show you that masculine cards can be fun and not boring at all.

Best Guy Ever card dimensions:

  • Delightful Dijon cardstock: 11-6/8″ x 4-1/8″ scored in half at 5-7/8″ (29.7 x 10.5 cm scored in half at 14.8 cm)
  • Early Espresso cardstock: 5-6/8″ x 4″ (14.6 cm x 10.2 cm)
  • Delightful Dijon cardstock for sentiment: 1-3/8″ x 2″
  • White Vellum cardstock mat: 1-5/8″ x 2-2/8″
  • Early Espresso, Delightful Dijon and White Vellum scraps for die cutting

To achieve this fun texture on my Early Espresso panel I spritzed it with water to soften the fibre. Next, I dabbed Hexagons Dynamic Embossing folder with Whisper White Craft Ink, put Early Espresso cardstock inside, run it through the Big Shot and let it dry. When it dried I adhered it to the card base.

Next, I die cut various size frames from Delightful Dijon cardstock using squares from Stitched Shapes Framelits Dies and Layering Squares Framelits Dies. You can mix and match these as you wish. Glued them to my card with liquid adhesive.

I also die cut three ‘branches’ using one of the dies from Everyday Jars Framelits Dies: one from vellum, one from Delightful Dijon and one from Early Espresso cardstock.

The sentiment I chose for my card is brilliant and can be used for any occasion really. And I love the bold font. I stamped it on a piece of Delightful Dijon in Early Espresso and matted it with a piece of vellum.

I adhered my sentiment to the card with a couple of dimensionals. For a final touch, I added my ‘branches’ to the card. I glued their ends under the sentiment panel. And this is my card done. I hope I inspired you today.

Thanks for visiting my blog today and make sure you head over to Kylie’s blog to check all lovely projects and vote for your favourites. Hope you like my project enough to give it some love ?

Vote for me Kylie's Highlights Badge

Thank you for stopping by and have a blessed day,

Stampin’ Up! Daisy Delight Sneak Peek

Anna’ Stampin’ Cave – Stampin’ Up! Daisy Delight Sneak Peek

Hello, everyone! What a beautiful day we had today down here in Coventry, Warwickshire. Even though I can’t fully enjoy the weather (yet) I managed to spend few minutes in the garden. And oh, boy, what a wonderful feeling it was.

Today I’m back with a lovely card I created for this week’s sketch over at Global Design Project Challenge Blog. I truly enjoy their challenges as each week they have a new challenge based on either a colour combination, a sketch, theme and CASE-ing the Designer. Lot’s of fun!

For my card today I decided to use some old favourites, as well as a sneak peek of new, coming soon bundle: Daisy Delight Stamp Set and coordinating Daisy Punch.

Dear Friend card dimensions:

  • Whisper White cardstock: 11-6/8″ x 4-1/8″ scored in half at 5-7/8″ (29.7 x 10.5 cm scored in half at 14.8 cm)
  • Crumb Cake cardstock: 5-6/8″ x 4″ (14.6 cm x 10.2 cm)
  • Pear Pizzazz cardstock: 5″ x 4″ (12.6 cm x 10.2 cm)
  • White Vellum cardstock: 1-1/8″ x 5-1/2″ strip
  • White Vellum and Whisper White cardstock scraps to stamp and punch daisies

First, I created the bottom half of my panel using the border die from retiring Botanical Builder Framelits Dies. I die-cut it at a slight angle, so it creates a diagonal ‘line’, and adhered it to the Crumb Cake panel. I also randomly stamped a couple of images from Daisy Delight Stamp Set: centre of the flowers and outline of the leaves, on the Crumb Cake panel.

Next, I took a Crumb Cake ink pad and a scrap of Whisper White cardstock. I stamped two flowers from Daisy Delight Stamp Set and punched them out using coordinating Daisy Punch.

I also stamped one daisy and daisy centre onto vellum with Versamark ink, heat embossed it in gold and punched out as well. I layered all flowers together with vellum as a top layer, offsetting them slightly for extra dimension. I adhered them to my panel, just above Pear Pizzazz piece, using liquid adhesive.

The sentiment comes from Birthday Blooms Stamp Set and I heat embossed it in gold on a strip of White Vellum. Because my vellum strip was wider than the Crumb Cake piece I was able to adhere the ends to the back of my panel. This way I didn’t have to worry how to hide the adhesive. I mounted my panel to the card base.

And that’s my card for today. I hope you like it. I also hope you’ve enjoyed seeing a sneak peek of Daisy Delight Stamp Set and Daisy Punch. These both will be available in my shop on 1 June 2017. But if you don’t want to wait, and want to be able to order new products earlier, it’s as easy as 1…2…3… -> simply join the fun and order your Starter Kit. If you have more questions why don’t you drop me a message?

As always, I really want to encourage you to visit the Global Design Project challenge blog to see other beautiful projects from all around the world. Just click on their logo below to visit the website

If you wish to purchase any of products I have used, simply click the images below to go directly to my online store and don’t forget to enter the hostess code for the month of May SS3AK62K to receive a gift from me.

Just a reminder: Botanical Builder Framelits Dies are still available at a fraction of a price! But only until the end of May. After that date, you won’t be able to purchase them. So if you waited for a better moment to buy them – this moment is now.

Thank you for stopping by and have a blessed day,


Don’t forget to check:

Stampin’ Up! Spring Summer & Annual Catalogue 2016 2017 Retiring List

Anna' Stampin' Cave Stampin' Up! Retiring Products 2017

It’s that time of the year again, when Stampin’ Up! is getting ready to retire stamps and accessories from both the Annual and Spring Summer catalogues. As sad as it is to see these products go, there’s still time for you to get them before they’re gone. Retiring products will only be available until 31 May, or while supplies last. So if there’s something from retiring products on your wishlist, don’t wait until last day – once they’re gone, they’re gone. And they are selling fast! Click here for more details ->

Colourful Striped Background For Global Design Project – I am Guest Designer

Anna’ Stampin’ Cave – Colourful Striped Background For Global Design Project – I am Guest Designer

Hello, my friends! I am so excited as today I am a Guest Designer for Global Design Project. How amazing is that?! I’m so humbled and honoured that GDP team has chosen me to join them for this week’s Colour Challenge. And boy, what a great colours we have to play with!

Choose your fav three wasn’t an option for me because I love all of these and wouldn’t know which to choose, to be honest. So I decided to be a rebel and for my project today I’ve used all five. Let’s say this post is a farewell to these beautiful In Colours.

Colourful Striped Background card dimensions:

  • Mint Macaron cardstock: 11-6/8″ x 4-1/8″ scored in half at 5-7/8″ (29.7 x 10.5 cm scored in half at 14.8 cm)
  • Very Vanilla cardstock: two panels, one for the card front, one for the inside of the card 5-7/8″ x 4″ (14.8 cm x 10.2 cm) each
  • cardstock for building the background: 5-7/8″ x 3-1/2″ (14.8 cm x 8.9 cm)
  • scraps of cardstock in colours: Mint Macaron, Delightful Dijon, Watermelon Wonder, Cucumber Crush and Tip Top Taupe
  • White Vellum for stamping and die-cutting

I started my card by creating this fun and colourful striped background. I took my scraps of cardstock of 2015-2017 In Colours and I cut it into strips of different widths. Next, I took a piece of cardstock (random colour as it won’t be seen anyway), covered it in glue,  using snail adhesive, and adhered my strips diagonally, mixing colours and widths, making sure there’s no space left in-between the strips. When the whole panel was covered, I trimmed any overhanging stripes.

Can you see the shimmer on this panel? I took empty spritzer bottle and fill it with water. Next, I took Clear Wink of Stella Glitter Brush and squeezed pretty few drops of it into the spritzer. I shake it really well, spritz my entire panel with this glittery mist and let it dry.

I took the Very Vanilla panel and die-cut this intricate butterfly from Butterflies Framelits Dies in the middle of it. I also die-cut solid butterfly from vellum using Bold Butterfly Framelit Dies.

Using t-ruler, I draw two diagonal (and parallel) lines at the back of my panel. Using these lines as guides, I cut my panel into three and discarded the middle piece. Next, I stamped this lovely chicken wire (kinda) pattern from Butterfly Basics Stamp Set all over the other two pieces. I stamped it in Mint Macaron and to create this faded look I stamp off twice before I stamped on the cardstock.

I adhered my Very Vanilla pieces to the background panel, with butterflies inlaid between them: vellum butterfly at the bottom and vanilla one on the top, and added the whole panel to the card base with liquid adhesive.

For the sentiment, I chose “Sending Wishes Your Way”, also from Butterfly Basics Stamp Set. I prepared vellum with embossing buddy, dabbed my stamp in Versamark and straight away in Basic Black Archival ink, and stamped it onto vellum. Sprinkled it with clear embossing powder and heat set it.  Adhered it to the card with few tiny drops of Fine-Tip Glue Pen. All that’s left was to add second Very Vanilla panel inside of the card. Done!

Once again I wanted to thank amazing GDP team for this opportunity and privilege, that I could showcase my project alongside such wonderful artists. Thank you from the bottom of my heart.

As always, I really want to encourage you to visit the Global Design Project challenge and play along. You too have a chance to be the next Guest Designer

Thank you for stopping by and have a blessed day,

Rustic Best Birds For Global Design Project #084 Challenge

Anna’ Stampin’ Cave – Rustic Best Birds For Global Design Project #084 Challenge

Hello and welcome everyone! Today I’m back with my entry for Global Design Project. This week is Case The Designer Challenge over at GDP and we’re casing wonderful Michelle Last. I have to admit I absolutely love Michelle’s style. She’s an incredible artist and amazing person too (I had the privilege to meet her in person a few years back).

It’s a beautiful card to CASE: clean & simple with lots of yummy texture. But I didn’t really want to follow the colour combination or the layout of Michelle’s card (but as you will see I failed miserably as I ‘accidentally’ cased the layout anyway haha ). For my card, I decided to focus on a couple of products she used instead: Best Birds Stamp Set and coordinating Birds & Blooms Thinlits Dies.

Rustic Best Birds card dimensions:

  • Crumb Cake cardstock: 8-1/4″ x 5-7/8″ scored in half at 4-1/8″ (21cm x 14.8 cm scored in half at 10.5 cm)
  • Crumb Cake cardstock: 4-1/8″ x 5-6/8″ (10.2 cm x 14.6 cm)
  • Whisper White cardstock for stamping & die cutting
  • Pool Party cardstock: 3/8″ x 4-3/8″
  • Burlap Ribbon: approx 5-6/8″ (14.6 cm)

I don’t know about you, but when I first saw this stamp set it has called countryside to me. I only bought this bundle a few weeks ago and was really eager to have a play. So this week’s challenge was perfect for inking up my stamp for the first time.

First, I created the background for my ‘idyllic’ scene. I took Crumb Cake panel and stamped it with Hardwood background stamp in Soft Suede. I also sponged the edges of the panel with Soft Suede ink to add to the ‘rustic feel’.

Next, I stamped and die cut all the elements of my scene. The bird is stamped using Crumb Cake ink. Flowers – Pool Party. For little berries/fruits, I’ve used Pear Pizzazz. Branch is stamped in Soft Suede ink and coloured in with markers: Crumb Cake for the branch and Pear Pizzazz for leaves.

I love this sentiment “It’s a good day” from Best Birds Stamp Set. I stamped it in Soft Suede on a piece of Whisper White cardstock and die cut using an oval die from Stitched Shapes Framelits Dies. I think stitched edge suit rustic ‘feel’ of this card just perfectly.

Before I assembled my card I played a little with a placement of all the elements. To add some ‘natural’ texture I decided to use Burlap Ribbon as a banner. I also cut a thin strip of Pool Party cardstock to ‘break’ all the browns. When I was happy with the placement, I took a photo and started the assembly.

Tip: If you have a layout, either a card or a scrapbook page, that consist of lots of small elements, play with the placement first, before glueing things down. Once you’re happy, take a photo of your test layout with your phone ( we all have it on hand, don’t we?). Next, assemble your card/scrapbook page piece by piece by piece with a help of your reference photo. No more guessing ‘where was this or that element supposed to go.

I truly hope you like my little, rustic card. It reminds me of my childhood in Poland and summer holidays we spent in the countryside with our great-grandmother. Wonderful memories.

As always, I really want to encourage you to visit the Global Design Project challenge blog to see other beautiful projects from all around the world. Just click on their logo below to visit the website

Thank you for stopping by and have a blessed day,