Mother’s Day Card using “Mum’s Love” Stamp Set by Stampin’ Up!

Mother’s Day – a day to show love to all wonderful mums in the whole world. In different parts of the world it’s celebrated in different days: in US it’s second Sunday of May, in Poland it’s 26th of May but here in UK and Ireland it’s celebrated on fourth Sunday of March. But regardless time and place it’s a day to show how much we value and appreciate their hard work. We give them cards, Mother’s Day gifts or simply buy flowers. A little acts of kindness is all that matters after all.

So today I want to share with you this beautiful fun fold card for Mother’s Day. It’s quick and easy to make and you really don’t need many supplies to make one.

mother's love 6

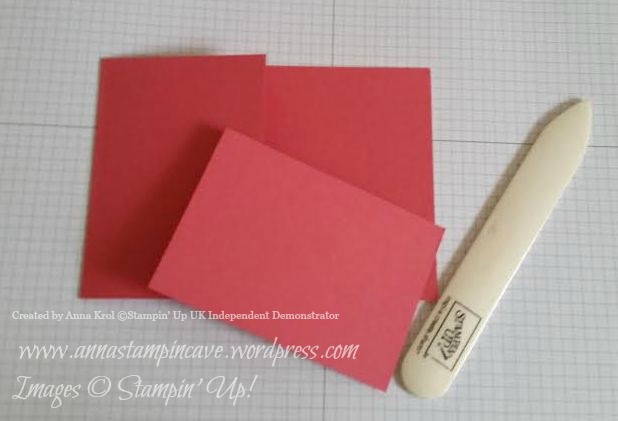
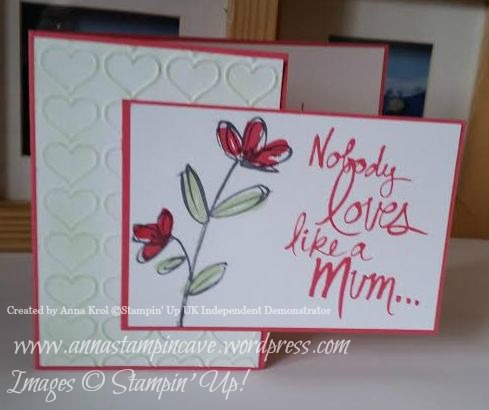
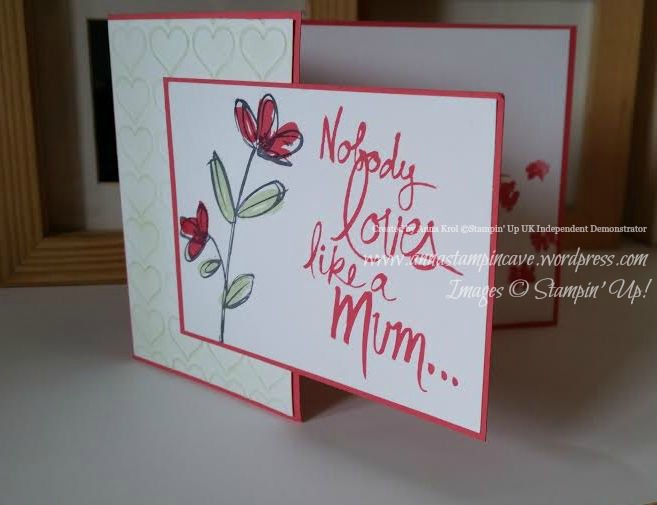
To make this card you need  half of A4 piece of card stock (cut in half on long side) folded in half. I’ve used Strawberry Slush. Then you cut front panel of the card in half. This is our base.

mother's love

You will also need three pieces of whisper white card stock. For inside of the card you need a piece that measures 5 5/8 x 4″. And two smaller pieces for the front panels: both measure 4 x 2 3/4″. One of them I run through the Big Shot with Happy Heart Embossing Folder and slightly sponged embossed part with Pistachio Pudding ink.

mother's love 1

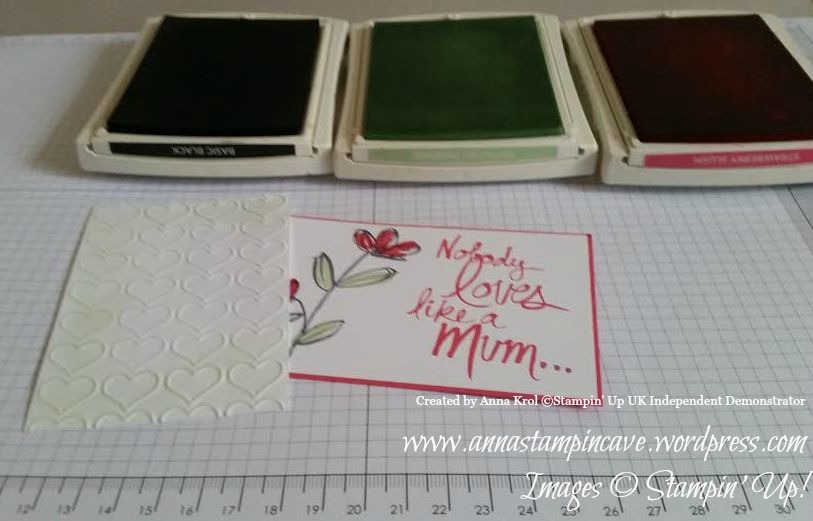
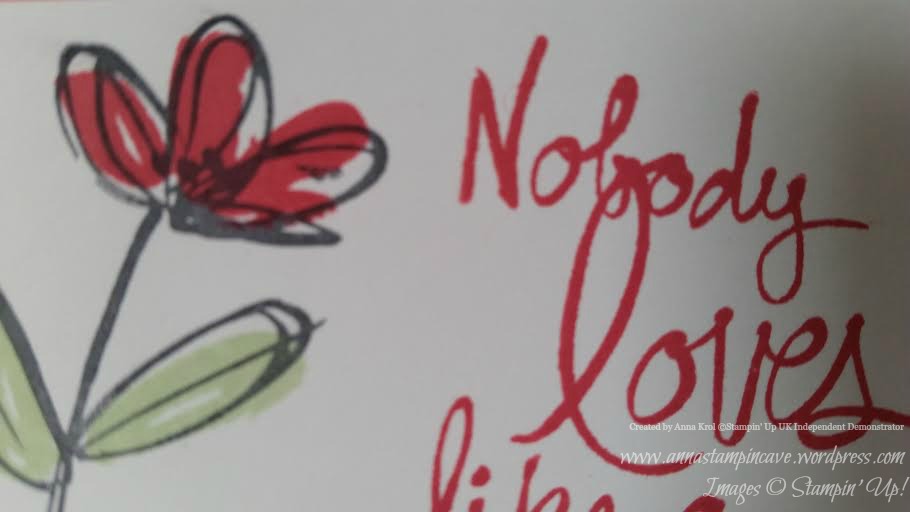
On second panel I stamped a this fun flower. It’s double step stamp, so for the first step I used Basic Black ink, and for second step Strawberry Slush and Pistachio Pudding. Both, flower and sentiment comes from Mum’s Love stamp set. Don’t you just love this sentiment and artful font? 🙂

mother's love 3

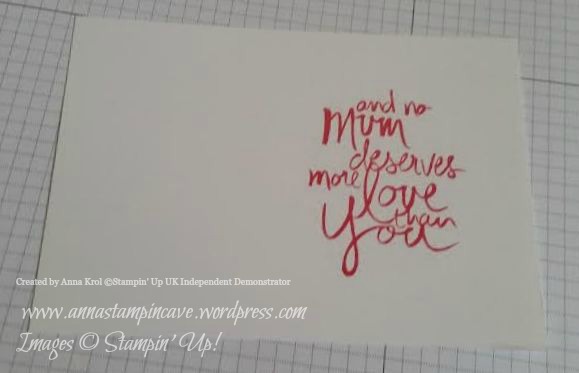
This stamp set has a coordinating sentiment for the inside of the card and it’s amazing: “…and no mum deserves more love than you…” – Isn’t it beautiful? Now it’s time to asseble the card.

mother's love 8

This little flower looks so cute 🙂

mother's love 4

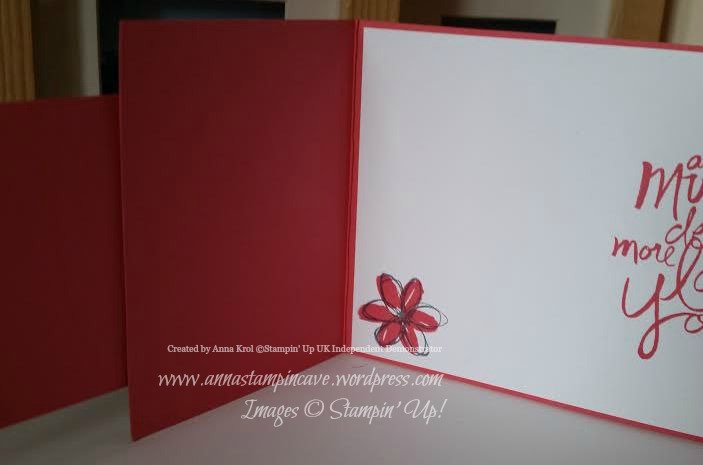
…hmmm..I think there’s something missing…so I stamped inside few mini flowers from same stamp set.

mother's love 9

I just love how this card turned out! So simply to make yet so effective and cheery 🙂 I hope you like this project.

Thank you for stopping by.

Easter Bunny & Chic Made Using Curvy Keepsake Box Die From Stampin’ Up!

Cute and cutest: Easter bunny and chic treat holders made using Curvy Keepsake Box Thinlits Dies. I know, I know, they are all over the internet but I just had to make them myself too 🙂

 1

Aren’t they stinkin’ cute? 🙂

I made these cuties for my sweet grand-niece Ashley 🙂 I just hope I will feel better by Easter time so I can travel and visit my family. Got my first Tysabri treatment tomorrow. All in God’s hands.

As for how I made them: there’s so many tutorials about how to assemble the box, and it’s so easy, that I decided to keep this post short. All the punches and dies used are listed below.

But if you want me to make a tutorial just let me know 🙂 Thank you for stopping by,

Thank You Card Using Crazy About You Stamp Set & Irresistibly Yours Specialty DSP by Stampin’ Up!

My card today uses Crazy About You stamp set and one of the Sale-A-Bration free items: Irresistibly Yours Specialty Designer Series Paper. I love the fresh look of this card as I really wanted to create card that is fresh and spring-ish, while not compromise on my beloved layers 🙂

thanks you

For the background I created a border with Scallop Edge Border punch and piece of Crisp Cantaloupe card stock. Then I randomly stamped leaves from Crazy About You. I chose Pear Pizzazz for that as it’s such a lush yet soft green.

thanks you 3

Above that border I added a piece of vellum. Vellum is quite tricky to attach as you always can see the adhesive trough. So I added few sequin to hide glue dots 🙂

thanks you 2

My little banner is created using a piece of Irresistibly Yours specialty paper. I spritz it with water and added Crisp Cantaloupe ink. This paper is so much more than just a paper. Glossy designs look great alone but they also resist ink. You can try it with spritzers, brayers, sponges, watercolour techniques and more. You can make it bold or subtle as you wish. This paper is a must-have for your paper stash. Check the video HERE

thanks you 1

Now, for the sentiment I cut “you” using Hello You thinlits and adhere it on the border. I stamped “thanks” just above that “you” and “so much” a little below. For a final touch I also made coordinating envelope. Isn’t it springy, fresh-looking card? I love it!

Hope you like this project and as always thank you for stopping by

Lotus Blossom Gorgeous Grunge And Gold Fancy Foil Vellum All About Kindness + Bonus Free Gift

Lotus Blossom is so far the most popular Sale-A-Bration product. And I’m not surprised at all. This gorgeous three step stamping stamp set is very versatile, and flowers look like hand-painted. It comes with two sentiments: simple “thank you” and absolutely beautiful “The kindness you show has no end…”. And this sentiment I’ve used in today’s card.

I wanted to keep this card sweet and gentle so decided to use Crisp Cantaloupe for card base and Pistachio Pudding for banner. I’ve layered the base (standard A6) with piece of Gold Fancy Foil Designer Vellum. Pistachio Pudding banner measure 1 1/2″ x 4 1/2″, and is dry embossed with Chevron Embossing folder to add some texture to the card.

sweet 1

I took a piece of Whisper White and cut it into banner that measures 2 1/2″ x 3 1/2″ and distressed the edges. Then stamped Lotus Blossom in Crisp Cantaloupe. Added little stem in Pistachio Pudding. But it was missing something, so decided to stamp some splotches from Gorgeous Grunge. Sentiment is stamped in versamark and heat embossed with Gold Embossing Powder – LUSH, and it fits the vellum.

Before I put the card together I decided to add Crisp Cantaloupe Thick Bakers Twine (in Weekly Deals offer this week) to my white banner. To avoid visible traces of glue under vellum I used glue dots – perfect, as they are hiding under gold dots. For the rest of the card I’ve used snail adhesive. Less then 10 minutes and card is done 🙂

sweet 2

I love this card. It looks exactly the way I wanted 🙂 Soft colours, and a WOW factor with gold embossing and vellum. And all done in 10 minutes – it’s a win win 🙂

Thank you for stopping by,

Hello Sunshine Card Using Crazy About You Stamp Set & Matching Dies By Stampin’ Up!

Hello everyone! Today I’ve got for you a card made using cool technique called partial diecuting. This technique I learned from Jennifer McGuire. You can check her YouTube Channel. So when I saw Crazy About You stamp set and matching Hello You thinlits in Spring/Summer catalogue I knew I have to try this technique! This stamp set is absolutely amazing! 


hello sunshine 2

As you can see I partially diecut word hello, then I diecut whole word from Daffodil Delight and adhere it to the front of my card.

hello sunshine 1

Large flowers are cut by hand with scissors, as I don’t have that punch yet (1 3/4″ Scallop Circle). Small flowers are punched with 1 1/4 Scallop Circle Punch.

hello sunshine 5

To add some definition to the flowers I stamped twig with leaves on some scrap piece of cardstock. I hand cut few of them and adhered them here and there.

hello sunshine 3

Letters e and o are coloured with Blendabilities I get for FREE as my Sale-A-Bration freebie 🙂 If you want to choose something different as you free SAB items you can purchase Blendabilities in our store. I will add links at the end of this post.

hello sunshine 4

I added few sequins and voila! – card is done! Really hope you like today’s project!

Thank you for stopping by!