Anna’ Stampin’ Cave – New Stitched Shapes Framelits Dies
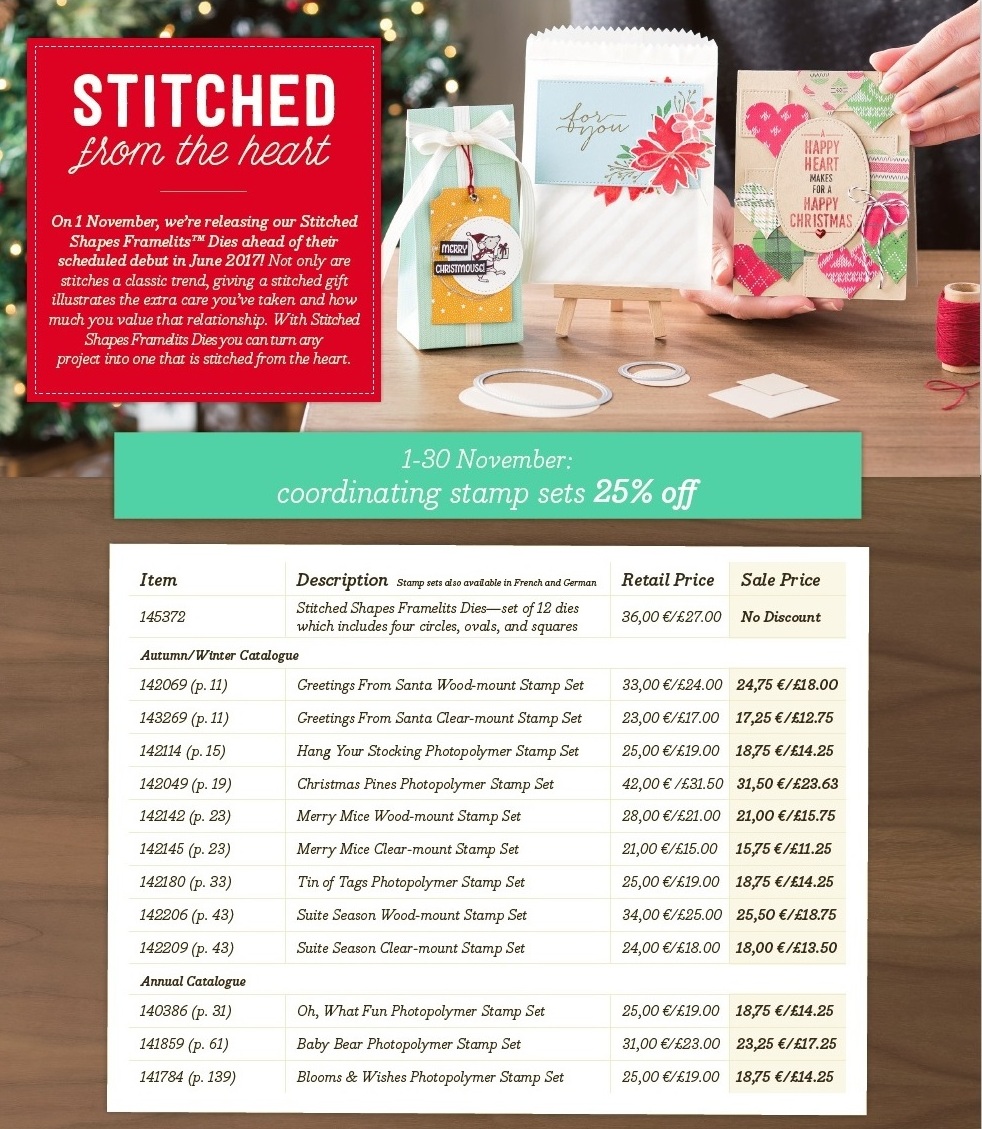
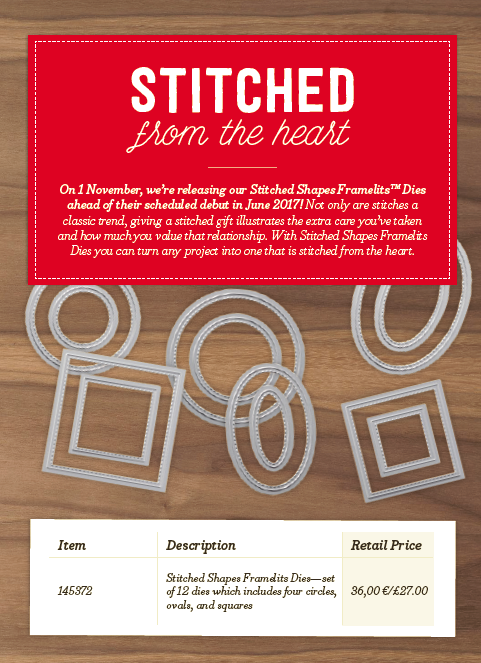
Not only stitches are a classic trend, they illustrate the quality, precision, and extra care is taken when creating a piece. Giving a stitched gift shows just how much you value that relationship.
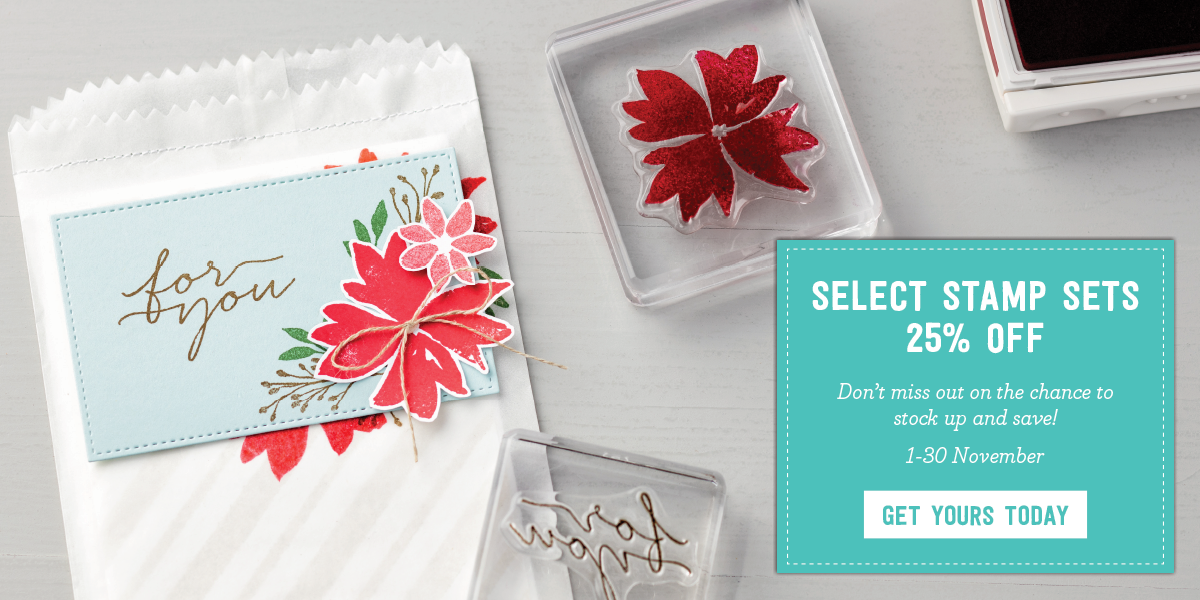
Now you have the opportunity to purchase Stitched Shapes Framelits ahead of their official release in the 2017-2018 annual catalogue and get 25% off coordinating stamp sets.
With Stitched Shapes Framelits you can make paper stitches in seconds, turning any project into one that is stitched from the heart.
And there’s more great news…although the 25% off stamps sets ends 30 November, you will still be able to get the Stitched Shapes Framelits after that date.
25% off stamps sets ends 30 November. I will post all the stamps sets with clickable images and links at the very end of this post
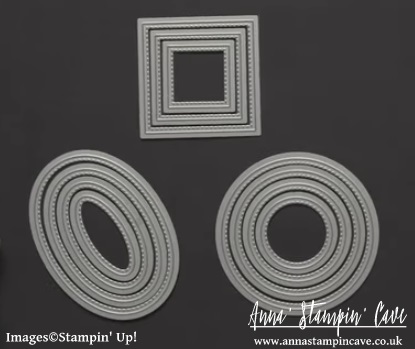
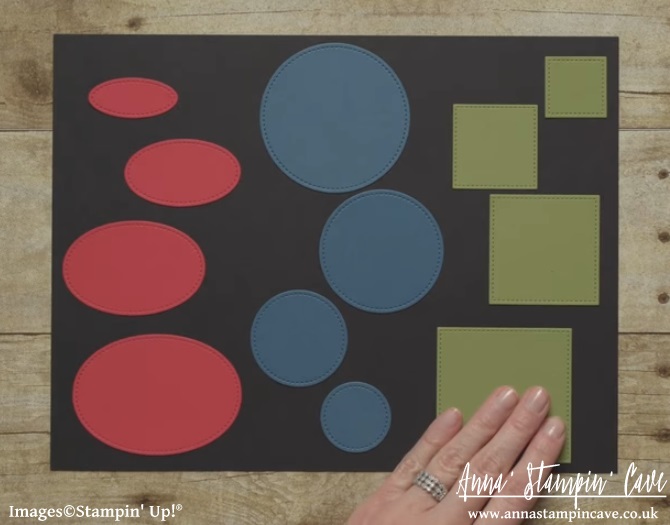
There are 12 pieces all together in the Stitched Shapes Framelits Dies. You get 4 each of the squares, circles, and ovals.
They are sized for the stamped images that you tend to use the most.
The stitched shape sits approximately 1/6″ from the edge of the cutout, making the stamp-able dimensions roughly 1/8″ smaller than the cut-out.
Here are all the sizes:
Squares
1-3/16”
1-5/8”
2-1/8”
2-5/8”
Circles
1-3/8”
1-7/8”
2-3/8”
2-7/8”
Ovals
1-3/4” x 13/16”
2-1/4” x 1-5/16”
2-3/4” x 1-13/16”
3-1/4” x 2-5/16”
Here are few of the projects from Stampin’ Up! to showcase the versatility of Stitched Shapes Framelits Dies.
Stitched Shapes Framelits Dies are not reserved for cardmaking only…
Anna’ Stampin’ Cave – Elegant Monochromatic With Pop Of Colour
Wow! It’s hard to believe, but today is last day with My Hero Stamp Set from Stampin’ Up! Yep, 5 weeks have passed!
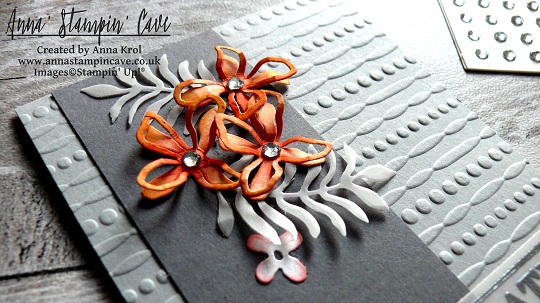
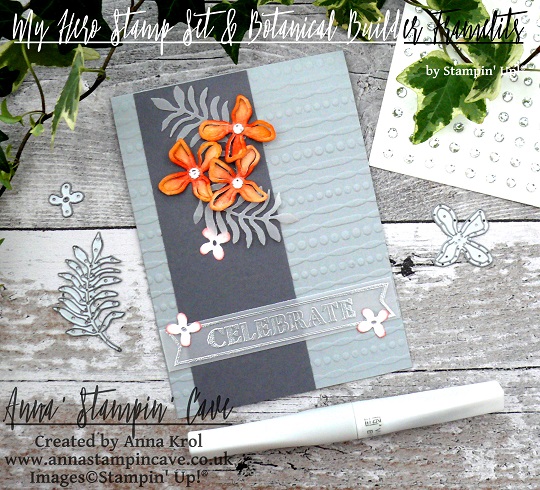
For my final project, I’ve created this striking yet elegant, almost monochromatic card, in shades of grey but with a pop of colour in form of dainty orange flowers.
For the base of my card I took an A4 sheet of Smoky Slate cardstock, cut it in half at 4-1/8″ and folded in half at 5-7/8″. I run the front of the base through Big Shot with Festive Embossing Folder. The panel is a piece of Basic Grey cardstock that measures 2″ x 5-7/8″. I adhere it to the base with Multipurpose Liquid Adhesive.
Next, I created my floral composition using Botanical Builder Framelits Dies. I die cut a couple of leaves from vellum and six flowers: three tiny flowers and three small 3D flowers from a scrap of Whisper White cardstock.
Savvy Tip: Don’t know what to do with random off cuts that are to small to use on cards or to punch anything out of them? Don’t throw them away! I save all my off cuts and use them up when need to die cut small elements, flowers, etc using framelits dies
To add a little bit of colour to my flowers I sponged the edges of the tiny flowers with Watermelon Wonder. For 3D flowers, I decided for more ‘dramatic’ look I sponged entire flowers using Pumpkin Pie ink pad and a dab of Watermelon Wonder to the centres. I also added a large rhinestone to each centre. You can’t really tell from the photos (blame the awful English weather) but I’ve added a touch of shimmer using Clear Wink Of Stella Glitter Brush to each flower (tiny ones too).
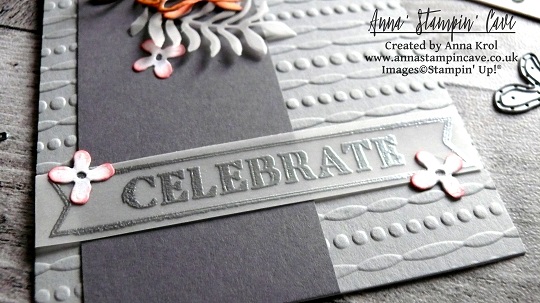
Next, I took a strip of vellum ( 1/2″ x 4-1/8″) and stamped a ‘Celebrate’ from My Hero Stamp Set in Versamark. Of course, I’ve used an Embossing Buddy prior to stamping. I heat embossed the sentiment with Silver Stampin’ Emboss Powder.
Tip: For best results with heat embossing always treat your cardstock, dsp, vellum, etc with embossing buddy. I takes off the statick from the surface of your paper, and makes the powder stick only to the areas you stamped.
Tip 2: If you don’t have an embossing buddy or any other antistatic tool you can use cornflour instead. Just sprinkle a little amount of flour over the surface of your cardstock, spread it with fingers or paint brush, and shake off the excess. Now you can stamp and heat emboss.
I assembled my composition using Glue Dots and liquid adhesive. Two tiny flowers on the vellum banner are hiding adhesive that I’ve used to adhere the banner to the card base.
I really like how this card turned out. I love the monochromatic, cold look of greys with a pop of bright orange. And what do you think about this colour combination? Do you like it? I would love to hear from you in comments below.
Another week has passed by, and it’s that time again when our little group of demonstrators is showcasing you this lovely stamp set called ‘My Hero’. I love the versatility of this set, as it covers all major holidays/occasions throughout the year. But not only that. This is Ronald McDonald House Charities stamp set, which means for every set purchased, Stampin’ Up! donates £2 to the RMHC. Visit www.stampinup.com/giving_ukto learn how you can help too.
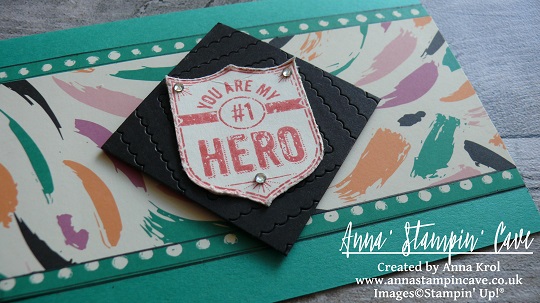
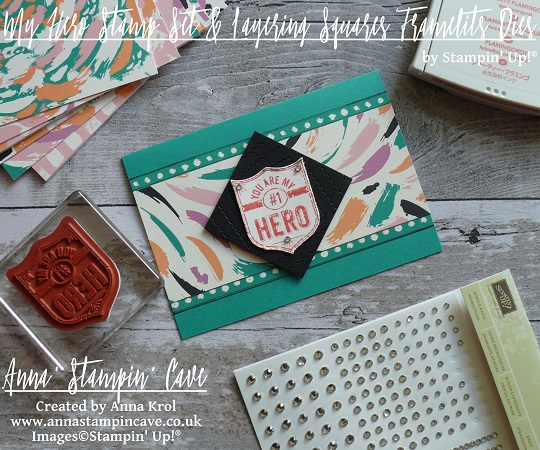
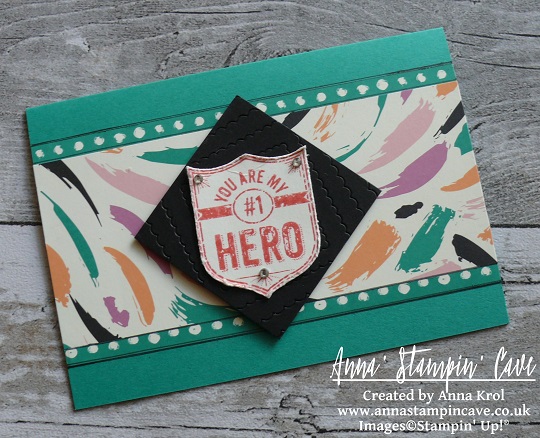
For today’s project, I’ve chosen ‘You are my #1 hero’ sentiment. I’ve seen many beautiful samples using this stamp. It’s perfect for all those oh-so-hard-to-make masculine cards. But I decided to make a card with a feminine twist. After all, women can be heroes too.
This is a very simple card. For the card base, I chose beautiful and very vibrant Emerald Envy cardstock (standard A6 size). Next layer is a piece of DSP from Playful Palette Designer Series Paper Stack. I took half of the sheet of my chosen design ( 3″x 6″) and trimmed 1/4″ from both sides. I adhered the larger piece to the base first and next, those tiny strips on each side of the panel, but reverse side up. Because the base is smaller than 6″ wide, I trimmed any overhanging paper using my scissors. It’s easier, and for sure you won’t end up with a too small panel. Unfortunately, my strips slightly ‘disappeared’, when adhered to the card base. So I draw few black lines along the edges using Project Life Journaling Pens.
Tip: learn from my mistakes! If, like me, you chose a design that has a kinda symmetrical pattern on the reverse, make sure you trim your panel so you have the same pattern on both strips you’ve trimmed.
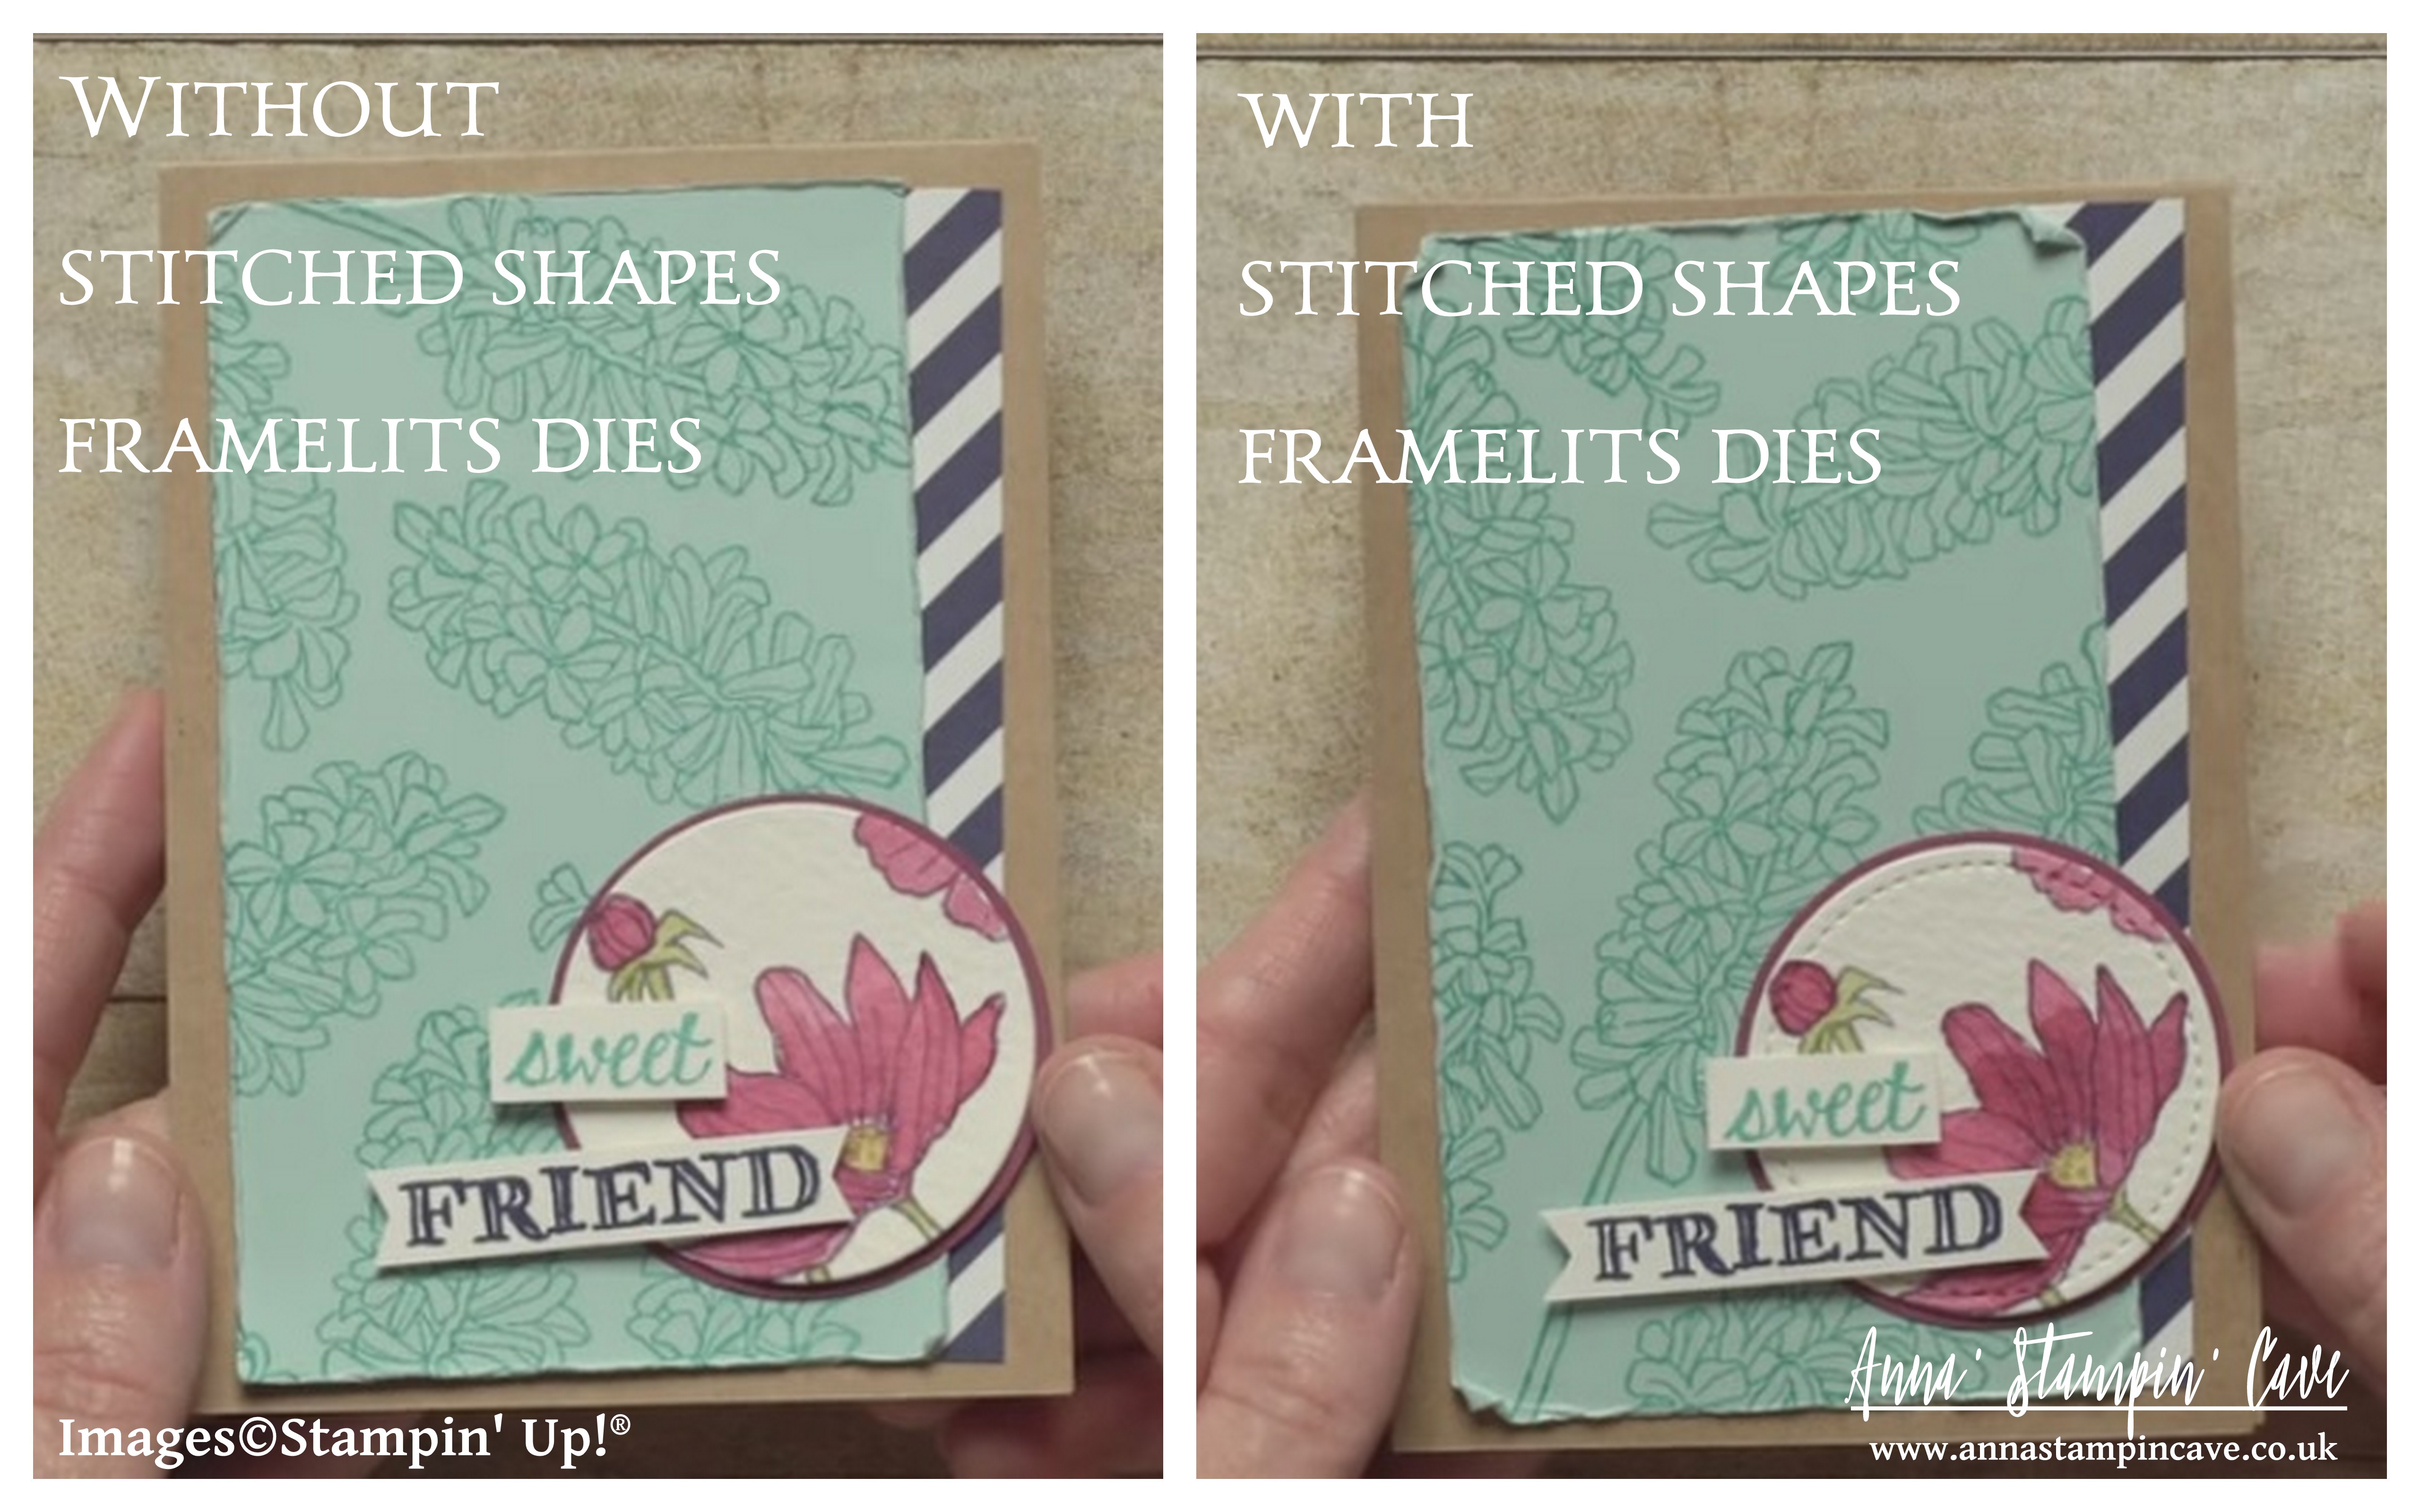
Now to the focal point. I stamped my sentiment in Flirty Flamingo, on a piece of Very Vanilla cardstock and fussy cut it. It’s an easy shape to do so. I distressed the edges slightly. To make the sentiment ‘pop’ I decided to add a square Basic Black cardstock underneath. I could dry emboss it but instead, I decided to create a fun panel using Layering Squares Framelits. I’ve seen this idea just recently, on Carolyn Bennie blog and just had to try it myself. Carolyn is an amazing Australian demo. You should definitely check her out.
I arranged five scalloped squares dies on a piece of Basic Black cardstock, but offset them slightly. I secured dies to the paper with washi tape and run it through the big shot. Before I removed my dies, I’ve added washi tape underneath of the panel, to keep the squares together. I took another piece of Basic Black cardstock and adhered my die cut squares to that panel. I trimmed it to the 2-3/8″ square.
I adhered my fun square to the card base with a couple of dimensionals. Next, I’ve added my sentiment on top of it, with regular snail adhesive. Few rhinestones on the corners of the badge finish off my card.
Thank you for joining us on another Pootlers Blog Hop! We’re showcasing lots of gorgeous projects using products from the new Stampin’ Up!® Autumn Winter Seasonal Catalogue. Simply use the buttons at the end of each post to keep hopping!
If you arrived here from lovely Louise’s blog, thank you for stopping by. I hope you enjoy seeing all these beautiful projects and inspiration and continue to hop on through to see what everyone has made.
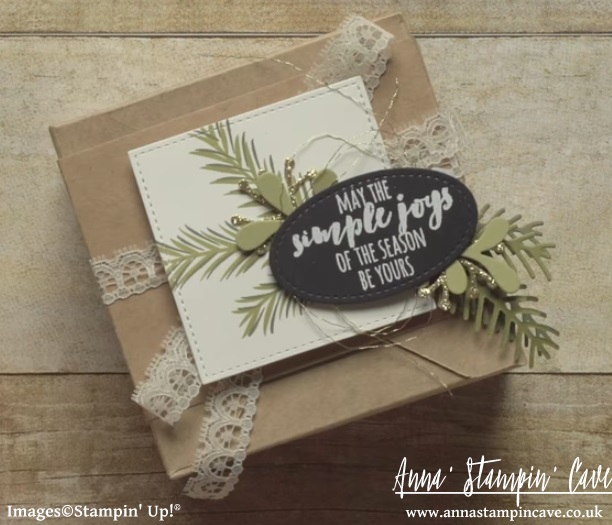
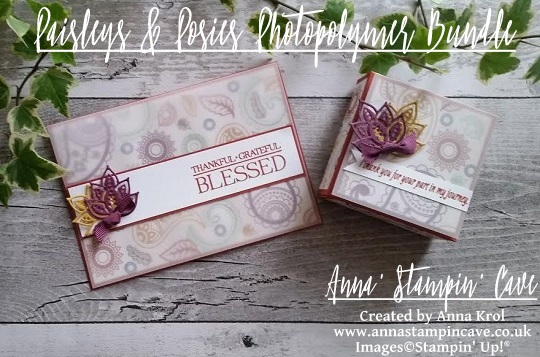
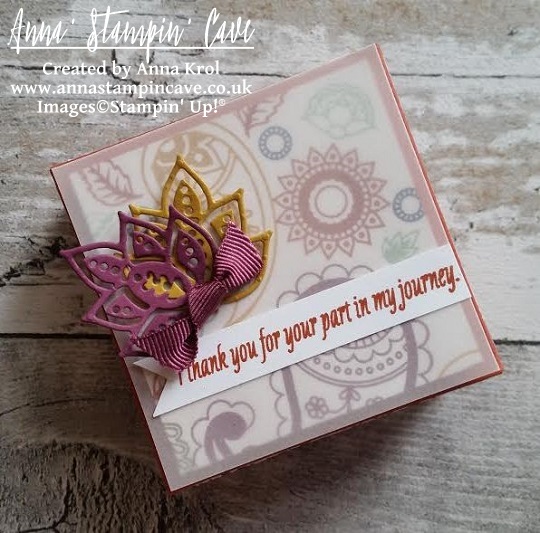
For today’s project, I’ve been using new Paisleys & Posies Stamp Set with Paisley Framelits Dies, and these two are a part of beautifulPetals & Paisleys Product Suite. I used them to create a beautiful contemporary card and matching gift box.
I don’t know about you, but I just love paisley. It is such a trendy design right now, you can find it everywhere: from home decor, through fashion, art and more.
For my card, I randomly stamped various images from Paisleys & Posies Stamp Set on a piece of Whisper White. It’s like creating your own DSP. To take off the guesswork, I’ve used the colours that coordinate with Petals & Paisleys Suite: Cajun Craze, Rich Razzleberry, Delightful Dijon, Mint Macaron, Soft Suede and Night of Navy. I adhered it to my card base (Cajun Craze) and added a layer of vellum on the top, to soften the bold colours. Next, I cut a strip of Whisper White and stamped the sentiment from the same stamp set (love this font!), to the left in Cajun Craze. Backed it with a slightly wider piece of Cajun Craze cardstock, and adhered it to the card front. Using Paisley Framelits Dies, I die-cut two intricate leaves, one in Rich Razzleberry and one in Delightful Dijon, and add it to the panel. The final touch for the card was a tiny Rich Razzleberry bow I’ve made using one of the ribbons from new 3/8″ (1 cm) Ribbon Trio Pack.
Top tip 1: Glue dots are handy to adhere small elements like little bows. Top tip 2: There’s not such a thing as an invisible adhesive for when using vellum; be smart and hide adhesive under panels, die-cuts or embellishments. Savvy tip: To save the precious ribbon, tie a square knot straight from the spool.
For the gift box base, I’ve used, again, Cajun Craze cardstock. It’s really cute dinky little box, with the base being a 2-7/8 x 2-7/8″ square, and 1″ tall. Same as with the card, I created my own piece of DSP to decorate the box. Using dimensionals I slightly elevated the panel that goes on the top of the lid. But panels on the sides of my box are glued flat. Next, I’ve added a panel of vellum to the top of my box, followed by a little banner with a sentiment, and (again) leaves and a bow to match the card.
I don’t make boxes or gift sets too often, but I really like this one. I don’t know why. Perhaps for the autumnal colours and maybe for the paisley design. Whatever the reason, I hope you like it too.
Your next stop is lovely Jerim. Simply click the next button to keep hopping around all the blogs to see lots of new ideas and inspiration.
Thank you for joining us for another Simply Sketched Saturday Challenge! We’re so excited to be sharing this hop with you. The products used are all available in the current Annual, or seasonal, Stampin’ Up!® Catalogues*. Simply use the buttons at the bottom of the post to keep hopping!
Today’s sketch was designed by very talented and lovely Louise from Whiteflag Designs, who sadly couldn’t take a part in the challenge today. But we hope she’ll be back with us soon.
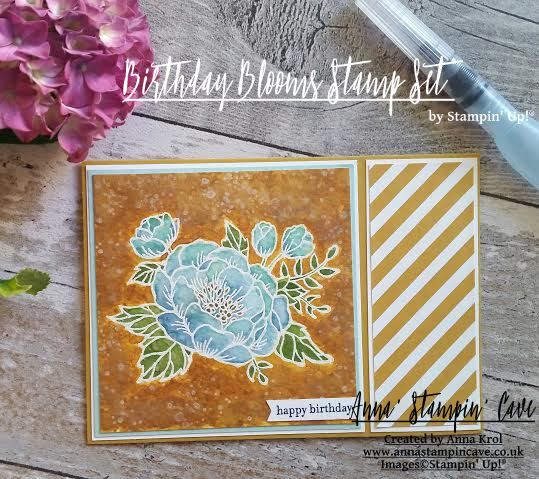
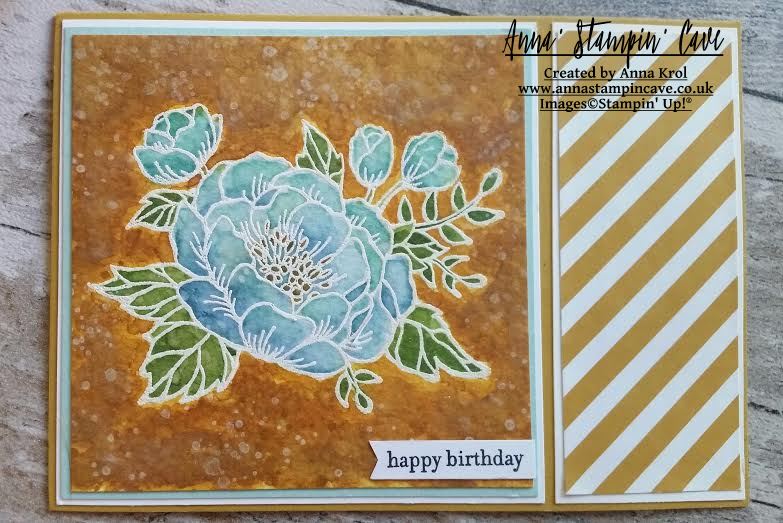
For today’s card I’ve used Birthday Blooms stamp set but in a rather unexpected colour scheme. Since I can remember I always loved blue and yellow colour combination. Firstly, these were the colours of my town’s sports club Avia Świdnik. These were also the colours of my favourite radio station RMF FM, back when I was a teenager. And it’s not surprising that, when I first moved out from my mum’s, I repainted all cabinets in my new kitchen yellow and blue. Even a fridge, that’s how much I loved these two together 🙂 But enough of my babbling, here’s the card I’ve made:
I slightly alternated the sketch: I created landscape fold card instead of portrait one. I also decided to mirror the image, so the largest ‘panel’ is on the right side of the focal point. For the base, I’ve used beautiful but sadly underrated Delightful Dijon. I truly love its deep, earthy shade. I added two panels of Whisper White to the base: a square that measures 4″x 4″, and a strip that measures 4″x 1-5/8″. For next panels, I’ve used a square piece of Pool Party card stock and a piece of a striped pattern paper from Designer Series Paper Stack in Delightful Dijon. And these are accordingly 1/8″ smaller than Whisper White pieces.
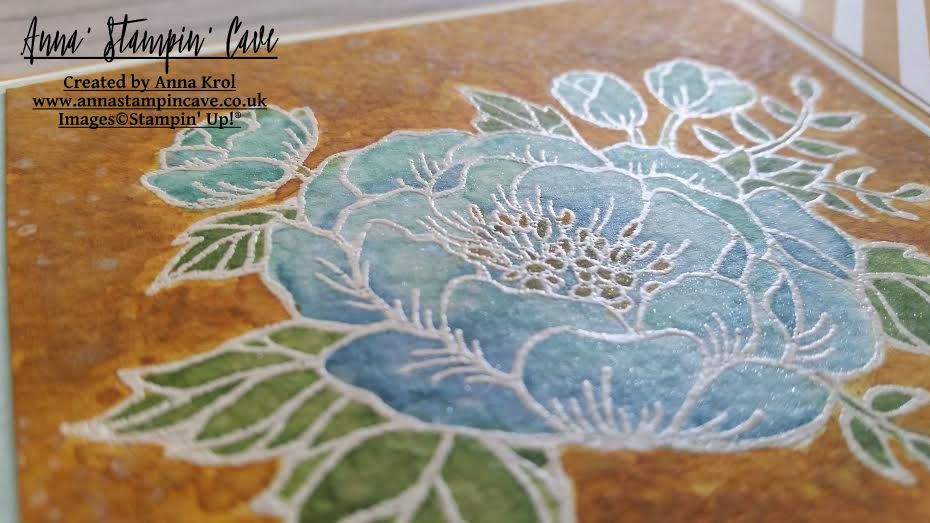
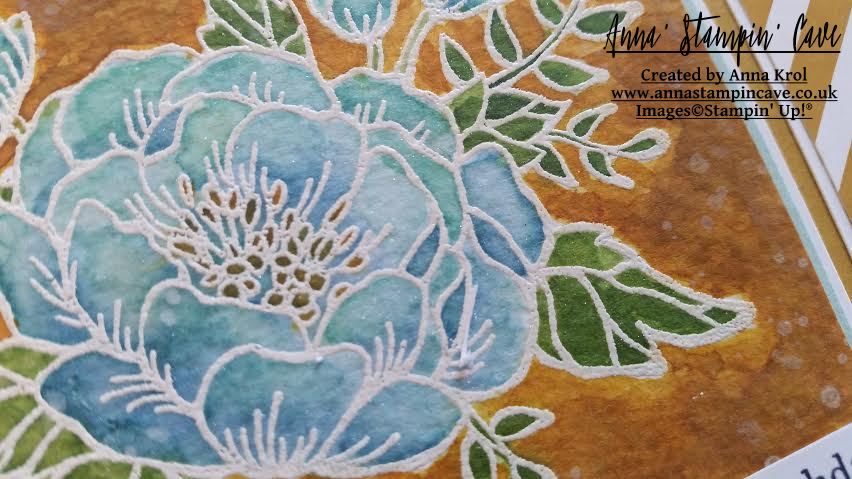
Now for the watercolour. I stamped the flower on a piece of watercolour paper using Versamark, and heat embossed it in white. Using aqua painter, I added water to the petals first and started adding the colour. For the first layer of colour, I’ve used Pool Party. I started really light and added more colour along the way. Next, to add more definition to the flower, I added some shading with Marina Mist. For the leaves, I’ve used a combination of Pear Pizzazz and Wild Wasabi. And again I started light and built up the colour.
When I was happy with the flower it was time to create the background. I added water to my watercolour piece. I had to be really careful to not let the colours from the flower bleed into the background. I’ve used same technique like with the petals: I started with a light wash of Delightful Dijon and I kept adding more colour along the way until I was happy with the results. Next, I’ve used aqua painter to “flick” few droplets of water to the surface of the panel. I think will never get tired of seeing how ink reacts with water and create interesting organic texture. To jazz it up a little more I used Gorgeous Grunge stamp set to stamp some splashes in Delightful Dijon first, followed by Whisper White Craft Ink. When the panel was completely dry I adhered it to my card base. I kept the sentiment really simple: I stamped Happy Birthday from Teeny Tiny Sentiments in Basic Black on a strip of Whisper White and glued it to the card using liquid glue.
To finish off my card I decided to add Delightful Dijon to the centre of the flower with a blender pen, as I don’t own the markers. And the very last touch was to add Clear Wink Of Stella Glitter Brush Pen to the petals and leaves.
I’m so chuffed how this card turned out: beautiful bold colours and textures. I just love how these blue flowers stand out from their deep yellow background. I really hope you like my project too.
Now, be sure to hop along and see more inspiring projects. Your next stop is Karen’sblog – go and see what she has made for you.