The Creative Flow Blog Hop – Cookie Cutter Peek-A-Boo Baby Cards

Anna’ Stampin’ Cave – The Creative Flow Blog Hop – Cookie Cutter Peek-A-Boo Baby Cards

the-creative-flow-header

Thank you for joining us on our Creative Flow Blog Hop. Each month we are set a challenge to creatively stretch our imaginations. To hop along, please use the buttons at the bottom of the post to keep hopping.

For this month we’ve been set a challenge to use any carry-over holiday-themed stamps to create a non-Christmassy project.

stampin-up-carry-over-stamp-sets

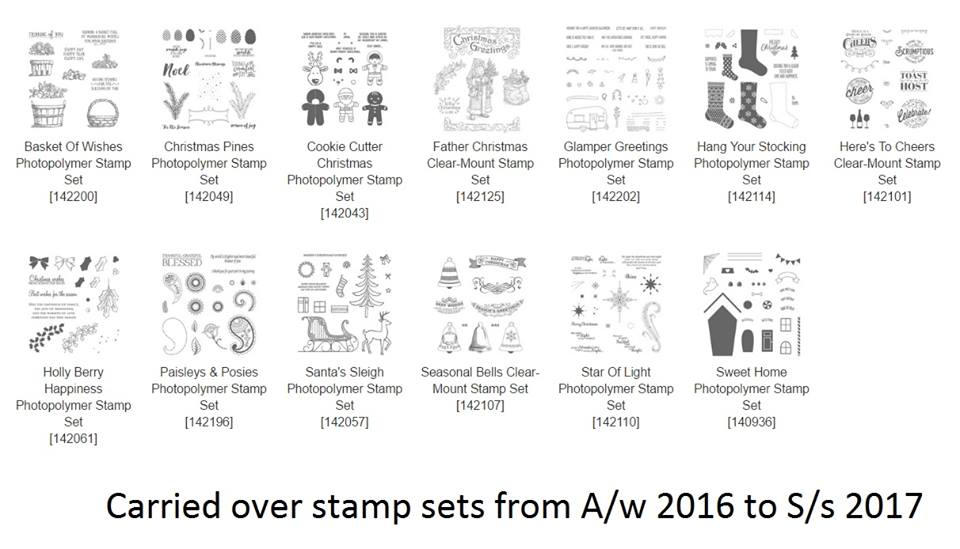
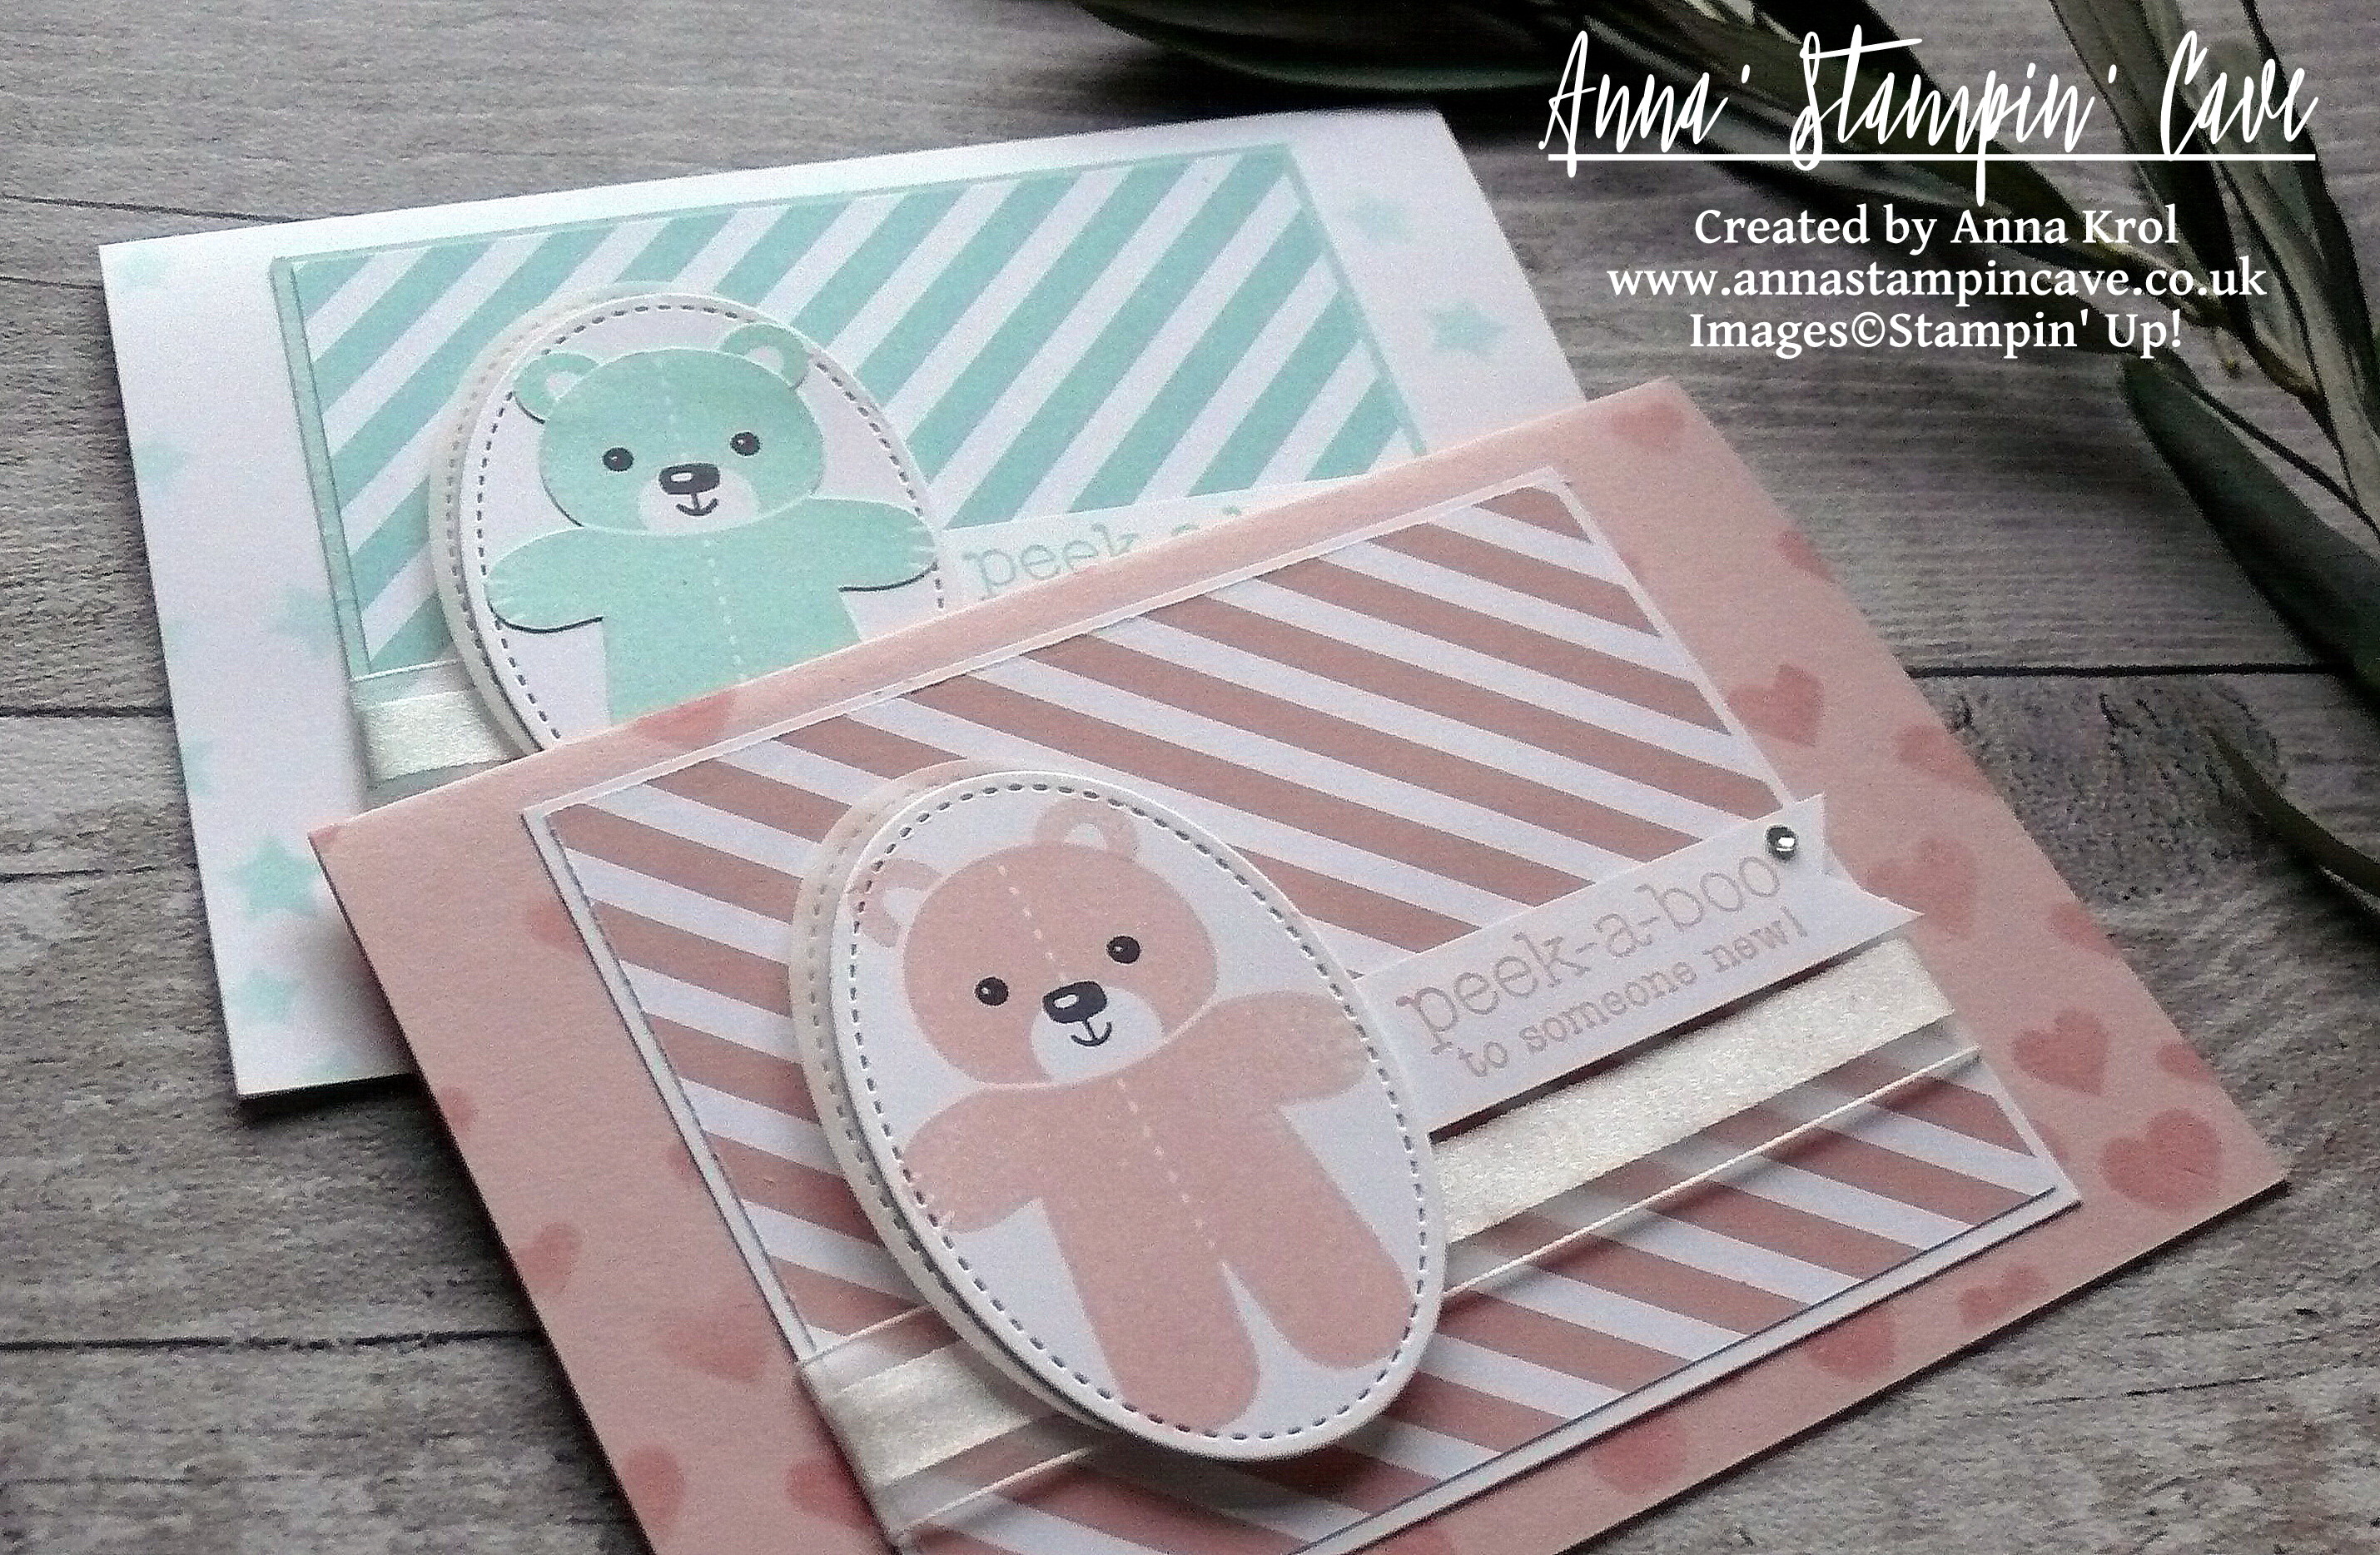
I knew straight away I wanted to use Cookie Cutter Christmas Stamp Set to create some super cute baby cards.

anna-stampin-cave-cookie-cutter-peek-a-boo-baby-card

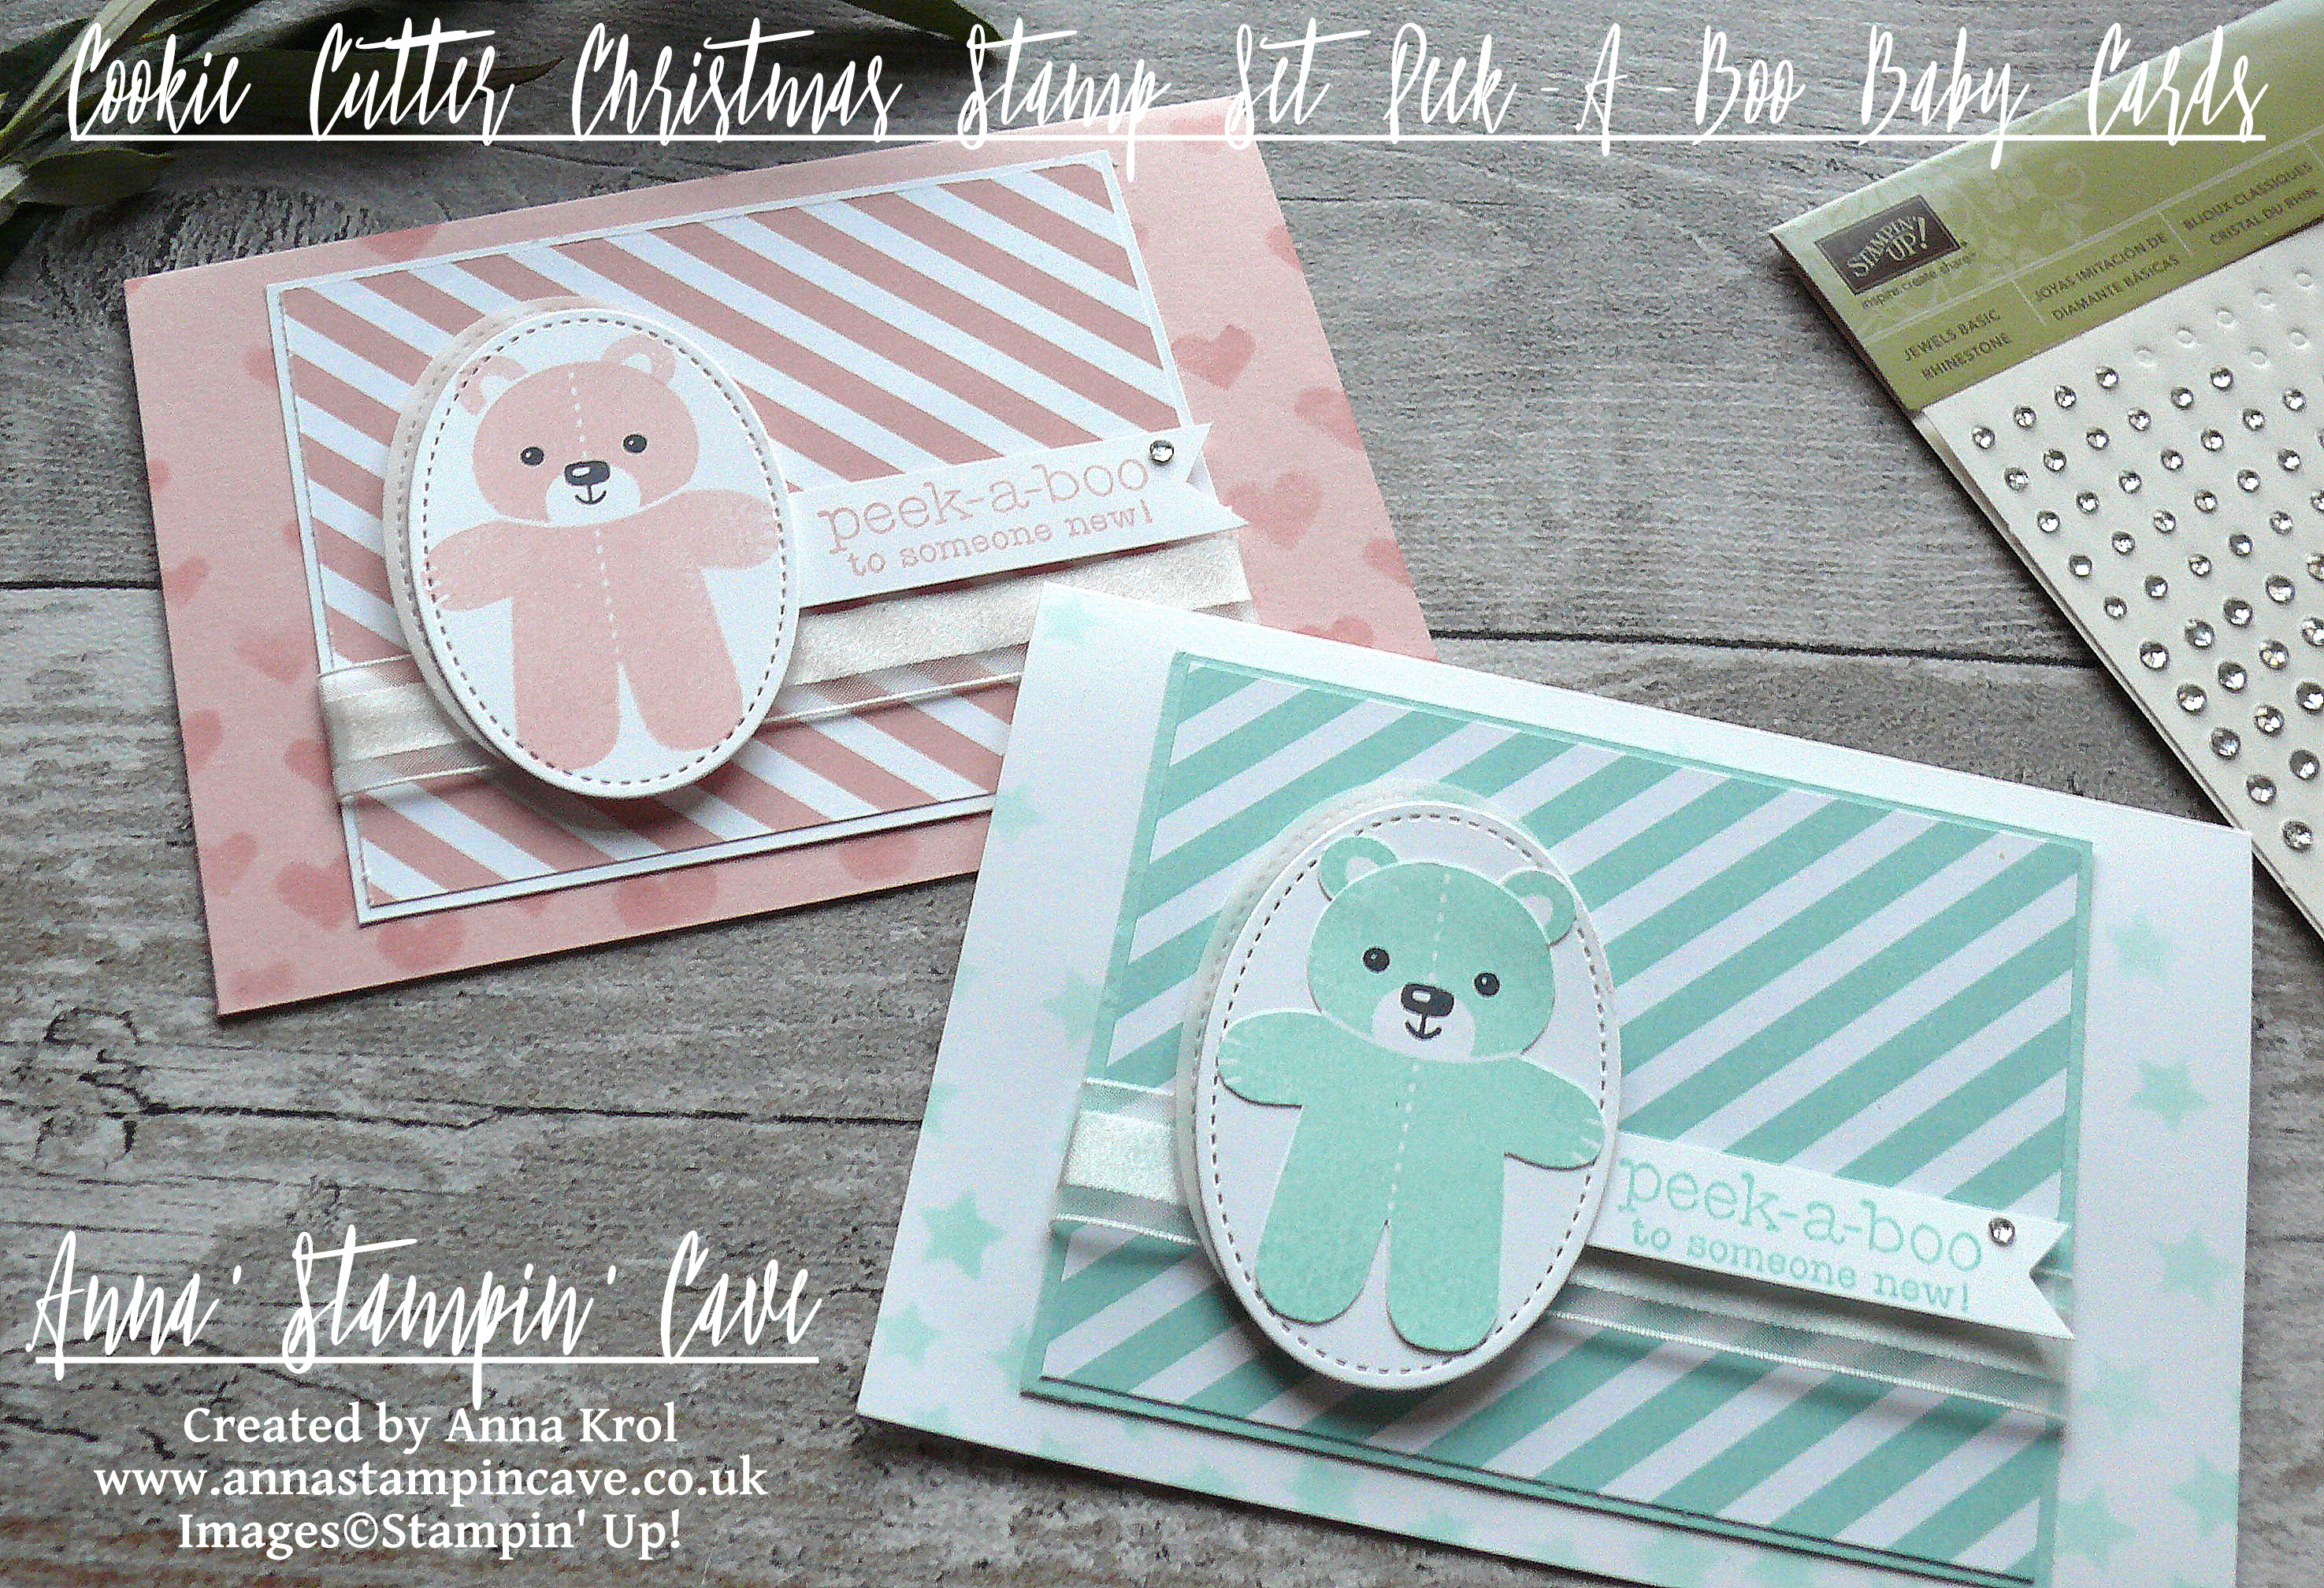
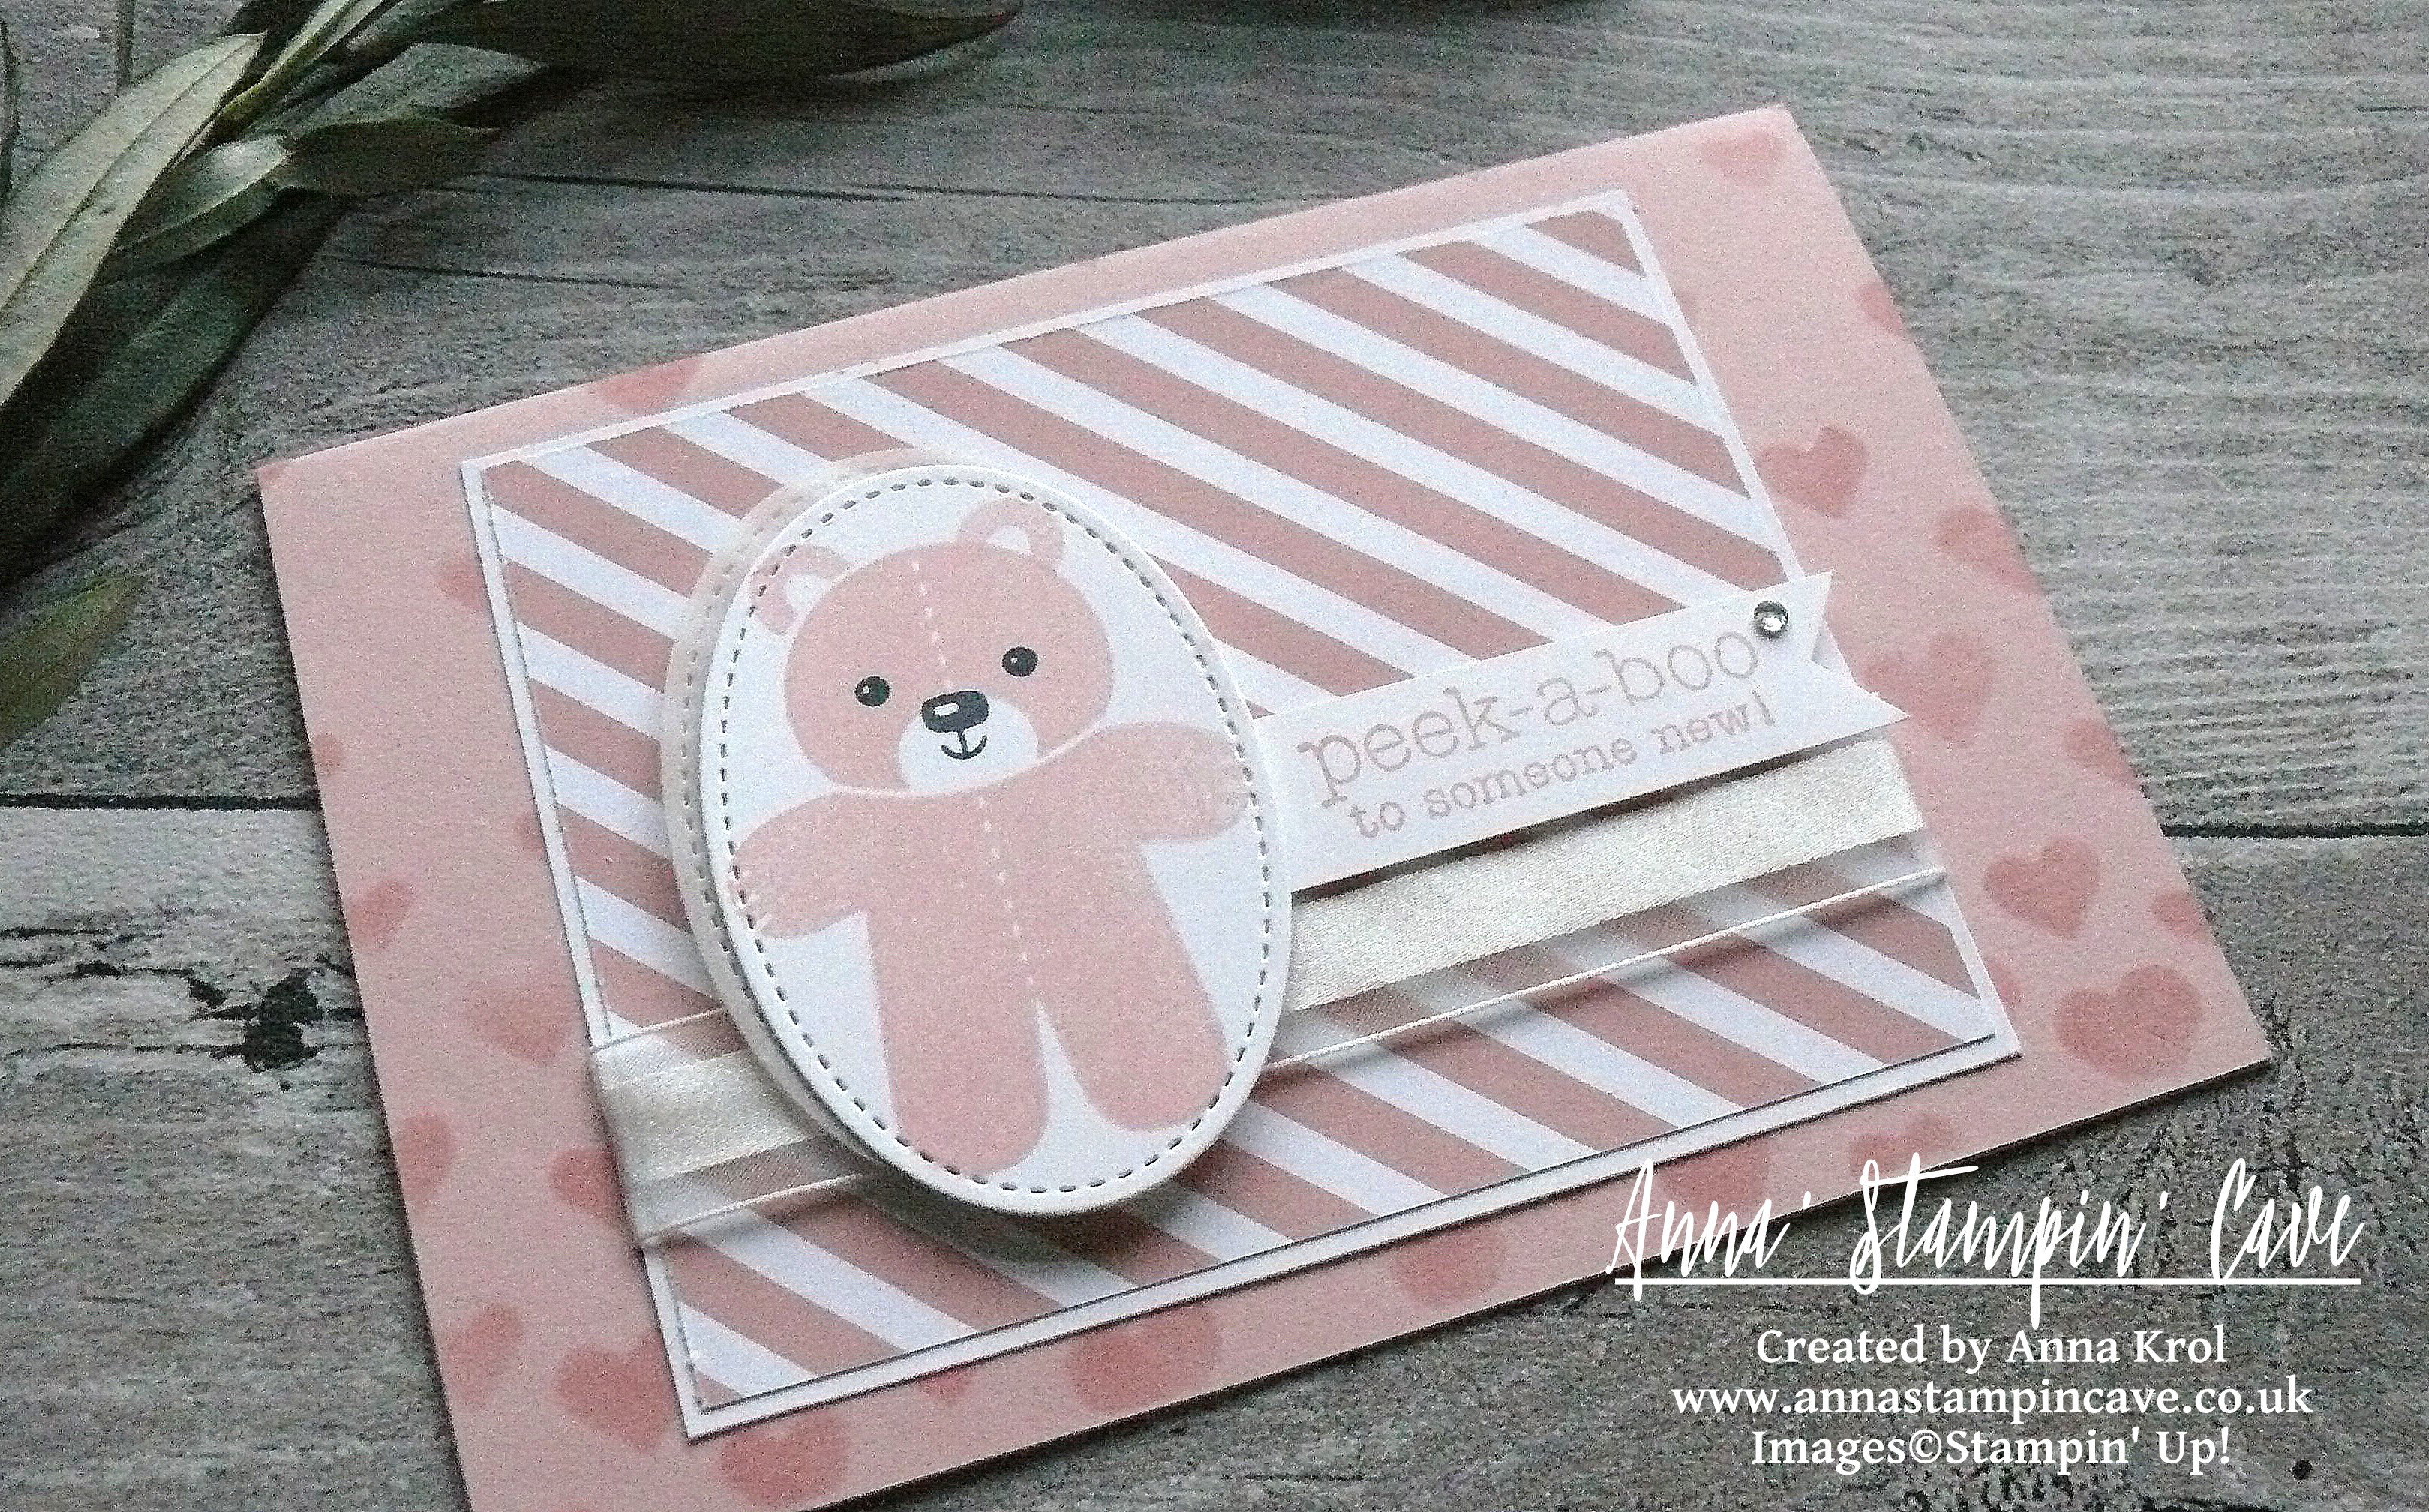
I chose rather traditional baby colours: pink and blue. For the pink, I’ve used beautiful dusty Blushing Bride, and Pool Party seemed just perfect for a baby boy card.

anna-stampin-cave-cookie-cutter-peek-a-boo-baby-card-baby-girl

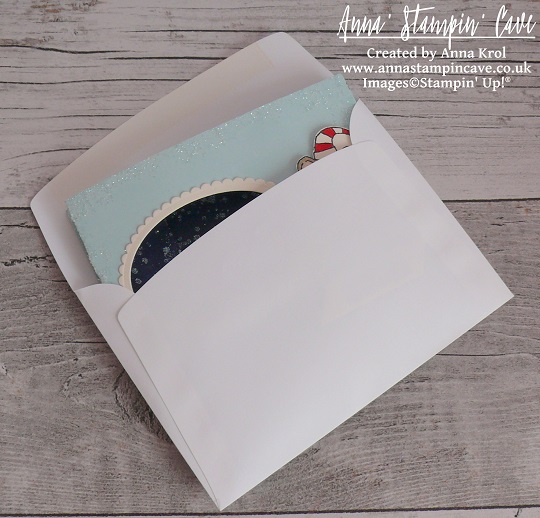
Peek-A-Boo Baby Girl card dimensions:

  • Blushing Bride cardstock: 8-1/4″ x 5-7/8″ scored in half at 4-1/8″ (21 x 14.8 cm scored in half at 10.5 cm)
  • Whisper White cardstock: 4-3/8″ x 3-5/8″ (11.1 x 9.2 cm)
  • Blushing Bride Designer Series Paper from Subtles Designer Series Paper Stack: 4-2/8″ x 3-1/2″ (10.7 x 8.8 cm)
  • Scraps of Whisper White and White Vellum cardstock for die-cutting and sentiment
  • Whisper White Organza Ribbon: approx 6″

First, I stamped the little bear from Cookie Cutter Christmas Stamp Set, in Blushing Bride, onto a piece of Whisper White cardstock. For the little face, I’ve used Basic Black Archival Ink Pad. I die-cut the bear image using the second largest oval from Stitched Shapes Framelits Dies. I also die-cut the same size stitched oval shape from White Vellum. Next, I stamped ‘peek-a-boo’ sentiment from Suite Sayings Stamp Set, also in Blushing Bride, on a strip of Whisper White, and cut it into a banner. A baby card can’t go without a little bling so I added a tiny rhinestone to the sentiment banner.

To add some interest (and cuteness) to the card base, I pull out long forgotten Hearts & Stars Decorative Masks. For the girly card, I’ve used hearts stencil. First, I thought to add some sparkle through the stencil, but at the end, I decided for tone on tone effect and sponged hearts with Blushing Bride Ink.

anna-stampin-cave-cookie-cutter-peek-a-boo-baby-card-pool-party

Peek-A-Boo Baby Boy card dimensions:

  • Whisper White cardstock: 8-1/4″ x 5-7/8″ scored in half at 4-1/8″ (21 x 14.8 cm scored in half at 10.5 cm)
  • Pool Party cardstock: 4-3/8″ x 3-5/8″ (11.1 x 9.2 cm)
  • Pool Party Designer Series Paper from Subtles Designer Series Paper Stack: 4-2/8″ x 3-1/2″ (10.7 x 8.8 cm)
  • Scraps of Whisper White and White Vellum cardstock for die-cutting and sentiment
  • Whisper White Organza Ribbon: approx 6″

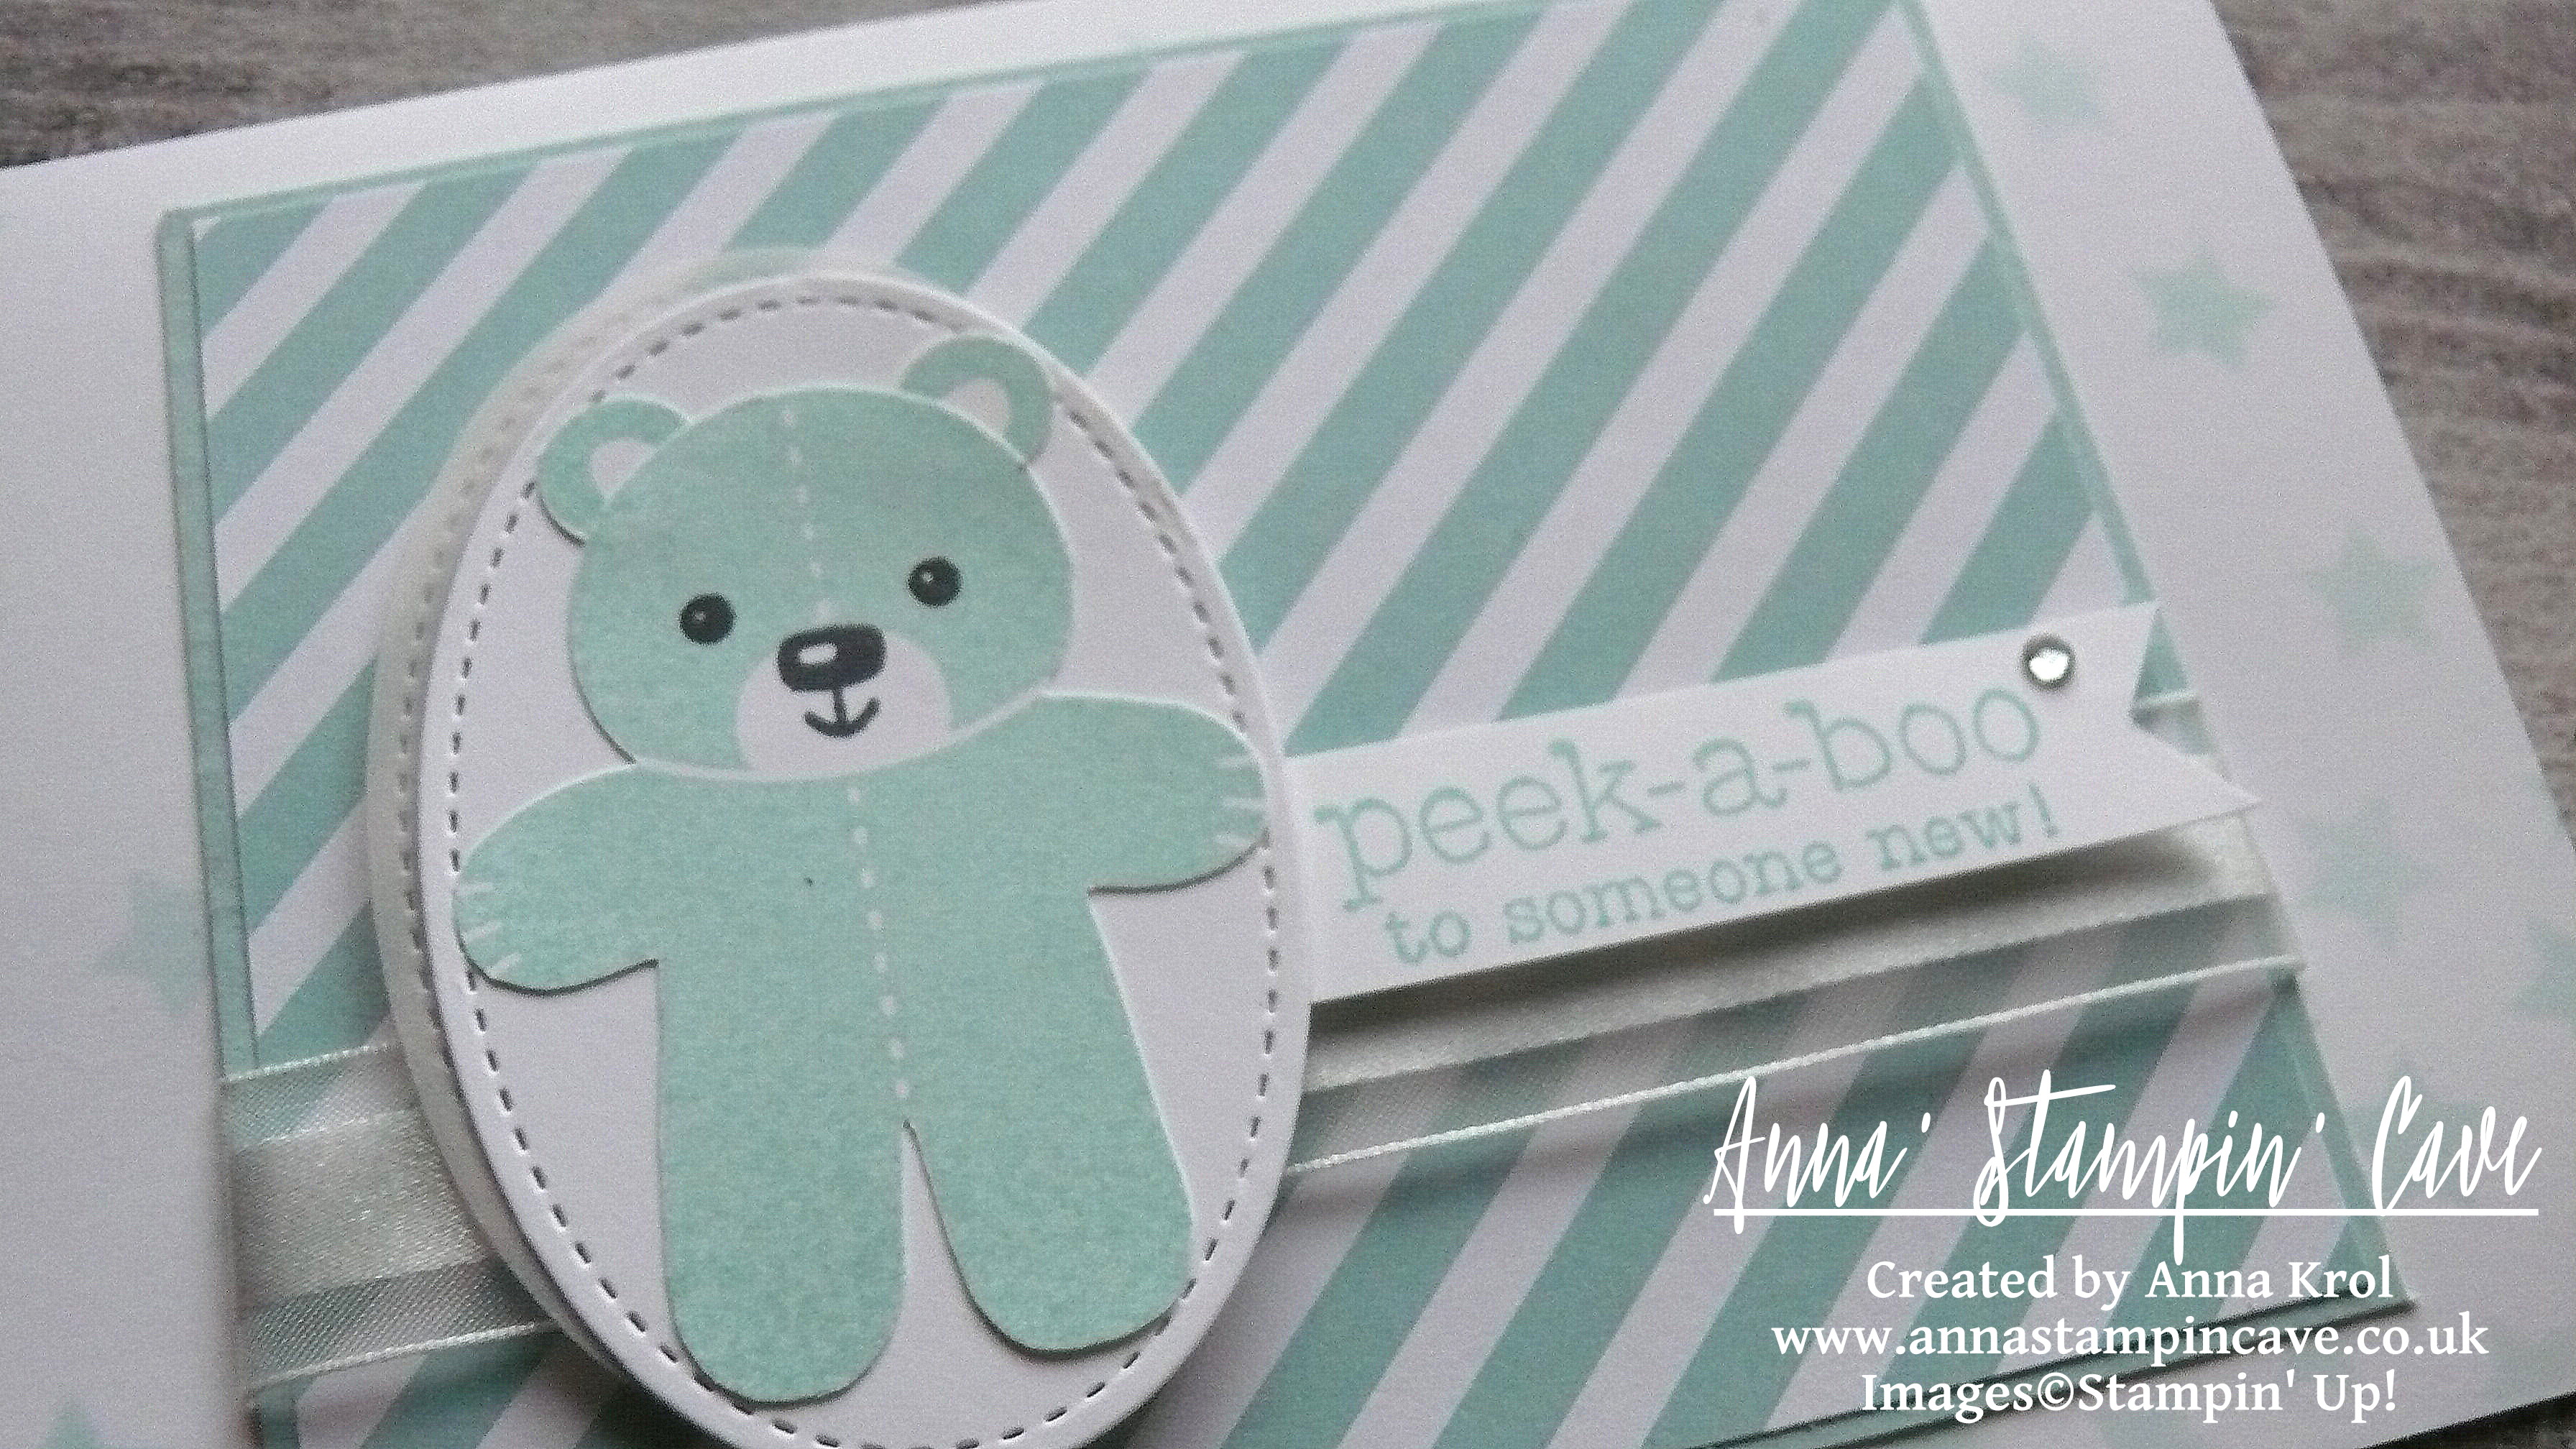
This card was made similarly to the baby girl one. The only significant change, except colour combo obviously,  was that I stamped the bear and his ears separately as I planned to punch the bear using Cookie Cutter Bilder Punch. 

It turned out that the bear has a slightly wider ‘body’ than the other images from this stamp set and you can’t punch it without losing a little bit of his chubby shape.

At the end, I had to fussy-cut the bear but it’s quite a straightforward process. I punched out his ears and using snail adhesive I glued his ears behind his head and next I glued the bear flat onto the stitched oval shape.

Assembling these cards was pretty easy. First I adhered DSP panels to the cardstock. I added the ribbon at the bottom of my panels. I secured it at the back of the panels using snail adhesive and glued it to the card base.

Next step was to assemble my little bears. I glued the ovals with bears to the vellum ovals, offsetting them slightly. I adhered them to the card with Stampin’ Dimensionals for some extra dimension. Sentiments are adhered using Stampin’ Dimensionals too.

anna-stampin-cave-cookie-cutter-peek-a-boo-baby-cards

I truly hope you like my cute ‘peek-a-boo’ baby cards. They are not only adorable but also very easy to recreate.

Now, be sure to hop along and see more inspiring projects. Your next stop is lovely and talented Heidi.

Thank you for stopping by and have a blessed day

the-creative-flow-previous-button the-creative-flow-next-button

The Creative Flow Blog Hop -Shaun The Sheep Punch Art

Anna’ Stampin’ Cave – The Creative Flow Blog Hop -Shaun The Sheep Punch Art

the-creative-flow-header

Thank you for joining us on our Creative Flow Blog Hop. Each month we are set a challenge to creatively stretch our imaginations. The products we have used are all available in the current Annual and/or seasonal Stampin’ Up!® catalogues. To hop along, please use the buttons at the bottom of the post to keep hopping.

Hello hello! This is our very first The Creative Flow Blog Hop, and I’m really excited to be a part of it. Today’s theme was a quite a stumper. We’ve been set a challenge to create an ‘animal’ project using Pretty Pines Thinlits Dies. Yes, I know!?!? How is that even possible!!! 😀 But hey, with a little bit of imagination everything is possible!

anna-stampin-cave-shaun-the-sheep-bah-humbug-christmas-card-punch-art-stampin-up

Because not every one of us had these dies, our lovely Jerim has sent some of us (including me) a foam die-cuts so we could actually use them as stamps! How cool! Thank you, Jerim, you are a ⭐

So I’ve spent some time looking at these shapes and…nothing sparked! Typical, right? And then one day: Eureka!!! I saw a sheep 😉 But not just normal, ordinary sheep. I saw Shaun the Sheep, how wicked is that lol Yet I had to figure out how to bring him to life, not literally of course 😉 After few attempts and different combinations I knew exactly which shapes will become Shaun the Sheep. At this point, I wasn’t sure yet what occasion for this card would be.


First, for tummy, ‘curls’ and tail, I stamped one of the large pinecones twice, using Smoky Slate Ink Pad. I stamp-it-off twice for a lighter shade. To create ‘curls’ for my Shaun the Sheep I cut off the bottom of one of the pinecones. I used what’s left to hand cut his little tail. For the head, I stamped the smallest pinecone using Basic Black Archival Ink Pad. To create legs, rams and ears I’ve used larger mistletoe branch. I stamped it three times, also in Basic Black Archival Ink and cut them apart. For his eyes, I punched two 3/16″ circles from Whisper white cardstock using Crop-a-Dile, and two Basic Black tiny circles using Owl Builder Punch. When I had all my pieces ready I assembled my Shaun the Sheep using liquid glue. To make his eyes ‘pop’ I added Fine-Tip Glue to them. I also used Fine-Tip Glue Pen to create his nostrils.

anna-stampin-cave-shaun-the-sheep-punch-art-stampin-up

So now, when I had my sheep created I had to decide what kind of card/sentiment I want to make. And I have to tell you my mind went blank. I only knew it has to be something fun. And while looking for some fun ‘sheepy’ sentiment (if it’s even a word lol) I came across this ‘Christmassy’ sentiment: ‘Bah humbug’ or even ‘Baa humbug’ haha. Yes! That was it! Let it be a Christmas (kinda) card then.

I took a piece of Whisper White cardstock that measures 4″ x 5-6/8″ and stamped a wreath using following colours: Pear Pizzaz and Wild Wasabi for fir branches, Mint Macaron for mistletoe and Cajun Craze for twigs. Mint Macaron and Cajun craze has been stamped off. The sentiment is stamped at the bottom of my panel using Labeler Alphabet stamp set in Basic Black Archival Ink.

anna-stampin-cave-shaun-the-sheep-bah-humbug-christmas-card-punch-art-stampin-up

I die-cut two ovals: one from vellum using largest of the Layering Ovals Framelits Dies, and the second one from Whisper White cardstock using the largest Oval Stitched Die. I assembled them using dimensionals and adhered Shaun the Sheep on top. I adhered my panel to the Cajun Craze card base.

anna-stampin-cave-shaun-the-sheep-bah-humbug-christmas-card-punch-art-stampin-up

For the final touch, I took three White Perfect Accents, paint them in black using nail polish (couldn’t find my sharpie doh) and added them to the card. I think it really finished the look of the card. I like how this card turned out. It’s quirky and fun. I hope you like it too. Please let me know in the comments below. I would love to hear from you.

Your next stop is lovely Keila  go and see what she has made for you. Thank you for stopping by and have a blessed day

the-creative-flow-previous-button the-creative-flow-next-button

Pinkies Stampin’ Up! Autumn Winter 2016 Blog Hop – Merry Mice

blog hop logo

Thank you for joining us on another Pinkies Blog Hop! We’re showcasing lots of gorgeous projects using products from the new Stampin’ Up!® Autumn/Winter Seasonal Catalogue. Simply use the buttons at the end of each post to keep hopping.

If you arrived here from lovely Hannah at Stampin by Hannah, thank you for stopping by. I hope you enjoy seeing all these beautiful projects and inspiration and continue to hop on through to see what everyone has made.

Here is my project –

merry-mice-stamp-set-shadow-box-christmas-card-2

I wanted to create shadow-box type card for a while but never came around to do it. But when I saw these adorable little mice I thought they are just perfect to do so.

For the base, I’ve used two pieces of Soft Sky cardstock that measures 4-1/8 x 8-1/2″.  scored them both at 1-1/2″ and 3″.  Next, I die-cut a window in my front panel using Layering Ovals Framelits. I used the same die and slightly bigger scalloped oval die to create the frame from Very Vanilla cardstock.

I wanted to add some subtle ‘bling’ to my card base, so I decided to use Heat & Stick Powder with Dazzling Diamond Glitter. I took this little, distressed stamp from Timeless Textures stamp set, and stamped it around the front panel in Versamark. I sprinkled Heat & Stick powder over it, heat set it, sprinkled with Dazzling Diamonds Glitter and heat set it again.

I cut a piece of Whisper White cardstock that measures 4-1/16 x 8-1/2″ and sponged it to create a background for my scene. I wanted to achieve beautiful night sky. To do so I’ve used Daffodil Delight, Pumpkin Pie, Melon Mambo, Pool Party, Bermuda Bay, Island Indigo, Perfect Plum and Night of Navy. I started with lighter colours at the bottom and slowly building up the colour until I was happy with the results.

To create starry night I’ve used irreplaceable Gorgeous Grunge and again Heat & Stick powder with Dazzling Diamonds Glitter. Once the glitter was set,  I took this piece and cut a 1-1/2″strip from it, on the long side, and scored the remaining piece at 4″. I glued the longer piece to my base, to the back panel. The strip I cut off, I adhered on the inside of my front base, so once the card is closed for posting, you can still see the starry night. on the inside panel. And what’s cool about this card: it’s folding down, just like a card in the box, and fits standard A6 envelope

To create front and back inserts, I took 2 strips of Very Vanilla, that measured 2-1/2 x 5 and  I tore them both (one bit smaller) on one side so they look like snowbanks. I’ve added a liquid glue to the torn edges and dabbed it in Dazzling Diamonds Glitter. I scored them both at 1/2″ and 4-1/2″. I adhered the taller one to the background panel.

merry-mice-stamp-set-shadow-box-christmas-card-caroler

Now the fun part: colouring the mice! I stamped singing mouse on a piece of Very Vanilla with Jet Black Stazon ink. I coloured him with Many Marvellous Markers and fussy cut it. Next,  I took a piece of Very Vanilla (2-1/2 x 5″) and marked it at 1″ from the bottom, on the long side. This piece will create our middle insert. I stamped my cute carolers so their feet were touching my 1″ mark. I coloured them in, and fussy-cut them, but only to the 1″ mark. I scored this piece at 1/2″ and 4-1/2″.

I took all my inserts and assembled the card. I adhered the singing mouse on the front of my card with dimensionals. The sentiment underneath comes from the same stamp set. But because of all the ‘busy-ness’ (if it’s even a word haha) of the card, I decided to keep it simple.

merry-mice-stamp-set-shadow-box-card

I’m really happy how this card turned out. Aren’t these mice super cute?! I hope I inspired you a little bit.

Now, be sure to hop along and see more inspiring projects. Your next stop is amazingly talented Jerim from Willow Piggy  go and see what she has made using new products.

next

previous

Thank you for stopping by and have a blessed day,